torque RAM CHASSIS CAB 2022 Owner's Manual
[x] Cancel search | Manufacturer: RAM, Model Year: 2022, Model line: CHASSIS CAB, Model: RAM CHASSIS CAB 2022Pages: 428, PDF Size: 20.18 MB
Page 320 of 428
318IN CASE OF EMERGENCY
7. Install wheel center cap (if equipped) and remove wheel blocks. Do not install chrome or
aluminum wheel center caps on the spare
wheel. This may result in cap damage.
8. Lower the jack to its fully closed position. Stow the replaced tire and tools as previously
described.
9. Adjust the tire pressure when possible.
10. After 25 miles (40 km), check the lug nut torque Ú page 397 with a torque wrench to
ensure that all lug nuts are properly seated
against the wheel.
Dual Rear Wheels
Slots in the wheels will assist in properly orienting
the inner and outer wheels. Align these slots when
assembling the wheels for best access to the tire
valve on the inner wheel. The tires of both dual
wheels must be completely off the ground when
tightening to ensure wheel centering and
maximum wheel clamping. Dual wheel models require a special heavy-duty lug
nut tightening adapter (included with the vehicle)
to correctly tighten the lug nuts. Also, when it is
necessary to remove and install dual rear wheels,
use a proper vehicle lifting device.
NOTE:When installing a spare tire (if equipped) as part of
a dual rear wheel end combination, the tire
diameter of the two individual tires must be
compared. If there is a significant difference, the
larger tire should be installed in a front location.
The correct direction of rotation for dual tire instal
-
lations must also be observed.
It is recommended that wheel stud nuts be kept
torqued to specifications at all times. Torque wheel
stud nuts to specifications at each lubrication
interval Ú page 397.
Wheel Nuts
All wheel nuts should be tightened occasionally to
eliminate the possibility of wheel studs being
sheared or the bolt holes in the wheels becoming
elongated. This is especially important during the
first few hundred miles/kilometers of operation to
allow the wheel nuts to become properly set. All
wheel nuts should first be firmly seated against the
wheel. The wheel nuts should then be tightened to
recommended torque. Tighten the wheel nuts to
final torque in increments. Progress around the
bolt circle, tightening the wheel nut opposite to the wheel nut just previously tightened until final
torque is achieved Ú
page 397.
TO STOW THE FLAT OR SPARE —
I
F EQUIPPED
Refer to Upfitters Body Builder’s Guide for
information on stowing your spare tire (if
equipped).
HUB CAPS/WHEEL COVERS —
I
F EQUIPPED
The hub caps must be removed before raising the
vehicle off the ground.
For 3500 Single Rear-Wheel (SRW) models, use
the flat end of the lug wrench to hook and pull off
the hub cap. Find the opening in the hub cap,
insert the lug wrench, and pull off the cap. If you
need to pry against the wheel, protect the wheel
surface.
WARNING!
A loose tire or jack thrown forward in a collision
or hard stop, could endanger the occupants of
the vehicle. Always stow the jack parts and the
spare tire in the places provided.
CAUTION!
Use extreme caution when removing the front
and rear wheel covers. Damage can occur to the
center cap and/or the wheel if screwdriver type
tools are used. A pulling motion, not a pry off
motion, is recommended to remove the caps.
22_DPF_OM_EN_USC_t.book Page 318
Page 362 of 428

360SERVICING AND MAINTENANCE
NOTE:If it is necessary to check the transmission below
the operating temperature, the fluid level should
be between the two COLD (lower) holes on the
dipstick with the fluid at 68-86°F / 20-30°C. Only
use the COLD region of the dipstick as a rough
reference when setting the fluid level after a trans -
mission service or fluid change. Re-check the fluid
level, and adjust as required, once the trans -
mission reaches normal operating temperature.
Fluid And Filter Changes — 8-Speed
Transmission
Under normal operating conditions, the fluid
installed at the factory will provide satisfactory
lubrication for the life of the vehicle.
Routine fluid and filter changes are not required.
However, change the fluid and filter if the fluid
becomes contaminated (with water, etc.), or if the
transmission is disassembled for any reason.
Fluid And Filter Changes — 6-Speed
Transmission
For the proper maintenance intervals Úpage 329.
In addition, change the fluid and filters if the fluid
becomes contaminated (with water, etc.), or if the
transmission is disassembled for any reason.
Selection Of Lubricant
It is important to use the proper transmission fluid
to ensure optimum transmission performance and
life. Use only the manufacturer’s specified
transmission fluid Ú page 407. It is important to
maintain the transmission fluid at the correct level
using the recommended fluid. No chemical flushes
should be used in any transmission; only the
approved lubricant should be used.
REAR AXLE AND 4X4 FRONT DRIVING
A
XLE FLUID LEVEL
For normal service, periodic fluid level checks are
not required. When the vehicle is serviced for other
reasons the exterior surfaces of the axle assembly
should be inspected. If gear oil leakage is
suspected inspect the fluid level. This inspection
should be made with the vehicle in a level position.
When checking the fluid level, the vehicle should
be in a level position. The fluid level at room
temperature should be as follows:
3500 Front Axle: ¼ inch ± ¼ inch (6.4 mm ±
6.4 mm) below the bottom of the fill hole.
3500 Rear Axle: ¼ inch ± ¼ inch (6.4 mm ±
6.4 mm) below the bottom of the fill hole.
4500/5500 Front Axle: ¼ inch +/- ¼ inch (6.4 mm
± 6.4 mm) below the bottom of the fill hole.
4500/5500 Rear Axle: 1/8 inch +/- 1/8 inch
(3.2 mm +/- 3.2 mm) below the bottom of the fill
hole.
CAUTION!
If the fluid temperature is below 50°F (10°C) it
may not register on the dipstick. Do not add fluid
until the temperature is elevated enough to
produce an accurate reading. Run the engine at
idle, in PARK, to warm the fluid.
CAUTION!
Using a transmission fluid other than the
manufacturer’s recommended fluid may cause
deterioration in transmission shift quality and/or
torque converter shudder, and (for 6-speed
transmissions) will require more frequent fluid
and filter changes Ú page 407.
22_DPF_OM_EN_USC_t.book Page 360
Page 399 of 428
397
TECHNICAL SPECIFICATIONS
VEHICLE IDENTIFICATION NUMBER (VIN)
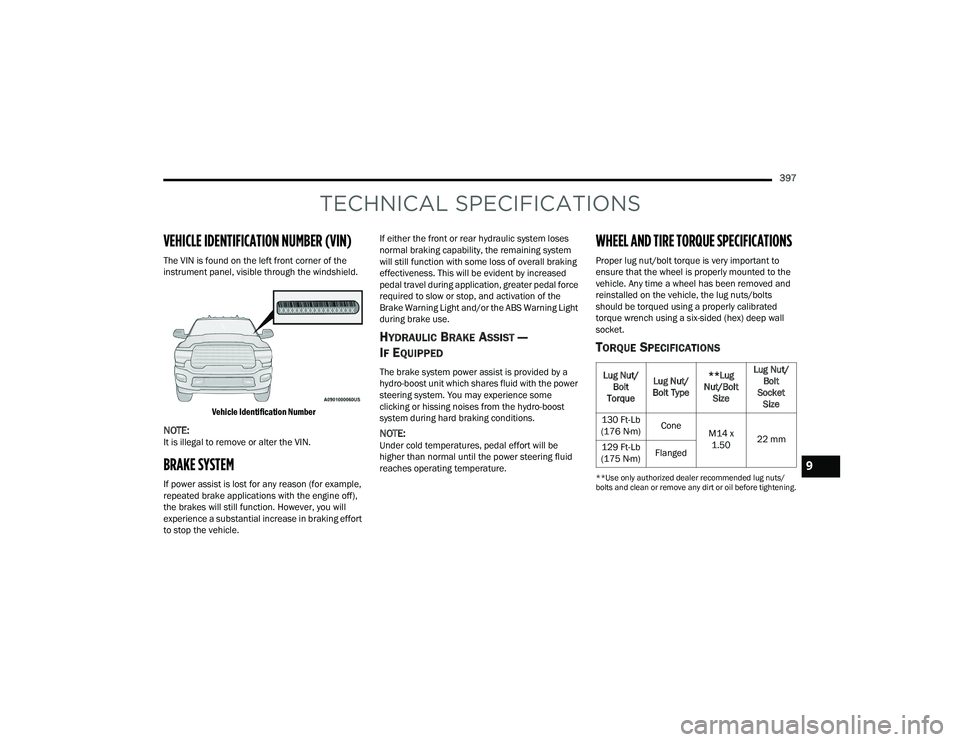
The VIN is found on the left front corner of the
instrument panel, visible through the windshield.
Vehicle Identification Number
NOTE:It is illegal to remove or alter the VIN.
BRAKE SYSTEM
If power assist is lost for any reason (for example,
repeated brake applications with the engine off),
the brakes will still function. However, you will
experience a substantial increase in braking effort
to stop the vehicle. If either the front or rear hydraulic system loses
normal braking capability, the remaining system
will still function with some loss of overall braking
effectiveness. This will be evident by increased
pedal travel during application, greater pedal force
required to slow or stop, and activation of the
Brake Warning Light and/or the ABS Warning Light
during brake use.
HYDRAULIC BRAKE ASSIST —
I
F EQUIPPED
The brake system power assist is provided by a
hydro-boost unit which shares fluid with the power
steering system. You may experience some
clicking or hissing noises from the hydro-boost
system during hard braking conditions.
NOTE:Under cold temperatures, pedal effort will be
higher than normal until the power steering fluid
reaches operating temperature.
WHEEL AND TIRE TORQUE SPECIFICATIONS
Proper lug nut/bolt torque is very important to
ensure that the wheel is properly mounted to the
vehicle. Any time a wheel has been removed and
reinstalled on the vehicle, the lug nuts/bolts
should be torqued using a properly calibrated
torque wrench using a six-sided (hex) deep wall
socket.
TORQUE SPECIFICATIONS
**Use only authorized dealer recommended lug nuts/
bolts and clean or remove any dirt or oil before tightening.
Lug Nut/
Bolt
Torque Lug Nut/
Bolt Type **Lug
Nut/Bolt Size Lug Nut/
Bolt
Socket Size
130 Ft-Lb
(176 N·m) Cone
M14 x
1.50 22 mm
129 Ft-Lb
(175 N·m) Flanged
9
22_DPF_OM_EN_USC_t.book Page 397
Page 400 of 428
398TECHNICAL SPECIFICATIONS
Inspect the wheel mounting surface prior to
mounting the tire and remove any corrosion or
loose particles.
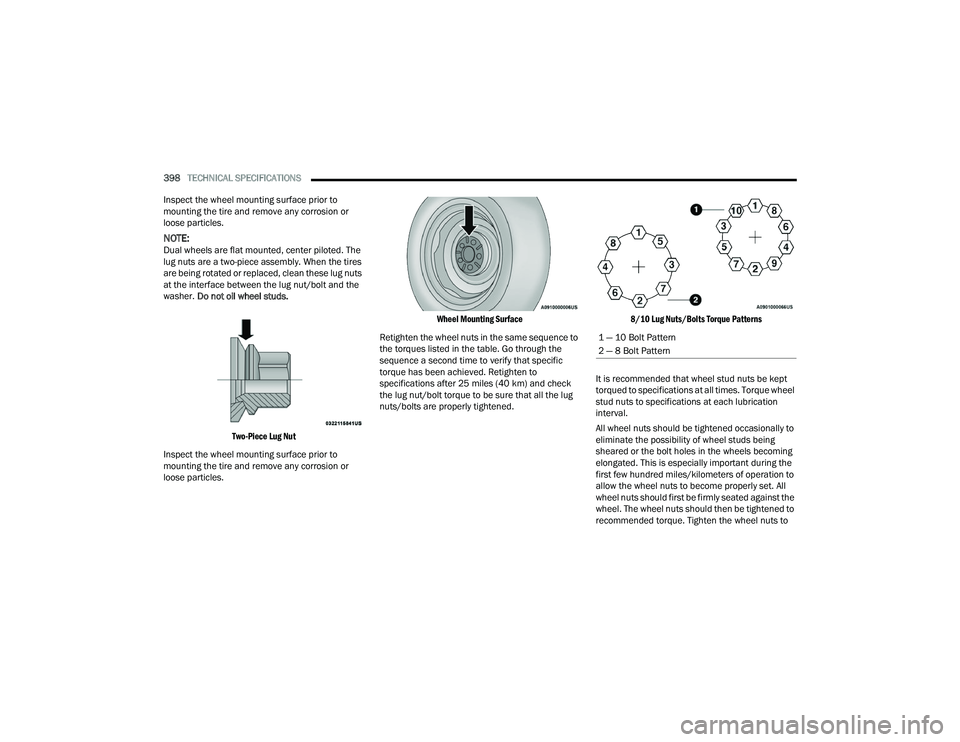
NOTE:Dual wheels are flat mounted, center piloted. The
lug nuts are a two-piece assembly. When the tires
are being rotated or replaced, clean these lug nuts
at the interface between the lug nut/bolt and the
washer. Do not oil wheel studs.
Two-Piece Lug Nut
Inspect the wheel mounting surface prior to
mounting the tire and remove any corrosion or
loose particles.
Wheel Mounting Surface
Retighten the wheel nuts in the same sequence to
the torques listed in the table. Go through the
sequence a second time to verify that specific
torque has been achieved. Retighten to
specifications after 25 miles (40 km) and check
the lug nut/bolt torque to be sure that all the lug
nuts/bolts are properly tightened.
8/10 Lug Nuts/Bolts Torque Patterns
It is recommended that wheel stud nuts be kept
torqued to specifications at all times. Torque wheel
stud nuts to specifications at each lubrication
interval.
All wheel nuts should be tightened occasionally to
eliminate the possibility of wheel studs being
sheared or the bolt holes in the wheels becoming
elongated. This is especially important during the
first few hundred miles/kilometers of operation to
allow the wheel nuts to become properly set. All
wheel nuts should first be firmly seated against the
wheel. The wheel nuts should then be tightened to
recommended torque. Tighten the wheel nuts to
1 — 10 Bolt Pattern
2 — 8 Bolt Pattern
22_DPF_OM_EN_USC_t.book Page 398
Page 401 of 428
TECHNICAL SPECIFICATIONS399
final torque in increments. Progress around the
bolt circle, tightening the wheel nut opposite to the
wheel nut just previously tightened until final
torque is achieved.
FUEL REQUIREMENTS— GASOLINE ENGINE
While operating on gasoline with the required
octane number, hearing a light knocking sound
from the engine is not a cause for concern.
However, if the engine is heard making a heavy
knocking sound, see a dealer immediately. Use of
gasoline with a lower than recommended octane
number can cause engine failure and may void or
not be covered by the New Vehicle Limited
Warranty.
Poor quality gasoline can cause problems such as
hard starting, stalling, and hesitations. If you
experience these symptoms, try another brand of
gasoline before considering service for the vehicle.
6.4L ENGINE
Do not use E-85 flex fuel or ethanol blends greater
than 15% in this engine. This engine is designed to meet all
emissions regulations and provide
satisfactory fuel economy and
performance when using high quality
unleaded gasoline having a posted octane number
of 87 as specified by the (R+M)/2 method.
REFORMULATED GASOLINE
Many areas of the country require the use of
cleaner-burning gasoline referred to as
“reformulated gasoline”. Reformulated gasoline
contains oxygenates and are specifically blended
to reduce vehicle emissions and improve air
quality.
The use of reformulated gasoline is recommended.
Properly blended reformulated gasoline will
provide improved performance and durability of
engine and fuel system components.
MATERIALS ADDED TO FUEL
Besides using unleaded gasoline with the proper
octane rating, gasolines that contain detergents,
corrosion and stability additives are
recommended. Using gasolines that have these
additives will help improve fuel economy, reduce
emissions, and maintain vehicle performance. Designated TOP TIER Detergent Gasoline
contains a higher level of detergents to
further aide in minimizing engine and
fuel system deposits. When available,
the usage of TOP TIER Detergent Gasoline is
recommended. Visit www.toptiergas.com for a list
of TOP TIER Detergent Gasoline Retailers.
Indiscriminate use of fuel system cleaning agents
should be avoided. Many of these materials
intended for gum and varnish removal may contain
active solvents or similar ingredients. These can
harm fuel system gasket and diaphragm materials.
GASOLINE/OXYGENATE BLENDS
Some fuel suppliers blend unleaded gasoline with
oxygenates such as ethanol.
WARNING!
To avoid the risk of forcing the vehicle off the
jack, do not tighten the lug nuts/bolts fully until
the vehicle has been lowered. Failure to follow
this warning may result in personal injury.
CAUTION!
DO NOT use E-85, gasoline containing methanol,
or gasoline containing more than 15% ethanol
(E-15). Use of these blends may result in starting
and drivability problems, damage critical fuel
system components, cause emissions to exceed
the applicable standard, and/or cause the
Malfunction Indicator Light to illuminate. Please
observe pump labels as they should clearly
communicate if a fuel contains greater than
15% ethanol (E-15).
9
22_DPF_OM_EN_USC_t.book Page 399
Page 423 of 428
421
Storage, Vehicle
...................................... 60, 393Store Radio Presets....................................... 219Storing Your Vehicle...................................... 393Sunglasses Storage......................................... 64Sway Control, Trailer...................................... 266Synthetic Engine Oil....................................... 342
T
Telescoping Steering Column.......................... 27Temperature Control, Automatic (ATC)............ 60Tilt Down........................................................... 32Up................................................................ 32Tilt Steering Column........................................ 27Tip Start............................................... 107, 109Tire And Loading Information Placard........... 380Tire Markings................................................. 376Tire Safety Information.................................. 376Tires................................... 309, 383, 387, 392Aging (Life Of Tires)................................... 385Air Pressure............................................... 383Chains....................................................... 390Changing................................................... 315Compact Spare......................................... 387Dual........................................ 318, 392, 397General Information........................ 383, 387High Speed................................................ 384Inflation Pressure...................................... 383Jacking...................................................... 315Life Of Tires............................................... 385
Load Capacity........................................... 380Pressure Monitoring System (TPMS)..99, 268Quality Grading......................................... 392Radial....................................................... 384Replacement............................................ 386Rotation.................................................... 391Safety.............................................. 376, 383Sizes......................................................... 377Snow Tires................................................ 387Spare Tires...................................... 387, 388Spinning................................................... 385Trailer Towing........................................... 178Tread Wear Indicators.............................. 385Wheel Nut Torque..................................... 397To Open Hood.................................................. 73Tongue Weight/Trailer Weight...................... 177Torque Converter Clutch............................... 131Tow Mode Mirror.............................................. 39Towing................................................. 173, 325Disabled Vehicle....................................... 325Guide........................................................ 176Recreational............................................. 185Weight...................................................... 176Towing Behind A Motorhome........................ 185Traction......................................................... 188Traction Control............................................ 265Trailer Sway Control (TSC)............................. 266Trailer Towing............................................... 173Hitches..................................................... 176Minimum Requirements........................... 177
Mirrors.........................................................42Tips........................................................... 182Trailer And Tongue Weight........................ 177Wiring....................................................... 181Trailer Towing Guide..................................... 176Trailer Weight................................................ 176Transfer Case................................................ 361Electronically Shifted....................... 132, 135Fluid.......................................................... 407Transmission................................................. 122Automatic............................... 122, 126, 358Fluid.......................................................... 407Maintenance............................................ 358Shifting..................................................... 121Transporting Pets.......................................... 307Tread Wear Indicators................................... 385Turn Signals.................................. 50, 102, 373
U
UconnectPhone Call Features
................................. 228Things You Should Know About Your Uconnect Phone................................... 231Uconnect Phone............................................ 225Answer Or Ignore An Incoming Call — Call Currently In Progress..................... 230Answer Or Ignore An Incoming Call — No Call Currently In Progress................ 229Bluetooth Communication Link................ 233Call Continuation...................................... 231
11
22_DPF_OM_EN_USC_t.book Page 421