radio RAM CHASSIS CAB 2022 Owner's Guide
[x] Cancel search | Manufacturer: RAM, Model Year: 2022, Model line: CHASSIS CAB, Model: RAM CHASSIS CAB 2022Pages: 428, PDF Size: 20.18 MB
Page 220 of 428

218MULTIMEDIA
FAVORITES
Press the Favorites button on the touchscreen to
activate the favorites menu, which will time out
within 20 seconds in absence of user interaction.
You can exit the Favorites Menu by a press of the X
button.
The Favorites feature enables you to set a favorite
artist or song that is currently playing. The radio
then uses this information to alert you when either
the favorite artist or song is being played at any
time by any of the SiriusXM® Channels.
The maximum number of favorites that can be
stored in the Radio is 50.
Favorite Artist: While the song is playing, to set a
favorite artist, press the Favorites button on the
touchscreen and then the Favorite Artist button on
the touchscreen.
Favorite Song: While the song is playing, to set a
favorite song, press the Favorites button on the
touchscreen and then the Favorite Song button on
the touchscreen.
BROWSE IN SXM
Press the Browse button on the touchscreen to
edit Presets, Favorites, Game Zone, and Jump
settings, along with providing the SiriusXM®
Channel List. This Screen contains many submenus. You can
exit submenus to return to a parent menu by
pressing the Back arrow.
All
Press the All button on the Browse Screen. When
pressing the All button, the following categories
become available:
Channel List:
Press the Channel List to display
all the SiriusXM® Channel Numbers. You can
scroll the Channel List by pressing the Up and
Down arrows, located on the right side of the
screen. Scrolling can also be done by operating
the TUNE/SCROLL knob.
Genre List: Press the Genre button on the touch -
screen to display a list of Genres. You can select
any desired Genre by pressing the Genre List.
The radio tunes to a channel with the content in
the selected Genre.
Favorites
Press the Favorites button on the Browse screen.
The Favorites menu provides a means to edit the
Favorites list and to configure the Alert Settings,
along with providing a list of Channels currently
airing any of the items in the Favorites list.
You can scroll the Favorites list by pressing the Up
and Down arrows located at the right side of the
screen. Scrolling can also be done by operating the
TUNE/SCROLL knob as well. Remove Favorites
Press the Remove Favorites tab at the top of the
screen. Press the Delete All button on the
touchscreen to delete all of the Favorites or press
the Trash Can icon next to the Favorite to be
deleted.
Alert Settings
Press the Alert Settings tab at the top of the
Favorites screen. The Alert Settings menu allows
you to choose from a visual alert or audible and
visual alert when one of your favorites is airing on
any of the SiriusXM® channels.
Game Zone
Press the Game Zone button, located at the left of
the Browse screen. This feature provides you with
the ability to select teams, edit the selection, and
set alerts.
On-Air
Press the On-Air tab at the top of the screen. The
On-Air list provides a list of Channels currently
airing any of the items in the Selections list, and
pressing any of the items in the list tunes the radio
to that channel.
22_DPF_OM_EN_USC_t.book Page 218
Page 221 of 428
MULTIMEDIA219
Add/Delete — If Equipped
Press the Add/Delete button on the touchscreen to
activate the League Scroll list. Press the chosen
league and a scroll list of all teams within the
league will appear, then you can select a team by
pressing the corresponding box. A check mark
appears for all teams that are chosen.
Remove Selection/Trash Can Icon
Press the Remove Selection tab at the top of the
screen. Press the Delete All button on the
touchscreen to delete all of the selections or press
the Trash Can icon next to the selection to be
deleted.
Alert Settings
Press the Alert Setting tab at the top of the screen.
The Alert Settings menu allows you to choose from
“Alert me to on-air games upon start” or “Alert
upon score update” or both when one or more of
your selections is airing on any of the SiriusXM®
channels.
Tune Start
Tune Start begins playing the current song from
the beginning when you tune to a music channel
using one of the 12 presets. This feature occurs
the first time the preset is selected during that
current song.
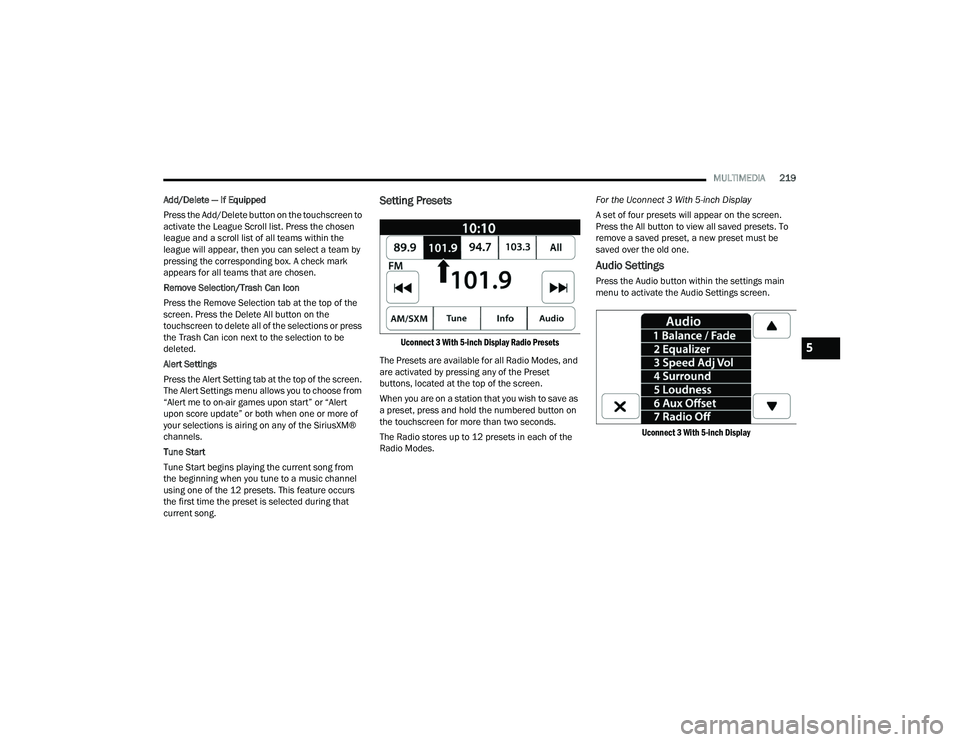
Setting Presets
Uconnect 3 With 5-inch Display Radio Presets
The Presets are available for all Radio Modes, and
are activated by pressing any of the Preset
buttons, located at the top of the screen.
When you are on a station that you wish to save as
a preset, press and hold the numbered button on
the touchscreen for more than two seconds.
The Radio stores up to 12 presets in each of the
Radio Modes. For the Uconnect 3 With 5-inch Display
A set of four presets will appear on the screen.
Press the All button to view all saved presets. To
remove a saved preset, a new preset must be
saved over the old one.
Audio Settings
Press the Audio button within the settings main
menu to activate the Audio Settings screen.
Uconnect 3 With 5-inch Display
5
22_DPF_OM_EN_USC_t.book Page 219
Page 222 of 428

220MULTIMEDIA
Audio Setting Description
Balance/FadePress the Balance/Fade button on the touchscreen to balance audio between
the front speakers or fade the audio between the rear and front speakers.
Press the Front, Rear, Left or Right button or press and drag the red Speaker
icon to adjust the Balance/Fade.
Equalizer Press the + or – button or press and drag the level bar to increase or decrease
each of the equalizer bands. The level value, which spans between plus or
minus nine, is displayed at the top of each of the bands.
Speed Adjusted Volume The Speed Adjusted Volume is adjusted by selecting from “Off”, “1”, “2”, and
“3”. This alters the automatic adjustment of the audio volume with variation
to vehicle speed. Volume increases automatically as speed increases to
compensate for normal road noise.
Surround Sound — If Equipped When Surround Sound is on, you can hear audio coming from every direction
as in a movie theatre or home theatre system.
Loudness — If Equipped When Loudness is on, the sound quality at lower volumes improves.
AUX Volume Offset The AUX Volume Offset is adjusted by pressing + and – buttons. This alters the
AUX input audio volume. The level value, which spans between plus or minus
three, is displayed above the adjustment bar.
Auto Play — If Equipped The Auto Play feature begins playing music as soon as a USB Media device is
connected to one of the vehicle’s Media USB ports, when it is turned on. Press
“Off” to turn the setting off.
Radio Off With Door — If Equipped The Radio Off With Door feature, when activated, keeps the radio on until the
driver or passenger door is opened or until the Radio Off Delay selected time
has expired.
22_DPF_OM_EN_USC_t.book Page 220
Page 224 of 428
222MULTIMEDIA
To insert an Auxiliary device, gently insert the
Auxiliary device cable into the AUX port. If you
insert an Auxiliary device with the ignition and the
radio on, the unit will switch to AUX Mode and
begin to play.
Controlling The Auxiliary Device
The control of the Auxiliary device (e.g., selecting
playlists, play, fast forward, etc.) cannot be
provided by the radio; use the device controls
instead. Adjust the volume with the Volume button,
Volume/Mute rotary knob, or the On/Off rotary
knob, or with the volume of the attached device.
NOTE:The radio unit is acting as the amplifier for audio
output from the Auxiliary device. Therefore, if the
volume control on the Auxiliary device is set too
low, there will be insufficient audio signal for the
radio unit to play the music on the device.
Seek Up /Seek Down
In USB Mode, press the Seek Up button on the
touchscreen for the next selection on the USB
device. Press and release the Seek Down button
on the touchscreen to return to the beginning of
the current selection, or to return to the beginning
of the previous selection if the USB device is within
the first three seconds of the current selection.
In Bluetooth® Mode, press and release the Seek
Up button on the touchscreen for the next
selection on the Bluetooth® device. Press and release the Seek Down button on the touchscreen
to return to the beginning of the current selection,
or return to the beginning of the previous selection
if the Bluetooth® device is within the first second
of the current selection.
Browse
In USB Mode, press the Browse button on the
touchscreen to display the browse window. In USB
Mode, the left side of the browse window displays
a list of ways you can browse through the contents
of the USB device. If supported by the device, you
can browse by Folder, Artist, Playlist, Album, Song,
etc. Press the desired button on the touchscreen
on the left side of the screen. The center of the
browse window shows items and their
sub-functions, which can be scrolled through by
pressing the Up and Down buttons to the right. The
TUNE/SCROLL knob can also be used to scroll.
On the Uconnect 3 With 5-inch Display, select the
Browse button on the touchscreen to scroll
through and select a desired track on the device.
Press the Exit button on the touchscreen if you
wish to cancel the Browse function.
Media Mode
In USB Mode, press the Media button on the
touchscreen to select the desired audio source:
USB.
In Bluetooth® Mode, press the Media button on
the touchscreen to select the desired audio
source: Bluetooth®.
In AUX Mode, press the Media button on the
touchscreen to select the desired audio source:
AUX.
Repeat
In USB Mode, press the Repeat button on the
touchscreen to toggle the repeat functionality. The
Repeat button on the touchscreen is highlighted
when active. The Radio will continue to play the
current track, repeatedly, as long as the repeat is
active. Press the Repeat button again to enter
Repeat All. The radio will continue to play all the
current tracks, repeatedly, as long as the repeat
function is active. To cancel Repeat, press the
Repeat button a third time.
Shuffle
In USB Mode, press the Shuffle button on the
touchscreen to play the selections on the USB
device in random order to provide an interesting
change of pace. Press the Shuffle button on the
touchscreen a second time to turn this feature off.
Audio
Audio settings can be accessed by pressing the
Audio button Ú
page 214.
22_DPF_OM_EN_USC_t.book Page 222
Page 226 of 428
224MULTIMEDIA
Screen Activated Features
Dialing via Keypad using touchscreen.
Viewing and Calling contacts from Phonebooks
displayed on the touchscreen.
Setting Favorite Contact phone numbers so they
are easily accessible on the Main Phone screen.
Viewing and Calling contacts from Recent Call
logs.
Reviewing your recent Incoming SMS
Messages.
Pairing up to 10 phones/audio devices for easy
access to connect to them quickly.
NOTE:Your phone must be capable of SMS messaging via
Bluetooth® for messaging features to work
properly.
Your mobile phone’s audio is transmitted through
your vehicle’s audio system; the system will
automatically mute your radio when using the
Uconnect Phone.
For Uconnect customer support:
US visit UconnectPhone.com or call
877-855-8400
Canada visit UconnectPhone.com or call
800-465-2001 (English) or (French) call
800-387-9983 Uconnect Phone allows you to transfer calls
between the system and your mobile phone as you
enter or exit your vehicle and enables you to mute
the system's microphone for private conversation.
The Phone feature is driven through your
Bluetooth® “Hands-Free Profile” mobile phone.
Uconnect features Bluetooth® technology — the
global standard that enables different electronic
devices to connect to each other without wires or a
docking station. Ensure you phone is turned on
with Bluetooth® active and has been paired to the
Uconnect system. Up to 10 mobile phones or audio
devices are allowed to be linked to the system.
Only one linked (or paired) mobile phone and one
audio device can be used with the system at a
time.
Phone Button
The Phone button on your steering wheel
is used to get into the Phone Mode and
make calls, show recent, incoming or
outgoing calls, view phonebook, etc.
When you push the button you will hear a BEEP.
The BEEP is your signal to give a command.
Voice Command Button
The Voice Command button on your
steering wheel is only used for “barge in”
and when you are already in a call or
want to make another call.
The button on your steering wheel is also used to
access the Voice Commands for the Uconnect
Voice Command features if your vehicle is
equipped.
Phone Operation
OPERATION
Voice commands can be used to operate the
Uconnect Phone and to navigate its menu
structure. Voice commands are required after
most Uconnect Phone prompts. There are two
general methods for how Voice Command works:
1. Say compound commands like “Call John Smith mobile”.
2. Say the individual commands and allow the system to guide you to complete the task.
WARNING!
ALWAYS drive safely with your hands on the
steering wheel. You have full responsibility and
assume all risks related to the use of the
Uconnect features and applications in this
vehicle. Only use Uconnect when it is safe to do
so. Failure to do so may result in an accident
involving serious injury or death.
22_DPF_OM_EN_USC_t.book Page 224
Page 229 of 428
MULTIMEDIA227
NOTE:During the pairing procedure, you may receive a
pop-up on your mobile phone for the Uconnect
system to access your “messages” and “contacts”.
Selecting “Ok” or “Allow” will sync your contacts
with the Uconnect system.
You can also use the following VR command to
bring up the Paired Phone screen from any screen
on the radio:
“Show Paired Phones”
NOTE:Software updates on your phone or the Uconnect
system may interfere with the Bluetooth®
connection. If this happens, simply repeat the
pairing process. However, first make sure to delete
the device from the list of phones on your
Uconnect system. Next, be sure to remove
Uconnect from the list of devices in your phone’s
Bluetooth® settings.
CONNECTING TO A PARTICULAR MOBILE
PHONE OR AUDIO DEVICE AFTER PAIRING
Uconnect Phone will automatically connect to the
highest priority paired phone and/or Audio Device
within range. If you need to choose a particular
phone or audio device follow these steps:
1. Press the
Settings
button on the touchscreen.
2. Press the Paired Phones or Audio Sources button. 3. Press to select the particular phone or the
particular audio device. A pop-up menu will
appear; press “Connect Phone”.
4. Press the X to exit out of the Settings screen.
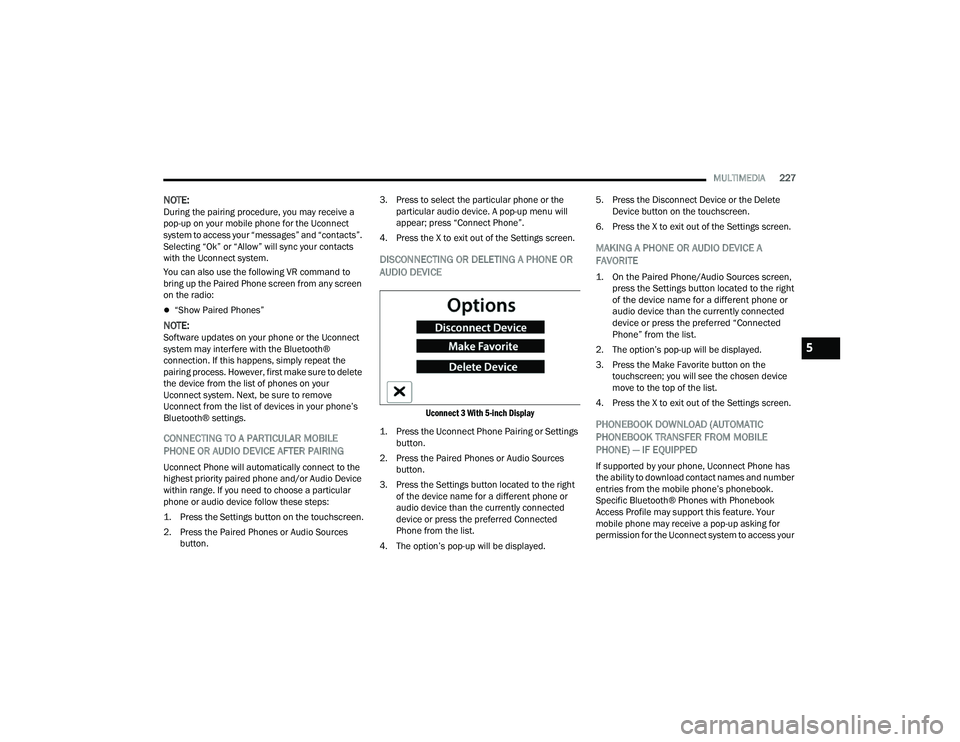
DISCONNECTING OR DELETING A PHONE OR
AUDIO DEVICE
Uconnect 3 With 5-inch Display
1. Press the Uconnect Phone Pairing or Settings button.
2. Press the Paired Phones or Audio Sources button.
3. Press the Settings button located to the right of the device name for a different phone or
audio device than the currently connected
device or press the preferred Connected
Phone from the list.
4. The option’s pop-up will be displayed. 5. Press the Disconnect Device or the Delete
Device button on the touchscreen.
6. Press the X to exit out of the Settings screen.
MAKING A PHONE OR AUDIO DEVICE A
FAVORITE
1. On the Paired Phone/Audio Sources screen, press the Settings button located to the right
of the device name for a different phone or
audio device than the currently connected
device or press the preferred “Connected
Phone” from the list.
2. The option’s pop-up will be displayed.
3. Press the Make Favorite button on the touchscreen; you will see the chosen device
move to the top of the list.
4. Press the X to exit out of the Settings screen.
PHONEBOOK DOWNLOAD (AUTOMATIC
PHONEBOOK TRANSFER FROM MOBILE
PHONE) — IF EQUIPPED
If supported by your phone, Uconnect Phone has
the ability to download contact names and number
entries from the mobile phone’s phonebook.
Specific Bluetooth® Phones with Phonebook
Access Profile may support this feature. Your
mobile phone may receive a pop-up asking for
permission for the Uconnect system to access your
5
22_DPF_OM_EN_USC_t.book Page 227
Page 235 of 428
MULTIMEDIA233
Siri® Eyes Free — If Equipped
When used with your Apple® iPhone® connected
to your vehicle via Bluetooth®, Siri lets you use
your voice to send text messages, select media,
place phone calls and much more. Siri uses your
natural language to understand what you mean
and responds back to confirm your requests. The
system is designed to keep your eyes on the road
and your hands on the wheel by letting Siri help you
perform useful tasks.
To enable Siri, push and hold, then release the
Uconnect Voice Recognition (VR) button on the
steering wheel. After you hear a double beep, you
can ask Siri to play podcasts and music, get
directions, read text messages, and many other
useful requests.
BLUETOOTH® COMMUNICATION LINK
Mobile phones may lose connection to the
Uconnect Phone. When this happens, the
connection can generally be re-established by
restarting the mobile phone. Your mobile phone is
recommended to remain in Bluetooth® ON mode.
POWER-UP
After switching the ignition key from OFF to either
the ON/RUN or ACC position, or after a language
change, you must wait at least 15 seconds prior to
using the system Ú page 412.
CONNECTED VEHICLE SERVICES —
IF EQUIPPED
IS MY VEHICLE CONNECTED?
If equipped, vehicles with an ASSIST and an SOS
button are connected vehicles. These buttons will
be located on either the rearview mirror or
overhead console, depending on the vehicle. If
these buttons are present in your vehicle, you have
a connected radio and can take advantage of the
many connected vehicle features.
For further information about the ASSIST and SOS
buttons Úpage 312.
INTRODUCTION TO CONNECTED VEHICLE
S
ERVICES
One of the many benefits of your vehicle’s
Uconnect system is that you can now take
advantage of SiriusXM Guardian™ connected
services. To unlock the full potential of SiriusXM
Guardian™ in your vehicle, you first need to
activate SiriusXM Guardian™ connected services.
NOTE:SiriusXM Guardian™ involves the collection, trans -
mission and use of data from your vehicle
Ú page 252.
SiriusXM Guardian™ Contact Information
SiriusXM Guardian™/Care
US residents visit: https://www.driveucon -
nect.com/sirius-xm-guardian.html or call
1-844-796-4827
Canadian residents visit: https://www.driveuco -
nnect.ca/en/sirius-xm-guardian or call
1-877-324-9091
WARNING!
ALWAYS obey traffic laws and pay attention to
the road. ALWAYS drive safely with your hands on
the steering wheel. You have full responsibility
and assume all risks related to the use of the
features and applications in this vehicle. Only
use the features and applications when it is safe
to do so. Failure to comply may result in an
accident involving serious injury or death.
5
22_DPF_OM_EN_USC_t.book Page 233
Page 240 of 428

238MULTIMEDIA
(Continued)
(Continued)
Requirements
This feature is available only on vehicles sold in
the US or Canada.
Vehicle must be properly equipped with the
SiriusXM Guardian™ connected services.
Vehicle must be registered with SiriusXM
Guardian™ and have an active subscription that
includes the applicable feature.
Vehicle must have an operable LTE (voice/data)
or 3G or 4G (data) network connection compat
-
ible with your device.
Vehicle must be powered in the ON/RUN or ACC
(Accessory) position with a properly functioning
electrical system.
Automatic SOS — If Equipped
Automatic SOS is a hands-free safety service that
can immediately connect you with help in the event
that your vehicle’s airbags deploy. After an
accident, a live agent will contact you through the
Uconnect system and alert emergency services.
NOTE:An active SiriusXM Guardian™ subscription is
required for this feature to function.
WARNING!
Never place anything on or near the vehicle’s
LTE (voice/data) or 3G or 4G (data) and GPS
antennas. You could prevent LTE (voice/data)
or 4G (data) and GPS signal reception, which
can prevent your vehicle from placing an
emergency call.
Do not add any aftermarket electrical equip -
ment to the vehicle’s electrical system. This
may prevent your vehicle from sending a
signal to initiate an emergency call. To avoid
interference that can cause the SOS Call
system to fail, never add aftermarket equip -
ment (e.g., two-way mobile radio, CB radio,
data recorder, etc.) to your vehicle’s electrical
system or modify the antennas on your
vehicle. IF YOUR VEHICLE LOSES POWER FOR
ANY REASON (INCLUDING DURING OR AFTER
AN ACCIDENT), NEITHER THE MOBILE APPS
NOR THE SIRIUSXM GUARDIAN™ CONNECTED
SERVICES WILL OPERATE.
The Occupant Restraint Controller (ORC) turns
on the Air Bag Warning Light on the instru -
ment panel if a malfunction in any part of the
air bag system is detected. If the Air Bag
Warning Light is illuminated, the air bag
system may not be working properly and the
SOS Call system may not be able to send a
signal to the SiriusXM Guardian™ Customer
Care center. If the Air Bag Warning Light is illu -
minated, have an authorized dealer service
your vehicle immediately.
WARNING!
Ignoring the Rearview Mirror Light could mean
you will not have SOS Call services if needed.
If the Rearview Mirror Light is illuminated,
have an authorized dealer service the SOS
Call system immediately.
If anyone in the vehicle could be in danger
(e.g., fire or smoke is visible, dangerous road
conditions or location), do not wait for voice
contact from a SiriusXM Guardian™ Customer
Care agent. All occupants should exit the
vehicle immediately and move to a safe loca -
tion.
Failure to perform scheduled maintenance
and regular inspection of your vehicle may
result in vehicle damage, accident or injury.
WARNING!
22_DPF_OM_EN_USC_t.book Page 238
Page 244 of 428
242MULTIMEDIA
vate your services, renew after your trial has
expired, for in-vehicle support for your SiriusXM
Guardian™ connected services, or help
answering any general questions surrounding
your connected services.
Uconnect Care — In-vehicle support for all
non-connected Uconnect system features, such
as radio and Bluetooth® connections.
Vehicle Care — Total support for your vehicle.
SiriusXM Guardian™ In-Vehicle Assistance
Features — If Equipped
With SiriusXM Guardian™, your vehicle has
onboard assistance features located on the
rearview mirror or overhead console designed to
enhance your driving experience if you should ever
need assistance or support.
How It Works
Simply push the ASSIST button in the vehicle and
you will be presented with your ASSIST options on
the touchscreen. Make your selection by pressing
the touchscreen.
Requirements
This feature is available only on vehicles sold in
the US and Canada.
Vehicle must be properly equipped with the
SiriusXM Guardian™ connected services.
Vehicle must have an operable LTE (voice/data)
or 3G or 4G (data) network connection.
Vehicle must be registered with SiriusXM
Guardian™ and have an active subscription that
includes the applicable feature.
Vehicle must be powered in the ON/RUN or ACC
(Accessory) position with a properly functioning
electrical system.
Disclaimers
If Roadside Assistance Call is provided to your
vehicle, you agree to be responsible for any
additional roadside assistance service costs that
you may incur. In order to provide SiriusXM
Guardian™ connected services to you, we may
record and monitor your conversations with
Roadside Assistance Call, Vehicle Care, Uconnect
Care, or SiriusXM Guardian™ Customer Care,
whether such conversations are initiated through
the SiriusXM Guardian™ connected services in
your vehicle, or via a landline or mobile device, and
may share information obtained through such
recording and monitoring in accordance with
regulatory requirements. You acknowledge, agree
and consent to any recording, monitoring or
sharing of information obtained through any such
call recordings.
Send & Go — If Equipped
Description
The Send & Go feature allows you to search for a
destination on your mobile device, and then send
the route to your vehicle’s Navigation system. How It Works
1. There are multiple ways to find a destination.
After selecting the Location tab at the bottom
of the App, browse through one of the
categories provided, or type the name or
keyword in the search box. You can also
select categories such as “Favorites” or
“Contact List”.
2. Select your destination from the list that appears. Location information will then be
displayed on the map.
From this screen, you will be able to:
View the location on a map.
See the distance from your current location.
Send the destination to the vehicle (Send &
Go).
3. Send the destination to the Uconnect Navigation in your vehicle. You can also call
the destination by pressing the Call button.
4. Confirm your destination in the vehicle through a notification or in the Navigation system.
Requirements
Vehicle must have an operable LTE (voice/data)
or 3G or 4G (data) network connection compat -
ible with your device.
Vehicle must have an active subscription that
includes the applicable feature.
22_DPF_OM_EN_USC_t.book Page 242
Page 245 of 428

MULTIMEDIA243
Vehicle Finder
Description
The Vehicle Finder feature allows you to find the
location of your vehicle.
You can also sound the horn and flash the lights to
make finding your vehicle even easier.
How It Works
Select the Vehicle Finder function within the
Mobile App and select the Location tab at the
bottom of the App. Then, press the Vehicle icon to
find your vehicle.
Requirements
Vehicle must be properly equipped with the
Uconnect system.
Vehicle must have an operable LTE (voice/data)
or 3G or 4G (data) network connection compat -
ible with your device.
Vehicle must have an active subscription that
includes the applicable feature.
Vehicle ignition must have been turned on
within 14 days.
4G Wi-Fi Hotspot — If Equipped
Description
4G Wi-Fi Hotspot is an in-vehicle service that
connects your device to an LTE (voice/data) or 4G
(data) network that is ready to go wherever you are.
After you've made your purchase, turn on your
device’s Wi-Fi and connect your devices.
Enables all your passengers to be simultane -
ously connected to the web.
Connect several devices at one time.
Any Wi-Fi-enabled device — such as a laptop or
any other portable-enabled media — can
connect over your private in-vehicle network.
A high-speed, secured connection lets anyone
on your private network access the Web — great
for working and relaxing. Create A 4G Wi-Fi Hotspot For Use In Your Vehicle
How It Works
The 4G Wi-Fi Hotspot feature provides
the vehicle passengers with an internet
access hotspot in the vehicle, using the
radio as an access point. The hotspot will
allow Wi-Fi-enabled in-vehicle devices (such as a
laptop or any other portable-enabled media
device) to wirelessly connect to the internet.
Uconnect offers a complimentary 3-month trial
period that includes 1GB of total data. The trial can
be activated any time within the first year of new
vehicle ownership.
Use one of these three ways to purchase a
subscription to the 4G Wi-Fi Hotspot:
1. From your vehicle’s touchscreen, select the 4G Wi-Fi Hotspot App, and press the How To
Purchase button and follow the instructions.
2. Log onto your Owner’s Site and click the link to the AT&T portal to get set up.
3. For existing Connected Car customers: Push
the ASSIST button to be routed to an AT&T
Customer Care agent who will assist you.
WARNING!
The driver should NEVER use the 4G Wi-Fi
Hotspot while driving the vehicle as doing so
may result in an accident involving serious injury
or death.
5
22_DPF_OM_EN_USC_t.book Page 243