manual radio set RAM CHASSIS CAB 2022 Owners Manual
[x] Cancel search | Manufacturer: RAM, Model Year: 2022, Model line: CHASSIS CAB, Model: RAM CHASSIS CAB 2022Pages: 428, PDF Size: 20.18 MB
Page 194 of 428

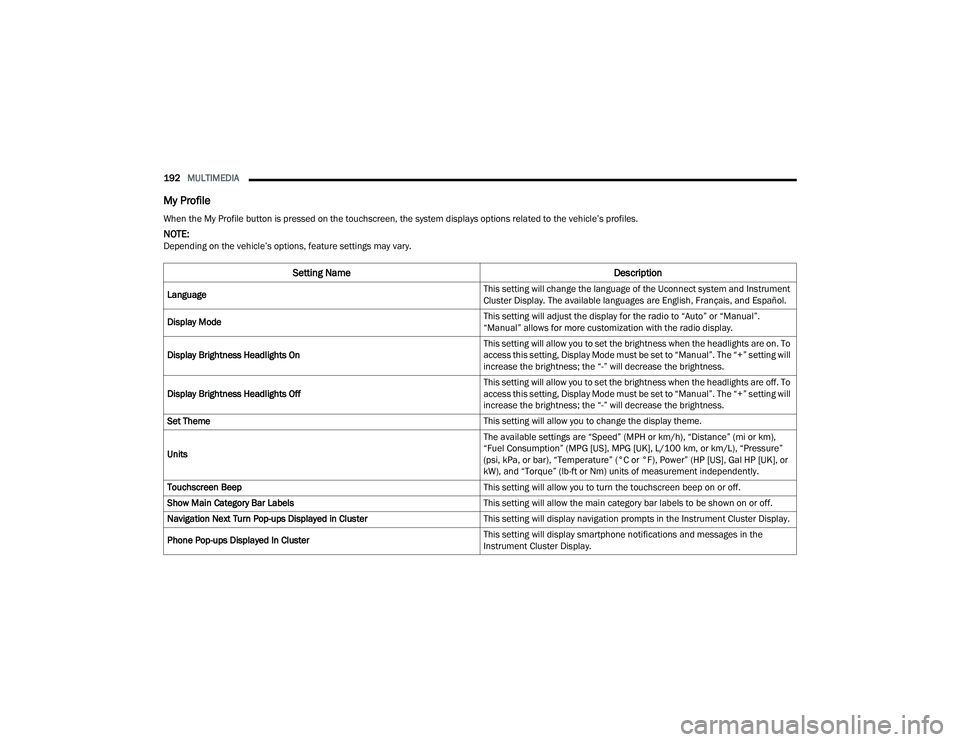
192MULTIMEDIA
My Profile
When the My Profile button is pressed on the touchscreen, the system displays options related to the vehicle’s profiles.
NOTE:Depending on the vehicle’s options, feature settings may vary.
Setting Name Description
Language This setting will change the language of the Uconnect system and Instrument
Cluster Display. The available languages are English, Français, and Español.
Display Mode This setting will adjust the display for the radio to “Auto” or “Manual”.
“Manual” allows for more customization with the radio display.
Display Brightness Headlights On This setting will allow you to set the brightness when the headlights are on. To
access this setting, Display Mode must be set to “Manual”. The “+” setting will
increase the brightness; the “-” will decrease the brightness.
Display Brightness Headlights Off This setting will allow you to set the brightness when the headlights are off. To
access this setting, Display Mode must be set to “Manual”. The “+” setting will
increase the brightness; the “-” will decrease the brightness.
Set Theme This setting will allow you to change the display theme.
Units The available settings are “Speed” (MPH or km/h), “Distance” (mi or km),
“Fuel Consumption” (MPG [US], MPG [UK], L/100 km, or km/L), “Pressure”
(psi, kPa, or bar), “Temperature” (°C or °F), Power” (HP [US], Gal HP [UK], or
kW), and “Torque” (lb-ft or Nm) units of measurement independently.
Touchscreen Beep This setting will allow you to turn the touchscreen beep on or off.
Show Main Category Bar Labels This setting will allow the main category bar labels to be shown on or off.
Navigation Next Turn Pop-ups Displayed in Cluster This setting will display navigation prompts in the Instrument Cluster Display.
Phone Pop-ups Displayed In Cluster This setting will display smartphone notifications and messages in the
Instrument Cluster Display.
22_DPF_OM_EN_USC_t.book Page 192
Page 195 of 428

MULTIMEDIA193
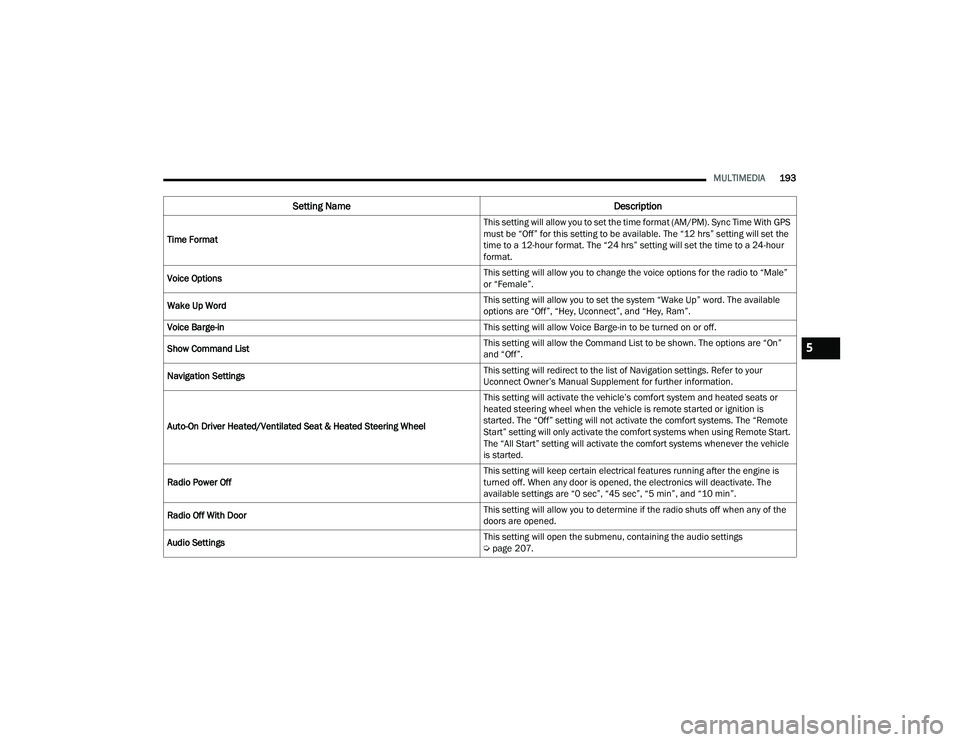
Time Format This setting will allow you to set the time format (AM/PM). Sync Time With GPS
must be “Off” for this setting to be available. The “12 hrs” setting will set the
time to a 12-hour format. The “24 hrs” setting will set the time to a 24-hour
format.
Voice Options This setting will allow you to change the voice options for the radio to “Male”
or “Female”.
Wake Up Word This setting will allow you to set the system “Wake Up” word. The available
options are “Off”, “Hey, Uconnect”, and “Hey, Ram”.
Voice Barge-in This setting will allow Voice Barge-in to be turned on or off.
Show Command List This setting will allow the Command List to be shown. The options are “On”
and “Off”.
Navigation Settings This setting will redirect to the list of Navigation settings. Refer to your
Uconnect Owner’s Manual Supplement for further information.
Auto-On Driver Heated/Ventilated Seat & Heated Steering Wheel This setting will activate the vehicle’s comfort system and heated seats or
heated steering wheel when the vehicle is remote started or ignition is
started. The “Off” setting will not activate the comfort systems. The “Remote
Start” setting will only activate the comfort systems when using Remote Start.
The “All Start” setting will activate the comfort systems whenever the vehicle
is started.
Radio Power Off This setting will keep certain electrical features running after the engine is
turned off. When any door is opened, the electronics will deactivate. The
available settings are “0 sec”, “45 sec”, “5 min”, and “10 min”.
Radio Off With Door This setting will allow you to determine if the radio shuts off when any of the
doors are opened.
Audio Settings This setting will open the submenu, containing the audio settings
Ú
page 207.
Setting Name Description
5
22_DPF_OM_EN_USC_t.book Page 193
Page 214 of 428

212MULTIMEDIA
NOTE:Uconnect screen images are for illustration purposes only and may not reflect exact software for your vehicle.
Feature Description
Radio/Media
Press/Push the Radio button or Media button to enter Radio Mode/Media
Mode and access the radio functions and external audio sources
Ú
page 213.
Phone Press/Push the Phone button to enter Phone Mode and access the
hands-free phone system Ú
page 223.
Settings Press/Push the Settings button to access the Uconnect Settings Ú page 191.
Push the ENTER/BROWSE button on the faceplate to accept a highlighted
selection on the screen. Rotate the TUNE/SCROLL rotary knob to scroll
through a list or tune a radio station.
Push the SCREEN OFF button on the faceplate to turn the screen on or off.
Push the MUTE button on the faceplate to turn the audio of the radio system
off. Push it again to turn the audio back on.
Rotate the rotary knob to adjust the volume. Push the VOLUME & On/Off
button on the faceplate to turn the system on or off.
NOTE:Push and hold the VOLUME & On/Off button for approximately 10 seconds to
reset the radio manually. Doing this can also recover the radio screen from
freezing or being stuck.
Compass Push the COMPASS button to access the vehicle’s compass.
More Push the MORE button to access additional options.
22_DPF_OM_EN_USC_t.book Page 212
Page 218 of 428

216MULTIMEDIA
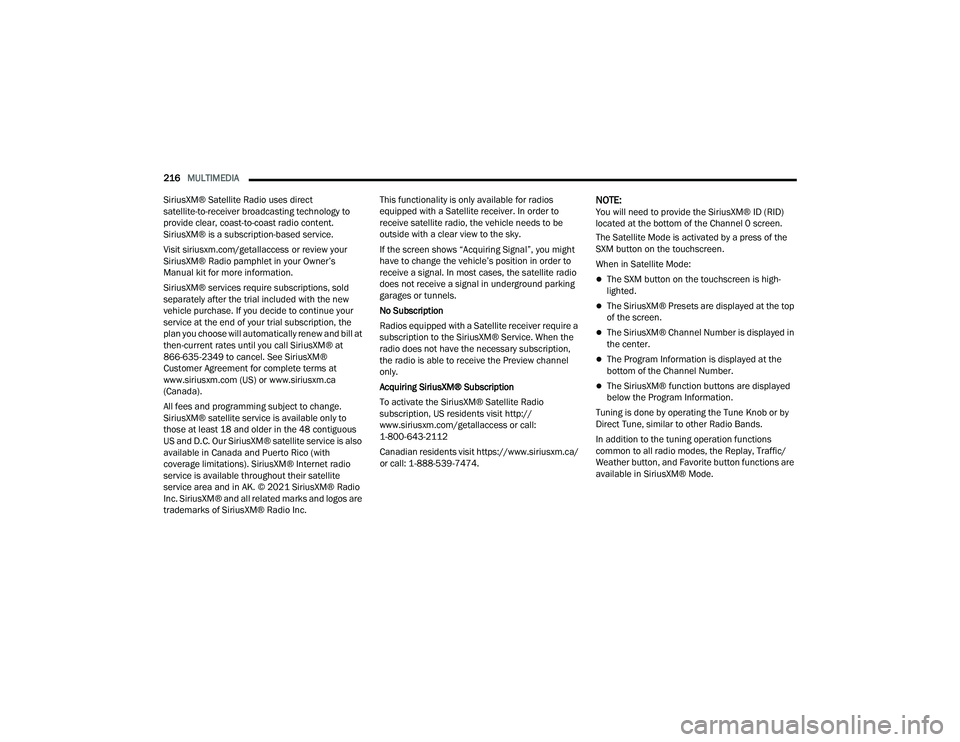
SiriusXM® Satellite Radio uses direct
satellite-to-receiver broadcasting technology to
provide clear, coast-to-coast radio content.
SiriusXM® is a subscription-based service.
Visit siriusxm.com/getallaccess or review your
SiriusXM® Radio pamphlet in your Owner’s
Manual kit for more information.
SiriusXM® services require subscriptions, sold
separately after the trial included with the new
vehicle purchase. If you decide to continue your
service at the end of your trial subscription, the
plan you choose will automatically renew and bill at
then-current rates until you call SiriusXM® at
866-635-2349 to cancel. See SiriusXM®
Customer Agreement for complete terms at
www.siriusxm.com (US) or www.siriusxm.ca
(Canada).
All fees and programming subject to change.
SiriusXM® satellite service is available only to
those at least 18 and older in the 48 contiguous
US and D.C. Our SiriusXM® satellite service is also
available in Canada and Puerto Rico (with
coverage limitations). SiriusXM® Internet radio
service is available throughout their satellite
service area and in AK. © 2021 SiriusXM® Radio
Inc. SiriusXM® and all related marks and logos are
trademarks of SiriusXM® Radio Inc. This functionality is only available for radios
equipped with a Satellite receiver. In order to
receive satellite radio, the vehicle needs to be
outside with a clear view to the sky.
If the screen shows “Acquiring Signal”, you might
have to change the vehicle’s position in order to
receive a signal. In most cases, the satellite radio
does not receive a signal in underground parking
garages or tunnels.
No Subscription
Radios equipped with a Satellite receiver require a
subscription to the SiriusXM® Service. When the
radio does not have the necessary subscription,
the radio is able to receive the Preview channel
only.
Acquiring SiriusXM® Subscription
To activate the SiriusXM® Satellite Radio
subscription, US residents visit http://
www.siriusxm.com/getallaccess or call:
1-800-643-2112
Canadian residents visit https://www.siriusxm.ca/
or call: 1-888-539-7474.
NOTE:You will need to provide the SiriusXM® ID (RID)
located at the bottom of the Channel 0 screen.
The Satellite Mode is activated by a press of the
SXM button on the touchscreen.
When in Satellite Mode:
The SXM button on the touchscreen is high -
lighted.
The SiriusXM® Presets are displayed at the top
of the screen.
The SiriusXM® Channel Number is displayed in
the center.
The Program Information is displayed at the
bottom of the Channel Number.
The SiriusXM® function buttons are displayed
below the Program Information.
Tuning is done by operating the Tune Knob or by
Direct Tune, similar to other Radio Bands.
In addition to the tuning operation functions
common to all radio modes, the Replay, Traffic/
Weather button, and Favorite button functions are
available in SiriusXM® Mode.
22_DPF_OM_EN_USC_t.book Page 216
Page 288 of 428

286SAFETY
(Continued)
The first stage inflator is triggered immediately
during an impact that requires air bag deployment.
A low energy output is used in less severe
collisions. A higher energy output is used for more
severe collisions.
This vehicle may be equipped with a driver and/or
front passenger seat belt buckle switch that
detects whether the driver or front passenger seat
belt is buckled. The seat belt buckle switch may
adjust the inflation rate of the Advanced Front Air
Bags.
Front Air Bag Operation
Front Air Bags are designed to provide additional
protection by supplementing the seat belts. Front
air bags are not expected to reduce the risk of
injury in rear, side, or rollover collisions. The front
air bags will not deploy in all frontal collisions,
including some that may produce substantial
vehicle damage — for example, some pole
collisions, truck underrides, and angle offset
collisions.
On the other hand, depending on the type and
location of impact, front air bags may deploy in
crashes with little vehicle front-end damage but
that produce a severe initial deceleration.
Because air bag sensors measure vehicle
deceleration over time, vehicle speed and damage
by themselves are not good indicators of whether
or not an air bag should have deployed. Seat belts are necessary for your protection in all
collisions, and also are needed to help keep you in
position, away from an inflating air bag.
When the Occupant Restraint Controller (ORC)
detects a collision requiring the front air bags, it
signals the inflator units. A large quantity of
non-toxic gas is generated to inflate the front air
bags.
The steering wheel hub trim cover and the upper
passenger side of the instrument panel separate
and fold out of the way as the air bags inflate to
their full size. The front air bags fully inflate in less
time than it takes to blink your eyes. The front air
bags then quickly deflate while helping to restrain
the driver and front passenger.
Knee Impact Bolsters
The Knee Impact Bolsters help protect the knees
of the driver and front passenger, and position the
front occupants for improved interaction with the
front air bags.
WARNING!
No objects should be placed over or near the
air bag on the instrument panel or steering
wheel because any such objects could cause
harm if the vehicle is in a collision severe
enough to cause the air bag to inflate.
Do not put anything on or around the air bag
covers or attempt to open them manually. You
may damage the air bags and you could be
injured because the air bags may no longer be
functional. The protective covers for the air
bag cushions are designed to open only when
the air bags are inflating.
Relying on the air bags alone could lead to
more severe injuries in a collision. The air
bags work with your seat belt to restrain you
properly. In some collisions, air bags won’t
deploy at all. Always wear your seat belts even
though you have air bags.
WARNING!
WARNING!
Do not drill, cut, or tamper with the knee
impact bolsters in any way.
Do not mount any accessories to the knee
impact bolsters such as alarm lights, stereos,
citizen band radios, etc.
22_DPF_OM_EN_USC_t.book Page 286
Page 422 of 428

420
Seat Belt Automatic Locking Retractor (ALR)
............ 283Seat Belt Reminder......................................... 94Seat Belts............................................ 276, 307Adjustable Shoulder Belt........................... 280Adjustable Upper Shoulder Anchorage...... 280Adjustable Upper Shoulder Belt Anchorage............................................. 280Child Restraints......................................... 291Extender.................................................... 282Front Seat....................................... 276, 279Inspection................................................. 307Lap/Shoulder Belt Operation.................... 279Lap/Shoulder Belt Untwisting...................279Operating Instructions............................... 279Pregnant Women...................................... 282Reminder.................................................. 276Seat Belt Extender.................................... 282Seat Belt Reminder................................... 276Untwisting Procedure................................ 279Seat Belts Maintenance................................ 395Seats........................................................ 31, 32Adjustment........................................... 31, 32Easy Entry................................................... 33Folding Floor............................................... 65Head Restraints.......................................... 35Memory....................................................... 29Power.......................................................... 32Rear Folding................................................ 31Tilting.......................................................... 31
Security Alarm........................................... 23, 96Selection Of Coolant (Antifreeze).................. 404Send & Go........................................... 242, 248Sentry Key (Immobilizer).................................. 18Service Assistance........................................ 409Service Contract........................................... 410Service Manuals........................................... 411Settings, Audio.............................................. 219Shift Lever Override...................................... 322Shifting......................................................... 121Automatic Transmission.................. 122, 126Transfer Case........................................... 139Transfer Case, Shifting Into Transfer Case Neutral (N)................................... 186Transfer Case, Shifting Out Of TransferCase Neutral (N)................................... 187Signals, Turn................................. 50, 102, 309Sirius Satellite Radio..................................... 215Favorites................................................... 218Replay...................................................... 217SiriusXM Satellite RadioBrowse in SXM......................................... 218Favorites................................................... 218Replay...................................................... 217Sliding Rear Window, Power............................ 72Smart Watch................................................. 247Snow Chains (Tire Chains)............................ 390Snow Plow.................................................... 183
Snow Tires.................................................... 387SOS Call............................................... 236, 248Spare Tires........................................... 387, 388Speed ControlAccel/Decel.............................................. 142Cancel....................................................... 142Resume.................................................... 142Speed Control (Cruise Control)............. 141, 143Starting....................................... 105, 107, 108Automatic Transmission.................. 105, 109Button..........................................................18Cold Weather............................................ 108Engine Block Heater................................. 110Engine Fails To Start................................. 107Starting And Operating.................................. 107Starting Procedures............................. 107, 108Starting Procedures (Diesel Engines)............ 108Starting Procedures (Gas Engines)............... 105SteeringPower........................................................ 140Tilt Column...................................................27Wheel, Heated...................................... 27, 28Wheel, Tilt....................................................27Steering Wheel Audio Controls...................... 213Steering Wheel Mounted Sound System....... 213Stolen Vehicle Assistance.................... 244, 249Storage............................................................61Storage Compartment, Center Seat.................62
22_DPF_OM_EN_USC_t.book Page 420