bolt pattern RAM CHASSIS CAB 2022 Owners Manual
[x] Cancel search | Manufacturer: RAM, Model Year: 2022, Model line: CHASSIS CAB, Model: RAM CHASSIS CAB 2022Pages: 428, PDF Size: 20.18 MB
Page 311 of 428

SAFETY309
PERIODIC SAFETY CHECKS YOU SHOULD
M
AKE OUTSIDE THE VEHICLE
Tires
Examine tires for excessive tread wear and uneven
wear patterns. Check for stones, nails, glass, or
other objects lodged in the tread or sidewall.
Inspect the tread for cuts and cracks. Inspect
sidewalls for cuts, cracks, and bulges. Check the
lug nuts/bolt torque for tightness. Check the tires
(including spare) for proper cold inflation pressure.
Lights
Have someone observe the operation of brake
lights and exterior lights while you work the
controls. Check turn signal and high beam
indicator lights on the instrument panel.
Door Latches
Check for proper closing, latching, and locking.
Fluid Leaks
Check area under the vehicle after overnight
parking for fuel, coolant, oil, or other fluid leaks.
Also, if gasoline fumes are detected or if fuel or
brake fluid leaks are suspected, the cause should
be located and corrected immediately.
EXHAUST GAS The best protection against carbon monoxide entry
into the vehicle body is a properly maintained
engine exhaust system.
Whenever a change is noticed in the sound of the
exhaust system, when exhaust fumes can be
detected inside the vehicle, or when the underside
or rear of the vehicle is damaged, have an
authorized dealer inspect the complete exhaust
system and adjacent body areas for broken,
damaged, deteriorated, or mispositioned parts.
Open seams or loose connections could permit
exhaust fumes to seep into the passenger
compartment. In addition, inspect the exhaust
system each time the vehicle is raised for
lubrication or oil change. Replace as required.
WARNING!
Exhaust gases can injure or kill. They contain
carbon monoxide (CO), which is colorless and
odorless. Breathing it can make you
unconscious and can eventually poison you. To
avoid breathing (CO), follow these safety tips:
Do not run the engine in a closed garage or in
confined areas any longer than needed to
move your vehicle in or out of the area.
If you are required to drive with the trunk/lift -
gate/rear doors open, make sure that all
windows are closed and the climate control
BLOWER switch is set at high speed. DO NOT
use the recirculation mode.
If it is necessary to sit in a parked vehicle with
the engine running, adjust your heating or
cooling controls to force outside air into the
vehicle. Set the blower at high speed.
6
22_DPF_OM_EN_USC_t.book Page 309
Page 400 of 428

398TECHNICAL SPECIFICATIONS
Inspect the wheel mounting surface prior to
mounting the tire and remove any corrosion or
loose particles.
NOTE:Dual wheels are flat mounted, center piloted. The
lug nuts are a two-piece assembly. When the tires
are being rotated or replaced, clean these lug nuts
at the interface between the lug nut/bolt and the
washer. Do not oil wheel studs.
Two-Piece Lug Nut
Inspect the wheel mounting surface prior to
mounting the tire and remove any corrosion or
loose particles.
Wheel Mounting Surface
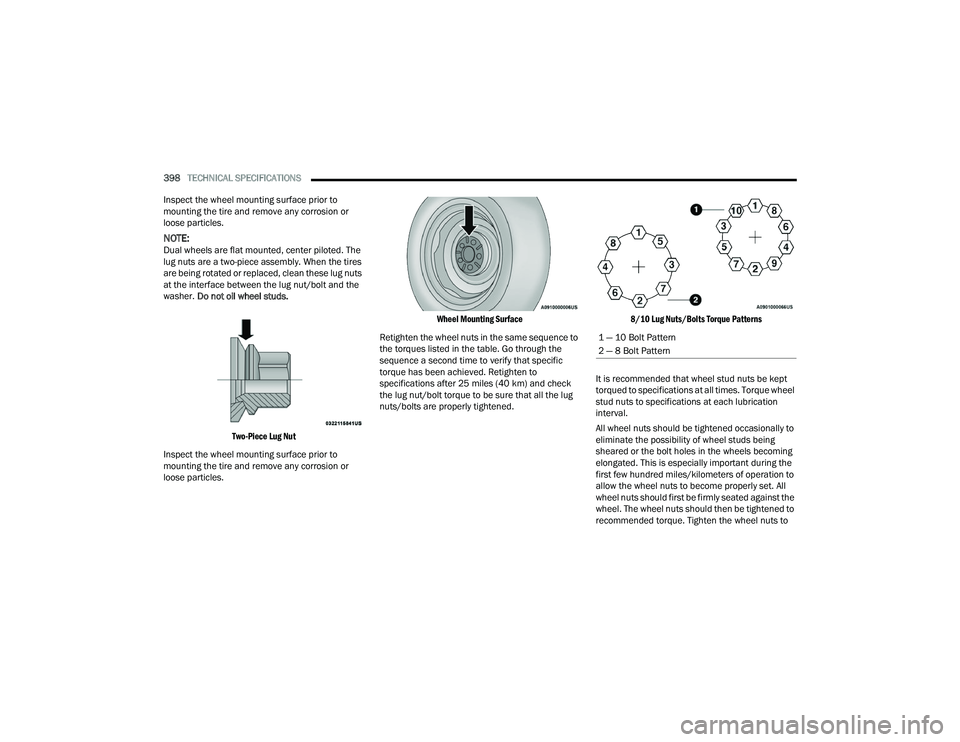
Retighten the wheel nuts in the same sequence to
the torques listed in the table. Go through the
sequence a second time to verify that specific
torque has been achieved. Retighten to
specifications after 25 miles (40 km) and check
the lug nut/bolt torque to be sure that all the lug
nuts/bolts are properly tightened.
8/10 Lug Nuts/Bolts Torque Patterns
It is recommended that wheel stud nuts be kept
torqued to specifications at all times. Torque wheel
stud nuts to specifications at each lubrication
interval.
All wheel nuts should be tightened occasionally to
eliminate the possibility of wheel studs being
sheared or the bolt holes in the wheels becoming
elongated. This is especially important during the
first few hundred miles/kilometers of operation to
allow the wheel nuts to become properly set. All
wheel nuts should first be firmly seated against the
wheel. The wheel nuts should then be tightened to
recommended torque. Tighten the wheel nuts to
1 — 10 Bolt Pattern
2 — 8 Bolt Pattern
22_DPF_OM_EN_USC_t.book Page 398