audio RAM CHASSIS CAB 2023 Owners Manual
[x] Cancel search | Manufacturer: RAM, Model Year: 2023, Model line: CHASSIS CAB, Model: RAM CHASSIS CAB 2023Pages: 444, PDF Size: 20.51 MB
Page 8 of 444
6
RECREATIONAL TOWING
(BEHIND MOTORHOME) ..................................... 194
Towing This Vehicle Behind Another Vehicle ...194
Recreational Towing â Two-Wheel
Drive Models.................................................. 195
Recreational Towing â Four-Wheel
Drive Models.................................................. 195
DRIVING TIPS ....................................................... 197
Driving On Slippery Surfaces ....................... 197
Driving Through Water ................................. 198
MULTIMEDIA
UCONNECT SYSTEMS ......................................... 199
CYBERSECURITY ................................................. 199
UCONNECT SETTINGS ........................................ 199Customer Programmable Features .............. 200
UCONNECT INTRODUCTION................................ 221
System Overview .......................................... 221
Safety And General Information ................... 223
UCONNECT MODES ............................................. 224
Steering Wheel Audio Controls ..................... 224
Radio Mode .................................................. 224
Media Mode .................................................. 232
Phone Mode ................................................. 234 CONNECTED VEHICLE SERVICES â
IF EQUIPPED ....................................................... 244
Is My Vehicle Connected?............................. 244
Introduction To Connected Vehicle
Services ........................................................ 244Getting Started With Connected Vehicle
Services ........................................................ 246Using SiriusXM Guardian⢠.......................... 247
Manage My SiriusXM Guardian⢠Account .. 258
CONNECTED SERVICES FAQS .......................... 258
Connected Services SOS FAQs â
If Equipped .................................................... 259
Connected Services Remote Door Lock/
Unlock FAQs .................................................. 259
Connected Services Roadside Assistance
FAQs .............................................................. 259
Connected Services Send & Go FAQs â
If Equipped .................................................... 259
Connected Services Vehicle Finder FAQs ... 260
Connected Services Stolen Vehicle Assistance
FAQs â If Equipped ...................................... 260
Connected Services Remote Vehicle
Start FAQs ..................................................... 260Connected Services Remote Horn &
Lights FAQs .................................................... 261
Connected Services Account FAQs â
If Equipped..................................................... 261Data Collection & Privacy ............................. 263
RADIO OPERATION AND MOBILE PHONES ..... 263
Regulatory And Safety Information .............. 264 OFF-ROAD PAGES â IF EQUIPPED .................... 264
Off-Road Pages Status Bar ........................... 265
Vehicle Dynamics .......................................... 266Accessory Gauge ........................................... 267
Pitch & Roll .................................................... 268
Suspension .................................................... 269
Forward Facing Camera................................ 269
SAFETY
SAFETY FEATURES .............................................. 270
Anti-Lock Brake System (ABS) ..................... 270Rear Seat Reminder Alert (RSRA) ................ 271Electronic Brake Control (EBC) System ....... 271
AUXILIARY DRIVING SYSTEMS .......................... 277
Blind Spot Assist Cameras â
If Equipped .................................................... 277
Forward Collision Warning (FCW) With
Mitigation â If Equipped ............................... 278
Tire Pressure Monitoring System (TPMS) ... 280
OCCUPANT RESTRAINT SYSTEMS ................... 288
Occupant Restraint Systems Features ....... 288
Important Safety Precautions ...................... 288
Seat Belt Systems ........................................ 289
Supplemental Restraint Systems (SRS) ...... 296Child Restraints ............................................. 305
23_DPF_OM_EN_USC_t.book Page 6
Page 93 of 444
GETTING TO KNOW YOUR INSTRUMENT PANEL91
NOTE:
ï¬Holding the up / down or left / right
arrow button will loop the user through the
currently selected menu or options presented
on the screen.
ï¬Main menu and submenus wrap for continuous
scrolling.
ï¬Upon returning to a main menu, the last
submenu screen viewed within that main menu
will be displayed.
OK Button:
For Digital Speedometer:
ï¬Pushing the OK button changes units (mph or
km/h).
Menu Button
ï¬Press Menu button for Home Screen display.
ï¬Navigate left or right to highlight desired
tile. Press OK to select desired. Once OK is
pressed, cluster will navigate to selected
submenu (e.g. âAudioâ).
NOTE:Exiting Home Screen Speed Limit tile and Navi -
gation tile with no Ethernet navigates to Speed -
ometer submenu.
ï¬Press up or down to select different
screen within selected category.
ï¬If Menu button is pressed while in this view,
cluster will return to previously displayed
screen.
ï¬Press and hold OK button to enter edit mode.
ï¡Instruction text may overlay lower tachom -
eter
For Screen Setup:
ï¬OK button allows user to enter menu and
submenus.
ï¬Within each submenu layer, the up and
down arrow buttons will allow the user to
select the item of interest.
ï¬Pushing the OK button makes the selection and
a confirmation screen will appear (returning the
user to the first page of the submenu).
ï¬Pushing the left arrow button will exit each
submenu layer and return to the main menu.
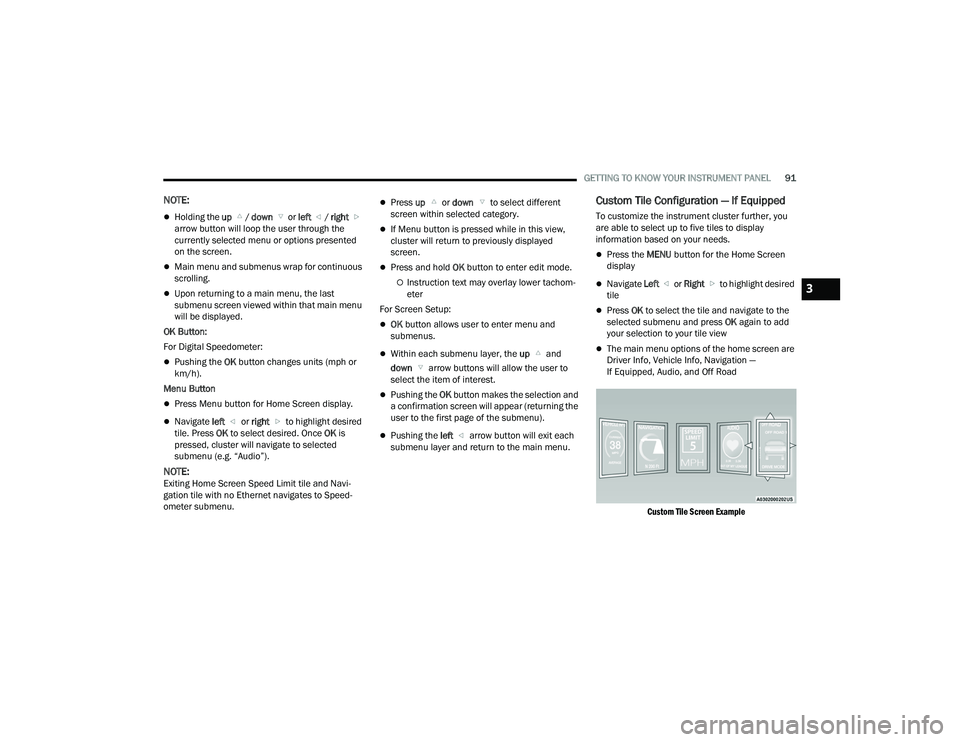
Custom Tile Configuration â If Equipped
To customize the instrument cluster further, you
are able to select up to five tiles to display
information based on your needs.
ï¬Press the MENU button for the Home Screen
display
ï¬Navigate Left or Right to highlight desired
tile
ï¬Press OK to select the tile and navigate to the
selected submenu and press OK again to add
your selection to your tile view
ï¬The main menu options of the home screen are
Driver Info, Vehicle Info, Navigation â
If Equipped, Audio, and Off Road
Custom Tile Screen Example
3
23_DPF_OM_EN_USC_t.book Page 91
Page 94 of 444
92GETTING TO KNOW YOUR INSTRUMENT PANEL
You can customize your Instrument Cluster Display
with up to five tiles that may consist of the
following:
NOTE:These options may vary based on your vehicle trim
level.
ï¬Navigation
ï¡Route Set / Route Not Set
ï¡Trip A / Trip B
ï¬Vehicle Info
ï¡Coolant Temp
ï¡Trans Temp
ï¡Oil Temp
ï¡Oil Pressure
ï¡Battery Voltage
ï¡Oil Life
ï¡Tire Pressure
ï¡Fuel Economy
ï¡Air Suspension
ï¬Driver Info
ï¡Driver Assist
ï¬Audio
ï¡Audio Info
ï¬Off Road
ï¡Selec-Terrain / Air Suspension Status
ï¡Steering Angle
ï¡Pitch
ï¡Roll
ï¬Trailer Tow
ï¡Trailer Trip
ï¡Trailer Brake
ï¡Trailer Tire Pressure Monitor
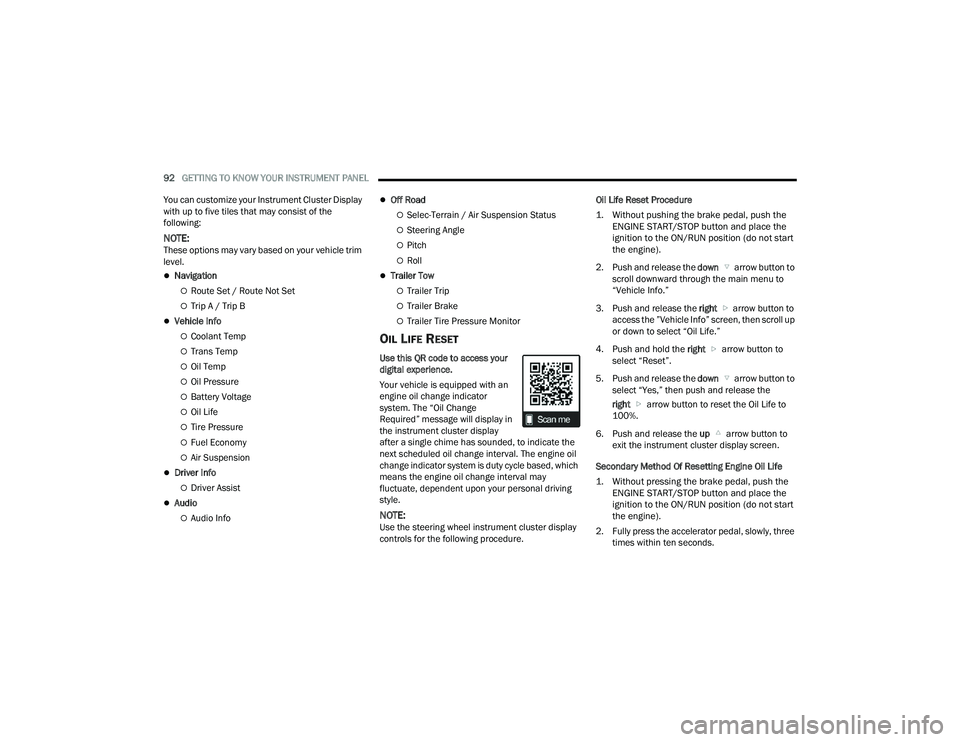
OIL LIFE RESET
Use this QR code to access your
digital experience.
Your vehicle is equipped with an
engine oil change indicator
system. The âOil Change
Requiredâ message will display in
the instrument cluster display
after a single chime has sounded, to indicate the
next scheduled oil change interval. The engine oil
change indicator system is duty cycle based, which
means the engine oil change interval may
fluctuate, dependent upon your personal driving
style.
NOTE:Use the steering wheel instrument cluster display
controls for the following procedure. Oil Life Reset Procedure
1. Without pushing the brake pedal, push the
ENGINE START/STOP button and place the
ignition to the ON/RUN position (do not start
the engine).
2. Push and release the down arrow button to
scroll downward through the main menu to
âVehicle Info.â
3. Push and release the right arrow button to
access the âVehicle Infoâ screen, then scroll up
or down to select âOil Life.â
4. Push and hold the right arrow button to
select âResetâ.
5. Push and release the down arrow button to
select âYes,â then push and release the
right arrow button to reset the Oil Life to
100%.
6. Push and release the up arrow button to
exit the instrument cluster display screen.
Secondary Method Of Resetting Engine Oil Life
1. Without pressing the brake pedal, push the ENGINE START/STOP button and place the
ignition to the ON/RUN position (do not start
the engine).
2. Fully press the accelerator pedal, slowly, three times within ten seconds.
23_DPF_OM_EN_USC_t.book Page 92
Page 95 of 444
GETTING TO KNOW YOUR INSTRUMENT PANEL93
3. Without pushing the brake pedal, push the ENGINE START/STOP button once to return the
ignition to the OFF position.
NOTE:If the indicator message illuminates when you start
the vehicle, the oil change indicator system did not
reset. If necessary, repeat this procedure.
DISPLAY MENU ITEMS
Push and release the up or down arrow
button until the desired selectable menu icon is
highlighted in the instrument cluster display.
The instrument cluster display menu items may
consist of the following:
Speedometer
Push and release the up or down arrow
button until the speedometer menu item is
highlighted in the instrument cluster display. Push
and release the right arrow button to cycle the
display between mph and km/h.
Driver Assist â If Equipped
The Driver Assist menu displays the status of the
ACC system.
Push and release the up or down arrow
button until the Driver Assist menu is displayed in
the instrument cluster display.
Adaptive Cruise Control (ACC) Feature
The instrument cluster display displays the current
ACC system settings. The information displayed
depends on ACC system status.
Push the ACC on/off button (located on the
steering wheel) until one of the following displays
in the instrument cluster display:
Adaptive Cruise Control Off
When ACC is deactivated, the display will read
âAdaptive Cruise Control Off.â
Adaptive Cruise Control Ready
When ACC is activated but the vehicle speed
setting has not been selected, the display will read
âAdaptive Cruise Control Ready.â Push the SET + or the SET- button (located on the
steering wheel) and the following will display in the
instrument cluster display:
ACC SET
When ACC is set, the set speed will display in the
instrument cluster.
The ACC screen may display once again if any ACC
activity occurs, which may include any of the
following:
ï¬Distance Setting Change
ï¬System Cancel
ï¬Driver Override
ï¬System Off
ï¬ACC Proximity Warning
ï¬ACC Unavailable Warning
NOTE:The instrument cluster display will return to the last
display selected after five seconds of no ACC
display activity Ã
page 150.
LaneSense â If Equipped
The instrument cluster display displays the current
LaneSense system settings. The information
displayed depends on LaneSense system status
and the conditions that need to be met
à page 163.
Speedometer Vehicle Info
Off Road â
If Equipped
Driver Assist â
If Equipped Fuel Economy Trip A/Trip B
Screen Set Up Vehicle
Settings â
If EquippedCommercial
Settings â
If Equipped
Trailer Tow Audio Messages
3
23_DPF_OM_EN_USC_t.book Page 93
Page 98 of 444
96GETTING TO KNOW YOUR INSTRUMENT PANEL
NOTE:Trailer connection status is remembered after the
key cycle. If the trailer connection status has not
changed, no pop-up will appear in your Instrument
Cluster Display.
Audio
Push and release the up or down arrow
button until the Audio Menu icon/title is
highlighted in the instrument cluster display. This
menu will display the audio source information,
including the Song name, Artist name, and audio
source with an accompanying graphic.
Phone Call Status
When a call is incoming, a Phone Call Status
pop-up will display on the screen. The pop-up will
remain until the phone is answered or ignored.
NOTE:The call status will temporarily replace the
previous media source information displayed on
the screen. When the pop-up is no longer
displayed, the display will return to the last used
screen.
Stored Messages
Push and release the up or down arrow
button until the Messages Menu item is
highlighted. This feature shows the number of
stored warning messages. Push and release the
right or left arrow button to cycle through
stored messages.
Settings â If Equipped
Personal Settings allows the driver to set and recall
features when the transmission is in PARK.
Push and release the up or down arrow
button until Settings displays in the instrument
cluster display.
Follow the prompts to display and set any of the
following Vehicle Settings.
NOTE:Your vehicle may be equipped with the following
settings.
ï¬If equipped with a base radio (Non-Touch -
screen) Vehicle Settings will be included in the
instrument cluster display.
ï¬If equipped with a Touchscreen radio, the
Vehicle Settings will be included in the radio
head unit.
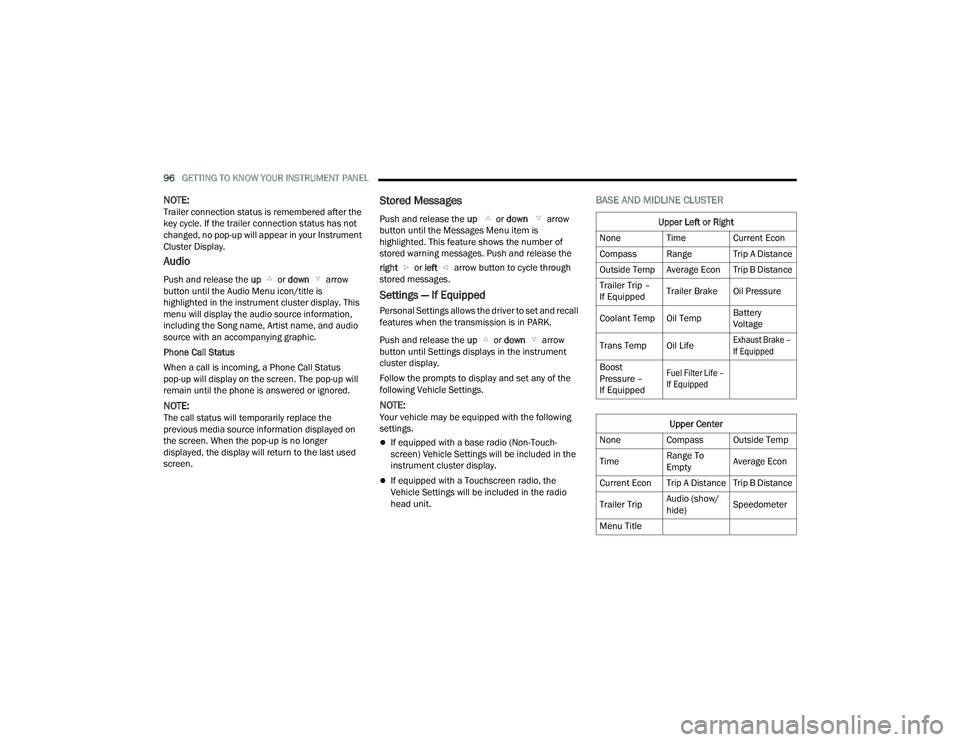
BASE AND MIDLINE CLUSTER
Upper Left or Right
None Time Current Econ
Compass Range Trip A Distance
Outside Temp Average Econ Trip B Distance
Trailer Trip â
If Equipped Trailer Brake Oil Pressure
Coolant Temp Oil Temp Battery
Voltage
Trans Temp Oil Life
Exhaust Brake â
If Equipped
Boost
Pressure â
If Equipped
Fuel Filter Life â
If Equipped
Upper Center
None Compass Outside Temp
Time Range To
EmptyAverage Econ
Current Econ Trip A Distance Trip B Distance
Trailer Trip Audio (show/
hide)Speedometer
Menu Title
23_DPF_OM_EN_USC_t.book Page 96
Page 99 of 444
GETTING TO KNOW YOUR INSTRUMENT PANEL97
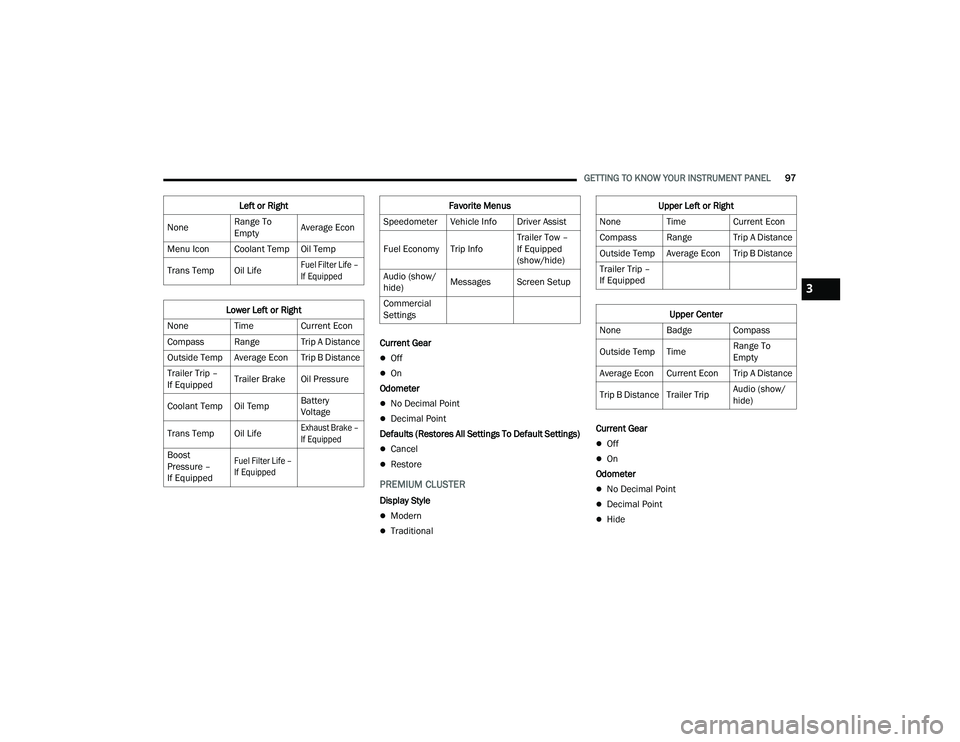
Current Gear
ï¬Off
ï¬On
Odometer
ï¬No Decimal Point
ï¬Decimal Point
Defaults (Restores All Settings To Default Settings)
ï¬Cancel
ï¬Restore
PREMIUM CLUSTER
Display Style
ï¬Modern
ï¬Traditional Current Gear
ï¬Off
ï¬On
Odometer
ï¬No Decimal Point
ï¬Decimal Point
ï¬Hide
Left or Right
None Range To
EmptyAverage Econ
Menu Icon Coolant Temp Oil Temp
Trans Temp Oil Life
Fuel Filter Life â
If Equipped
Lower Left or Right
None Time Current Econ
Compass Range Trip A Distance
Outside Temp Average Econ Trip B Distance
Trailer Trip â
If Equipped Trailer Brake Oil Pressure
Coolant Temp Oil Temp Battery
Voltage
Trans Temp Oil Life
Exhaust Brake â
If Equipped
Boost
Pressure â
If Equipped
Fuel Filter Life â
If Equipped
Favorite Menus
Speedometer Vehicle Info Driver Assist
Fuel Economy Trip Info Trailer Tow â
If Equipped
(show/hide)
Audio (show/
hide) Messages Screen Setup
Commercial
SettingsUpper Left or Right
None Time Current Econ
Compass Range Trip A Distance
Outside Temp Average Econ Trip B Distance
Trailer Trip â
If Equipped
Upper Center
None Badge Compass
Outside Temp Time Range To
Empty
Average Econ Current Econ Trip A Distance
Trip B Distance Trailer Trip Audio (show/
hide)
3
23_DPF_OM_EN_USC_t.book Page 97
Page 100 of 444
98GETTING TO KNOW YOUR INSTRUMENT PANEL
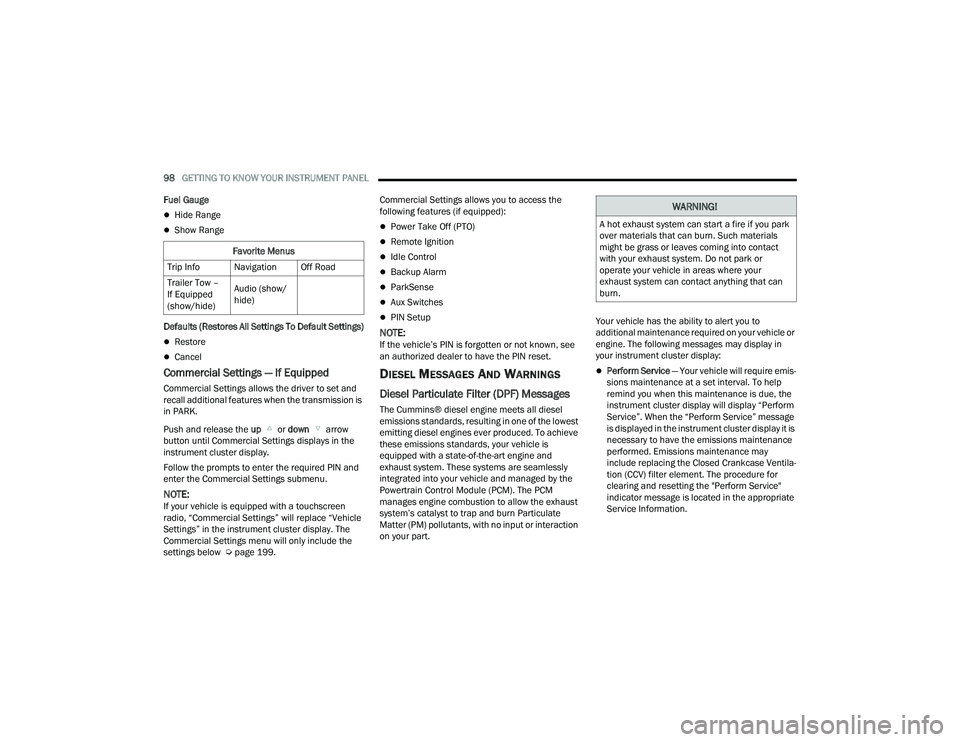
Fuel Gauge
ï¬Hide Range
ï¬Show Range
Defaults (Restores All Settings To Default Settings)
ï¬Restore
ï¬Cancel
Commercial Settings â If Equipped
Commercial Settings allows the driver to set and
recall additional features when the transmission is
in PARK.
Push and release the up or down arrow
button until Commercial Settings displays in the
instrument cluster display.
Follow the prompts to enter the required PIN and
enter the Commercial Settings submenu.
NOTE:If your vehicle is equipped with a touchscreen
radio, âCommercial Settingsâ will replace âVehicle
Settingsâ in the instrument cluster display. The
Commercial Settings menu will only include the
settings below à page 199. Commercial Settings allows you to access the
following features (if equipped):
ï¬Power Take Off (PTO)
ï¬Remote Ignition
ï¬Idle Control
ï¬Backup Alarm
ï¬ParkSense
ï¬Aux Switches
ï¬PIN Setup
NOTE:If the vehicleâs PIN is forgotten or not known, see
an authorized dealer to have the PIN reset.
DIESEL MESSAGES AND WARNINGS
Diesel Particulate Filter (DPF) Messages
The Cummins® diesel engine meets all diesel
emissions standards, resulting in one of the lowest
emitting diesel engines ever produced. To achieve
these emissions standards, your vehicle is
equipped with a state-of-the-art engine and
exhaust system. These systems are seamlessly
integrated into your vehicle and managed by the
Powertrain Control Module (PCM). The PCM
manages engine combustion to allow the exhaust
systemâs catalyst to trap and burn Particulate
Matter (PM) pollutants, with no input or interaction
on your part.
Your vehicle has the ability to alert you to
additional maintenance required on your vehicle or
engine. The following messages may display in
your instrument cluster display:
ï¬Perform Service
â Your vehicle will require emis -
sions maintenance at a set interval. To help
remind you when this maintenance is due, the
instrument cluster display will display âPerform
Serviceâ. When the âPerform Serviceâ message
is displayed in the instrument cluster display it is
necessary to have the emissions maintenance
performed. Emissions maintenance may
include replacing the Closed Crankcase Ventila -
tion (CCV) filter element. The procedure for
clearing and resetting the "Perform Service"
indicator message is located in the appropriate
Service Information.
Favorite Menus
Trip Info Navigation Off Road
Trailer Tow â
If Equipped
(show/hide) Audio (show/
hide)
WARNING!
A hot exhaust system can start a fire if you park
over materials that can burn. Such materials
might be grass or leaves coming into contact
with your exhaust system. Do not park or
operate your vehicle in areas where your
exhaust system can contact anything that can
burn.
23_DPF_OM_EN_USC_t.book Page 98
Page 104 of 444
102GETTING TO KNOW YOUR INSTRUMENT PANEL
NOTE:
ï¬The charging system is independent from load
reduction. The charging system performs a diag-
nostic on the charging system continuously.
ï¬If the Battery Charge Warning Light is on it may
indicate a problem with the charging system
à page 104.
The electrical loads that may be switched off
(if equipped), and vehicle functions which can be
affected by load reduction:
ï¬Heated Seats/Vented Seats/Heated Wheel
ï¬Rear Defroster And Heated Mirrors
ï¬HVAC System
ï¬115 Volt AC Power Inverter System
ï¬Audio and Telematics System
Loss of the battery charge may indicate one or
more of the following conditions:
ï¬The charging system cannot deliver enough
electrical power to the vehicle system because
the electrical loads are larger than the capability
of charging system. The charging system is still
functioning properly.
ï¬Turning on all possible vehicle electrical loads
(e.g. HVAC to max settings, exterior and interior
lights, overloaded power outlets +12 Volts, 115
Volt AC, USB ports) during certain driving condi -
tions (city driving, towing, frequent stopping).
ï¬Installing options like additional lights, upfitter
electrical accessories, audio systems, alarms
and similar devices.
ï¬Unusual driving cycles (short trips separated by
long parking periods).
ï¬The vehicle was parked for an extended period
of time (weeks, months).
ï¬The battery was recently replaced and was not
charged completely.
ï¬The battery was discharged by an electrical load
left on when the vehicle was parked.
ï¬The battery was used for an extended period
with the engine not running to supply radio,
lights, chargers, +12 Volt portable appliances
like vacuum cleaners, game consoles and
similar devices.
What to do when an electrical load reduction
action message is present (âBattery Saver Onâ or
âBattery Saver Modeâ)
During a trip:
ï¬Reduce power to unnecessary loads if possible:
ï¡Turn off redundant lights (interior or exte -
rior).
ï¡Check what may be plugged in to power
outlets +12 Volts, 115 Volt AC, USB ports.
ï¡Check HVAC settings (blower, temperature).
ï¡Check the audio settings (volume). After a trip:
ï¬Check if any aftermarket equipment was
installed (additional lights, upfitter electrical
accessories, audio systems, alarms) and review
specifications if any (load and Ignition Off Draw
currents).
ï¬Evaluate the latest driving cycles (distance,
driving time and parking time).
ï¬The vehicle should have service performed if
the message is still present during consecutive
trips and the evaluation of the vehicle and
driving pattern did not help to identify the cause.
WARNING LIGHTS AND MESSAGES
The warning/indicator lights will illuminate in the
instrument panel together with a dedicated
message and/or acoustic signal when applicable.
These indications are indicative and precautionary
and as such must not be considered as exhaustive.
Always refer to the information in this chapter in
the event of a failure indication. All active telltales
will display first if applicable. The system check
menu may appear different based upon
equipment options and current vehicle status.
Some telltales are optional and may not appear.
23_DPF_OM_EN_USC_t.book Page 102
Page 164 of 444

162STARTING AND OPERATING
NOTE:ParkSense will reduce the volume of the radio, if
on, when the system is sounding an audio tone.
ParkSense Camera Activation
If the ParkSense system detects an obstacle, a
camera image will display in the radio. The camera
will continue to display as long as the ParkSense
system continues to detect an object. This can be
turned on or off in the Uconnect system
Ãpage 199.
Front Park Assist Audible Alerts
ParkSense will turn off the Front Park Assist
audible alert (chime) after approximately three
seconds when an obstacle has been detected, the
vehicle is stationary, and brake pedal is applied.
Adjustable Chime Volume Settings
The Front and Rear chime volume settings are
programmable through the Uconnect system
à page 199.
ENABLING AND DISABLING PARKSENSE
Front ParkSense can be enabled and
disabled with the Front ParkSense
switch.
Rear ParkSense can be enabled and disabled with
the Rear ParkSense switch.
When the gear selector is moved to REVERSE and
the Front or Rear system is disabled, the instrument cluster display will show a vehicle
graphic with an âOffâ message overlay over the
system that is off (Front or Rear system). This
vehicle graphic will be displayed for as long as the
vehicle is in REVERSE.
The Front or Rear ParkSense switch LED will be on
when Front or Rear ParkSense is disabled or
requires service. The Front or Rear ParkSense
switch LED will be off when the Front or Rear
system is enabled. If the Front or Rear ParkSense
switch is pushed, and the system requires service,
the Front or Rear ParkSense switch LED will blink
momentarily, and then the LED will be on.
SERVICE THE PARKSENSE PARK ASSIST
S
YSTEM
During vehicle start-up, when the Front/Rear
ParkSense System has detected a faulted
condition, the instrument cluster display will show
the "Front/Rear ParkSense Unavailable Service
Required" or the "Front/Rear ParkSense
Unavailable Wipe Sensors" message.
When the gear selector is moved into REVERSE, a
vehicle graphic will show in the instrument cluster
display, along with the display overlay âWipe
Sensors.â If the system needs service, the display
overlay will read âService.â Under this condition,
ParkSense will not operate. If "Front/Rear ParkSense Unavailable Wipe
Sensors" appears in the instrument cluster display
make sure the outer surface and the underside of
the rear fascia/bumper is clean and clear of snow,
ice, mud, dirt or other obstruction, and then cycle
the ignition. If the message continues to appear,
see an authorized dealer.
If "Front/Rear ParkSense Unavailable Service
Required" appears in the instrument cluster
display, see an authorized dealer.
CLEANING THE PARKSENSE SYSTEM
Clean the ParkSense sensors with water, car wash
soap and a soft cloth. Do not use rough or hard
cloths. Do not scratch or poke the sensors.
Otherwise, you could damage the sensors.
PARKSENSE SYSTEM USAGE
P
RECAUTIONS
NOTE:
ï¬Ensure that the front and rear bumpers are free
of snow, ice, mud, dirt and debris to keep the
ParkSense system operating properly.
ï¬Jackhammers, large trucks, and other vibra -
tions could affect the performance of
ParkSense.
23_DPF_OM_EN_USC_t.book Page 162
Page 206 of 444
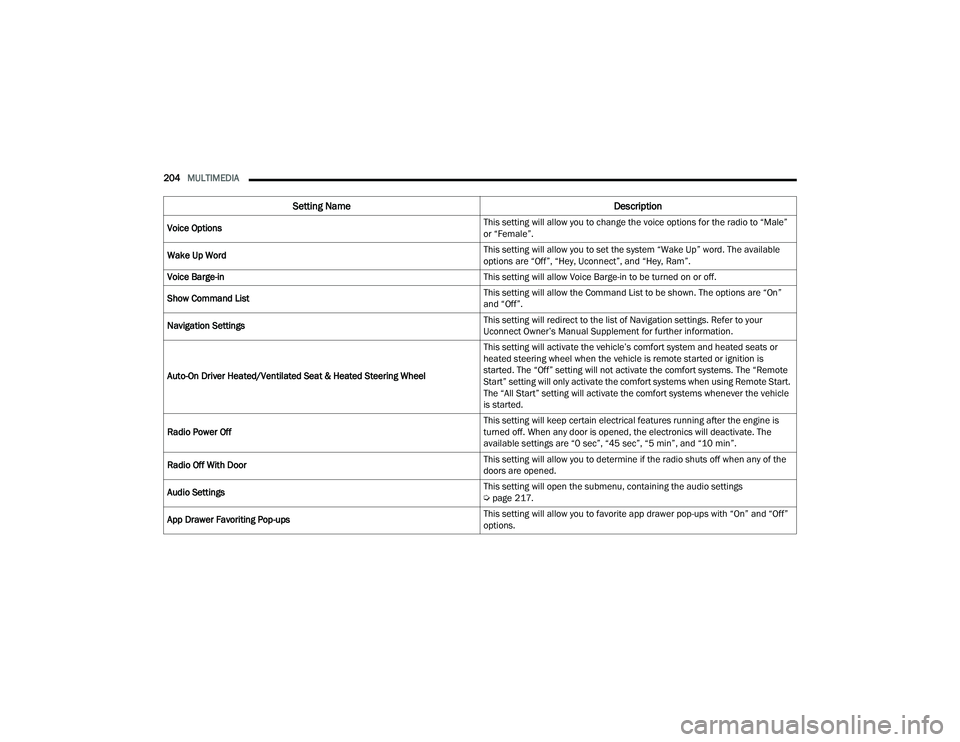
204MULTIMEDIA
Voice Options This setting will allow you to change the voice options for the radio to âMaleâ
or âFemaleâ.
Wake Up Word This setting will allow you to set the system âWake Upâ word. The available
options are âOffâ, âHey, Uconnectâ, and âHey, Ramâ.
Voice Barge-in This setting will allow Voice Barge-in to be turned on or off.
Show Command List This setting will allow the Command List to be shown. The options are âOnâ
and âOffâ.
Navigation Settings This setting will redirect to the list of Navigation settings. Refer to your
Uconnect Ownerâs Manual Supplement for further information.
Auto-On Driver Heated/Ventilated Seat & Heated Steering Wheel This setting will activate the vehicleâs comfort system and heated seats or
heated steering wheel when the vehicle is remote started or ignition is
started. The âOffâ setting will not activate the comfort systems. The âRemote
Startâ setting will only activate the comfort systems when using Remote Start.
The âAll Startâ setting will activate the comfort systems whenever the vehicle
is started.
Radio Power Off This setting will keep certain electrical features running after the engine is
turned off. When any door is opened, the electronics will deactivate. The
available settings are â0 secâ, â45 secâ, â5 minâ, and â10 minâ.
Radio Off With Door This setting will allow you to determine if the radio shuts off when any of the
doors are opened.
Audio Settings This setting will open the submenu, containing the audio settings
Ã
page 217.
App Drawer Favoriting Pop-ups This setting will allow you to favorite app drawer pop-ups with âOnâ and âOffâ
options.
Setting Name
Description
23_DPF_OM_EN_USC_t.book Page 204