buttons RAM CHASSIS CAB 2023 Owners Manual
[x] Cancel search | Manufacturer: RAM, Model Year: 2023, Model line: CHASSIS CAB, Model: RAM CHASSIS CAB 2023Pages: 444, PDF Size: 20.51 MB
Page 17 of 444
15
GETTING TO KNOW YOUR VEHICLE
KEYS
KEY FOB
Your vehicle is equipped with a key fob which
supports Remote Keyless Entry (RKE) (if equipped)
and Keyless Enter ‘n Go™ (if equipped).
If the vehicle is equipped with remote power door
locks, the key fob allows you to lock or unlock all
doors, as well as activate the Panic Alarm, from
distances up to approximately 66 ft (20 m). The
key fob does not need to be pointed at the vehicle
to activate the system.
NOTE:
The key fob’s wireless signal may be blocked if
the key fob is located next to a mobile phone,
laptop, or other electronic device. This may
result in poor performance.
The key fob should not be placed next to the
wireless charging pad (if equipped).
In the ON/RUN position, all key fob buttons will
work until the vehicle reaches 2 mph (4 km/h).
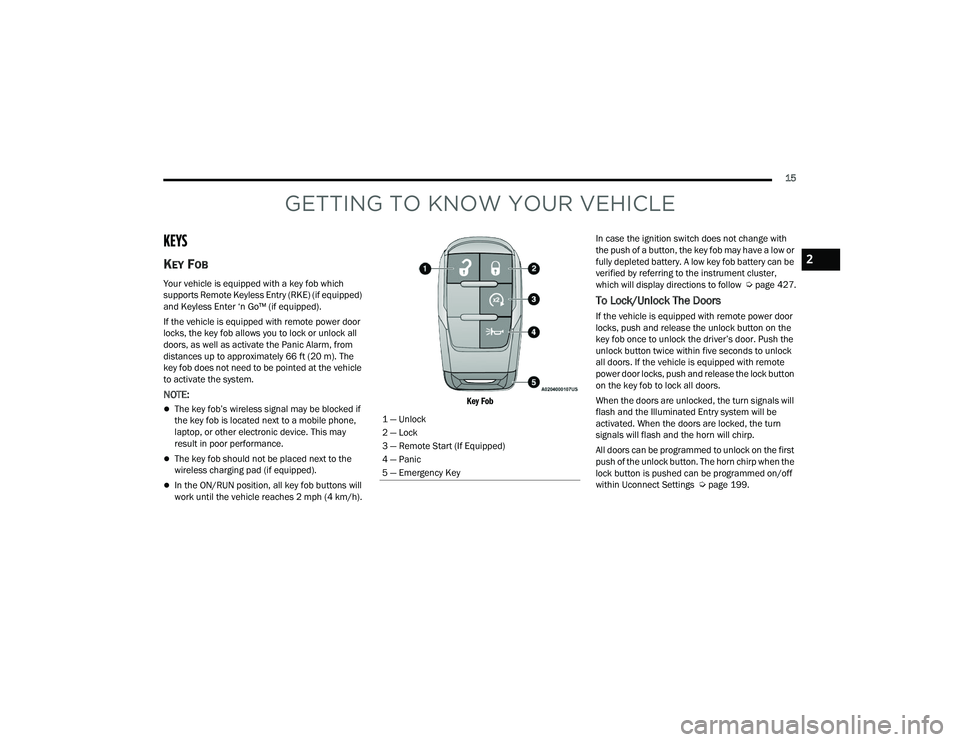
Key Fob
In case the ignition switch does not change with
the push of a button, the key fob may have a low or
fully depleted battery. A low key fob battery can be
verified by referring to the instrument cluster,
which will display directions to follow
Úpage 427.
To Lock/Unlock The Doors
If the vehicle is equipped with remote power door
locks, push and release the unlock button on the
key fob once to unlock the driver’s door. Push the
unlock button twice within five seconds to unlock
all doors. If the vehicle is equipped with remote
power door locks, push and release the lock button
on the key fob to lock all doors.
When the doors are unlocked, the turn signals will
flash and the Illuminated Entry system will be
activated. When the doors are locked, the turn
signals will flash and the horn will chirp.
All doors can be programmed to unlock on the first
push of the unlock button. The horn chirp when the
lock button is pushed can be programmed on/off
within Uconnect Settings Ú page 199.
1 — Unlock
2 — Lock
3 — Remote Start (If Equipped)
4 — Panic
5 — Emergency Key
2
23_DPF_OM_EN_USC_t.book Page 15
Page 27 of 444
GETTING TO KNOW YOUR VEHICLE25
The driver’s door will unlock automatically if the
key fob is detected inside the vehicle when the
door lock button on the front door panel is used to
lock the door. This will occur for two attempts.
Upon the third attempt, the doors will lock even if
the key fob is inside.
NOTE:If the key fob is located next to a mobile phone,
laptop, or other electronic device, the wireless
signal may get blocked, and the driver’s door may
not unlock automatically.
If the door lock switch is pushed while the ignition
is in ACC or ON/RUN and the driver's door is open,
the doors will not lock.
KEYLESS ENTER ‘N GO™ — PASSIVE
E
NTRY (IF EQUIPPED)
The Passive Entry system is an enhancement to
the vehicle’s Remote Keyless Entry system and a
feature of Keyless Enter ‘n Go™. This feature
allows you to lock and unlock the vehicle’s door(s)
without having to push the key fob lock or unlock
buttons.
NOTE:
Passive Entry may be programmed on/off within
Uconnect Settings Ú page 199.
If wearing gloves, if it has been raining/snowing,
or if there is salt/dirt covering the Passive Entry
door handle, the unlock sensitivity can be
affected, resulting in a slower response time.
The doors may unlock when water is sprayed on
the Passive Entry door handles if the key fob is
located outside of the vehicle within 5 ft (1.5 m)
of the handle.
If the vehicle is unlocked by Passive Entry and
no door is opened within 60 seconds, the
vehicle will relock and if equipped will arm the
security alarm.
The Vehicle Security system can be armed/
disarmed by pushing the Passive Entry key fob
lock/unlock buttons (if equipped).
The key fob may not be detected by the vehicle
Passive Entry system if it is located next to a
mobile phone, laptop or other electronic device;
these devices may block the key fob's wireless
signal and prevent the Passive Entry door
handle from locking/unlocking the vehicle. To Unlock From The Driver or Passenger Side:
With a valid Passive Entry key fob within 5 ft
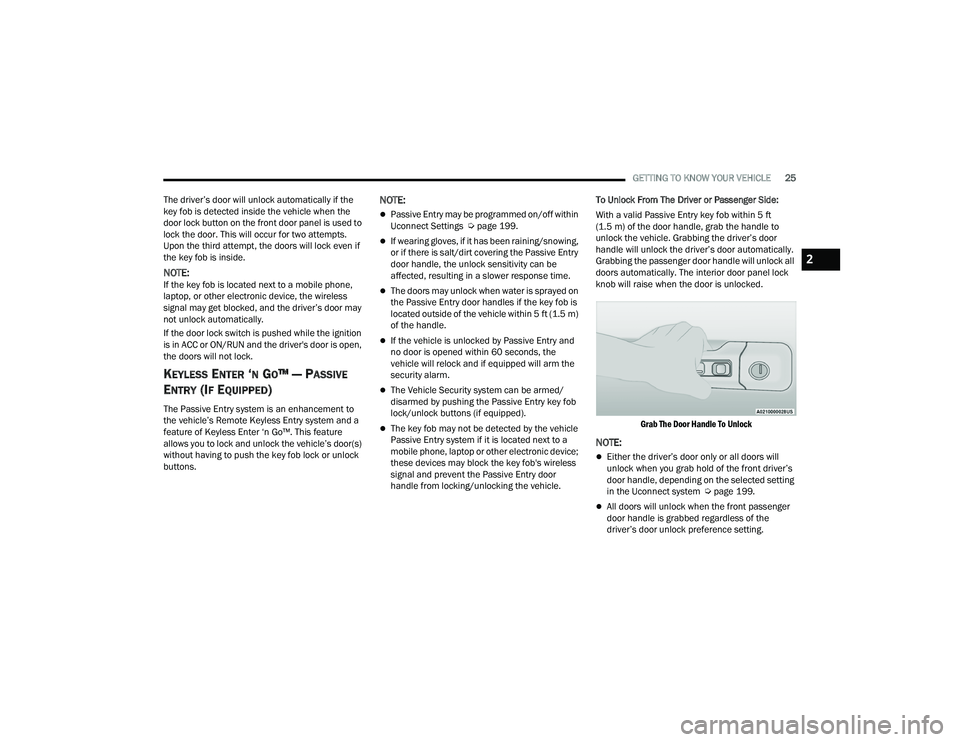
(1.5 m) of the door handle, grab the handle to
unlock the vehicle. Grabbing the driver’s door
handle will unlock the driver’s door automatically.
Grabbing the passenger door handle will unlock all
doors automatically. The interior door panel lock
knob will raise when the door is unlocked.
Grab The Door Handle To Unlock
NOTE:
Either the driver’s door only or all doors will
unlock when you grab hold of the front driver’s
door handle, depending on the selected setting
in the Uconnect system Ú page 199.
All doors will unlock when the front passenger
door handle is grabbed regardless of the
driver’s door unlock preference setting.
2
23_DPF_OM_EN_USC_t.book Page 25
Page 30 of 444
28GETTING TO KNOW YOUR VEHICLE
HEATED STEERING WHEEL —
I
F EQUIPPED
The steering wheel contains a heating
element that helps warm your hands in
cold weather. The heated steering wheel
has only one temperature setting. Once
the heated steering wheel has been turned on, it
will stay on until the operator turns it off. The
heated steering wheel may not turn on when it is
already warm.
The heated steering wheel button is located on the
center of the instrument panel below the radio
screen, or within the climate or comfort screen of
the touchscreen.
NOTE:If the vehicle is equipped with a 12-inch radio,
there will only be control buttons through the
touchscreen.
Press the heated steering wheel button once to
turn the heating element on.
Press the heated steering wheel button a
second time to turn the heating element off.
NOTE:The engine must be running for the heated
steering wheel to operate.
For information on use with the Remote Start
system, see Ú page 21.
UCONNECT VOICE RECOGNITION —
IF EQUIPPED
INTRODUCING VOICE RECOGNITION
Start using Uconnect Voice Recognition with these
helpful quick tips. It provides the key Voice
Commands and tips you need to know to control
your vehicle’s Voice Recognition (VR) system.
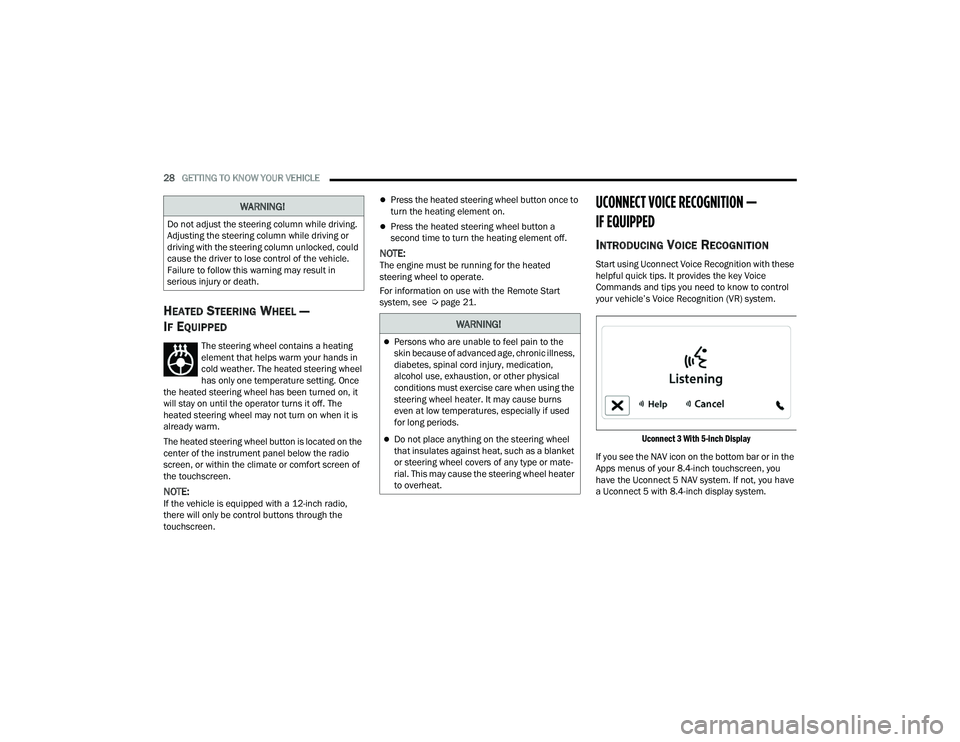
Uconnect 3 With 5-inch Display
If you see the NAV icon on the bottom bar or in the
Apps menus of your 8.4-inch touchscreen, you
have the Uconnect 5 NAV system. If not, you have
a Uconnect 5 with 8.4-inch display system.
WARNING!
Do not adjust the steering column while driving.
Adjusting the steering column while driving or
driving with the steering column unlocked, could
cause the driver to lose control of the vehicle.
Failure to follow this warning may result in
serious injury or death.
WARNING!
Persons who are unable to feel pain to the
skin because of advanced age, chronic illness,
diabetes, spinal cord injury, medication,
alcohol use, exhaustion, or other physical
conditions must exercise care when using the
steering wheel heater. It may cause burns
even at low temperatures, especially if used
for long periods.
Do not place anything on the steering wheel
that insulates against heat, such as a blanket
or steering wheel covers of any type or mate -
rial. This may cause the steering wheel heater
to overheat.
23_DPF_OM_EN_USC_t.book Page 28
Page 31 of 444
GETTING TO KNOW YOUR VEHICLE29
BASIC VOICE COMMANDS
The following basic Voice Commands can be given
at any point while using your Uconnect system.
Push the VR button or for the Uconnect 5/
5 NAV, say the vehicle’s Wake Up word, “Hey
Uconnect”. After the beep, say:
“Cancel ” to stop a current voice session
“Help ” to hear a list of suggested Voice
Commands
“ Repeat ” to listen to the system prompts again
Notice the visual cues that inform you of your voice
recognition system’s status. Cues appear on the
touchscreen.
NOTE:On Uconnect 5 systems, the factory default Wake
Up word is set to “Hey Uconnect” and can be repro -
grammed through the Uconnect Settings.
GET STARTED
All you need to control your Uconnect system with
your voice are the buttons on your steering wheel.
Helpful hints for using Voice Recognition:
Reduce background noise. Wind and passenger
conversations are examples of noise that may
impact recognition.
Speak clearly at a normal pace and volume
while facing straight ahead.
Each time you give a Voice Command, first push
the VR button, wait until after the beep, then say
your Voice Command. You can also say the
vehicle “Wake Up” word and state your
command. Some examples of “Wake up” words
include “Hey Uconnect” or “Hey Ram”.
A passenger can press the VR button shortcut
on the radio status bar to also issue a
command.
You can interrupt the help message or system
prompts by pushing the VR button and saying a
Voice Command from the current category.
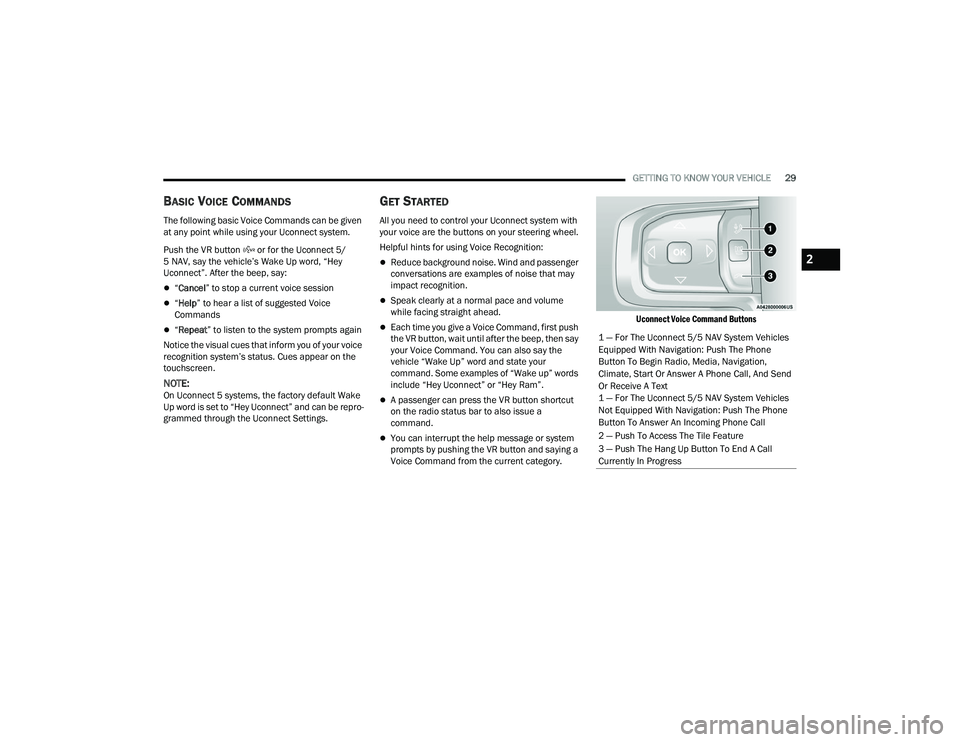
Uconnect Voice Command Buttons
1 — For The Uconnect 5/5 NAV System Vehicles
Equipped With Navigation: Push The Phone
Button To Begin Radio, Media, Navigation,
Climate, Start Or Answer A Phone Call, And Send
Or Receive A Text
1 — For The Uconnect 5/5 NAV System Vehicles
Not Equipped With Navigation: Push The Phone
Button To Answer An Incoming Phone Call
2 — Push To Access The Tile Feature
3 — Push The Hang Up Button To End A Call
Currently In Progress
2
23_DPF_OM_EN_USC_t.book Page 29
Page 32 of 444
30GETTING TO KNOW YOUR VEHICLE
ADDITIONAL INFORMATION
© 2022 FCA US LLC. All rights reserved. Mopar and
Uconnect are registered trademarks and Mopar
Owner Connect is a trademark of FCA US LLC.
SiriusXM® and all related marks and logos are
trademarks of SiriusXM® Radio Inc.
Uconnect System Support:
US residents visit www.DriveUconnect.com or
call: 1-877-855-8400 (24 hours a day 7 days a
week)
Canadian residents visit www.DriveUcon -
nect.ca or call: 1-800-465-2001 (English) or
1-800-387-9983 (French)
SiriusXM Guardian™ services support:
US residents visit www.driveuconnect.com/
sirius-xm-guardian or call: 1-844-796-4827
Canadian residents visit https://www.driveu -
connect.ca/en/sirius-xm-guardian or call:
1-877-324-9091
DRIVER MEMORY SETTINGS — IF EQUIPPED
This feature allows the driver to save up to two
different memory profiles for easy recall through a
memory switch. Each memory profile saves
desired position settings for the following features:
Driver seat position
Easy Entry/Exit seat operation (if equipped)
Side mirrors
Adjustable pedals (if equipped)
A set of desired radio station presets
NOTE:
If equipped with power convex mirrors, these
mirror positions will not set as part of a memory
profile.
Your vehicle is equipped with two key fobs, each
can be linked to either memory position 1 or 2.
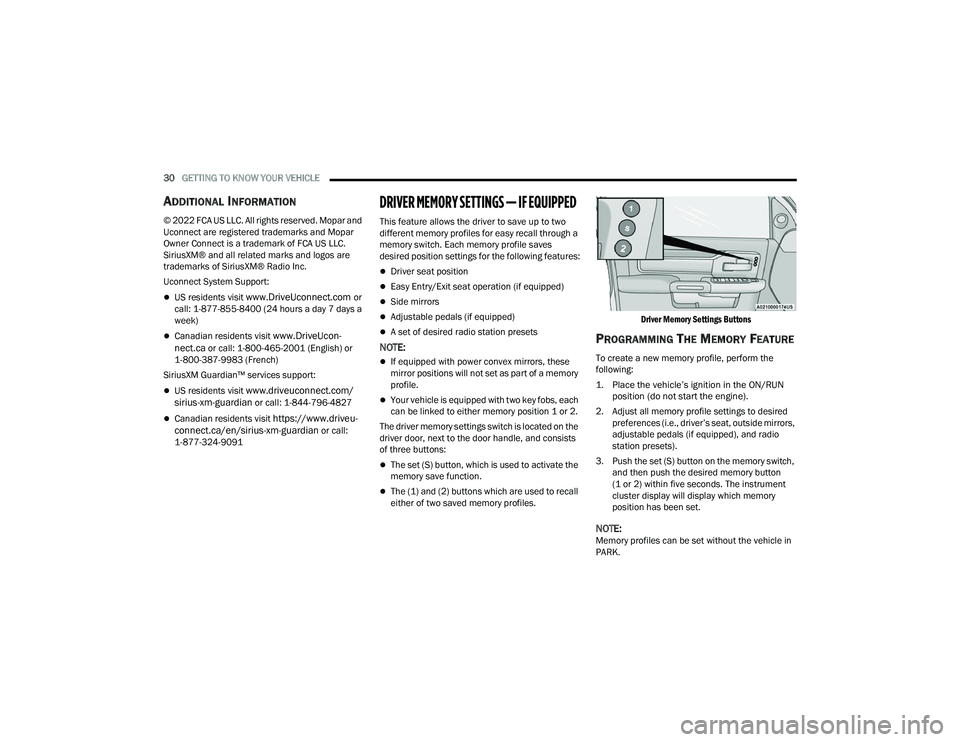
The driver memory settings switch is located on the
driver door, next to the door handle, and consists
of three buttons:
The set (S) button, which is used to activate the
memory save function.
The (1) and (2) buttons which are used to recall
either of two saved memory profiles.
Driver Memory Settings Buttons
PROGRAMMING THE MEMORY FEATURE
To create a new memory profile, perform the
following:
1. Place the vehicle’s ignition in the ON/RUN
position (do not start the engine).
2. Adjust all memory profile settings to desired preferences (i.e., driver’s seat, outside mirrors,
adjustable pedals (if equipped), and radio
station presets).
3. Push the set (S) button on the memory switch, and then push the desired memory button
(1 or 2) within five seconds. The instrument
cluster display will display which memory
position has been set.
NOTE:Memory profiles can be set without the vehicle in
PARK.
23_DPF_OM_EN_USC_t.book Page 30
Page 33 of 444
GETTING TO KNOW YOUR VEHICLE31
LINKING AND UNLINKING THE REMOTE
K
EYLESS ENTRY KEY FOB TO MEMORY
Your key fob can be programmed to recall one of
two saved memory profiles.
NOTE:Before programming your key fob you must select
the “Personal Settings Linked to Key Fob” feature
through the Uconnect Settings Ú page 199.
To program your key fob, perform the following:
1. Place the vehicle’s ignition in the OFF position.
2. Select a desired memory profile 1 or 2.
3. Once the profile has been recalled, push and release the set (S) button on the memory
switch.
4. Push and release button (1) or (2) accordingly. “Memory Profile Set” (1 or 2) will display in the
instrument cluster.
5. Push and release the lock button on the key fob within 10 seconds.
NOTE:Your key fob can be unlinked from your memory
settings by pushing the set (S) button, and within
10 seconds, pushing the unlock button on the key
fob.
MEMORY POSITION RECALL
NOTE:The vehicle speed must be lower than 5 mph
(8 km/h) to recall memory positions. If a recall is
attempted when the vehicle speed is greater than
5 mph (8 km/h), a message will be displayed in the
instrument cluster display.
To recall the memory settings for driver one or two,
push the desired memory button number (1 or 2)
or the unlock button on the key fob linked to the
desired memory position.
A recall can be canceled by pushing any of the
memory buttons during a recall (S, 1, or 2). When
a recall is canceled, the driver's seat and the
adjustable pedals (if equipped) stop moving. A
delay of one second will occur before another
recall can be selected.
SEATS
Seats are a part of the Occupant Restraint system
of the vehicle.
WARNING!
It is dangerous to ride in a cargo area, inside
or outside of a vehicle. In a collision, people
riding in these areas are more likely to be seri -
ously injured or killed.
Do not allow people to ride in any area of your
vehicle that is not equipped with seats and
seat belts. In a collision, people riding in these
areas are more likely to be seriously injured or
killed.
Be sure everyone in your vehicle is in a seat
and using a seat belt properly.
2
23_DPF_OM_EN_USC_t.book Page 31
Page 37 of 444
GETTING TO KNOW YOUR VEHICLE35
Front Heated Seats
The heated seats control buttons are
located on the center instrument panel
below the touchscreen, and are also
located within the Climate or Comfort
screen of the touchscreen.
NOTE:If the vehicle is equipped with a 12-inch radio,
there will only be control buttons through the
touchscreen.
Press the heated seat button once to turn the HI
setting on.
Press the heated seat button a second time to
turn the MED setting on.
Press the heated seat button a third time to turn
the LO setting on.
Press the heated seat button a fourth time to
turn the heating elements off.
NOTE:
The engine must be running for the heated
seats to operate.
The level of heat selected will stay on until the
operator changes it.
For information on use with the Remote Start
system, see Ú page 21.
Rear Heated Seats
On some models, the two outboard rear
seats are equipped with heated seats.
The heated seat switches for these seats
are located on the rear of the center
console.
There are two heated seat switches that allow the
rear passengers to operate the seats
independently. You can choose from HI, MED, LO,
or OFF heat settings. Amber indicator lights in each
switch indicate the level of heat in use.
Push the heated seat button once to turn the HI
setting on.
Push the heated seat button a second time to
turn the MED setting on.
Push the heated seat button a third time to turn
the LO setting on.
Push the heated seat button a fourth time to
turn the heating elements off.
NOTE:
The level of heat selected will stay on until the
operator changes it.
Once a heat setting is selected, heat will be felt
within two to five minutes.
The engine must be running for the heated
seats to operate.
VENTILATED SEATS — IF EQUIPPED
Front Ventilated Seats
Located in the seat cushion are small
fans that draw the air from the passenger
compartment and move air through fine
perforations in the seat cover to help
keep the driver and front passenger cooler in
higher ambient temperatures. The fans operate at
three speeds: HI, MED and LO.
The front ventilated seats control buttons are
located on the center instrument panel below the
touchscreen, and are also located within the
Climate or Comfort screen of the touchscreen.
NOTE:If the vehicle is equipped with a 12-inch radio,
there will only be control buttons through the
touchscreen.
Press the ventilated seat button once to choose
HI.
Press the ventilated seat button a second time
to choose MED.
Press the ventilated seat button a third time to
choose LO.
Press the ventilated seat button a fourth time to
turn the ventilation off.
2
23_DPF_OM_EN_USC_t.book Page 35
Page 39 of 444
GETTING TO KNOW YOUR VEHICLE37
Front Head Restraint Removal
Two-Way Head Restraints — If Equipped
To remove the head restraint, push the adjustment
button and the release button while pulling upward
on the whole assembly. To reinstall the head
restraint, put the head restraint posts into the
holes and adjust it to the appropriate height.
Four-Way Head Restraints — If Equipped
The head restraints should only be removed by
qualified technicians, for service purposes only. If
either of the head restraints require removal, see
an authorized dealer.
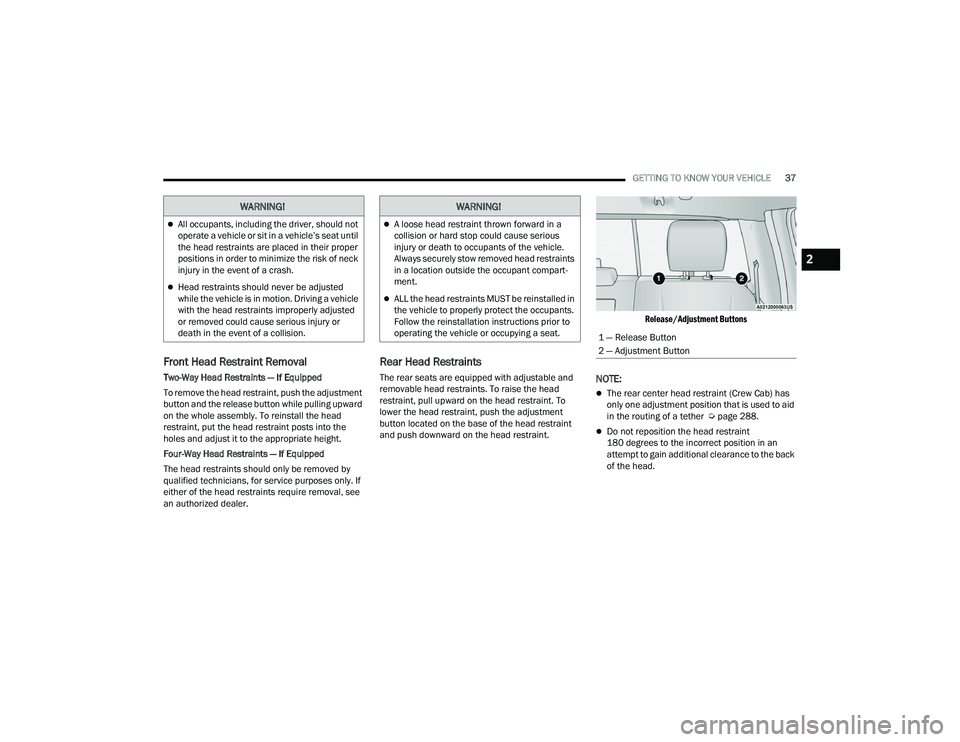
Rear Head Restraints
The rear seats are equipped with adjustable and
removable head restraints. To raise the head
restraint, pull upward on the head restraint. To
lower the head restraint, push the adjustment
button located on the base of the head restraint
and push downward on the head restraint.
Release/Adjustment Buttons
NOTE:
The rear center head restraint (Crew Cab) has
only one adjustment position that is used to aid
in the routing of a tether Ú
page 288.
Do not reposition the head restraint
180 degrees to the incorrect position in an
attempt to gain additional clearance to the back
of the head.
WARNING!
All occupants, including the driver, should not
operate a vehicle or sit in a vehicle’s seat until
the head restraints are placed in their proper
positions in order to minimize the risk of neck
injury in the event of a crash.
Head restraints should never be adjusted
while the vehicle is in motion. Driving a vehicle
with the head restraints improperly adjusted
or removed could cause serious injury or
death in the event of a collision.
WARNING!
A loose head restraint thrown forward in a
collision or hard stop could cause serious
injury or death to occupants of the vehicle.
Always securely stow removed head restraints
in a location outside the occupant compart -
ment.
ALL the head restraints MUST be reinstalled in
the vehicle to properly protect the occupants.
Follow the reinstallation instructions prior to
operating the vehicle or occupying a seat.
1 — Release Button
2 — Adjustment Button
2
23_DPF_OM_EN_USC_t.book Page 37
Page 42 of 444
40GETTING TO KNOW YOUR VEHICLE
When Digital Rearview Mode is not in use, push the
on/off control lever forward toward the windshield
to return the mirror to the regular Automatic
Dimming Mirror.
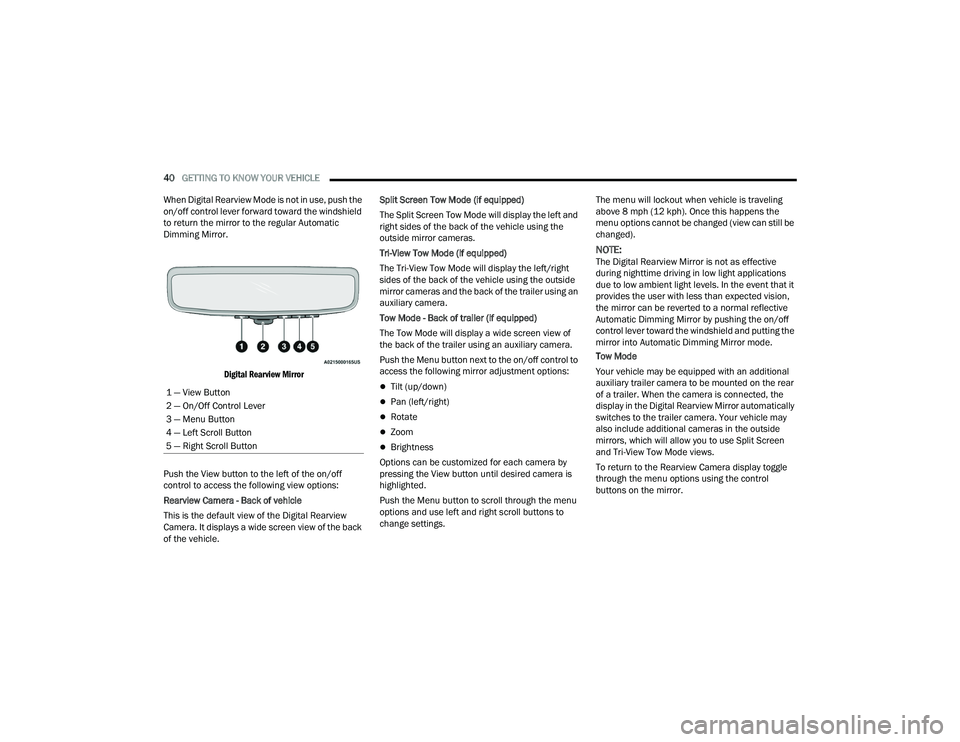
Digital Rearview Mirror
Push the View button to the left of the on/off
control to access the following view options:
Rearview Camera - Back of vehicle
This is the default view of the Digital Rearview
Camera. It displays a wide screen view of the back
of the vehicle. Split Screen Tow Mode (if equipped)
The Split Screen Tow Mode will display the left and
right sides of the back of the vehicle using the
outside mirror cameras.
Tri-View Tow Mode (if equipped)
The Tri-View Tow Mode will display the left/right
sides of the back of the vehicle using the outside
mirror cameras and the back of the trailer using an
auxiliary camera.
Tow Mode - Back of trailer (if equipped)
The Tow Mode will display a wide screen view of
the back of the trailer using an auxiliary camera.
Push the Menu button next to the on/off control to
access the following mirror adjustment options:
Tilt (up/down)
Pan (left/right)
Rotate
Zoom
Brightness
Options can be customized for each camera by
pressing the View button until desired camera is
highlighted.
Push the Menu button to scroll through the menu
options and use left and right scroll buttons to
change settings. The menu will lockout when vehicle is traveling
above 8 mph (12 kph). Once this happens the
menu options cannot be changed (view can still be
changed).
NOTE:The Digital Rearview Mirror is not as effective
during nighttime driving in low light applications
due to low ambient light levels. In the event that it
provides the user with less than expected vision,
the mirror can be reverted to a normal reflective
Automatic Dimming Mirror by pushing the on/off
control lever toward the windshield and putting the
mirror into Automatic Dimming Mirror mode.
Tow Mode
Your vehicle may be equipped with an additional
auxiliary trailer camera to be mounted on the rear
of a trailer. When the camera is connected, the
display in the Digital Rearview Mirror automatically
switches to the trailer camera. Your vehicle may
also include additional cameras in the outside
mirrors, which will allow you to use Split Screen
and Tri-View Tow Mode views.
To return to the Rearview Camera display toggle
through the menu options using the control
buttons on the mirror.
1 — View Button
2 — On/Off Control Lever
3 — Menu Button
4 — Left Scroll Button
5 — Right Scroll Button
23_DPF_OM_EN_USC_t.book Page 40
Page 46 of 444
44GETTING TO KNOW YOUR VEHICLE
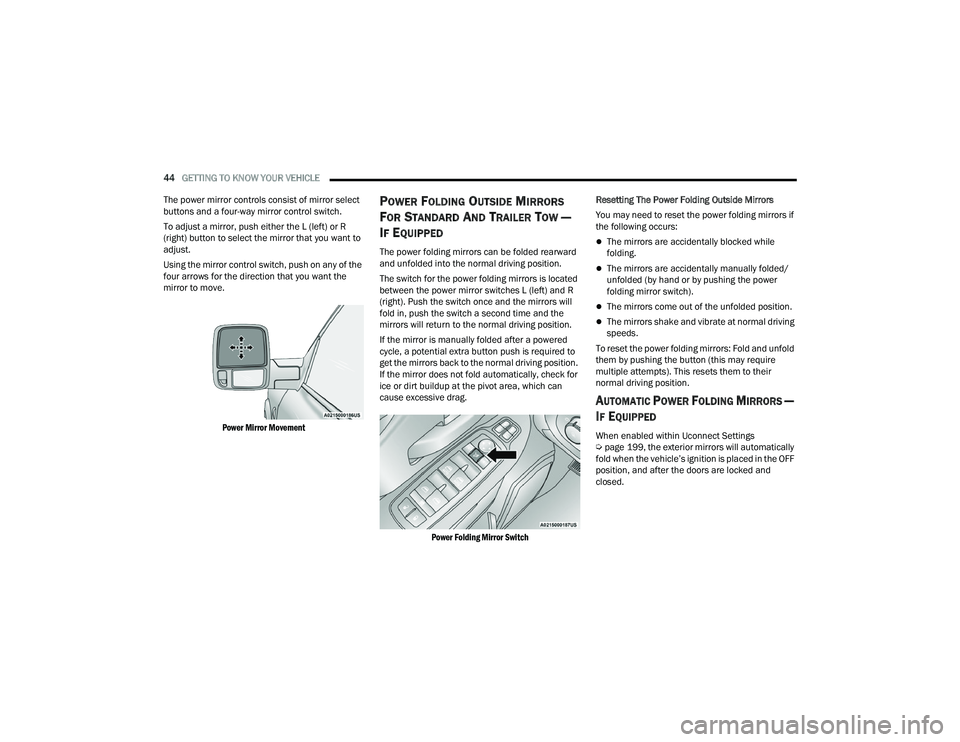
The power mirror controls consist of mirror select
buttons and a four-way mirror control switch.
To adjust a mirror, push either the L (left) or R
(right) button to select the mirror that you want to
adjust.
Using the mirror control switch, push on any of the
four arrows for the direction that you want the
mirror to move.
Power Mirror Movement
POWER FOLDING OUTSIDE MIRRORS
F
OR STANDARD AND TRAILER TOW —
I
F EQUIPPED
The power folding mirrors can be folded rearward
and unfolded into the normal driving position.
The switch for the power folding mirrors is located
between the power mirror switches L (left) and R
(right). Push the switch once and the mirrors will
fold in, push the switch a second time and the
mirrors will return to the normal driving position.
If the mirror is manually folded after a powered
cycle, a potential extra button push is required to
get the mirrors back to the normal driving position.
If the mirror does not fold automatically, check for
ice or dirt buildup at the pivot area, which can
cause excessive drag.
Power Folding Mirror Switch
Resetting The Power Folding Outside Mirrors
You may need to reset the power folding mirrors if
the following occurs:The mirrors are accidentally blocked while
folding.
The mirrors are accidentally manually folded/
unfolded (by hand or by pushing the power
folding mirror switch).
The mirrors come out of the unfolded position.
The mirrors shake and vibrate at normal driving
speeds.
To reset the power folding mirrors: Fold and unfold
them by pushing the button (this may require
multiple attempts). This resets them to their
normal driving position.
AUTOMATIC POWER FOLDING MIRRORS —
I
F EQUIPPED
When enabled within Uconnect Settings
Ú page 199, the exterior mirrors will automatically
fold when the vehicle’s ignition is placed in the OFF
position, and after the doors are locked and
closed.
23_DPF_OM_EN_USC_t.book Page 44