buttons RAM CHASSIS CAB 2023 Owner's Manual
[x] Cancel search | Manufacturer: RAM, Model Year: 2023, Model line: CHASSIS CAB, Model: RAM CHASSIS CAB 2023Pages: 444, PDF Size: 20.51 MB
Page 92 of 444
90GETTING TO KNOW YOUR INSTRUMENT PANEL
INSTRUMENT CLUSTER DISPLAY
L
OCATION AND CONTROLS
Instrument Cluster Display/Controls Location
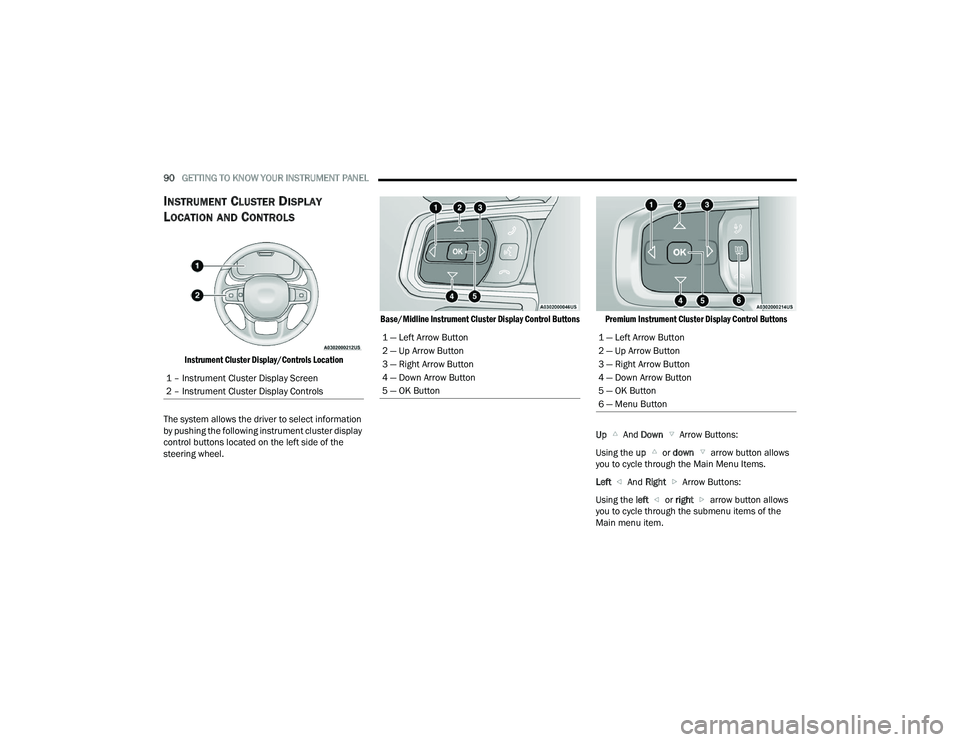
The system allows the driver to select information
by pushing the following instrument cluster display
control buttons located on the left side of the
steering wheel.
Base/Midline Instrument Cluster Display Control Buttons Premium Instrument Cluster Display Control Buttons
Up And Down Arrow Buttons:
Using the up or down arrow button allows
you to cycle through the Main Menu Items.
Left And Right Arrow Buttons:
Using the left or right arrow button allows
you to cycle through the submenu items of the
Main menu item.
1 – Instrument Cluster Display Screen
2 – Instrument Cluster Display Controls
1 — Left Arrow Button
2 — Up Arrow Button
3 — Right Arrow Button
4 — Down Arrow Button
5 — OK Button1 — Left Arrow Button
2 — Up Arrow Button
3 — Right Arrow Button
4 — Down Arrow Button
5 — OK Button
6 — Menu Button
23_DPF_OM_EN_USC_t.book Page 90
Page 93 of 444
GETTING TO KNOW YOUR INSTRUMENT PANEL91
NOTE:
Holding the up / down or left / right
arrow button will loop the user through the
currently selected menu or options presented
on the screen.
Main menu and submenus wrap for continuous
scrolling.
Upon returning to a main menu, the last
submenu screen viewed within that main menu
will be displayed.
OK Button:
For Digital Speedometer:
Pushing the OK button changes units (mph or
km/h).
Menu Button
Press Menu button for Home Screen display.
Navigate left or right to highlight desired
tile. Press OK to select desired. Once OK is
pressed, cluster will navigate to selected
submenu (e.g. “Audio”).
NOTE:Exiting Home Screen Speed Limit tile and Navi -
gation tile with no Ethernet navigates to Speed -
ometer submenu.
Press up or down to select different
screen within selected category.
If Menu button is pressed while in this view,
cluster will return to previously displayed
screen.
Press and hold OK button to enter edit mode.
Instruction text may overlay lower tachom -
eter
For Screen Setup:
OK button allows user to enter menu and
submenus.
Within each submenu layer, the up and
down arrow buttons will allow the user to
select the item of interest.
Pushing the OK button makes the selection and
a confirmation screen will appear (returning the
user to the first page of the submenu).
Pushing the left arrow button will exit each
submenu layer and return to the main menu.
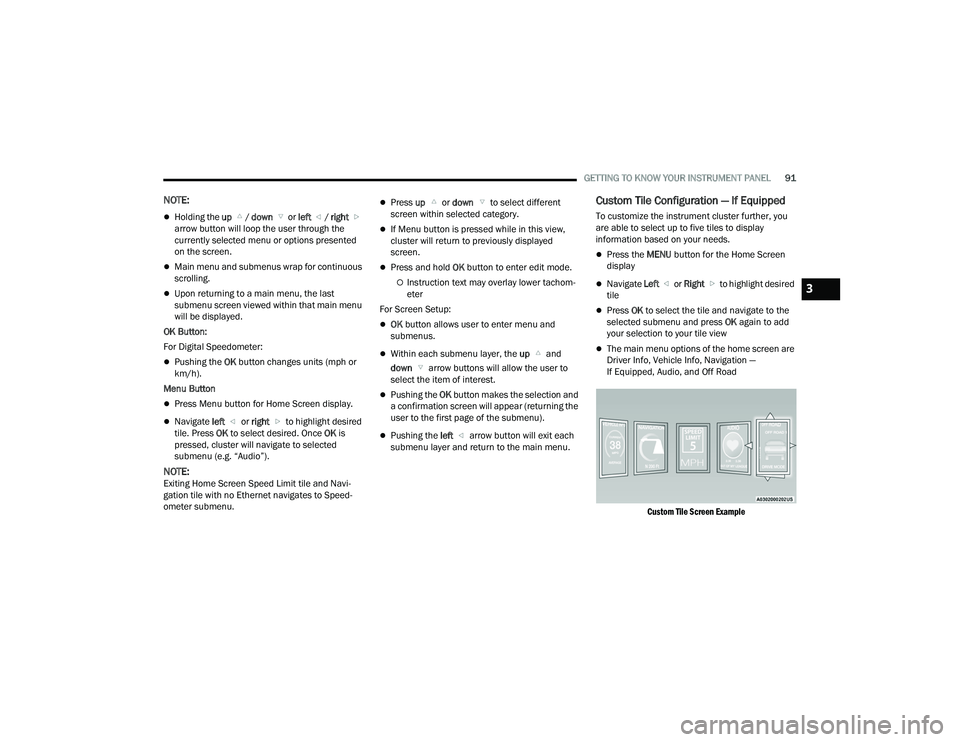
Custom Tile Configuration — If Equipped
To customize the instrument cluster further, you
are able to select up to five tiles to display
information based on your needs.
Press the MENU button for the Home Screen
display
Navigate Left or Right to highlight desired
tile
Press OK to select the tile and navigate to the
selected submenu and press OK again to add
your selection to your tile view
The main menu options of the home screen are
Driver Info, Vehicle Info, Navigation —
If Equipped, Audio, and Off Road
Custom Tile Screen Example
3
23_DPF_OM_EN_USC_t.book Page 91
Page 126 of 444

124STARTING AND OPERATING
ENGINE IDLING
Avoid prolonged idling. Long periods of idling may be
harmful to your engine because combustion
chamber temperatures can drop so low that the fuel
may not burn completely. Incomplete combustion
allows carbon and varnish to form on piston rings,
engine valves, and injector nozzles. Also, the
unburned fuel can enter the crankcase, diluting the
oil and causing rapid wear to the engine.
If the engine is allowed to idle or the truck is driven
on low engine speed drive cycles for more than two
hours, the system will automatically enter an
emissions operating mode that will increase the
engine idle speed to 900 RPM (1,050 RPM for
Chassis Cab). While in this mode, which is
designed to help maintain the Diesel Particulate
Filter, the engine idle speed will return to normal
when the brake pedal is applied. A small change in
engine tone or a slight change in engine
performance while accelerating may also be
noticeable at speeds below 20 mph (32 km/h).
This operating mode may last for up to an hour of
idle time, or around 20 minutes of driving time.
Your truck may have been ordered with an optional
voltage monitoring idle up feature. If a load is placed
on the electrical system while the truck is in PARK,
this feature will attempt to maintain normal system
voltage by automatically increasing engine idle
speed. You may notice several consecutive increases
in idle speed, up to a maximum of 1,450 RPM, as the system will attempt to utilize the smallest increase in
idle speed necessary to maintain normal system
voltage. The idle speed will return to normal when
either the electrical load is removed, or when the
brake pedal is applied.
NOTE:For instrument cluster display messages related to
the vehicle's exhaust system Ú
page 89.
Idle-Up Feature
The driver-controlled high idle speed feature will
help increase cylinder temperatures and provide
additional cab heat, however, excessive idling may
still cause the exhaust after-treatment system to
not properly regenerate. Extended periods of idle
time should be avoided.
The Idle-Up feature uses the Cruise Control buttons
to increase engine idle speed and quickly warm the
vehicle's interior.
1. With the transmission in PARK, the parking
brake applied, and the engine running, turn
on the Cruise Control, then push the SET (-)
button.
2. The engine RPM will go up to 1,100 RPM. To increase the RPM, push and hold the RES (+)
button and the idle speed will increase to
approximately 1,500 RPM. To decrease the
RPM, push and hold the SET (-) button and the
idle speed will decrease to approximately
1,100 RPM. 3. To cancel the Idle–Up feature, either push the
CANCEL button, push the ON/OFF button, or
press the brake pedal.
NOISE
Diesel engines can create noises that may seem
as a concern. The nature of a diesel engine is
compression ignition where compressed air and
fuel are mixed and ignited. Weather, barometric
pressure, altitude and temperature will affect how
fuel is ignited in the engine. Engines will sound
different from day to day or previous model years.
Clicking, ticking, or light knocking is normal and will
change from day to day, as the engine breaks in,
and can vary with changes in ambient
temperature; this is normal. Diesel equipped
vehicles also have an exhaust after treatment
system to reduce emissions utilizing a Diesel
Particulate Filter (DPF) and a Selective Reduction
Catalyst (SCR). The SCR reduces Nox using the
Diesel Exhaust Fluid (DEF) system. DEF is injected
directly into the SCR through an dosing module.
This process will create a clicking sound and at
times, will make noise even with the vehicle shut
off. This is normal as the DEF dosing module is
purging DEF. If at any time the check engine light is
on, please visit an authorized dealer.
23_DPF_OM_EN_USC_t.book Page 124
Page 151 of 444

STARTING AND OPERATING149
Only one Cruise Control feature can operate at a
time. For example, if Fixed Speed Cruise Control
is enabled, Adaptive Cruise Control will be
unavailable, and vice versa.
CRUISE CONTROL
When engaged, the Cruise Control takes over
accelerator operations at speeds greater than
20 mph (32 km/h).
The Cruise Control buttons are located on the right
side of the steering wheel.
Cruise Control Buttons
To Activate
Push the on/off button to activate the Cruise
Control. The cruise indicator light in the instrument
cluster display will illuminate. To turn the system
off, push the on/off button a second time. The
cruise indicator light will turn off. The system
should be turned off when not in use.
To Set A Desired Speed
Turn the Cruise Control on.
When the vehicle has reached the desired speed,
push the SET (+) or SET (-) button and release.
Release the accelerator and the vehicle will
operate at the selected speed.
NOTE:The vehicle should be traveling at a steady speed
and on level ground before pushing the SET (+) or
SET (-) button.
To Vary The Speed Setting
To Increase Or Decrease The Set Speed
After setting a speed, you can increase the set
speed by pushing the SET (+) button, or decrease
speed by pushing the SET (-) button.
U.S. Speed (mph)
Pushing the SET (+) , or SET (-) button once will
result in a 1 mph speed adjustment. Each
subsequent tap of the button results in an
adjustment of 1 mph.
If the button is continually pushed, the set
speed will continue to adjust in 5 mph incre -
ments until the button is released. The new set
speed is reflected in the instrument cluster
display.
Metric Speed (km/h)
Pushing the SET (+) , or SET (-) button once will
result in a 1 km/h speed adjustment. Each
subsequent tap of the button results in an
adjustment of 1 km/h.
If the button is continually pushed, the set speed
will continue to adjust in 10 km/h increments
until the button is released. The new set speed is
reflected in the instrument cluster display.
NOTE:When you override and push the SET (+) or SET (-)
button, the new set speed will be the current speed
of the vehicle.
1 — SET (+)/Accel
2 — CANC/Cancel
3 — SET (-)/Decel
4 — On/Off
5 — RES/Resume
WARNING!
Leaving the Cruise Control system on when not
in use is dangerous. You could accidentally set
the system or cause it to go faster than you
want. You could lose control and have an
accident. Always ensure the system is off when
you are not using it.4
23_DPF_OM_EN_USC_t.book Page 149
Page 153 of 444
STARTING AND OPERATING151
(Continued)
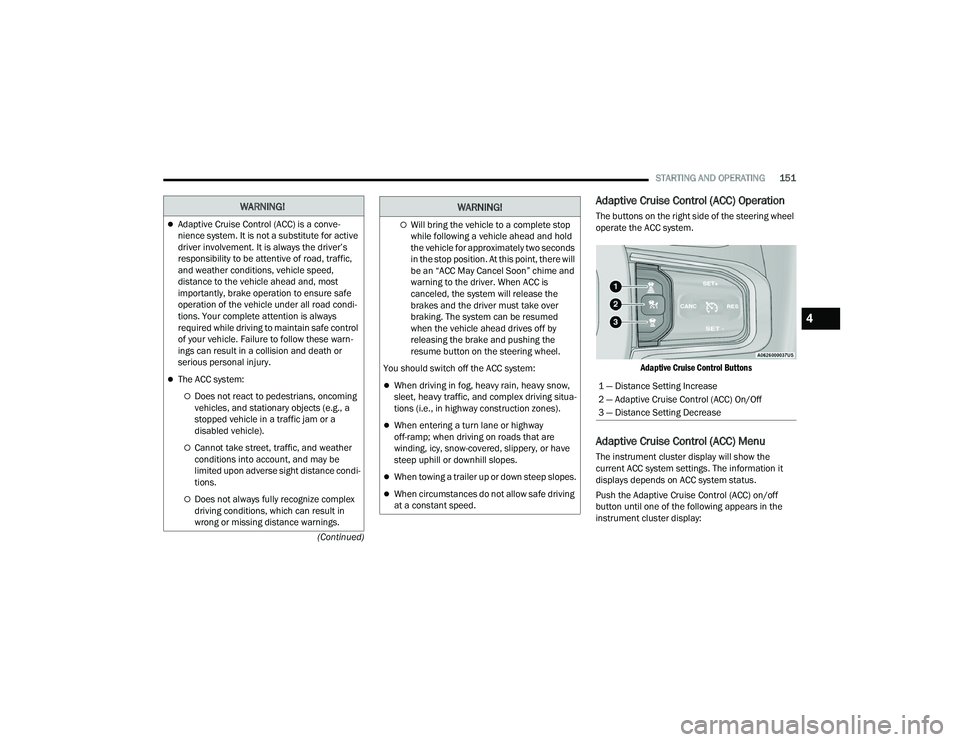
Adaptive Cruise Control (ACC) Operation
The buttons on the right side of the steering wheel
operate the ACC system.
Adaptive Cruise Control Buttons
Adaptive Cruise Control (ACC) Menu
The instrument cluster display will show the
current ACC system settings. The information it
displays depends on ACC system status.
Push the Adaptive Cruise Control (ACC) on/off
button until one of the following appears in the
instrument cluster display:
WARNING!
Adaptive Cruise Control (ACC) is a conve -
nience system. It is not a substitute for active
driver involvement. It is always the driver’s
responsibility to be attentive of road, traffic,
and weather conditions, vehicle speed,
distance to the vehicle ahead and, most
importantly, brake operation to ensure safe
operation of the vehicle under all road condi -
tions. Your complete attention is always
required while driving to maintain safe control
of your vehicle. Failure to follow these warn -
ings can result in a collision and death or
serious personal injury.
The ACC system:
Does not react to pedestrians, oncoming
vehicles, and stationary objects (e.g., a
stopped vehicle in a traffic jam or a
disabled vehicle).
Cannot take street, traffic, and weather
conditions into account, and may be
limited upon adverse sight distance condi -
tions.
Does not always fully recognize complex
driving conditions, which can result in
wrong or missing distance warnings.
Will bring the vehicle to a complete stop
while following a vehicle ahead and hold
the vehicle for approximately two seconds
in the stop position. At this point, there will
be an “ACC May Cancel Soon” chime and
warning to the driver. When ACC is
canceled, the system will release the
brakes and the driver must take over
braking. The system can be resumed
when the vehicle ahead drives off by
releasing the brake and pushing the
resume button on the steering wheel.
You should switch off the ACC system:
When driving in fog, heavy rain, heavy snow,
sleet, heavy traffic, and complex driving situa -
tions (i.e., in highway construction zones).
When entering a turn lane or highway
off-ramp; when driving on roads that are
winding, icy, snow-covered, slippery, or have
steep uphill or downhill slopes.
When towing a trailer up or down steep slopes.
When circumstances do not allow safe driving
at a constant speed.
WARNING!
1 — Distance Setting Increase
2 — Adaptive Cruise Control (ACC) On/Off
3 — Distance Setting Decrease
4
23_DPF_OM_EN_USC_t.book Page 151
Page 156 of 444

154STARTING AND OPERATING
NOTE:
While in ACC mode, when the vehicle comes to
a complete stop longer than two seconds, the
system will cancel. The driver will have to apply
the brakes to keep the vehicle at a standstill.
ACC cannot be resumed if there is a stationary
vehicle in front of your vehicle in close proximity.
To Vary The Speed Setting
To Increase Or Decrease The Set Speed
After setting a speed, you can increase the set
speed by pushing the SET (+) button, or decrease
speed by pushing the SET (-) button. U.S. Speed (mph)
Pushing the SET (+)
, or SET (-) button once will
result in a 1 mph speed adjustment. Each
subsequent tap of the button results in an
adjustment of 1 mph.
If the button is continually pushed, the set
speed will continue to adjust in 5 mph incre -
ments until the button is released. The new set
speed is reflected in the instrument cluster
display.
Metric Speed (km/h)
Pushing the SET (+) , or SET (-) button once will
result in a 1 km/h speed adjustment. Each
subsequent tap of the button results in an
adjustment of 1 km/h.
If the button is continually pushed, the set
speed will continue to adjust in 10 km/h incre -
ments until the button is released. The new set
speed is reflected in the instrument cluster
display.
NOTE:When you override and push the SET (+) button or
SET (-) buttons, the new set speed will be the
current speed of the vehicle. When ACC Is Active
When you use the SET
(-) button to decelerate, if
the engine’s braking power does not slow the
vehicle sufficiently to reach the set speed, the
brake system will automatically slow the
vehicle.
The ACC system applies the brake down to a full
stop when following a vehicle in front. If your
vehicle follows the vehicle in front to a standstill,
your vehicle will release the brakes two seconds
after coming to a full stop.
The ACC system maintains set speed when
driving uphill and downhill. However, a slight
speed change on moderate hills is normal. In
addition, downshifting may occur while climbing
uphill or descending downhill. This is normal
operation and necessary to maintain set speed.
When driving uphill and downhill, the ACC
system will cancel if the braking temperature
exceeds normal range (overheated).
Setting The Following Distance In ACC
The specified following distance for Adaptive
Cruise Control (ACC) can be set by varying the
distance setting between four bars (longest), three
bars (long), two bars (medium) and one bar (short).
Using this distance setting and the vehicle speed,
ACC calculates and sets the distance to the vehicle
ahead. This distance setting displays in the
instrument cluster display.
WARNING!
The Resume function should only be used if
traffic and road conditions permit. Resuming a
set speed that is too high or too low for
prevailing traffic and road conditions could
cause the vehicle to accelerate or decelerate too
sharply for safe operation. Failure to follow these
warnings can result in a collision and death or
serious personal injury.
23_DPF_OM_EN_USC_t.book Page 154
Page 174 of 444
172STARTING AND OPERATING
Deactivation
The Forward Facing Camera is deactivated in the
following conditions:
The vehicle exceeds 8 mph (13 km/h), except
when vehicle is in 4WD Low
The touchscreen X button on the display is
pressed.
The vehicle is shifted into PARK.
The ignition is placed in the OFF position.
NOTE:If the vehicle is in 4WD Low, the Forward Facing
Camera image will be displayed until the X button
is pressed or the ignition is placed in the OFF
position.
Trailer Reverse Guidance — If Equipped
The Trailer Reverse Guidance feature assists the
driver in backing up a trailer by providing
adjustable camera views of the trailer and
surrounding area. The cameras are mounted on
the side mirrors and the images will be displayed
side-by-side on the touchscreen. Left and right
camera images are swapped and mirrored on the
touchscreen to show the equivalent area behind
the vehicle as though the driver is using the side
mirrors. Activation
The Trailer Reverse Guidance feature can be
activated by pressing the Trailer Reverse Guidance
button on the Back Up/Cargo Camera Display.
Deactivation
When the vehicle is shifted out of REVERSE with
camera delay turned on, the camera image will
continue to be displayed for up to 10 seconds unless
the vehicle speed exceeds 8 mph (13 km/h), the
vehicle is shifted into PARK or the ignition is placed
in the OFF position. There is a touchscreen X button
to disable the display of the camera image.
If Trailer Reverse Guidance is selected through
manually activated Surround View, Back Up
Camera, or Cargo Camera, the following
deactivation conditions apply:
The touchscreen X button on the display is
pressed
The ignition is placed in the OFF position
The vehicle speed is over 8 mph (13 km/h) for
10 seconds
Blind Spot Assist Cameras — If Equipped
There are cameras located in the exterior mirrors
to assist in blind spot detection by providing a wide
camera view of the side of the vehicle selected.
The blind spot cameras will work in the ON/RUN or
ignition ON position. Press the X or More Cams
button to exit the screen. The Blind Spot Cameras can also be activated with Turn Signal
engagement, see Ú
page 166 for more
information.
Activation
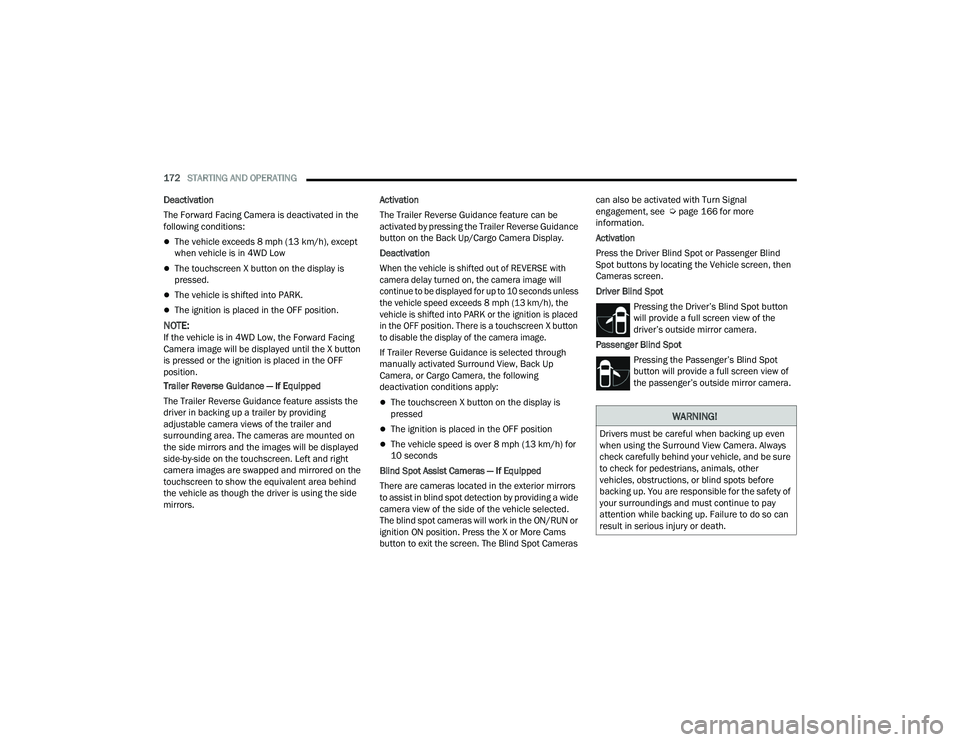
Press the Driver Blind Spot or Passenger Blind
Spot buttons by locating the Vehicle screen, then
Cameras screen.
Driver Blind Spot
Pressing the Driver’s Blind Spot button
will provide a full screen view of the
driver’s outside mirror camera.
Passenger Blind Spot Pressing the Passenger’s Blind Spot
button will provide a full screen view of
the passenger’s outside mirror camera.
WARNING!
Drivers must be careful when backing up even
when using the Surround View Camera. Always
check carefully behind your vehicle, and be sure
to check for pedestrians, animals, other
vehicles, obstructions, or blind spots before
backing up. You are responsible for the safety of
your surroundings and must continue to pay
attention while backing up. Failure to do so can
result in serious injury or death.
23_DPF_OM_EN_USC_t.book Page 172
Page 178 of 444
176STARTING AND OPERATING
(Continued)
AUX CAMERA — IF EQUIPPED
Your vehicle may be equipped with one or two AUX
Cameras, which display a rearview image from the
trailer on the touchscreen.
NOTE:Two Aux Cameras are only available on vehicles
with NAV equipped radios if the vehicle is not
equipped with a Center High Mounted Stop Lamp
(CHMSL) and Surround View Camera system.
Activation
The AUX Camera is activated by first pressing the
Backup Camera or Cargo Camera (if equipped)
button on the touchscreen, followed by the AUX
button located in the upper left corner of the rearview display. On vehicles with Surround View
Camera (if equipped), the AUX Camera can be
activated when the vehicle is in REVERSE by first
pressing the More Cams button in the Surround
view screen, followed by the AUX tab. The AUX
camera can also be activated when the vehicle is
in REVERSE by pressing the AUX button.
If equipped with two AUX Cameras, you can switch
between each camera by pressing the AUX 1 or
AUX 2 buttons on the Trailer Camera display.
Deactivation
The AUX Camera is deactivated by pressing the
touchscreen X button in the upper right corner of
the touchscreen. This will return the display back
to the previously displayed screen.
NOTE:
If the AUX button is pressed and no AUX Camera
is connected, the touchscreen will display a blue
screen along with the message “Camera
System Unavailable.” The screen can be exited
out by pressing the touchscreen X button in the upper right hand corner. This will return the
display back to the previously displayed screen.
Zoom View is not available with the AUX Camera
feature.
The display will always default to the Trailer
Camera display AUX 1.
ENGINE RUNAWAY
Diesel engine runaway is a rare condition affecting
diesel engines, where the engine consumes its
own lubrication oil and runs at higher and higher
RPM until it overspeeds to a point where it destroys
itself due to either mechanical failure or engine
seizure through lack of lubrication.
CAUTION!
To avoid vehicle damage, Trailer Surround
View should only be used as a parking aid. The
Trailer Surround View Camera is unable to
view every obstacle or object in your drive
path.
To avoid vehicle damage, the vehicle must be
driven slowly when using Trailer Surround
View to be able to stop in time when an
obstacle is seen. It is recommended that the
driver look frequently over his/her shoulder
when using Trailer Surround View.
AUX 1 Camera Button
AUX 2 Camera Button
WARNING!
In case of engine runaway due to flammable
fumes from fuel spills or turbocharger oil leaks
being sucked into the engine, do the following to
help avoid personal injury and/or vehicle
damage:
Turn the ignition switch to the OFF position.
Using a CO2 or dry chemical type fire extin
-
guisher, direct the spray from the fire extin -
guisher into the grille on the passenger side so
that the spray enters the engine air intake.
23_DPF_OM_EN_USC_t.book Page 176
Page 190 of 444
188STARTING AND OPERATING
Integrated Trailer Brake Module (ITBM) —
If Equipped
Your vehicle may have an ITBM for Electric and
Electric Over Hydraulic (EOH) trailer brakes.
NOTE:This module has been designed and verified with
electric trailer brakes and new electric over
hydraulic systems. Some previous EOH systems
may not be compatible with ITBM.
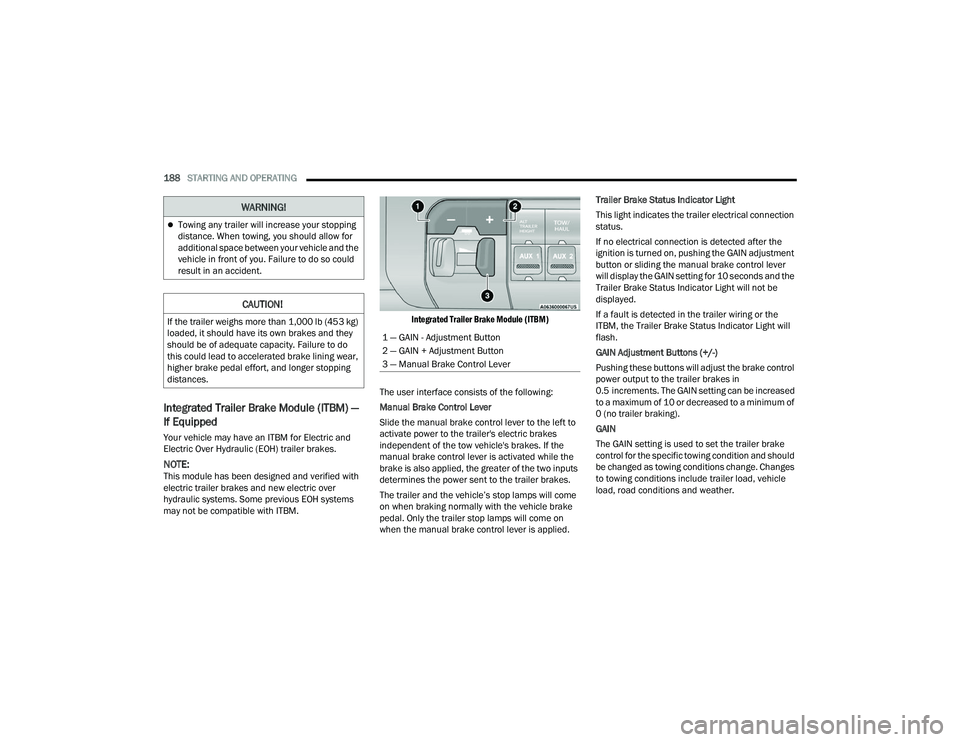
Integrated Trailer Brake Module (ITBM)
The user interface consists of the following:
Manual Brake Control Lever
Slide the manual brake control lever to the left to
activate power to the trailer's electric brakes
independent of the tow vehicle's brakes. If the
manual brake control lever is activated while the
brake is also applied, the greater of the two inputs
determines the power sent to the trailer brakes.
The trailer and the vehicle’s stop lamps will come
on when braking normally with the vehicle brake
pedal. Only the trailer stop lamps will come on
when the manual brake control lever is applied. Trailer Brake Status Indicator Light
This light indicates the trailer electrical connection
status.
If no electrical connection is detected after the
ignition is turned on, pushing the GAIN adjustment
button or sliding the manual brake control lever
will display the GAIN setting for 10 seconds and the
Trailer Brake Status Indicator Light will not be
displayed.
If a fault is detected in the trailer wiring or the
ITBM, the Trailer Brake Status Indicator Light will
flash.
GAIN Adjustment Buttons (+/-)
Pushing these buttons will adjust the brake control
power output to the trailer brakes in
0.5 increments. The GAIN setting can be increased
to a maximum of 10 or decreased to a minimum of
0 (no trailer braking).
GAIN
The GAIN setting is used to set the trailer brake
control for the specific towing condition and should
be changed as towing conditions change. Changes
to towing conditions include trailer load, vehicle
load, road conditions and weather.
Towing any trailer will increase your stopping
distance. When towing, you should allow for
additional space between your vehicle and the
vehicle in front of you. Failure to do so could
result in an accident.
CAUTION!
If the trailer weighs more than 1,000 lb (453 kg)
loaded, it should have its own brakes and they
should be of adequate capacity. Failure to do
this could lead to accelerated brake lining wear,
higher brake pedal effort, and longer stopping
distances.
WARNING!
1 — GAIN - Adjustment Button
2 — GAIN + Adjustment Button
3 — Manual Brake Control Lever
23_DPF_OM_EN_USC_t.book Page 188
Page 191 of 444

STARTING AND OPERATING189
Adjusting GAIN
NOTE:This should only be performed in a traffic-free envi -
ronment at speeds of approximately 20–25 mph
(30–40 km/h).
1. Make sure the trailer brakes are in good working condition, functioning normally and
properly adjusted. See a trailer dealer if
necessary.
2. Hook up the trailer and make the electrical connections according to the trailer
manufacturer's instructions.
3. When a trailer with electric/EOH brakes is plugged in, the trailer connected message
should appear in the instrument cluster
display (if the connection is not recognized by the ITBM, braking functions will not be
available), the GAIN setting will illuminate and
the correct type of trailer must be selected
from the instrument cluster display options.
4. Push the UP or DOWN button on the steering wheel until “TRAILER TOW” appears on the
screen.
5. Push the RIGHT arrow on the steering wheel to enter “TRAILER TOW”.
6. Push the UP or DOWN buttons until the Trailer Brake Type appears on the screen.
7. Push the RIGHT arrow and then push the UP or DOWN buttons until the proper Trailer Brake
Type appears on the screen. 8. In a traffic-free environment, tow the trailer on
a dry, level surface at a speed of 20–25 mph
(30–40 km/h) and squeeze the manual brake
control lever completely.
9. If the trailer wheels lockup (indicated by squealing tires), reduce the GAIN setting; if the
trailer wheels turn freely, increase the GAIN
setting.
Repeat steps 8 and 9 until the GAIN setting is at a
point just below trailer wheel lockup. If towing a
heavier trailer, trailer wheel lockup may not be
attainable even with the maximum GAIN setting
of 10.
* The suggested selection depends and may change depending on the customer preferences for braking performance. Condition of the trailer brakes, driving
and road state may also affect the selection.
Light Electric Heavy Electric Light EOHHeavy EOH
Type of Trailer Brakes Electric Trailer Brakes Electric Trailer Brakes Electric over Hydraulic Trailer
BrakesElectric over Hydraulic Trailer
Brakes
Load *Under 10,000 lb (4,536 kg) *Above 10,000 lb (4,536 kg) *Under 10,000 lb (4,536 kg) *Above 10,000 lb (4,536 kg)
4
23_DPF_OM_EN_USC_t.book Page 189