turn signal RAM CHASSIS CAB 2023 Owners Manual
[x] Cancel search | Manufacturer: RAM, Model Year: 2023, Model line: CHASSIS CAB, Model: RAM CHASSIS CAB 2023Pages: 444, PDF Size: 20.51 MB
Page 5 of 444
3
Forward Utility Lights and Rear Guidance
Lights — If Equipped .........................................46
Heated Mirrors — If Equipped..........................46
Tilt Side Mirrors In Reverse —
If Equipped........................................................46
UNIVERSAL GARAGE DOOR OPENER
(HOMELINK®) — IF EQUIPPED ............................ 47
Before You Begin Programming HomeLink® ... 47
Erasing All The HomeLink® Channels ............47
Identifying Whether You Have A Rolling Code
Or Non-Rolling Code Device.............................47
Programming HomeLink® To A Garage Door
Opener ..............................................................48
Programming HomeLink® To A Miscellaneous
Device ...............................................................49
Reprogramming A Single HomeLink® Button .. 49
Canadian/Gate Operator Programming .........49
Security .............................................................50
Troubleshooting Tips ........................................50
EXTERIOR LIGHTS.................................................. 51
Headlight Switch...............................................51
Multifunction Lever ..........................................51
Daytime Running Lights (DRLs) ......................52
High/Low Beam Switch....................................52 Automatic High Beam Headlamp Control —
If Equipped........................................................52
Flash-To-Pass ...................................................52
Automatic Headlights — If Equipped ..............52
Directional LED Headlamp System —
If Equipped........................................................53
Parking Lights ...................................................53
Headlights On With Wipers ..............................53
Headlight Illumination On Approach ...............53
Headlight Delay ................................................53
Lights-On Reminder .........................................54
Front Fog Lights — If Equipped .......................54
Turn Signals ......................................................54
Lane Change Assist — If Equipped ..................54
Cargo Lights/Rear Guidance Lights —
If Equipped........................................................54
Battery Saver ....................................................55
INTERIOR LIGHTS ..................................................55
Courtesy Lights .................................................55
WINDSHIELD WIPERS AND WASHERS............... 57
Windshield Wiper Operation ...........................57
Rain Sensing Wipers — If Equipped ...............58
CLIMATE CONTROLS .............................................58
Automatic Climate Control Descriptions
And Functions ...................................................59
Manual Climate Control Descriptions
And Functions ...................................................62 Automatic Temperature Control (ATC) ............ 64
Climate Voice Recognition —If Equipped ........ 64
Operating Tips .................................................64
INTERIOR STORAGE AND EQUIPMENT ............... 65
Storage ............................................................. 65
USB/AUX Control ............................................. 70
Electrical Power Outlets................................... 71
Power Inverter — If Equipped ......................... 72
Wireless Charging Pad —If Equipped ............. 74
WINDOWS ............................................................. 74
Power Windows — If Equipped ........................ 74
Automatic Window Features —If Equipped..... 75
Reset Auto-Up .................................................. 75
Window Lockout Switch — If Equipped ........... 76
Power Sliding Rear Window —If Equipped ..... 76
Manual Sliding Rear Window —
If Equipped .......................................................76
Wind Buffeting .................................................76
HOOD....................................................................... 77
To Open The Hood ........................................... 77
To Close The Hood ........................................... 77
23_DPF_OM_EN_USC_t.book Page 3
Page 7 of 444
5
ENGINE BREAK-IN RECOMMENDATIONS —
DIESEL ENGINE .................................................... 128
PARKING BRAKE ................................................ 128
DIESEL EXHAUST BRAKE (ENGINE BRAKING) .. 129
AUTOMATIC TRANSMISSION.............................. 130 Ignition Park Interlock ................................... 131Brake/Transmission Shift Interlock (BTSI)
System .......................................................... 131
8-Speed Automatic Transmission —
If Equipped .................................................... 132
6-Speed Automatic Transmission —
If Equipped .................................................... 135
AUXILIARY SWITCHES — IF EQUIPPED ............. 139
FOUR-WHEEL DRIVE OPERATION —
IF EQUIPPED ........................................................ 140
Electronically Shifted Transfer Case
(8-Speed Transmission) — If Equipped ....... 140Electronically Shifted Transfer Case
(6-Speed Transmission) —
If Equipped..................................................... 143
Manually Shifted Transfer Case —
If Equipped..................................................... 145
LIMITED-SLIP DIFFERENTIAL ............................ 147
POWER TAKE OFF (PTO) OPERATION —
IF EQUIPPED ........................................................ 147
HYDRAULIC POWER STEERING .........................148
Power Steering Fluid Check .......................... 148
CRUISE CONTROL SYSTEMS — IF EQUIPPED .... 148
Cruise Control ............................................... 149
Adaptive Cruise Control (ACC) ...................... 150 PARKSENSE FRONT/REAR PARK ASSIST —
IF EQUIPPED ....................................................... 159
ParkSense Sensors ....................................... 159
ParkSense Warning Display ......................... 159
ParkSense Display ........................................ 159Enabling And Disabling ParkSense .............. 162
Service The ParkSense Park Assist System ...162
Cleaning The ParkSense System ................. 162
ParkSense System Usage Precautions........ 162
LANESENSE — IF EQUIPPED ............................. 163
LaneSense Operation ................................... 163Turning LaneSense On Or Off ....................... 164
LaneSense Warning Message ...................... 164Changing LaneSense Status ........................ 166
Turn Signal Activated Blind Spot Assist —
If Equipped..................................................... 166
PARKVIEW REAR BACK UP CAMERA............... 166
SURROUND VIEW CAMERA SYSTEM —
IF EQUIPPED ........................................................ 168
TRAILER CAMERAS — IF EQUIPPED ................. 173 Trailer Surround View Camera System —
If Equipped..................................................... 173AUX Camera — If Equipped ........................... 176
ENGINE RUNAWAY ............................................. 176
REFUELING THE VEHICLE—
GASOLINE ENGINE ............................................. 177
Loose Fuel Filler Cap Message ................... 177
REFUELING THE VEHICLE — DIESEL ENGINE... 177
Diesel Exhaust Fluid...................................... 178 VEHICLE LOADING .............................................. 180
Gross Vehicle Weight Rating (GVWR) ......... 180
Payload .......................................................... 180Gross Axle Weight Rating (GAWR)................ 180Tire Size ......................................................... 181
Rim Size ......................................................... 181
Inflation Pressure .......................................... 181Curb Weight ................................................... 181
Loading .......................................................... 181
TRAILER TOWING ................................................ 181
Common Towing Definitions......................... 181
Trailer Hitch Type and Maximum Trailer
Weight ............................................................ 185
Trailer Towing Weights (Maximum Traile
r Weight Ratings) .......................................... 186Trailer And Tongue Weight .......................... 186
Towing Requirements .................................. 186Towing Tips ................................................... 192
SNOWPLOW — IF EQUIPPED.............................. 192
Before Plowing .............................................. 192
Snowplow Prep Package Model Availability....193
Over The Road Operation With Snowplow
Attached......................................................... 193
Operating Tips ............................................... 193General Maintenance ................................... 193
23_DPF_OM_EN_USC_t.book Page 5
Page 16 of 444

14 Green Indicator Lights
Adaptive Cruise Control (ACC) Set With Target Indicator Light Úpage 109
Adaptive Cruise Control (ACC) Set With No Target Detected Indicator Light
Ú page 110
Automatic Diesel Exhaust Brake Indicator Light Úpage 110
Cruise Control Set Indicator Light Úpage 110
ECO Mode Indicator Light Úpage 110
Front Fog Indicator Light Úpage 110
LaneSense Indicator Light Úpage 110
Parking/Headlights On Indicator Light Úpage 110
Turn Signal Indicator Lights
Úpage 110
White Indicator Lights
Adaptive Cruise Control (ACC) Ready Indicator Light Úpage 110
Cruise Control Ready Indicator Light Úpage 110
LaneSense Indicator Light Úpage 110
Set Speed Display Indicator Light Úpage 110
Blue Indicator Lights High Beam Indicator Light Úpage 111
Green Indicator Lights
23_DPF_OM_EN_USC_t.book Page 14
Page 17 of 444
15
GETTING TO KNOW YOUR VEHICLE
KEYS
KEY FOB
Your vehicle is equipped with a key fob which
supports Remote Keyless Entry (RKE) (if equipped)
and Keyless Enter ‘n Go™ (if equipped).
If the vehicle is equipped with remote power door
locks, the key fob allows you to lock or unlock all
doors, as well as activate the Panic Alarm, from
distances up to approximately 66 ft (20 m). The
key fob does not need to be pointed at the vehicle
to activate the system.
NOTE:
The key fob’s wireless signal may be blocked if
the key fob is located next to a mobile phone,
laptop, or other electronic device. This may
result in poor performance.
The key fob should not be placed next to the
wireless charging pad (if equipped).
In the ON/RUN position, all key fob buttons will
work until the vehicle reaches 2 mph (4 km/h).
Key Fob
In case the ignition switch does not change with
the push of a button, the key fob may have a low or
fully depleted battery. A low key fob battery can be
verified by referring to the instrument cluster,
which will display directions to follow
Úpage 427.
To Lock/Unlock The Doors
If the vehicle is equipped with remote power door
locks, push and release the unlock button on the
key fob once to unlock the driver’s door. Push the
unlock button twice within five seconds to unlock
all doors. If the vehicle is equipped with remote
power door locks, push and release the lock button
on the key fob to lock all doors.
When the doors are unlocked, the turn signals will
flash and the Illuminated Entry system will be
activated. When the doors are locked, the turn
signals will flash and the horn will chirp.
All doors can be programmed to unlock on the first
push of the unlock button. The horn chirp when the
lock button is pushed can be programmed on/off
within Uconnect Settings Ú page 199.
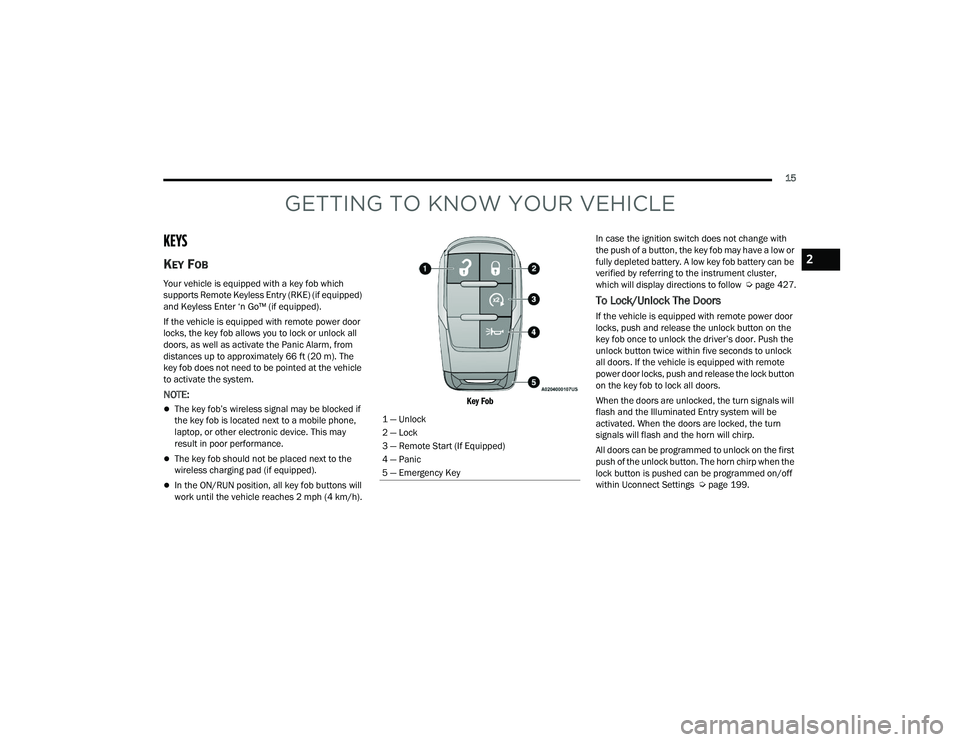
1 — Unlock
2 — Lock
3 — Remote Start (If Equipped)
4 — Panic
5 — Emergency Key
2
23_DPF_OM_EN_USC_t.book Page 15
Page 18 of 444

16GETTING TO KNOW YOUR VEHICLE
Using The Panic Feature
To turn the Panic feature on or off, push the Panic
button on the key fob. When the Panic feature is
activated, the turn signals will flash, the horn may
pulse on and off (if equipped with horn alarm), and
the interior lights will turn on.
The Panic feature will stay on for three minutes
unless you turn it off by either pushing the Panic
button a second time or driving the vehicle at a
speed of 15 mph (24 km/h) or greater.
NOTE:
The interior lights will turn off if you place the
ignition in the ON/RUN position while the Panic
feature is activated. However, the exterior lights
and horn (if equipped with horn alarm) will
remain on.
You may need to be less than 35 ft (11 m) from
the vehicle when using the key fob to turn off the
Panic feature due to the radio frequency noises
emitted by the system.
Key Left Vehicle Feature
If a valid key fob is no longer detected inside the
vehicle while the vehicle’s ignition system is in the
ON/RUN or START position, the message “Key Fob
Has Left The Vehicle” will be shown in the
instrument cluster display along with an interior
chime. An exterior audible and visual alert will also
be activated to warn the driver. The vehicle’s horn will rapidly chirp three times
along with a single flash of the vehicle’s exterior
lights.
NOTE:
The doors have to be open and then closed in
order for the vehicle to detect a key fob; the Key
Left Vehicle feature will not activate until all of
the doors are closed.
These alerts will not be activated in situations
where the vehicle’s engine is left running with
the key fob inside.
Replacing The Battery In The Key Fob
The replacement battery model is one CR2032
battery.
NOTE:
Customers are recommended to use a battery
obtained from Mopar®. Aftermarket coin
battery dimensions may not meet the original
OEM coin battery dimensions.
Perchlorate Material — special handling may
apply. See www.dtsc.ca.gov/hazard
-
ouswaste/perchlorate for further information.
Do not touch the battery terminals that are on
the back housing or the printed circuit board.
1. Remove the emergency key (1) by pushing
and holding the release button (2) located on
the side of the key fob while pulling the
emergency key out with your other hand.
Emergency Key Removal
2. Hold the key fob with the button side facing down, and locate the small rectangular gap on
the left side between the housing and the back
cover of the key fob. Use a small screwdriver
(or similar tool) to pry open the left side of the
fob cover while applying pressure until the
cover snaps open.
1 — Emergency Key
2 — Emergency Key Release Button
23_DPF_OM_EN_USC_t.book Page 16
Page 22 of 444

20GETTING TO KNOW YOUR VEHICLE
NOTE:
The key fob may not be detected by the vehicle
Keyless Enter ‘n Go™ system if it is located next
to a mobile phone, laptop or other electronic
device; these devices may block the key fob’s
wireless signal and prevent the Keyless Enter ‘n
Go™ system from starting the vehicle.
For more information on the engine starting
procedure, see Úpage 113.
REMOTE START — IF EQUIPPED
(GASOLINE)
This system uses the key fob to start the
engine conveniently from outside the
vehicle while still maintaining security.
The system has a range of approximately
300 ft (91 m).
Remote Start is used to defrost windows in cold
weather, and to reach a comfortable climate in all
ambient conditions before the driver enters the
vehicle.
NOTE:Obstructions between the vehicle and the key fob
may reduce this range Ú page 427.
HOW TO USE REMOTE START
Push and release the Remote Start button on the
key fob twice within five seconds. The parking
lights will flash, vehicle doors will lock, and the
horn will chirp twice (if programmed). Once the
vehicle has started, the engine will run for
15 minutes.
Pushing the Remote Start button a third time shuts
the engine off.
To drive the vehicle, push the unlock button, and
place the ignition in the ON/RUN position.
NOTE:
With Remote Start, the engine will only run for
15 minutes.
Remote Start can only be used twice.
If an engine fault is present or fuel level is low,
the vehicle will start and then shut down in 10
seconds.
The parking lights will turn on and remain on
during Remote Start mode.
For security, power window operation is
disabled when the vehicle is in the Remote Start
mode.
The ignition must be placed in the ON/RUN posi -
tion before the Remote Start sequence can be
repeated for a third cycle.
If your power door locks were unlocked, Remote
Start will automatically lock the doors.
All of the following conditions must be met before
the engine will remote start:
Gear selector in PARK
Doors closed
Hood closed
Hazard switch off
Brake switch inactive (brake pedal not pressed)
Battery at an acceptable charge level
Panic button not pushed
Fuel meets minimum requirement
System not disabled from previous Remote
Start event
WARNING!
Do not start or run an engine in a closed garage
or confined area. Exhaust gas contains carbon
monoxide (CO) which is odorless and colorless.
Carbon monoxide is poisonous and can cause
serious injury or death when inhaled.
Keep key fobs away from children. Operation
of the Remote Start system, windows, door
locks or other controls could cause serious
injury or death.
23_DPF_OM_EN_USC_t.book Page 20
Page 25 of 444

GETTING TO KNOW YOUR VEHICLE23
VEHICLE SECURITY SYSTEM — IF EQUIPPED
The Vehicle Security system monitors the vehicle
doors and ignition for unauthorized operation.
When the Vehicle Security system is activated,
interior switches for door locks are disabled. If
something triggers the alarm, the Vehicle Security
system will provide the following audible and
visible signals:
The horn will pulse
The turn signals will flash
The Vehicle Security Light in the instrument
cluster will flash
TO ARM THE SYSTEM
Follow these steps to arm the Vehicle Security
system:
1. Make sure the vehicle’s ignition is placed in
the OFF position.
For vehicles equipped with Keyless Entry,
make sure the vehicle’s keyless ignition
system is OFF. 2. Perform one of the following methods to lock
the vehicle:
Push the lock button on the interior power
door lock switch with the driver and/or
passenger door open.
Push the lock button on the exterior Passive
Entry door handle with a valid key fob avail -
able in the same exterior zone Ú page 25.
Push the lock button on the key fob.
3. If any doors are open, close them.
The Vehicle Security system will set when you use
the power door locks, or use the key fob to lock the
doors. After all the doors are locked and closed,
the Vehicle Security Light, in the instrument panel
cluster, will flash rapidly for about 16 seconds to
indicate that the alarm is being set. After the alarm
is set, the Vehicle Security Light will flash at a
slower rate to indicate that the system is armed.
TO DISARM THE SYSTEM
The Vehicle Security system can be disarmed using
any of the following methods:
1. Push the unlock button on the key fob.
2. Grab the Passive Entry door handle with a valid key fob within 5 ft (1.5 m) of the Passive Entry
door handle (if equipped) Ú page 25.
3. Cycle the ignition out of the OFF position. The Vehicle Security system is designed to protect
your vehicle. However, you can create conditions
where the system will give you a false alarm. If one
of the previously described arming sequences has
occurred, the Vehicle Security system will arm
regardless of whether you are in the vehicle or not.
If you remain in the vehicle and open a door, the
alarm will sound. If this occurs, disarm the Vehicle
Security system.
If the Vehicle Security system is armed and the
battery becomes disconnected, the Vehicle
Security system will remain armed when the
battery is reconnected; the exterior lights will flash,
and the horn will sound. If this occurs, disarm the
Vehicle Security system.
REARMING OF THE SYSTEM
If something triggers the alarm, and no action is
taken to disarm it, the Vehicle Security system will
turn the horn off after a 29 second cycle (with five
seconds between cycles and up to eight cycles if
the trigger remains active), and then rearm itself.
SECURITY SYSTEM MANUAL OVERRIDE
The Vehicle Security system will not arm if you lock
the doors using the manual door lock.
Keep key fobs away from children. Operation
of the Remote Start system, windows, door
locks or other controls could cause serious
injury or death.
WARNING!
2
23_DPF_OM_EN_USC_t.book Page 23
Page 43 of 444
GETTING TO KNOW YOUR VEHICLE41
The following indications may be displayed on the
Digital Rearview Mirror:
Digital Mode This indication will appear when the
Rearview camera is utilizing the cameras
on the vehicle.
Tow Mode Graphic - If Equipped This indication will appear when the
Rearview camera is utilizing the auxiliary
camera attached to the trailer.
View Switching In Progress This indication will appear when camera
view switching is in progress.
Camera Signal Lost - Single View This indication will appear when the
Rearview Camera has lost its signal.
Camera Signal Lost - Multiview This indication will appear when the
camera effected has lost its signal in
either Split Screen or Tri-View. Communication Lost
This indication will appear when the
Digital Rearview Camera has lost
communication with the vehicle.
If a camera signal is lost, switch to Automatic
Dimming Mirror mode.
For more information on trailer camera options,
see Ú page 173.
ILLUMINATED VANITY MIRROR —
I
F EQUIPPED
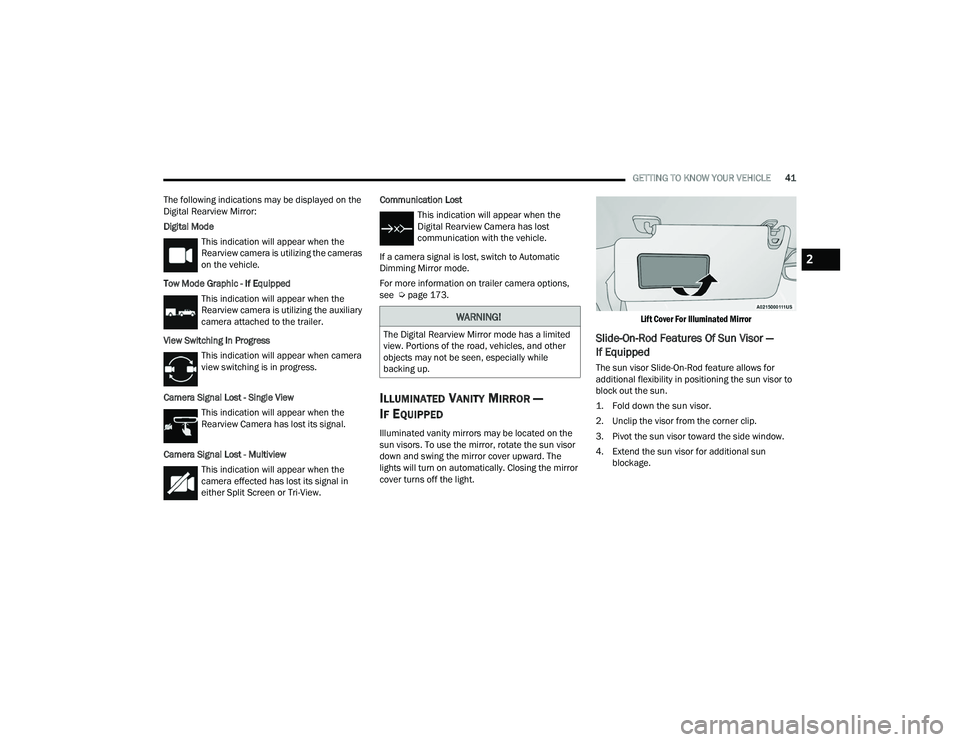
Illuminated vanity mirrors may be located on the
sun visors. To use the mirror, rotate the sun visor
down and swing the mirror cover upward. The
lights will turn on automatically. Closing the mirror
cover turns off the light.
Lift Cover For Illuminated Mirror
Slide-On-Rod Features Of Sun Visor —
If Equipped
The sun visor Slide-On-Rod feature allows for
additional flexibility in positioning the sun visor to
block out the sun.
1. Fold down the sun visor.
2. Unclip the visor from the corner clip.
3. Pivot the sun visor toward the side window.
4. Extend the sun visor for additional sun
blockage.
WARNING!
The Digital Rearview Mirror mode has a limited
view. Portions of the road, vehicles, and other
objects may not be seen, especially while
backing up.
2
23_DPF_OM_EN_USC_t.book Page 41
Page 45 of 444
GETTING TO KNOW YOUR VEHICLE43
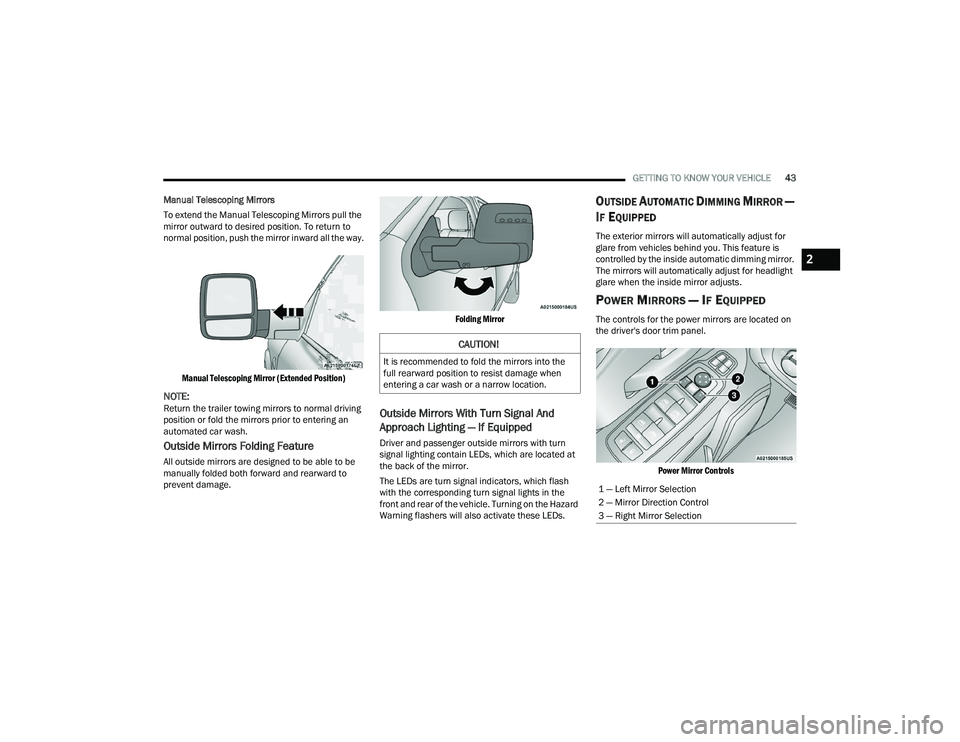
Manual Telescoping Mirrors
To extend the Manual Telescoping Mirrors pull the
mirror outward to desired position. To return to
normal position, push the mirror inward all the way.
Manual Telescoping Mirror (Extended Position)
NOTE:Return the trailer towing mirrors to normal driving
position or fold the mirrors prior to entering an
automated car wash.
Outside Mirrors Folding Feature
All outside mirrors are designed to be able to be
manually folded both forward and rearward to
prevent damage.
Folding Mirror
Outside Mirrors With Turn Signal And
Approach Lighting — If Equipped
Driver and passenger outside mirrors with turn
signal lighting contain LEDs, which are located at
the back of the mirror.
The LEDs are turn signal indicators, which flash
with the corresponding turn signal lights in the
front and rear of the vehicle. Turning on the Hazard
Warning flashers will also activate these LEDs.
OUTSIDE AUTOMATIC DIMMING MIRROR —
I
F EQUIPPED
The exterior mirrors will automatically adjust for
glare from vehicles behind you. This feature is
controlled by the inside automatic dimming mirror.
The mirrors will automatically adjust for headlight
glare when the inside mirror adjusts.
POWER MIRRORS — IF EQUIPPED
The controls for the power mirrors are located on
the driver's door trim panel.
Power Mirror Controls
CAUTION!
It is recommended to fold the mirrors into the
full rearward position to resist damage when
entering a car wash or a narrow location.
1 — Left Mirror Selection
2 — Mirror Direction Control
3 — Right Mirror Selection
2
23_DPF_OM_EN_USC_t.book Page 43
Page 54 of 444
52GETTING TO KNOW YOUR VEHICLE
DAYTIME RUNNING LIGHTS (DRLS)
The Daytime Running Lights (DRLs) come on
whenever the engine is running, and the low
beams are not on. The lights will remain on until
the ignition is placed in the OFF or ACC position, or
the parking brake is engaged.
NOTE:
For vehicles sold in Canada, the Daytime
Running Lights will automatically deactivate
when the front fog lights are turned on.
If allowed by law in the country in which the
vehicle was purchased, the Daytime Running
Lights can be turned on and off using the
Uconnect system Úpage 199.
On some vehicles, the Daytime Running Lights
may deactivate, or reduce intensity, on one side
of the vehicle (when a turn signal is activated on
that side), or on both sides of the vehicle (when
the hazard warning lights are activated).
HIGH/LOW BEAM SWITCH
Push the multifunction lever toward the instrument
panel to switch the headlights to high beam.
Pulling the multifunction lever back toward the
steering wheel will turn the low beams back on.
AUTOMATIC HIGH BEAM HEADLAMP
C
ONTROL — IF EQUIPPED
The Automatic High Beam Headlamp Control
system provides increased forward lighting at night
by automating high beam control through the use
of a camera mounted on the inside rearview mirror
or a windshield mounted camera. These cameras
detect vehicle specific light and automatically
switch from high beams to low beams until the
approaching vehicle is out of view.
NOTE:
The Automatic High Beam Headlamp Control
can be turned on or off by selecting “ON” under
“Auto Dim High Beams” within your Uconnect
Settings Ú page 199, as well as turning the
headlight switch to the AUTO position.
Broken, muddy, or obstructed headlights and
taillights of vehicles in the field of view will
cause headlights to remain on longer (closer to
the vehicle). Also, dirt, film, and other obstruc -
tions on the windshield or camera lens will
cause the system to function improperly.
If the windshield or Automatic High Beam Head -
lamp Control mirror is replaced, the mirror must
be re-aimed to ensure proper performance. See
a local authorized dealer.
To opt out of the Automatic High-Beam Sensi -
tivity Control (default) and enter Reduced
High-Beam Sensitivity Control (not recom -
mended), toggle the multifunction lever six full
on/off cycles within 10 seconds of ignition ON.
The system will return to the default setting
when the ignition is placed in the OFF position.
FLASH-TO-PASS
You can signal another vehicle with your headlights
by lightly pulling the multifunction lever toward you.
This will cause the high beam headlights to turn on,
and remain on, until the lever is released.
AUTOMATIC HEADLIGHTS — IF EQUIPPED
This system automatically turns your headlights on
or off based on ambient light levels. To turn the
system on, rotate the headlight switch to the AUTO
position.
When the system is on, the Headlight Delay feature
is also on. This means the headlights will stay on
for up to 90 seconds after you place the ignition
into the OFF position. To turn the automatic
headlights off, turn the headlight switch out of the
AUTO position.
NOTE:The engine must be running before the headlights
will come on in the Automatic mode.
23_DPF_OM_EN_USC_t.book Page 52