cooling Ram ProMaster 2018 User Guide
[x] Cancel search | Manufacturer: RAM, Model Year: 2018, Model line: ProMaster, Model: Ram ProMaster 2018Pages: 204, PDF Size: 4 MB
Page 25 of 204
NOTE:
• If fog or mist appears on the windshield orside glass, select Defrost mode and in-
crease blower speed if needed.
• If your air conditioning performance seems lower than expected, check the front of the
A/C condenser (located in front of the ra-
diator), for an accumulation of dirt or in-
sects. Clean with a gentle water spray from
the front of the radiator and through the
condenser.
Recirculation
When outside air contains smoke, odors, or
high humidity, or if rapid cooling is desired,
you may wish to recirculate interior air by
pressing the Recirculation control button.
The recirculation indicator will illuminate
when this button is selected. Press the button
a second time to turn off the Recirculation
mode and allow outside air into the vehicle. NOTE:
In cold weather, use of recirculation mode
may lead to excessive window fogging. On
systems with Manual Climate Controls, the
Recirculation mode is not allowed in Defrost
mode to improve window clearing operation.
Recirculation will be disabled automatically
if this mode is selected. Attempting to use
Recirculation while in this mode will cause
the LED in the control button to blink and
then turn off.
Operating Tips
Summer Operation
The engine cooling system must be protected
with a high-quality antifreeze coolant to pro-
vide proper corrosion protection and to pro-
tect against engine overheating. A solution of
50% OAT (Organic Additive Technology) cool-
ant that meets the requirements of FCA Ma-
terial Standard MS.90032 and 50% water is
recommended. Refer to “Dealer Service” in
“Servicing And Maintenance” for proper
coolant selection.
Winter Operation
Use of the air Recirculation mode during
winter months is not recommended because
it may cause window fogging.
Vacation Storage
Any time you store your vehicle or keep it out
of service (i.e., vacation) for two weeks or
more, run the air conditioning system at idle
for about five minutes in the fresh air and
high blower setting. This will ensure ad-
equate system lubrication to minimize the
possibility of compressor damage when the
system is started again.
Window Fogging
Interior fogging on the windshield can be
quickly removed by turning the mode selector
to Defrost. The Defrost/Floor mode can be
used to maintain a clear windshield and pro-
vide sufficient heating. If side window fog-
ging becomes a problem increase blower
speed. Vehicle windows tend to fog on the
inside in mild but rainy or humid weather.
23
Page 72 of 204

WARNING!
• If you are required to drive with thetrunk/liftgate/rear doors open, make sure
that all windows are closed and the cli-
mate control BLOWER switch is set at
high speed. DO NOT use the recircula-
tion mode.
• If it is necessary to sit in a parked vehicle
with the engine running, adjust your
heating or cooling controls to force out-
side air into the vehicle. Set the blower
at high speed.
The best protection against carbon monoxide
entry into the vehicle body is a properly
maintained engine exhaust system.
Whenever a change is noticed in the sound of
the exhaust system, when exhaust fumes can
be detected inside the vehicle, or when the
underside or rear of the vehicle is damaged,
have a competent mechanic inspect the com-
plete exhaust system and adjacent body ar-
eas for broken, damaged, deteriorated, or
mispositioned parts. Open seams or loose
connections could permit exhaust fumes to
seep into the passenger compartment. In addition, inspect the exhaust system each
time the vehicle is raised for lubrication or oil
change. Replace as required.
Safety Checks You Should Make
Inside The Vehicle
Seat Belts
Inspect the seat belt system periodically,
checking for cuts, frays, and loose parts.
Damaged parts must be replaced immedi-
ately. Do not disassemble or modify the sys-
tem.
Front seat belt assemblies must be replaced
after a collision. Rear seat belt assemblies
must be replaced after a collision if they have
been damaged (i.e., bent retractor, torn web-
bing, etc.). If there is any question regarding
seat belt or retractor condition, replace the
seat belt.
Air Bag Warning Light
The Air Bag warning lightwill turn on for
four to eight seconds as a bulb check when
the ignition switch is first turned to ON/RUN.
If the light is either not on during starting, stays on, or turns on while driving, have the
system inspected at your authorized dealer as
soon as possible. After the bulb check, this
light will illuminate with a single chime when
a fault with the Air Bag System has been
detected. It will stay on until the fault is
cleared. If the light comes on intermittently
or remains on while driving, have your autho-
rized dealer service the vehicle immediately.
Refer to “Occupant Restraint Systems” in
“Safety” for further information.
Defroster
Check operation by selecting the defrost
mode and place the blower control on high
speed. You should be able to feel the air
directed against the windshield. See your
authorized dealer for service if your defroster
is inoperable.
Floor Mat Safety Information
Always use floor mats designed to fit your
vehicle. Only use a floor mat that does not
interfere with the operation of the accelera-
tor, brake or clutch pedals. Only use a floor
mat that is securely attached using the floor
SAFETY
70
Page 105 of 204

Underhood Fuses
The Front Power Distribution Center is lo-
cated on the driver’s side of the engine com-
partment. To access the fuses, remove the
cover.The ID number of the electrical component
corresponding to each fuse can be found on
the back of the cover.
Cavity
Maxi Fuse Mini Fuse Description
F01 40 Amp Orange –Electronic Stability Control (ESC) Pump
F02 20 Amp Yellow (3.6 Gasoline
Engine) –
Starter Relay 3.6L (3.6 Gasoline Engine)
F03 30 Amp Green UREA (3.0 Diesel Engine)
F02 50 Amp Red (3.0 Diesel En-
gine) –
Glow Plug Unit (3.0 Diesel Engine)
F04 50 Amp Red (3.6 Gasoline
Engine) –Secondary Power Distribution Center (PDC) (Trans
Power Relay, Vacuum Pump, KL30 for the Shifter
Transmission Module [STM]) (3.6 Gasoline Engine)
F04 40 Amp Orange (3.0 Diesel
Engine) –
Fuel Filter Heater (3.0 Diesel Engine)
F05 30 Amp Green –SELESPEED Pump RELE (3.0 Diesel Engine) —
If Equipped
F06 40 Amp Orange (non A/C)
60 Amp Blue (A/C) –
Engine Cooling Fan - 2nd Speed
F07 50 Amp Red (non A/C)
60 Amp Blue (A/C) –
Engine Cooling Fan - 1st Speed
F08 40 Amp Orange –Passenger Compartment Blower
F09 –15 Amp BlueRear Power Outlet
103
Page 118 of 204
WARNING!
Do not attempt jump starting if the battery
is frozen. It could rupture or explode and
cause personal injury.
CAUTION!
Do not use a portable battery booster pack
or any other booster source with a system
voltage greater than 12 Volts or damage to
the battery, starter motor, alternator or
electrical system may occur.
Preparations For Jump Start
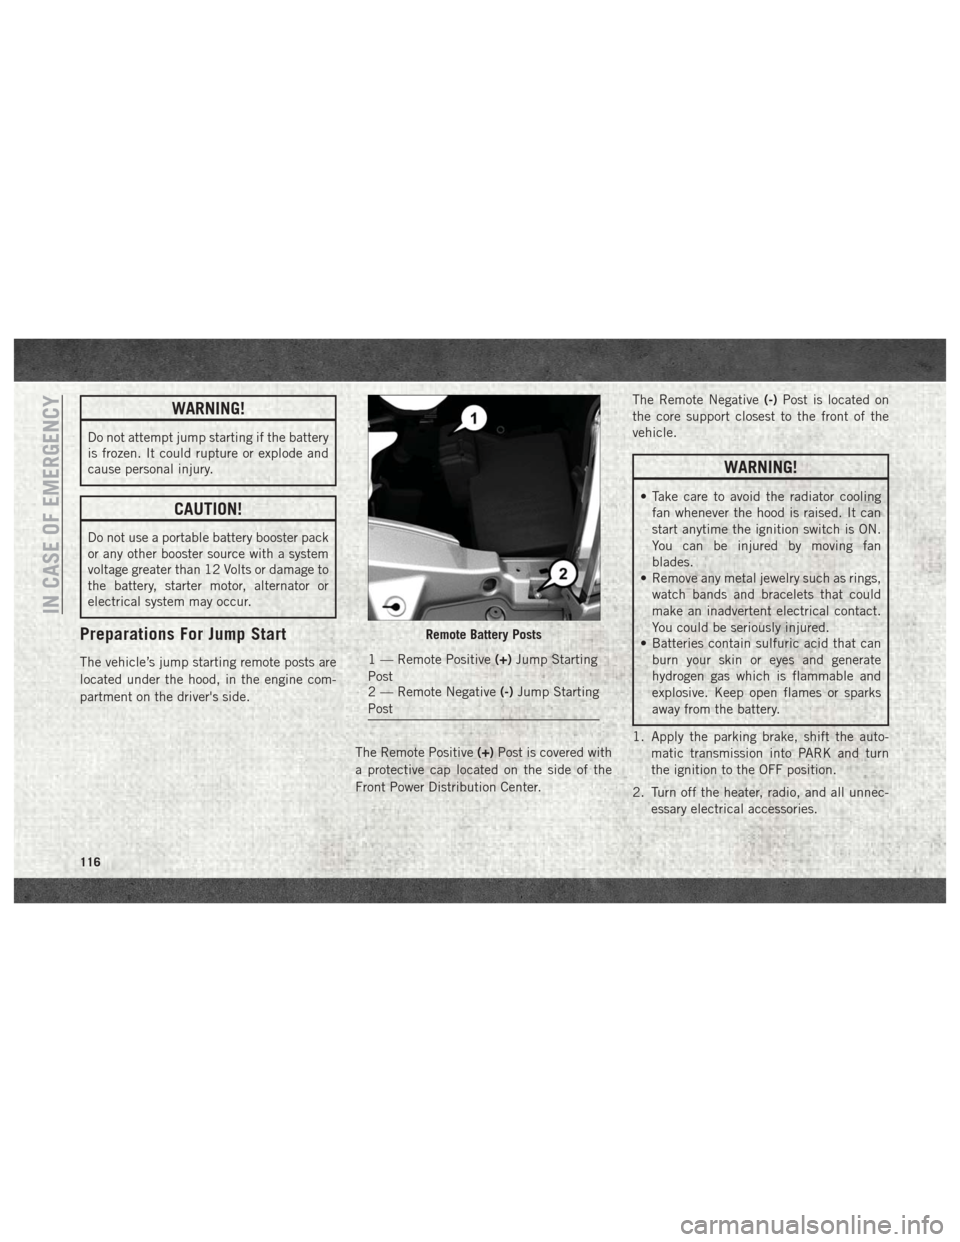
The vehicle’s jump starting remote posts are
located under the hood, in the engine com-
partment on the driver's side.The Remote Positive(+)Post is covered with
a protective cap located on the side of the
Front Power Distribution Center. The Remote Negative
(-)Post is located on
the core support closest to the front of the
vehicle.
WARNING!
• Take care to avoid the radiator cooling fan whenever the hood is raised. It can
start anytime the ignition switch is ON.
You can be injured by moving fan
blades.
• Remove any metal jewelry such as rings,
watch bands and bracelets that could
make an inadvertent electrical contact.
You could be seriously injured.
• Batteries contain sulfuric acid that can
burn your skin or eyes and generate
hydrogen gas which is flammable and
explosive. Keep open flames or sparks
away from the battery.
1. Apply the parking brake, shift the auto- matic transmission into PARK and turn
the ignition to the OFF position.
2. Turn off the heater, radio, and all unnec- essary electrical accessories.
Remote Battery Posts
1 — Remote Positive (+)Jump Starting
Post
2 — Remote Negative (-)Jump Starting
Post
IN CASE OF EMERGENCY
116
Page 120 of 204
3. Disconnect the positive end(+)of the
jumper cable from the positive (+)post of
the booster battery.
4. Disconnect the opposite end of the posi- tive (+)jumper cable from the remote
positive (+)post of the discharged
vehicle.
5. Close the cover of the Front Power Distri- bution Center.
If frequent jump starting is required to start
your vehicle you should have the battery and
charging system inspected at your authorized
dealer.
CAUTION!
Accessories plugged into the vehicle
power outlets draw power from the vehi-
cle’s battery, even when not in use (i.e.,
cellular devices, etc.). Eventually, if
plugged in long enough without engine
operation, the vehicle’s battery will dis-
charge sufficiently to degrade battery life
and/or prevent the engine from starting.
Battery Location
There are two remote jump starting posts
under the hood which is the recommended
jump start location. If access to the battery is
needed, an access panel on the driver’s side
floor will allow for battery access.
IF YOUR ENGINE OVERHEATS
In any of the following situations, you can
reduce the potential for overheating by taking
the appropriate action.
• On the highways — slow down.
• In city traffic — while stopped, place the transmission in NEUTRAL, but do not in-
crease the engine idle speed while prevent-
ing vehicle motion with the brakes.
NOTE:
There are steps that you can take to slow
down an impending overheat condition:
• If your air conditioner (A/C) is on, turn it off. The A/C system adds heat to the engine
cooling system and turning the A/C off can
help remove this heat. • You can also turn the temperature control
to maximum heat, the mode control to floor
and the blower control to high. This allows
the heater core to act as a supplement to
the radiator and aids in removing heat from
the engine cooling system.
WARNING!
You or others can be badly burned by hot
engine coolant (antifreeze) or steam from
your radiator. If you see or hear steam
coming from under the hood, do not open
the hood until the radiator has had time to
cool. Never try to open a cooling system
pressure cap when the radiator or coolant
bottle is hot.
IN CASE OF EMERGENCY
118
Page 121 of 204

CAUTION!
Driving with a hot cooling system could
damage your vehicle. If the temperature
gauge reads HOT (H), pull over and stop
the vehicle. Idle the vehicle with the air
conditioner turned off until the pointer
drops back into the normal range. If the
pointer remains on HOT (H), and you hear
continuous chimes, turn the engine off
immediately and call for service.
GEAR SELECTOR OVERRIDE (GASOLINE
ENGINE ONLY)
If a malfunction occurs and the gear selector
cannot be moved out of the PARK position,
you can use the following procedure to tem-
porarily move the gear selector:
1. Turn the engine OFF.
2. Firmly apply the parking brake.
3. Using a small screwdriver or similar tool,remove the gear selector override access
cover which is located below the gear
selector. 4. Press and maintain firm pressure on the
brake pedal.
5. Insert the screwdriver or similar tool into the access port, and push and hold the
override release lever forward.
6. Move the gear selector to the NEUTRAL position.
7. The vehicle may then be started in NEUTRAL.
8. Reinstall the gear selector override access cover.
FREEING A STUCK VEHICLE
If your vehicle becomes stuck in mud, sand,
or snow, it can often be moved using a rock-
ing motion. Turn the steering wheel right and
left to clear the area around the front wheels.
Shift back and forth between DRIVE and
REVERSE, while gently pressing the accel-
erator. Use the least amount of accelerator
pedal pressure that will maintain the rocking
motion, without spinning the wheels or racing
the engine. NOTE:
Vehicles with diesel engine (automated
manual transmission) cannot be rocked in
this manner, because the transmission will
not allow shifts between forward and RE-
VERSE gears while the wheels are turning.
CAUTION!
Racing the engine or spinning the wheels
may lead to transmission overheating and
failure. Allow the engine to idle with the
transmission in NEUTRAL for at least one
minute after every five rocking-motion
cycles. This will minimize overheating and
reduce the risk of transmission failure dur-
ing prolonged efforts to free a stuck ve-
hicle.
119
Page 127 of 204

Maintenance Plan
Required Maintenance Intervals
Refer to the maintenance plan on the follow-
ing pages for the required maintenance inter-
vals.
At Every Oil Change Interval As Indicated By OilChange Indicator System:
• Change oil and filter.
• Rotate the tires. Rotate at the first sign of
irregular wear, even if it occurs before the oil
indicator system turns on.
• Inspect battery and clean and tighten ter- minals as required.
• Inspect brake pads, shoes, rotors, drums, hoses and park brake.
• Inspect engine cooling system protection and hoses.
• Inspect exhaust system.
• Inspect engine air cleaner if using in dusty or off-road conditions.
125
Page 130 of 204
Heavy Duty Use Of The Vehicle
Change engine oil at 4,000 miles (6,500 km)
or 350 hours of engine run time if the vehicle
is operated in a dusty and off road environ-
ment or is operated predominately at idle or
only very low engine RPM’s. This type of
vehicle use is considered Severe Duty.
SCHEDULED MAINTENANCE — DIESEL
ENGINE
Your vehicle is equipped with an automatic
oil change indicator system. The oil change
indicator system will remind you that it is
time to take your vehicle in for scheduled
maintenance.
Based on engine operation conditions, the oil
change indicator message will illuminate in
the instrument cluster. This means that ser-
vice is required for your vehicle. Operating
conditions such as frequent short-trips,
trailer tow, and extremely hot or cold ambient
temperatures will influence when the “Oil
Change Required” message is displayed. Se-
vere Operating Conditions can cause the
change oil message to illuminate as early as3,500 miles (5,600 km) since last reset.
Have your vehicle serviced as soon as pos-
sible, within the next 500 miles (805 km).
NOTE:
Under no circumstances should oil change
intervals exceed 18,500 miles (29,773 km)
or twelve months, whichever comes first.
Once A Month Or Before A Long Trip:
• Check engine oil level
• Check windshield washer fluid level
• Check the tire inflation pressures and look
for unusual wear or damage
• Check the fluid levels of the coolant reser- voir, brake master cylinder, and power
steering, and fill as needed
• Check function of all interior and exterior lights
Maintenance Plan — Diesel Fuel
Up To B5 Biodiesel
Required Maintenance Intervals.
Refer to the maintenance schedules on the
following page for the required maintenance
intervals.
At Every Oil Change Interval As Indicated By The Oil Change Indicator System:
• Change oil and filter.
• Rotate the tires. Rotate at the first sign of
irregular wear, even if it occurs before your
next scheduled service.
• Inspect battery and clean and tighten ter- minals as required.
• Inspect brake pads, rotors, hoses and park brake.
• Inspect engine cooling system protection and hoses.
• Inspect exhaust system.
• Inspect engine air cleaner if using in dusty or off-road conditions.
SERVICING AND MAINTENANCE
128
Page 157 of 204

FLUID CAPACITIES — GASOLINE ENGINE
U.S.Metric
Fuel (Approximate) 24 Gallons90 Liters
Engine Oil With Filter
3.6L Engine (SAE 5W-20, API Certified) 6 Quarts5.6 Liters
Cooling System *
3.6L Engine (Mopar Antifreeze/Engine Coolant
10 Year/150,000 Mile Formula or equivalent) 10.5 Quarts
10 Liters
FLUID CAPACITIES — DIESEL ENGINE
U.S.Metric
Fuel (Approximate)
3.0L Diesel Engine 24 Gallons90 Liters
Diesel Exhaust Fluid Tank 5 Gallons18.9 Liters
Engine Oil with Filter
3.0L Diesel Engine 9.5 Quarts9.0 Liters
Cooling System *
3.0L Diesel Engine With MTA Transmission
(Mopar Antifreeze/Engine Coolant 10 Year/
150,000 Mile Formula or equivalent) 12.7 Quarts
12 Liters
* Includes heater and coolant recovery bottle filled to MAX level. Add 2.9 Qts (2.8 L) if equipped with a rear heater.
155
Page 158 of 204
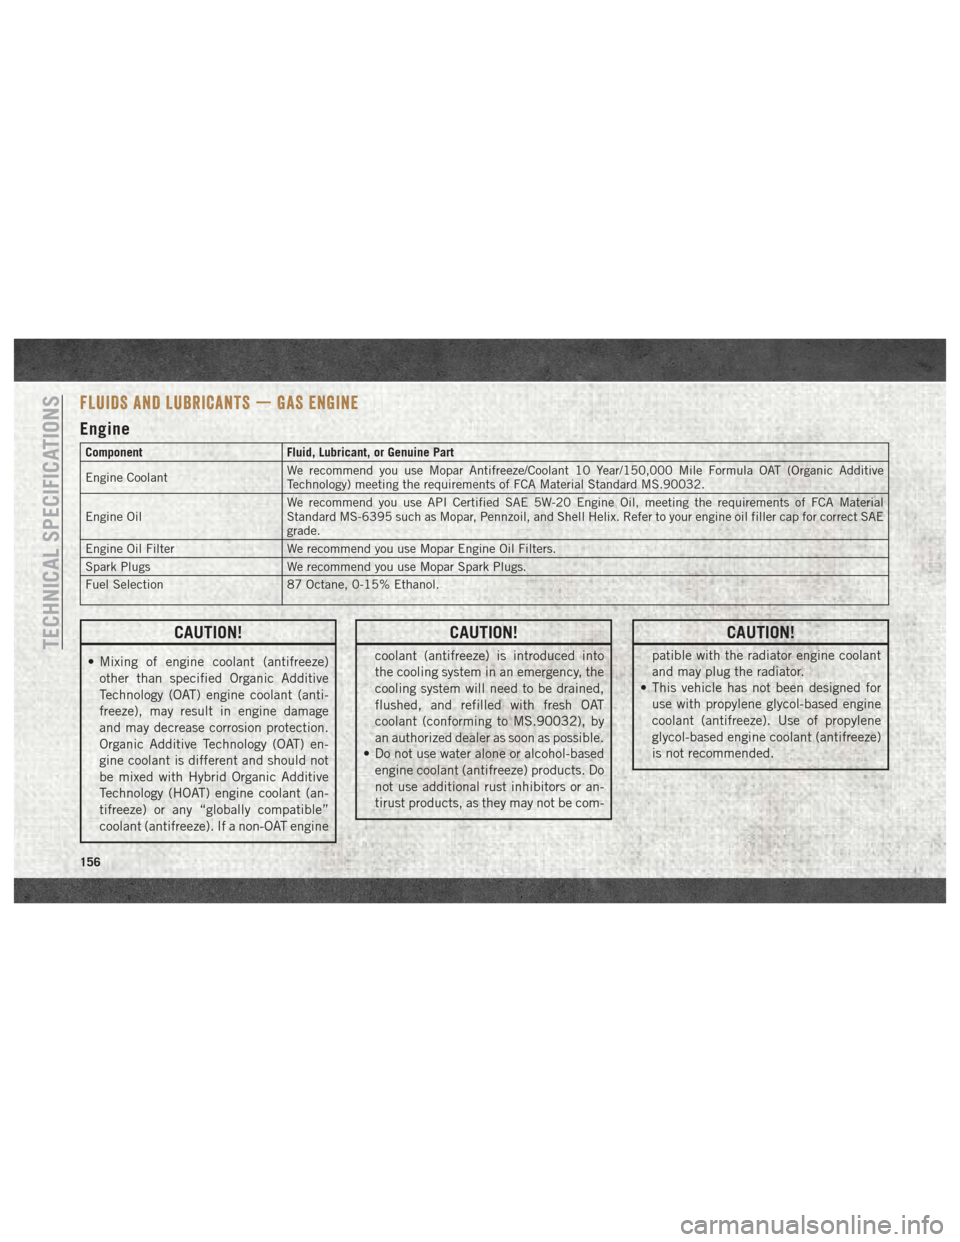
FLUIDS AND LUBRICANTS — GAS ENGINE
Engine
ComponentFluid, Lubricant, or Genuine Part
Engine Coolant We recommend you use Mopar Antifreeze/Coolant 10 Year/150,000 Mile Formula OAT (Organic Additive
Technology) meeting the requirements of FCA Material Standard MS.90032.
Engine Oil We recommend you use API Certified SAE 5W-20 Engine Oil, meeting the requirements of FCA Material
Standard MS-6395 such as Mopar, Pennzoil, and Shell Helix. Refer to your engine oil filler cap for correct SAE
grade.
Engine Oil Filter We recommend you use Mopar Engine Oil Filters.
Spark Plugs We recommend you use Mopar Spark Plugs.
Fuel Selection 87 Octane, 0-15% Ethanol.
CAUTION!
• Mixing of engine coolant (antifreeze)
other than specified Organic Additive
Technology (OAT) engine coolant (anti-
freeze), may result in engine damage
and may decrease corrosion protection.
Organic Additive Technology (OAT) en-
gine coolant is different and should not
be mixed with Hybrid Organic Additive
Technology (HOAT) engine coolant (an-
tifreeze) or any “globally compatible”
coolant (antifreeze). If a non-OAT engine
CAUTION!
coolant (antifreeze) is introduced into
the cooling system in an emergency, the
cooling system will need to be drained,
flushed, and refilled with fresh OAT
coolant (conforming to MS.90032), by
an authorized dealer as soon as possible.
• Do not use water alone or alcohol-based
engine coolant (antifreeze) products. Do
not use additional rust inhibitors or an-
tirust products, as they may not be com-
CAUTION!
patible with the radiator engine coolant
and may plug the radiator.
• This vehicle has not been designed for
use with propylene glycol-based engine
coolant (antifreeze). Use of propylene
glycol-based engine coolant (antifreeze)
is not recommended.TECHNICAL SPECIFICATIONS
156