manual radio set Ram ProMaster 2018 User Guide
[x] Cancel search | Manufacturer: RAM, Model Year: 2018, Model line: ProMaster, Model: Ram ProMaster 2018Pages: 204, PDF Size: 4 MB
Page 32 of 204
INSTRUMENT CLUSTER DISPLAY
Your vehicle may be equipped with an instru-
ment cluster display, which offers useful in-
formation to the driver. With the ignition in
the STOP/OFF mode, opening/closing of a
door will activate the display for viewing, and
display the total miles, or kilometers, in the
odometer. Your instrument cluster display is
designed to display important information
about your vehicle’s systems and features.
Using a driver interactive display located on
the instrument panel, your instrument clus-
ter display can show you how systems are
working and give you warnings when they are
not. The steering wheel mounted controls
allow you to scroll through the main menus
and submenus. You can access the specific
information you want and make selections
and adjustments.
Location And Controls
The instrument cluster display features a
driver-interactive display that is located in
the instrument cluster.This system allows the driver to select a
variety of useful information by pushing the
switches mounted on the instrument panel.
Examples of menu items are:
• Speed Beep
• Buzzer Volume
• Seat Belt Buzzer (Just Available After SBR
Disable Made By CHR Service)
• Service (Diesel Only)
• Exit Menu
If equipped with a Uconnect system, some
customer programmable features will
display in the radio. Refer to the “Uconnect
Settings” in “Multimedia” in the Owner’s
Manual at
www.mopar.com/en-us/care/
owners-manual.html (U.S. Residents) or
www.owners.mopar.ca (Canadian Residents)
for further information.
The system allows the driver to select infor-
mation by pushing the following buttons
mounted on the instrument panel to the left
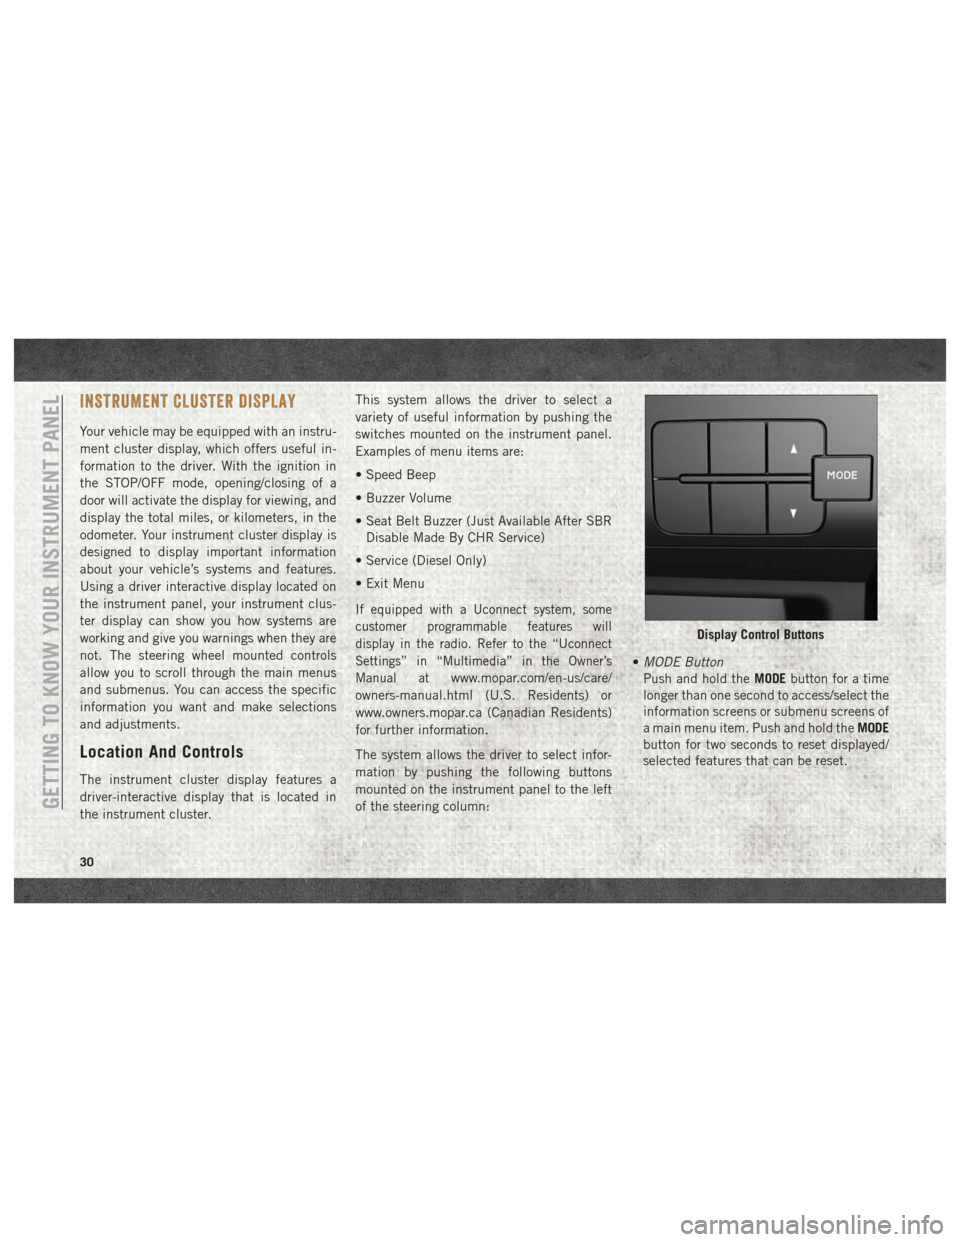
of the steering column: •
MODE Button
Push and hold the MODEbutton for a time
longer than one second to access/select the
information screens or submenu screens of
a main menu item. Push and hold the MODE
button for two seconds to reset displayed/
selected features that can be reset.
Display Control Buttons
GETTING TO KNOW YOUR INSTRUMENT PANEL
30
Page 91 of 204
SPEED CONTROL
When engaged, the Speed Control takes over
accelerator operations at speeds greater than
25 mph (40 km/h) up to the maximum speed
of 100 mph (160 km/h).
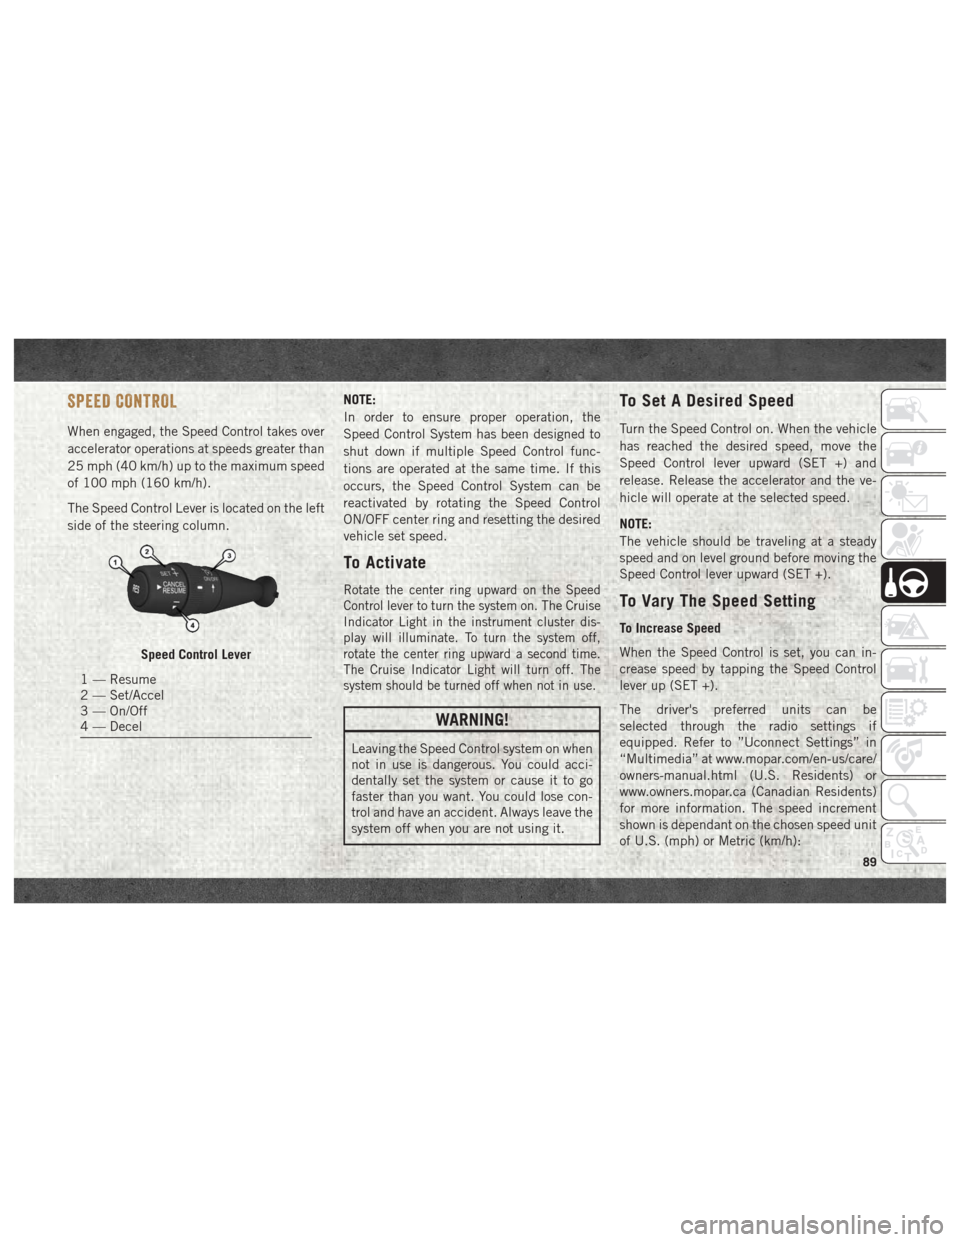
The Speed Control Lever is located on the left
side of the steering column.NOTE:
In order to ensure proper operation, the
Speed Control System has been designed to
shut down if multiple Speed Control func-
tions are operated at the same time. If this
occurs, the Speed Control System can be
reactivated by rotating the Speed Control
ON/OFF center ring and resetting the desired
vehicle set speed.
To Activate
Rotate the center ring upward on the Speed
Control lever to turn the system on. The Cruise
Indicator Light in the instrument cluster dis-
play will illuminate. To turn the system off,
rotate the center ring upward a second time.
The Cruise Indicator Light will turn off. The
system should be turned off when not in use.
WARNING!
Leaving the Speed Control system on when
not in use is dangerous. You could acci-
dentally set the system or cause it to go
faster than you want. You could lose con-
trol and have an accident. Always leave the
system off when you are not using it.
To Set A Desired Speed
Turn the Speed Control on. When the vehicle
has reached the desired speed, move the
Speed Control lever upward (SET +) and
release. Release the accelerator and the ve-
hicle will operate at the selected speed.
NOTE:
The vehicle should be traveling at a steady
speed and on level ground before moving the
Speed Control lever upward (SET +).
To Vary The Speed Setting
To Increase Speed
When the Speed Control is set, you can in-
crease speed by tapping the Speed Control
lever up (SET +).
The driver's preferred units can be
selected through the radio settings if
equipped. Refer to ”Uconnect Settings” in
“Multimedia” at www.mopar.com/en-us/care/
owners-manual.html (U.S. Residents) or
www.owners.mopar.ca (Canadian Residents)
for more information. The speed increment
shown is dependant on the chosen speed unit
of U.S. (mph) or Metric (km/h):
Speed Control Lever
1 — Resume
2 — Set/Accel
3 — On/Off
4 — Decel
89
Page 92 of 204
U.S. Speed (mph)
• Tapping the Speed Control lever up (SET +)once will result in a 1 mph increase in set
speed. Each subsequent tap of the lever
results in an increase of 1 mph.
• If the lever is continually held up, the set speed will continue to increase until the
lever is released, then the new set speed
will be established.
Metric Speed (km/h)
• Tapping the Speed Control lever up (SET +) once will result in a 1 km/h increase in set
speed. Each subsequent tap of the lever
results in an increase of 1 km/h.
• If the lever is continually held up, the set speed will continue to increase until the
lever is released, then the new set speed
will be established.
To Decrease Speed
When the Speed Control is set, you can de-
crease speed by tapping the Speed Control
lever down (-). The driver's preferred units can be
selected through the radio settings if
equipped. Refer to ”Uconnect Settings” in
“Multimedia” at www.mopar.com/en-us/care/
owners-manual.html (U.S. Residents) or
www.owners.mopar.ca (Canadian Residents)
for more information. The speed increment
shown is dependant on the chosen speed unit
of U.S. (mph) or Metric (km/h):
U.S. Speed (mph)
• Tapping the Speed Control lever down (-)
once will result in a 1 mph decrease in set
speed. Each subsequent tap of the lever
results in a decrease of 1 mph.
• If the lever is continually held down, the set speed will continue to decrease until the
lever is released, then the new set speed
will be established.
Metric Speed (km/h)
• Tapping the Speed Control lever down (-) once will result in a 1 km/h decrease in set
speed. Each subsequent tap of the lever
results in a decrease of 1 km/h. • If the lever is continually held down, the set
speed will continue to decrease until the
lever is released, then the new set speed
will be established.
To Accelerate For Passing
Press the accelerator as you would normally.
When the pedal is released, the vehicle will
return to the set speed.
Using Speed Control On Hills
The transmission may downshift on hills to
maintain the vehicle set speed.
NOTE:
The Speed Control system maintains speed
up and down hills. A slight speed change on
moderate hills is normal.
On steep hills, a greater speed loss or gain
may occur so it may be preferable to drive
without Speed Control.
WARNING!
Speed Control can be dangerous where the
system cannot maintain a constant speed.
Your vehicle could go too fast for the con-
STARTING AND OPERATING
90
Page 169 of 204
Seek Up/Down Buttons
• Push the up or down button to seek throughradio stations in AM, FM or SXM bands.
• Hold either button to bypass stations with- out stopping.
Store Radio Presets Manually
The Radio stores up to 12 presets in each of
the Radio modes. There are four visible pre-
sets at the top of the radio screen. Pressing
the “All” button on the touchscreen will dis-
play all of the preset stations for that mode.
To store a radio preset manually, follow the
steps below:
1. Tune to the desired station.
2. Press and hold the desired numbered but- ton on the touchscreen for more than two
seconds, or until you hear a confirmation
beep.USB/Audio Jack (AUX)/Bluetooth
Operation
USB/iPod
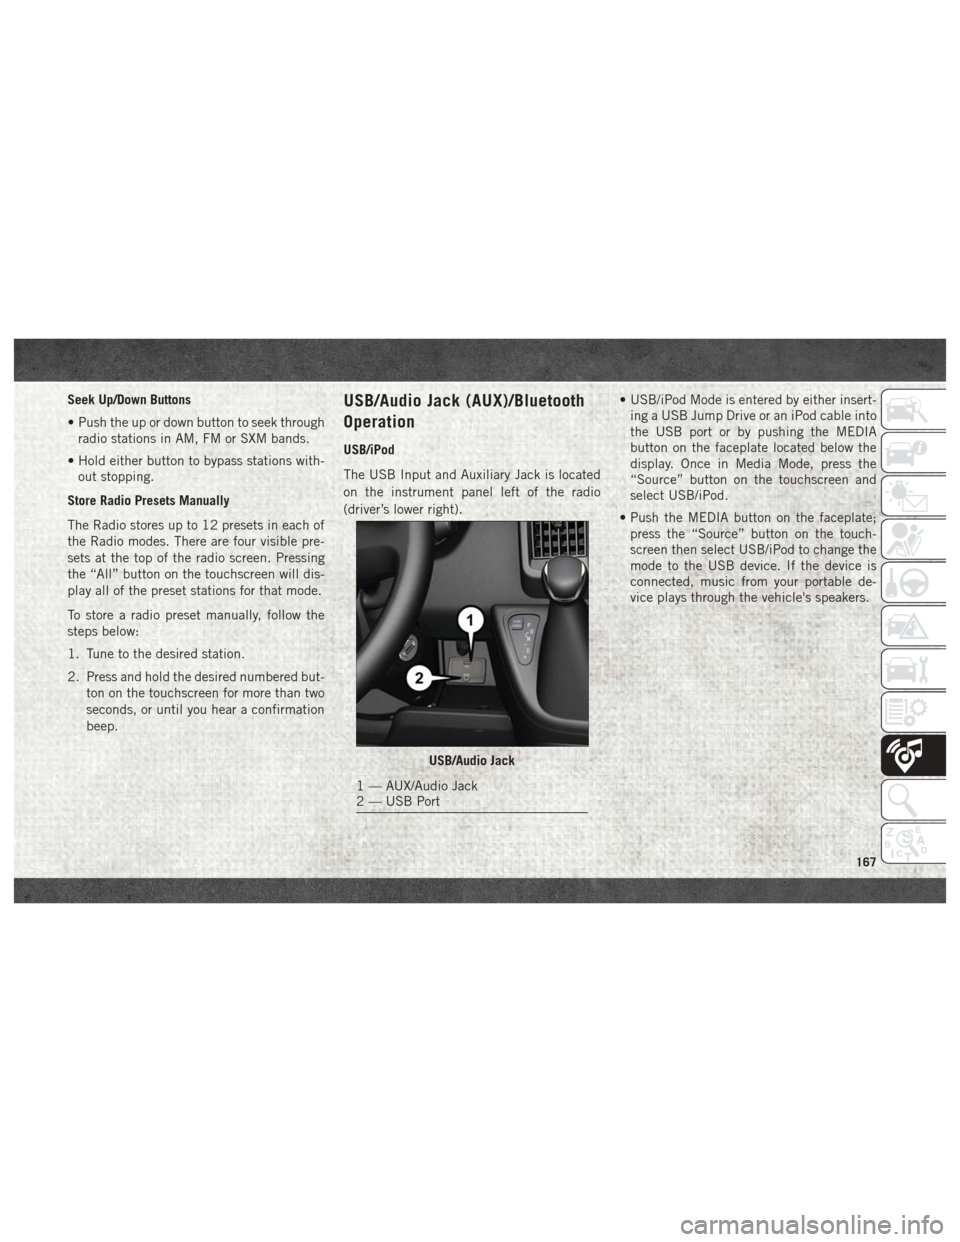
The USB Input and Auxiliary Jack is located
on the instrument panel left of the radio
(driver’s lower right). • USB/iPod Mode is entered by either insert-
ing a USB Jump Drive or an iPod cable into
the USB port or by pushing the MEDIA
button on the faceplate located below the
display. Once in Media Mode, press the
“Source” button on the touchscreen and
select USB/iPod.
• Push the MEDIA button on the faceplate; press the “Source” button on the touch-
screen then select USB/iPod to change the
mode to the USB device. If the device is
connected, music from your portable de-
vice plays through the vehicle's speakers.
USB/Audio Jack
1 — AUX/Audio Jack
2 — USB Port
167
Page 171 of 204
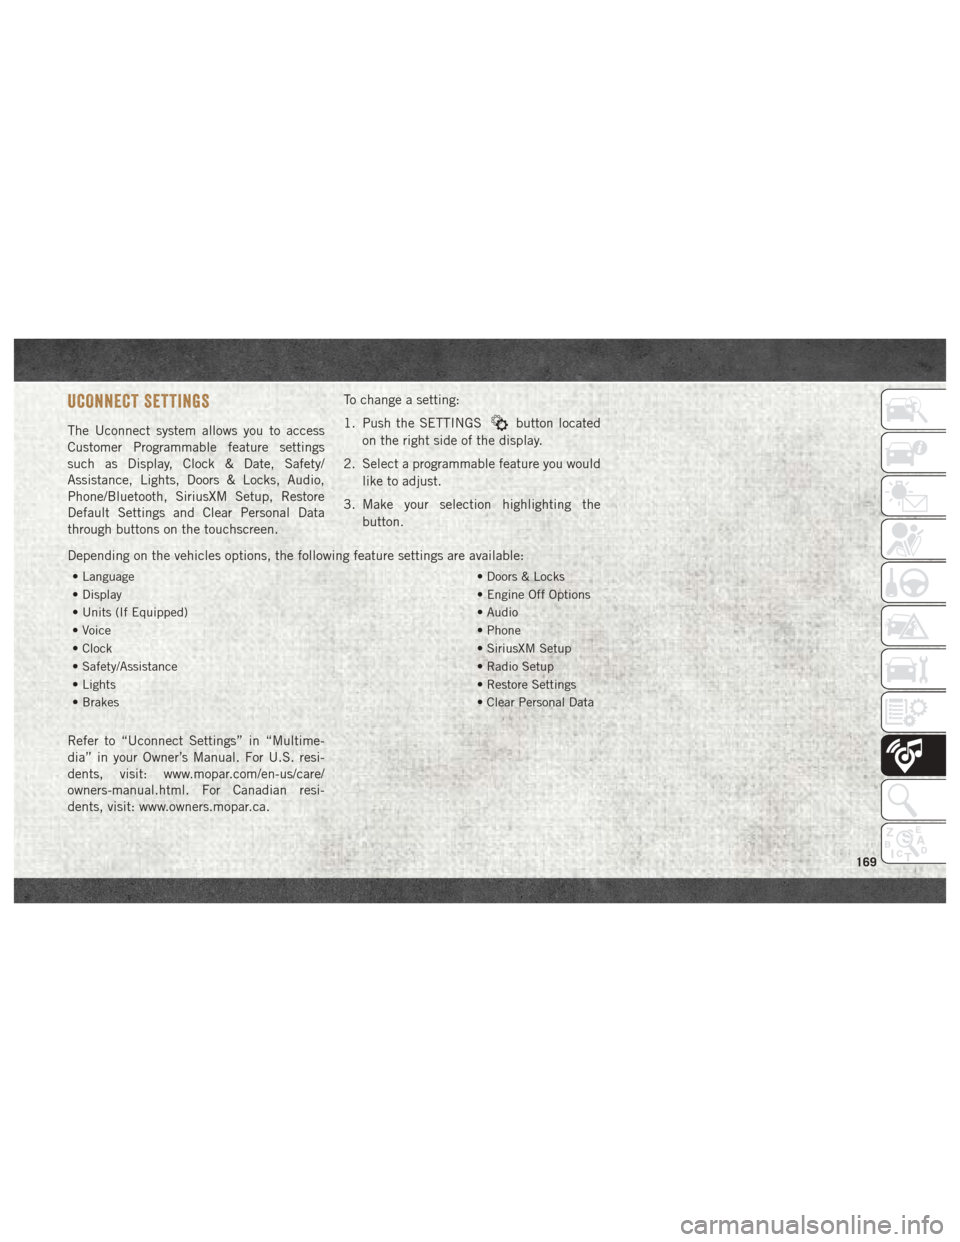
UCONNECT SETTINGS
The Uconnect system allows you to access
Customer Programmable feature settings
such as Display, Clock & Date, Safety/
Assistance, Lights, Doors & Locks, Audio,
Phone/Bluetooth, SiriusXM Setup, Restore
Default Settings and Clear Personal Data
through buttons on the touchscreen.To change a setting:
1. Push the SETTINGSbutton located
on the right side of the display.
2. Select a programmable feature you would like to adjust.
3. Make your selection highlighting the button.
Depending on the vehicles options, the following feature settings are available:
• Language • Doors & Locks
• Display • Engine Off Options
• Units (If Equipped) • Audio
• Voice • Phone
• Clock • SiriusXM Setup
• Safety/Assistance • Radio Setup
• Lights • Restore Settings
• Brakes • Clear Personal Data
Refer to “Uconnect Settings” in “Multime-
dia” in your Owner’s Manual. For U.S. resi-
dents, visit: www.mopar.com/en-us/care/
owners-manual.html. For Canadian resi-
dents, visit: www.owners.mopar.ca.
169
Page 180 of 204
Helpful Tips And Common
Questions To Improve Bluetooth
Performance With Your Uconnect
System
Mobile Phone won’t reconnect to system after
pairing:
• Set mobile phone to auto-connect ortrusted device in mobile phone Bluetooth
settings (Blackberry devices).
• Perform a factory reset on your mobile phone. Refer to your mobile phone manu-
facturer or cellular provider for instruc-
tions.
• Many mobile phones do not automatically reconnect after being restarted (hard re-
boot). Your mobile phone can still be con-
nected manually. Close all applications
that may be operating (refer to mobile
phone manufacturer’s instructions), and
follow “Pairing (Wirelessly Connecting)
Your Mobile Phone To The Uconnect
System”. Mobile Phone won’t pair to system:
• Perform a hard reset in the mobile phone by
removing the battery (if removable — see
your mobile phone’s owner manual).
• Delete pairing history in mobile phone and Uconnect system; usually found in phone’s
Bluetooth connection settings.
• Verify you are selecting “Uconnect” in the discovered Bluetooth devices on your mo-
bile phone.
• If your vehicle system generates a pin code the default is 0000.
Mobile Phonebook didn’t download:
• Check “Do not ask again,” then accept the “phonebook download” request on your
mobile phone.
Can’t make a conference call:
• CDMA (Code-Division Multiple Access) car- riers do not support conference calling.
Refer to your mobile phone user’s manual
for further information. Making calls while connected to AUX:
• Plugging in your mobile phone to AUX while
connected to Bluetooth will disable Hands-
Free Calling. Do not make calls while your
mobile phone is plugged into the AUX jack.Regulatory And Safety Information
USA/CANADA
Exposure to Radio Frequency Radiation
The radiated output power of the internal
wireless radio is far below the FCC and IC
radio frequency exposure limits. Neverthe-
less, the wireless radio will be used in such a
manner that the radio is 20 cm or further
from the human body.
The internal wireless radio operates within
guidelines found in radio frequency safety
standards and recommendations, which re-
flect the consensus of the scientific commu-
nity. The radio manufacturer believes the
internal wireless radio is safe for use by
consumers. The level of energy emitted is far
MULTIMEDIA
178
Page 194 of 204

Presets..................166
Radio Frequency General Information ...........13
Radio Operation ...............166
Radio (Sound Systems) ..........182
Rear Camera ..................91
Rear Seat, Folding ..............13
Recreational Towing .............96
Release, Hood .................24
Reminder, Seat Belt .............48
Replacement Bulbs .............100
Replacement Tires .............145
Reporting Safety Defects .........187
Restraint, Head ................14
Restraints, Child ...............64
Roll Over Warning ...............2
Safety Checks Inside Vehicle ........70
Safety Checks Outside Vehicle .......72
Safety Defects, Reporting .........187
Safety, Exhaust Gas .............69
Safety Information, Tire ..........134
Safety Tips ...................69
Schedule, Maintenance .......124, 128
Seat Belt Adjustable Upper Shoulder Belt
Anchorage .................51 Automatic Locking Retractor (ALR) . .53
Energy Management Feature
......53
Lap/Shoulder Belt Operation ......50
Lap/Shoulder Belts ............49
Lap/Shoulder Belt Untwisting .....51
Pregnant Women .............52
Seat Belt Pretensioner .........53
Seat Belt Reminder ...........48
Seat Belt Reminder ..............48
Seat Belts .................48, 70
Adjustable Shoulder Belt ........51
Adjustable Upper Shoulder
Anchorage .................51
Child Restraint ..............64
Front Seat ............48, 49, 50
Inspection .................70
Operating Instructions .........50
Pregnant Women .............52
Pretensioners ...............53
Rear Seat .................49
Untwisting Procedure ..........51
Seats ......................13
Adjustment ................13
Easy
Entry .................13
Heated ...................13
Memory ..................13
Rear Folding ...............13 Seatback Release
............13
Tilting ...................13
Vented ...................13
Ventilated .................13
Selection Of Coolant (Antifreeze) .............156, 157
Service Assistance .............186
Service Contract ...............187
Service Manuals ...............188
Shift Lever Override .............119
Shoulder Belts .................49
Signals, Turn ...............41, 72
Snow Tires ..................147
Spare Tire ............147, 148, 149
Spark Plugs .................156
Speed Control Accel/Decel ................90
Speed Control (Cruise Control) .......89
Starting .....................74
Starting Procedures ..............74
Starting Procedures (Diesel Engines) . . .74
Steering .....................16
Column Lock ...............16
Steering Wheel Audio Controls ......170
Storage, Vehicle ................23
INDEX
192