ignition RAM PROMASTER 2022 User Guide
[x] Cancel search | Manufacturer: RAM, Model Year: 2022, Model line: PROMASTER, Model: RAM PROMASTER 2022Pages: 268, PDF Size: 13.26 MB
Page 27 of 268
GETTING TO KNOW YOUR VEHICLE25
Lumbar Support — If Equipped
This feature allows you to increase or decrease the
amount of lumbar support. The lumbar control
knob is located on the rear upper outboard side of
the driver's seatback. Rotate the control forward to
increase and rearward to decrease the desired
amount of lumbar support.
Suspension Seat — If Equipped
The seat is equipped with a mechanical spring
system and hydraulic shock absorber to ensure
maximum comfort and safety. The system of
springs also effectively absorbs impact from
uneven road surfaces. Damper Weight Adjustment
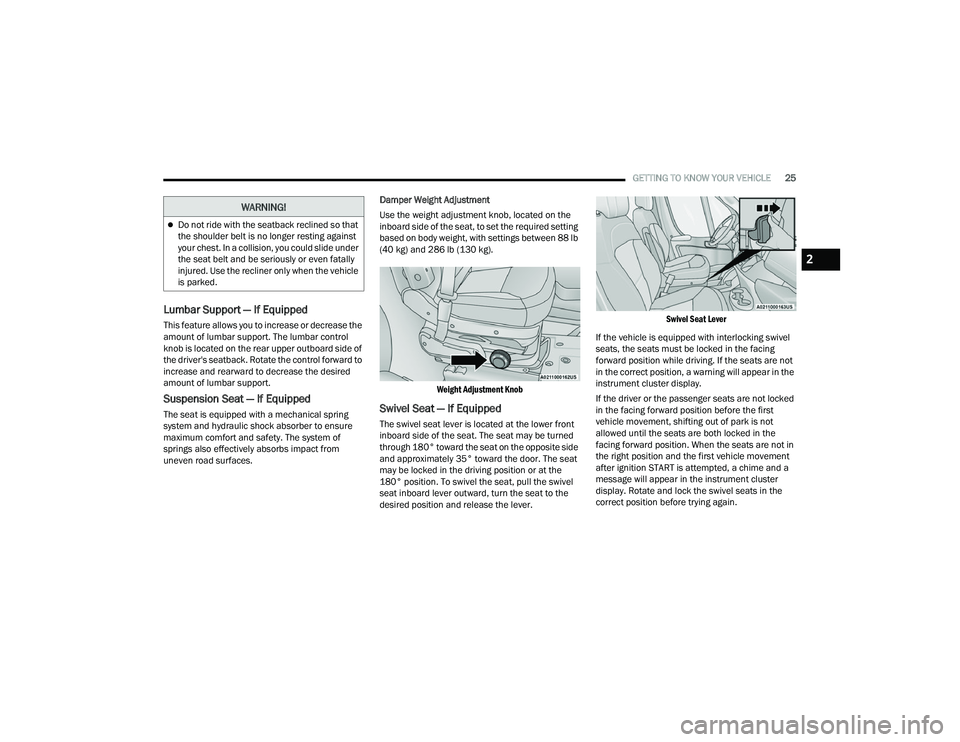
Use the weight adjustment knob, located on the
inboard side of the seat, to set the required setting
based on body weight, with settings between 88 lb
(40 kg) and 286 lb (130 kg).
Weight Adjustment Knob
Swivel Seat — If Equipped
The swivel seat lever is located at the lower front
inboard side of the seat. The seat may be turned
through 180° toward the seat on the opposite side
and approximately 35° toward the door. The seat
may be locked in the driving position or at the
180° position. To swivel the seat, pull the swivel
seat inboard lever outward, turn the seat to the
desired position and release the lever.
Swivel Seat Lever
If the vehicle is equipped with interlocking swivel
seats, the seats must be locked in the facing
forward position while driving. If the seats are not
in the correct position, a warning will appear in the
instrument cluster display.
If the driver or the passenger seats are not locked
in the facing forward position before the first
vehicle movement, shifting out of park is not
allowed until the seats are both locked in the
facing forward position. When the seats are not in
the right position and the first vehicle movement
after ignition START is attempted, a chime and a
message will appear in the instrument cluster
display. Rotate and lock the swivel seats in the
correct position before trying again.
Do not ride with the seatback reclined so that
the shoulder belt is no longer resting against
your chest. In a collision, you could slide under
the seat belt and be seriously or even fatally
injured. Use the recliner only when the vehicle
is parked.
WARNING!
2
22_VF_OM_EN_USC_t.book Page 25
Page 34 of 268
32GETTING TO KNOW YOUR VEHICLE
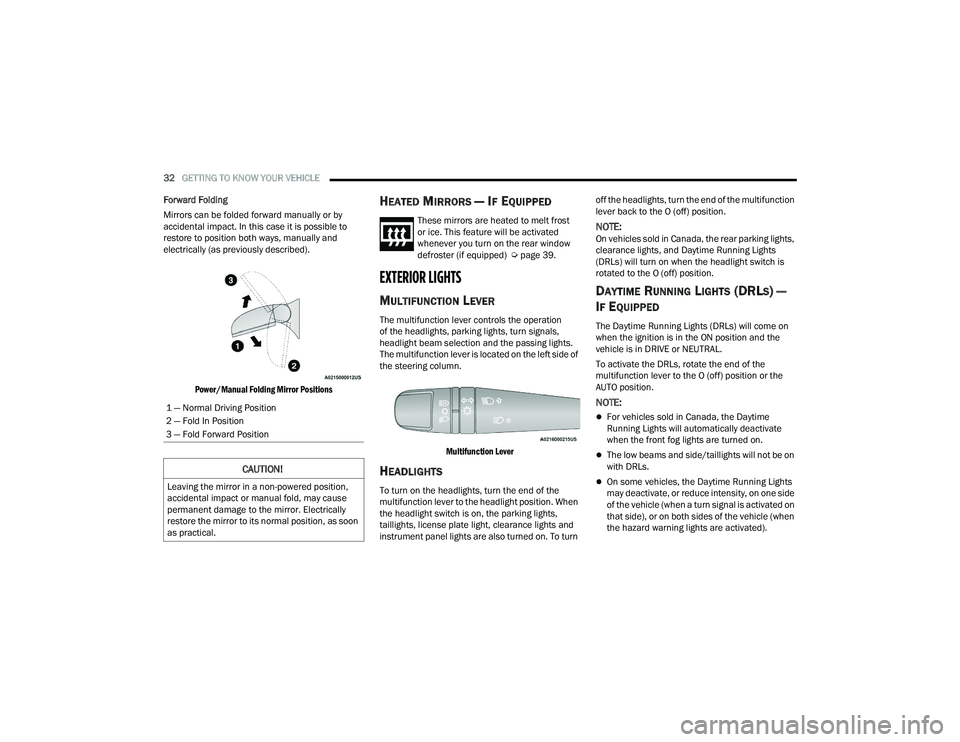
Forward Folding
Mirrors can be folded forward manually or by
accidental impact. In this case it is possible to
restore to position both ways, manually and
electrically (as previously described).
Power/Manual Folding Mirror Positions
HEATED MIRRORS — IF EQUIPPED
These mirrors are heated to melt frost
or ice. This feature will be activated
whenever you turn on the rear window
defroster (if equipped) Ú page 39.
EXTERIOR LIGHTS
MULTIFUNCTION LEVER
The multifunction lever controls the operation
of the headlights, parking lights, turn signals,
headlight beam selection and the passing lights.
The multifunction lever is located on the left side of
the steering column.
Multifunction Lever
HEADLIGHTS
To turn on the headlights, turn the end of the
multifunction lever to the headlight position. When
the headlight switch is on, the parking lights,
taillights, license plate light, clearance lights and
instrument panel lights are also turned on. To turn off the headlights, turn the end of the multifunction
lever back to the O (off) position.
NOTE:On vehicles sold in Canada, the rear parking lights,
clearance lights, and Daytime Running Lights
(DRLs) will turn on when the headlight switch is
rotated to the O (off) position.
DAYTIME RUNNING LIGHTS (DRLS) —
I
F EQUIPPED
The Daytime Running Lights (DRLs) will come on
when the ignition is in the ON position and the
vehicle is in DRIVE or NEUTRAL.
To activate the DRLs, rotate the end of the
multifunction lever to the O (off) position or the
AUTO position.
NOTE:
For vehicles sold in Canada, the Daytime
Running Lights will automatically deactivate
when the front fog lights are turned on.
The low beams and side/taillights will not be on
with DRLs.
On some vehicles, the Daytime Running Lights
may deactivate, or reduce intensity, on one side
of the vehicle (when a turn signal is activated on
that side), or on both sides of the vehicle (when
the hazard warning lights are activated).
1 — Normal Driving Position
2 — Fold In Position
3 — Fold Forward Position
CAUTION!
Leaving the mirror in a non-powered position,
accidental impact or manual fold, may cause
permanent damage to the mirror. Electrically
restore the mirror to its normal position, as soon
as practical.
22_VF_OM_EN_USC_t.book Page 32
Page 35 of 268
GETTING TO KNOW YOUR VEHICLE33
HIGH/LOW BEAM SWITCH
With the low beams activated, push the multifunction
lever toward the instrument panel to turn on the high
beams. The High Beam Indicator Light will illuminate in
the instrument cluster to indicated that the high beams
are on. Push the multifunction lever a second time to
switch the headlights back to low beam. When the
ignition is placed in the OFF position, both the high and
low beams will turn off.
AUTOMATIC HIGH BEAM HEADLAMP
C
ONTROL — IF EQUIPPED
The Automatic High Beam Headlamp Control
system provides increased forward lighting at night
by automating high beam control through the use
of a digital camera mounted on the windshield.
This camera detects vehicle specific light and
automatically switches from high beams to low
beams until the approaching vehicle is out of view.
NOTE:
The multifunction lever must be in the high
beam position in order for the Automatic High
Beam Headlamp Control to activate.
The Automatic High Beam Headlamp Control
can be turned on or off through Uconnect
Settings Ú page 120.
Broken, muddy, or obstructed headlights and
taillights of vehicles in the field of view will
cause headlights to remain on longer (closer to
the vehicle). Also, dirt, film, and other obstruc -
tions on the windshield or camera lens will
cause the system to function improperly.
When set to AUTO, the system automatically
turns the headlights on or off based on ambient
light levels.
FLASH-TO-PASS
You can signal another vehicle with your headlights
by lightly pulling the multifunction lever toward you.
This will cause the high beam headlights to turn on,
and remain on, until the lever is released.
AUTOMATIC HEADLIGHTS — IF EQUIPPED
To turn on the automatic headlights, turn the end
of the multifunction lever to the AUTO position. To
turn off the automatic headlights, turn the end of
the multifunction lever back to the O (off) position.
PARKING LIGHTS
These lights can be turned on, with the ignition in the
OFF position, by moving the end of the multifunction
lever to O (off) position and then to the headlight
position.
The indicator light in the instrument panel comes
on. The lights stay on until the next ignition cycle is
performed.
HEADLIGHT DELAY
When this feature is selected, the driver can
choose to have the headlights remain on for a
preset period of time after the engine is turned off.
Activation
To activate the delay feature, place the ignition in
the OFF position while the headlights are still on.
Then, rotate the multifunction lever to the O (off)
position within two minutes. The delay interval
begins when the headlight switch is turned from
O (off) to the low beam position. If the headlight
switch is in AUTO position and headlights were on
before the ignition is OFF, the delay interval begins
automatically.
Deactivation
The feature is disabled by turning on the
headlights, the parking lights or by placing the
ignition in the RUN position. If you shut off the
lights before the ignition is turned on, they will turn
off in the normal manner.
Headlights with ignition in the OFF position.
With the ignition in the OFF position, the headlights
can be switched on for a maximum time of
8 minutes. To turn on the headlights with the
ignition in the OFF position, turn the end of the
multifunction lever to the headlight position.
2
22_VF_OM_EN_USC_t.book Page 33
Page 36 of 268
34GETTING TO KNOW YOUR VEHICLE
NOTE:If the headlight delay function is disabled in the
Uconnect Setting, when you put the ignition in the
OFF position with the multifunction lever already
set in the headlight position, the headlights remain
on for 8 minutes.
FOG LIGHTS — IF EQUIPPED
The fog light switch is located on the instrument
panel to the left of the steering column.
To activate the front fog lights, turn on the
parking lights or the low beam headlights
and push the fog light button. To turn off
the front fog lights, push the fog light
button a second time or turn off the headlight
switch. An indicator light in the instrument cluster
illuminates when the fog lights are turned on.
NOTE:The fog lights will operate with the low beam head -
lights or parking lights on. Selecting the high beam
headlights will turn off the fog lights.
If the vehicle’s ignition is turned off, the fog lights
will also turn off. Cornering Lights
The cornering lights are a feature to improve visibility at
night while turning the vehicle. When activated, a light
incorporated in the front fog light will illuminate on the
side of the vehicle the steering wheel is rotated or the
turn signal indicator is on. It can be activated through
the Uconnect system
Ú
page 120.
TURN SIGNALS
Move the multifunction lever up or down and the
arrows on each side of the instrument cluster will
flash to show proper operation of the front and rear
turn signals.
NOTE:When the Daytime Running Lights are on and a
turn signal is activated, the Daytime Running Lamp
will turn off on the side of the vehicle in which the
turn signal is flashing. The Daytime Running Lamp
will turn back on when the turn signal is turned off.
If either light remains on and does not flash, or
there is a very fast flash rate, check for a defective
outside light bulb.
LANE CHANGE ASSIST
Lightly push the multifunction lever up or down,
without moving beyond the detent, and the turn
signal will flash five times then automatically
turn off.
BATTERY SAVER
To protect the life of your vehicle’s battery, when
the ignition is OFF and any door is left ajar for
15 minutes, the interior lights will automatically
turn off.
NOTE:Battery saver mode is canceled if the ignition is
placed in the ON/RUN position.
22_VF_OM_EN_USC_t.book Page 34
Page 38 of 268
36GETTING TO KNOW YOUR VEHICLE
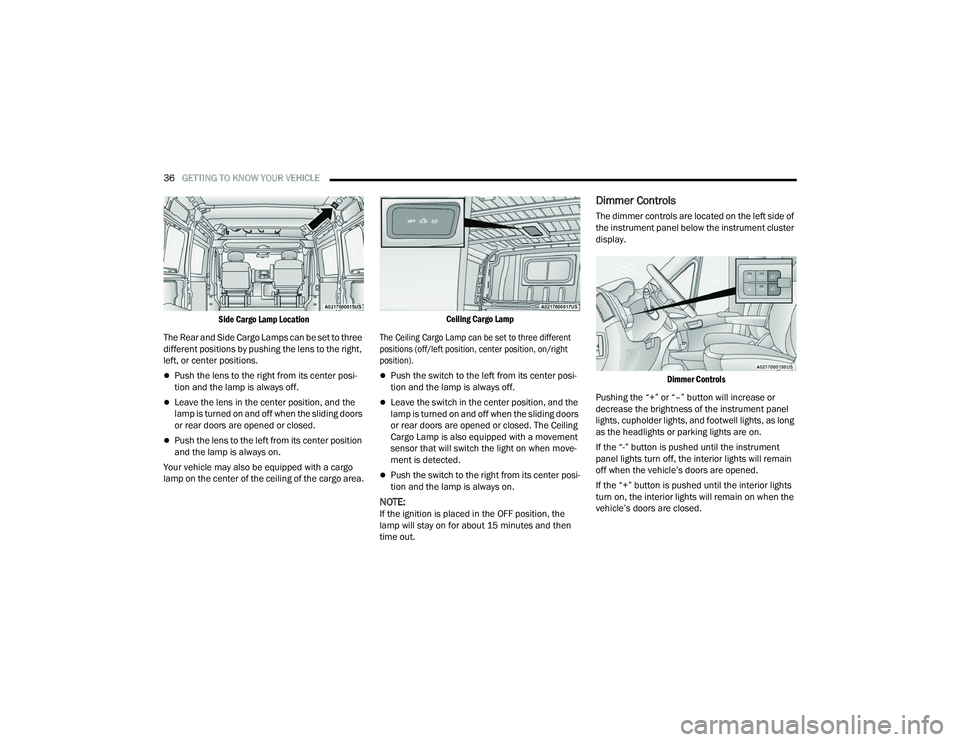
Side Cargo Lamp Location
The Rear and Side Cargo Lamps can be set to three
different positions by pushing the lens to the right,
left, or center positions.
Push the lens to the right from its center posi -
tion and the lamp is always off.
Leave the lens in the center position, and the
lamp is turned on and off when the sliding doors
or rear doors are opened or closed.
Push the lens to the left from its center position
and the lamp is always on.
Your vehicle may also be equipped with a cargo
lamp on the center of the ceiling of the cargo area.
Ceiling Cargo Lamp
The Ceiling Cargo Lamp can be set to three different
positions (off/left position, center position, on/right
position).
Push the switch to the left from its center posi -
tion and the lamp is always off.
Leave the switch in the center position, and the
lamp is turned on and off when the sliding doors
or rear doors are opened or closed. The Ceiling
Cargo Lamp is also equipped with a movement
sensor that will switch the light on when move -
ment is detected.
Push the switch to the right from its center posi -
tion and the lamp is always on.
NOTE:If the ignition is placed in the OFF position, the
lamp will stay on for about 15 minutes and then
time out.
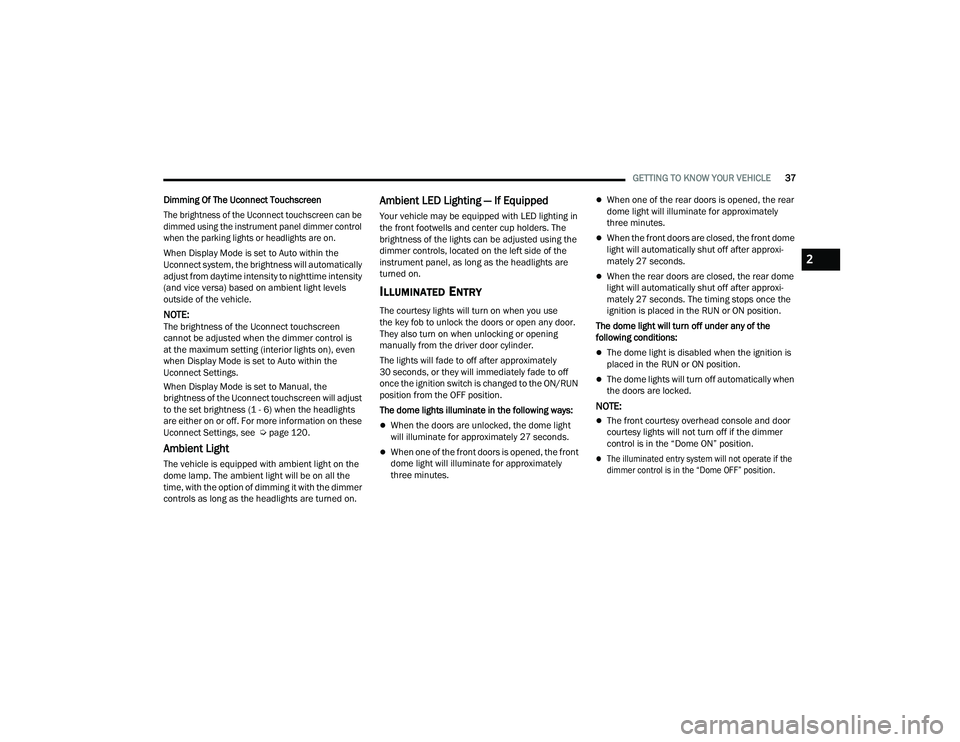
Dimmer Controls
The dimmer controls are located on the left side of
the instrument panel below the instrument cluster
display.
Dimmer Controls
Pushing the “+” or “–” button will increase or
decrease the brightness of the instrument panel
lights, cupholder lights, and footwell lights, as long
as the headlights or parking lights are on.
If the “-” button is pushed until the instrument
panel lights turn off, the interior lights will remain
off when the vehicle’s doors are opened.
If the “+” button is pushed until the interior lights
turn on, the interior lights will remain on when the
vehicle’s doors are closed.
22_VF_OM_EN_USC_t.book Page 36
Page 39 of 268
GETTING TO KNOW YOUR VEHICLE37
Dimming Of The Uconnect Touchscreen
The brightness of the Uconnect touchscreen can be
dimmed using the instrument panel dimmer control
when the parking lights or headlights are on.
When Display Mode is set to Auto within the
Uconnect system, the brightness will automatically
adjust from daytime intensity to nighttime intensity
(and vice versa) based on ambient light levels
outside of the vehicle.
NOTE:The brightness of the Uconnect touchscreen
cannot be adjusted when the dimmer control is
at the maximum setting (interior lights on), even
when Display Mode is set to Auto within the
Uconnect Settings.
When Display Mode is set to Manual, the
brightness of the Uconnect touchscreen will adjust
to the set brightness (1 - 6) when the headlights
are either on or off. For more information on these
Uconnect Settings, see Ú page 120.
Ambient Light
The vehicle is equipped with ambient light on the
dome lamp. The ambient light will be on all the
time, with the option of dimming it with the dimmer
controls as long as the headlights are turned on.
Ambient LED Lighting — If Equipped
Your vehicle may be equipped with LED lighting in
the front footwells and center cup holders. The
brightness of the lights can be adjusted using the
dimmer controls, located on the left side of the
instrument panel, as long as the headlights are
turned on.
ILLUMINATED ENTRY
The courtesy lights will turn on when you use
the key fob to unlock the doors or open any door.
They also turn on when unlocking or opening
manually from the driver door cylinder.
The lights will fade to off after approximately
30 seconds, or they will immediately fade to off
once the ignition switch is changed to the ON/RUN
position from the OFF position.
The dome lights illuminate in the following ways:
When the doors are unlocked, the dome light
will illuminate for approximately 27 seconds.
When one of the front doors is opened, the front
dome light will illuminate for approximately
three minutes.
When one of the rear doors is opened, the rear
dome light will illuminate for approximately
three minutes.
When the front doors are closed, the front dome
light will automatically shut off after approxi -
mately 27 seconds.
When the rear doors are closed, the rear dome
light will automatically shut off after approxi -
mately 27 seconds. The timing stops once the
ignition is placed in the RUN or ON position.
The dome light will turn off under any of the
following conditions:
The dome light is disabled when the ignition is
placed in the RUN or ON position.
The dome lights will turn off automatically when
the doors are locked.
NOTE:
The front courtesy overhead console and door
courtesy lights will not turn off if the dimmer
control is in the “Dome ON” position.
The illuminated entry system will not operate if the
dimmer control is in the “Dome OFF” position.
2
22_VF_OM_EN_USC_t.book Page 37
Page 40 of 268
38GETTING TO KNOW YOUR VEHICLE
WIPERS AND WASHERS
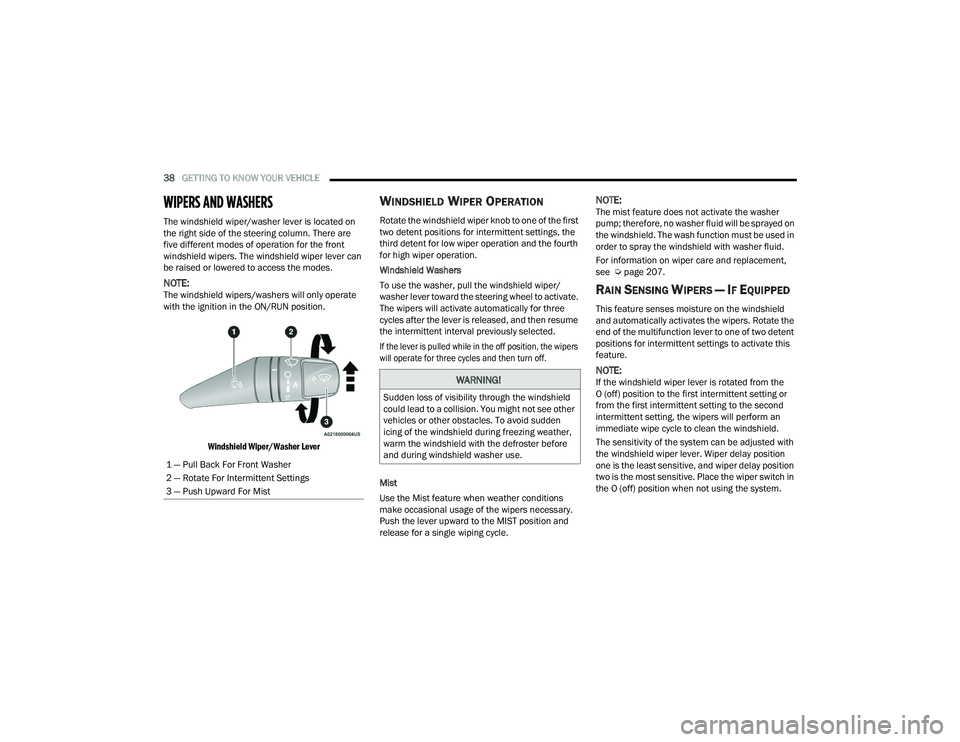
The windshield wiper/washer lever is located on
the right side of the steering column. There are
five different modes of operation for the front
windshield wipers. The windshield wiper lever can
be raised or lowered to access the modes.
NOTE:The windshield wipers/washers will only operate
with the ignition in the ON/RUN position.
Windshield Wiper/Washer Lever
WINDSHIELD WIPER OPERATION
Rotate the windshield wiper knob to one of the first
two detent positions for intermittent settings, the
third detent for low wiper operation and the fourth
for high wiper operation.
Windshield Washers
To use the washer, pull the windshield wiper/
washer lever toward the steering wheel to activate.
The wipers will activate automatically for three
cycles after the lever is released, and then resume
the intermittent interval previously selected.
If the lever is pulled while in the off position, the wipers
will operate for three cycles and then turn off.
Mist
Use the Mist feature when weather conditions
make occasional usage of the wipers necessary.
Push the lever upward to the MIST position and
release for a single wiping cycle.
NOTE:The mist feature does not activate the washer
pump; therefore, no washer fluid will be sprayed on
the windshield. The wash function must be used in
order to spray the windshield with washer fluid.
For information on wiper care and replacement,
see Úpage 207.
RAIN SENSING WIPERS — IF EQUIPPED
This feature senses moisture on the windshield
and automatically activates the wipers. Rotate the
end of the multifunction lever to one of two detent
positions for intermittent settings to activate this
feature.
NOTE:If the windshield wiper lever is rotated from the
O (off) position to the first intermittent setting or
from the first intermittent setting to the second
intermittent setting, the wipers will perform an
immediate wipe cycle to clean the windshield.
The sensitivity of the system can be adjusted with
the windshield wiper lever. Wiper delay position
one is the least sensitive, and wiper delay position
two is the most sensitive. Place the wiper switch in
the O (off) position when not using the system.
1 — Pull Back For Front Washer
2 — Rotate For Intermittent Settings
3 — Push Upward For MistWARNING!
Sudden loss of visibility through the windshield
could lead to a collision. You might not see other
vehicles or other obstacles. To avoid sudden
icing of the windshield during freezing weather,
warm the windshield with the defroster before
and during windshield washer use.
22_VF_OM_EN_USC_t.book Page 38
Page 41 of 268
GETTING TO KNOW YOUR VEHICLE39
NOTE:
The Rain Sensing feature will not operate when the
wiper switch is in the low or high-speed position.
The Rain Sensing feature may not function prop -
erly when ice, or dried salt water is present on
the windshield.
Use of Rain-X or products containing wax or sili-
cone may reduce Rain Sensing performance.
The Rain Sensing feature can be turned on and
off using the Uconnect system Ú page 120.
The Rain Sensing system has protection features
for the wiper blades and arms, and will not operate
under the following conditions:
Low Ambient Temperature — When the ignition
is first placed in the ON position, the Rain
Sensing system will not operate until the wiper
switch is moved, vehicle speed is greater than
3 mph (5 km/h), or the outside temperature is
greater than 32°F (0°C).
Transmission In NEUTRAL Position — When the
ignition is ON, and the automatic transmission
is in the NEUTRAL position, the Rain Sensing
system will not operate until the wiper switch is
moved, vehicle speed is greater than 3 mph
(5 km/h), or the gear selector is moved out of
the NEUTRAL position.
Remote Start Mode Inhibit — On vehicles
equipped with a Remote Start system, Rain
Sensing wipers are not operational when the
vehicle is in the Remote Start mode.
The user can activate the Rain Sensing Wipers in
three ways:
Moving the lever from the O (off) position to the
intermittent positions.
One Mist command actuation.
The vehicle speed exceeds 3 mph (5 km/h) and
the rain sensor detects the presence of rain.
NOTE:In the event of a rain sensor failure, a dedicated
telltale on the instrument cluster will appear to
warn the customer (if equipped).
CLIMATE CONTROLS
The Climate Control system allows you to regulate
the temperature, air flow, and direction of air
circulating throughout the vehicle. The controls are
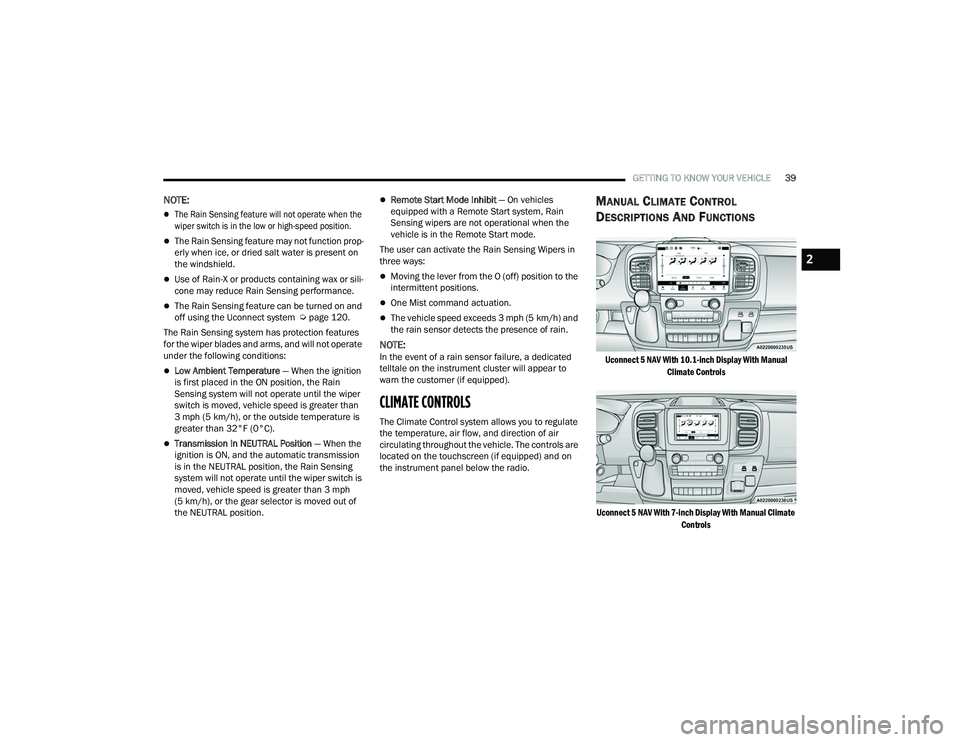
located on the touchscreen (if equipped) and on
the instrument panel below the radio.
MANUAL CLIMATE CONTROL
D
ESCRIPTIONS AND FUNCTIONS
Uconnect 5 NAV With 10.1-inch Display With Manual
Climate Controls
Uconnect 5 NAV With 7-inch Display With Manual Climate Controls
2
22_VF_OM_EN_USC_t.book Page 39
Page 47 of 268
GETTING TO KNOW YOUR VEHICLE45
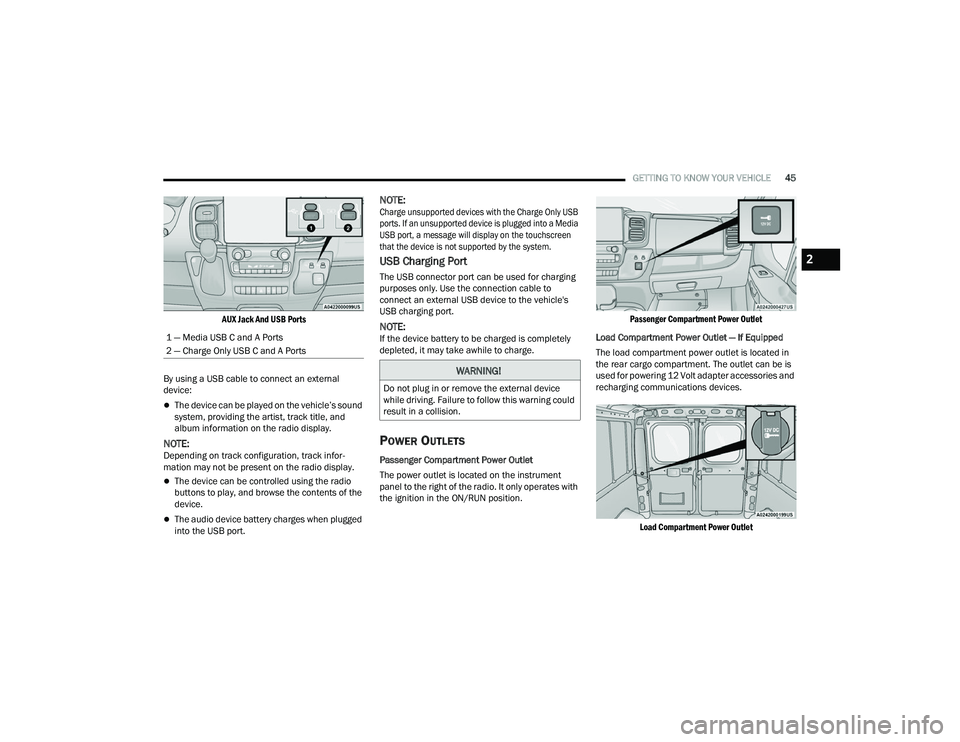
AUX Jack And USB Ports
By using a USB cable to connect an external
device:
The device can be played on the vehicle’s sound
system, providing the artist, track title, and
album information on the radio display.
NOTE:Depending on track configuration, track infor -
mation may not be present on the radio display.
The device can be controlled using the radio
buttons to play, and browse the contents of the
device.
The audio device battery charges when plugged
into the USB port.
NOTE:
Charge unsupported devices with the Charge Only USB
ports. If an unsupported device is plugged into a Media
USB port, a message will display on the touchscreen
that the device is not supported by the system.
USB Charging Port
The USB connector port can be used for charging
purposes only. Use the connection cable to
connect an external USB device to the vehicle's
USB charging port.
NOTE:If the device battery to be charged is completely
depleted, it may take awhile to charge.
POWER OUTLETS
Passenger Compartment Power Outlet
The power outlet is located on the instrument
panel to the right of the radio. It only operates with
the ignition in the ON/RUN position.
Passenger Compartment Power Outlet
Load Compartment Power Outlet — If Equipped
The load compartment power outlet is located in
the rear cargo compartment. The outlet can be is
used for powering 12 Volt adapter accessories and
recharging communications devices.
Load Compartment Power Outlet
1 — Media USB C and A Ports
2 — Charge Only USB C and A Ports
WARNING!
Do not plug in or remove the external device
while driving. Failure to follow this warning could
result in a collision.
2
22_VF_OM_EN_USC_t.book Page 45
Page 49 of 268
GETTING TO KNOW YOUR VEHICLE47
The power inverter is designed with built-in
overload protection. If the power rating of
150 Watts is exceeded, the power inverter will
automatically shut down. Once the electrical
device has been removed from the outlet the
inverter should automatically reset. To avoid
overloading the circuit, check the power ratings on
electrical devices prior to using the inverter.
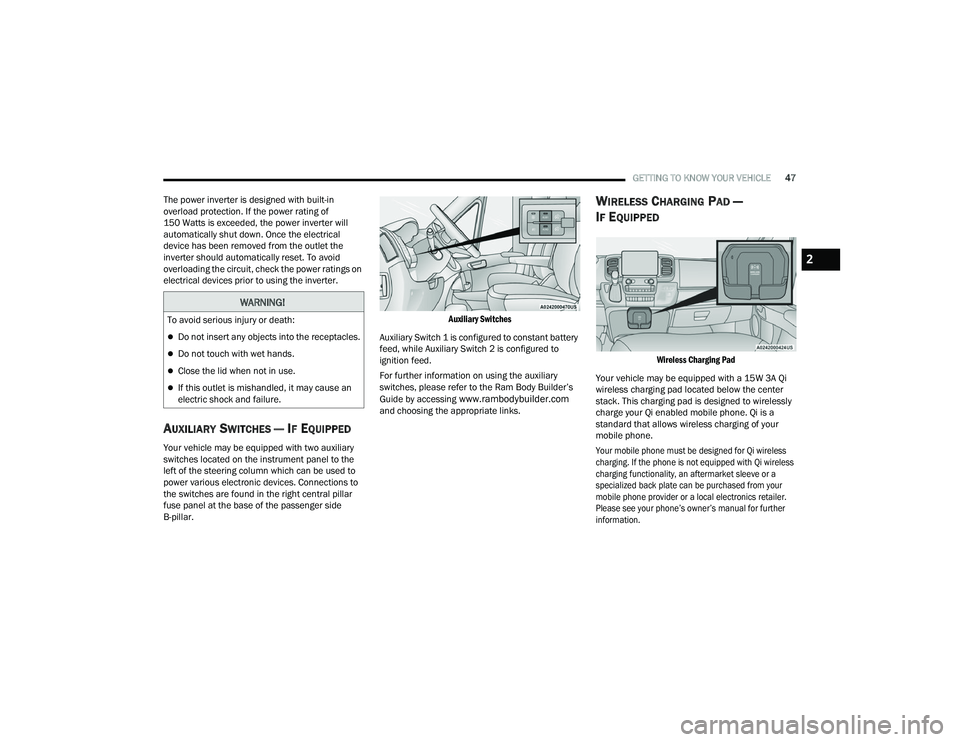
AUXILIARY SWITCHES — IF EQUIPPED
Your vehicle may be equipped with two auxiliary
switches located on the instrument panel to the
left of the steering column which can be used to
power various electronic devices. Connections to
the switches are found in the right central pillar
fuse panel at the base of the passenger side
B-pillar.
Auxiliary Switches
Auxiliary Switch 1 is configured to constant battery
feed, while Auxiliary Switch 2 is configured to
ignition feed.
For further information on using the auxiliary
switches, please refer to the Ram Body Builder’s
Guide by accessing
www.rambodybuilder.com
and choosing the appropriate links.
WIRELESS CHARGING PAD —
I
F EQUIPPED
Wireless Charging Pad
Your vehicle may be equipped with a 15W 3A Qi
wireless charging pad located below the center
stack. This charging pad is designed to wirelessly
charge your Qi enabled mobile phone. Qi is a
standard that allows wireless charging of your
mobile phone.
Your mobile phone must be designed for Qi wireless
charging. If the phone is not equipped with Qi wireless
charging functionality, an aftermarket sleeve or a
specialized back plate can be purchased from your
mobile phone provider or a local electronics retailer.
Please see your phone’s owner’s manual for further
information.
WARNING!
To avoid serious injury or death:
Do not insert any objects into the receptacles.
Do not touch with wet hands.
Close the lid when not in use.
If this outlet is mishandled, it may cause an
electric shock and failure.
2
22_VF_OM_EN_USC_t.book Page 47