lights RAM PROMASTER 2022 User Guide
[x] Cancel search | Manufacturer: RAM, Model Year: 2022, Model line: PROMASTER, Model: RAM PROMASTER 2022Pages: 268, PDF Size: 13.26 MB
Page 35 of 268
GETTING TO KNOW YOUR VEHICLE33
HIGH/LOW BEAM SWITCH
With the low beams activated, push the multifunction
lever toward the instrument panel to turn on the high
beams. The High Beam Indicator Light will illuminate in
the instrument cluster to indicated that the high beams
are on. Push the multifunction lever a second time to
switch the headlights back to low beam. When the
ignition is placed in the OFF position, both the high and
low beams will turn off.
AUTOMATIC HIGH BEAM HEADLAMP
C
ONTROL — IF EQUIPPED
The Automatic High Beam Headlamp Control
system provides increased forward lighting at night
by automating high beam control through the use
of a digital camera mounted on the windshield.
This camera detects vehicle specific light and
automatically switches from high beams to low
beams until the approaching vehicle is out of view.
NOTE:
The multifunction lever must be in the high
beam position in order for the Automatic High
Beam Headlamp Control to activate.
The Automatic High Beam Headlamp Control
can be turned on or off through Uconnect
Settings Ú page 120.
Broken, muddy, or obstructed headlights and
taillights of vehicles in the field of view will
cause headlights to remain on longer (closer to
the vehicle). Also, dirt, film, and other obstruc -
tions on the windshield or camera lens will
cause the system to function improperly.
When set to AUTO, the system automatically
turns the headlights on or off based on ambient
light levels.
FLASH-TO-PASS
You can signal another vehicle with your headlights
by lightly pulling the multifunction lever toward you.
This will cause the high beam headlights to turn on,
and remain on, until the lever is released.
AUTOMATIC HEADLIGHTS — IF EQUIPPED
To turn on the automatic headlights, turn the end
of the multifunction lever to the AUTO position. To
turn off the automatic headlights, turn the end of
the multifunction lever back to the O (off) position.
PARKING LIGHTS
These lights can be turned on, with the ignition in the
OFF position, by moving the end of the multifunction
lever to O (off) position and then to the headlight
position.
The indicator light in the instrument panel comes
on. The lights stay on until the next ignition cycle is
performed.
HEADLIGHT DELAY
When this feature is selected, the driver can
choose to have the headlights remain on for a
preset period of time after the engine is turned off.
Activation
To activate the delay feature, place the ignition in
the OFF position while the headlights are still on.
Then, rotate the multifunction lever to the O (off)
position within two minutes. The delay interval
begins when the headlight switch is turned from
O (off) to the low beam position. If the headlight
switch is in AUTO position and headlights were on
before the ignition is OFF, the delay interval begins
automatically.
Deactivation
The feature is disabled by turning on the
headlights, the parking lights or by placing the
ignition in the RUN position. If you shut off the
lights before the ignition is turned on, they will turn
off in the normal manner.
Headlights with ignition in the OFF position.
With the ignition in the OFF position, the headlights
can be switched on for a maximum time of
8 minutes. To turn on the headlights with the
ignition in the OFF position, turn the end of the
multifunction lever to the headlight position.
2
22_VF_OM_EN_USC_t.book Page 33
Page 36 of 268
34GETTING TO KNOW YOUR VEHICLE
NOTE:If the headlight delay function is disabled in the
Uconnect Setting, when you put the ignition in the
OFF position with the multifunction lever already
set in the headlight position, the headlights remain
on for 8 minutes.
FOG LIGHTS — IF EQUIPPED
The fog light switch is located on the instrument
panel to the left of the steering column.
To activate the front fog lights, turn on the
parking lights or the low beam headlights
and push the fog light button. To turn off
the front fog lights, push the fog light
button a second time or turn off the headlight
switch. An indicator light in the instrument cluster
illuminates when the fog lights are turned on.
NOTE:The fog lights will operate with the low beam head -
lights or parking lights on. Selecting the high beam
headlights will turn off the fog lights.
If the vehicle’s ignition is turned off, the fog lights
will also turn off. Cornering Lights
The cornering lights are a feature to improve visibility at
night while turning the vehicle. When activated, a light
incorporated in the front fog light will illuminate on the
side of the vehicle the steering wheel is rotated or the
turn signal indicator is on. It can be activated through
the Uconnect system
Ú
page 120.
TURN SIGNALS
Move the multifunction lever up or down and the
arrows on each side of the instrument cluster will
flash to show proper operation of the front and rear
turn signals.
NOTE:When the Daytime Running Lights are on and a
turn signal is activated, the Daytime Running Lamp
will turn off on the side of the vehicle in which the
turn signal is flashing. The Daytime Running Lamp
will turn back on when the turn signal is turned off.
If either light remains on and does not flash, or
there is a very fast flash rate, check for a defective
outside light bulb.
LANE CHANGE ASSIST
Lightly push the multifunction lever up or down,
without moving beyond the detent, and the turn
signal will flash five times then automatically
turn off.
BATTERY SAVER
To protect the life of your vehicle’s battery, when
the ignition is OFF and any door is left ajar for
15 minutes, the interior lights will automatically
turn off.
NOTE:Battery saver mode is canceled if the ignition is
placed in the ON/RUN position.
22_VF_OM_EN_USC_t.book Page 34
Page 37 of 268

GETTING TO KNOW YOUR VEHICLE35
INTERIOR LIGHTS
COURTESY LIGHTS
These lights are mounted between the sun visors
on the overhead console. Each light is turned on by
pushing the corresponding switch.
Courtesy Lights
Dome Lights
The interior lights can be set to three different
positions (off/left position, center position,
on/right position). Using the switch on the
bottom of the overhead console:
Push the switch to the on/right position from its
center position and the lights are always on.
Push the switch to the off/left position from its
center position and the lights are always off.
Leave the switch in the center position, and the
lights are turned on and off when the doors are
opened or closed.
Map Lights
The switches on the left and right sides of the
overhead console control the map or reading
function of the lights. Push the switch on the right
to turn the right light on; push again to turn off.
Push the switch on the left to turn the left light on;
push again to turn off.
Rear Lights
Your vehicle may be equipped with a Rear Cargo
Lamp located at the upper rear cargo area above
the rear doors.
Rear Cargo Lamp Location
Your vehicle may also be equipped with a Side
Cargo Lamp located at the upper rear area of the
passenger side sliding door opening.
1 — Ambient Light
2 — Left Map Light
3 — Off/Left Position
4 — Center Position
5 — Right Map Light
6 — On/Right Position
CAUTION!
Before getting out of the vehicle be sure that the
switch is in the center position or that the lights
are off to avoid draining the battery.
2
22_VF_OM_EN_USC_t.book Page 35
Page 38 of 268
36GETTING TO KNOW YOUR VEHICLE
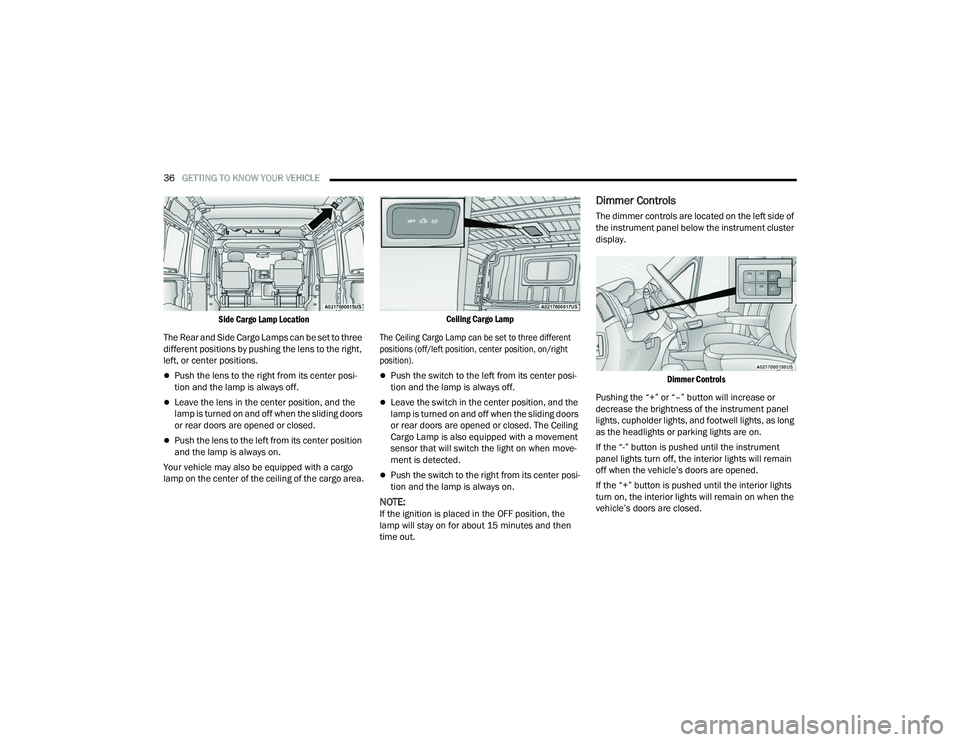
Side Cargo Lamp Location
The Rear and Side Cargo Lamps can be set to three
different positions by pushing the lens to the right,
left, or center positions.
Push the lens to the right from its center posi -
tion and the lamp is always off.
Leave the lens in the center position, and the
lamp is turned on and off when the sliding doors
or rear doors are opened or closed.
Push the lens to the left from its center position
and the lamp is always on.
Your vehicle may also be equipped with a cargo
lamp on the center of the ceiling of the cargo area.
Ceiling Cargo Lamp
The Ceiling Cargo Lamp can be set to three different
positions (off/left position, center position, on/right
position).
Push the switch to the left from its center posi -
tion and the lamp is always off.
Leave the switch in the center position, and the
lamp is turned on and off when the sliding doors
or rear doors are opened or closed. The Ceiling
Cargo Lamp is also equipped with a movement
sensor that will switch the light on when move -
ment is detected.
Push the switch to the right from its center posi -
tion and the lamp is always on.
NOTE:If the ignition is placed in the OFF position, the
lamp will stay on for about 15 minutes and then
time out.
Dimmer Controls
The dimmer controls are located on the left side of
the instrument panel below the instrument cluster
display.
Dimmer Controls
Pushing the “+” or “–” button will increase or
decrease the brightness of the instrument panel
lights, cupholder lights, and footwell lights, as long
as the headlights or parking lights are on.
If the “-” button is pushed until the instrument
panel lights turn off, the interior lights will remain
off when the vehicle’s doors are opened.
If the “+” button is pushed until the interior lights
turn on, the interior lights will remain on when the
vehicle’s doors are closed.
22_VF_OM_EN_USC_t.book Page 36
Page 39 of 268
GETTING TO KNOW YOUR VEHICLE37
Dimming Of The Uconnect Touchscreen
The brightness of the Uconnect touchscreen can be
dimmed using the instrument panel dimmer control
when the parking lights or headlights are on.
When Display Mode is set to Auto within the
Uconnect system, the brightness will automatically
adjust from daytime intensity to nighttime intensity
(and vice versa) based on ambient light levels
outside of the vehicle.
NOTE:The brightness of the Uconnect touchscreen
cannot be adjusted when the dimmer control is
at the maximum setting (interior lights on), even
when Display Mode is set to Auto within the
Uconnect Settings.
When Display Mode is set to Manual, the
brightness of the Uconnect touchscreen will adjust
to the set brightness (1 - 6) when the headlights
are either on or off. For more information on these
Uconnect Settings, see Ú page 120.
Ambient Light
The vehicle is equipped with ambient light on the
dome lamp. The ambient light will be on all the
time, with the option of dimming it with the dimmer
controls as long as the headlights are turned on.
Ambient LED Lighting — If Equipped
Your vehicle may be equipped with LED lighting in
the front footwells and center cup holders. The
brightness of the lights can be adjusted using the
dimmer controls, located on the left side of the
instrument panel, as long as the headlights are
turned on.
ILLUMINATED ENTRY
The courtesy lights will turn on when you use
the key fob to unlock the doors or open any door.
They also turn on when unlocking or opening
manually from the driver door cylinder.
The lights will fade to off after approximately
30 seconds, or they will immediately fade to off
once the ignition switch is changed to the ON/RUN
position from the OFF position.
The dome lights illuminate in the following ways:
When the doors are unlocked, the dome light
will illuminate for approximately 27 seconds.
When one of the front doors is opened, the front
dome light will illuminate for approximately
three minutes.
When one of the rear doors is opened, the rear
dome light will illuminate for approximately
three minutes.
When the front doors are closed, the front dome
light will automatically shut off after approxi -
mately 27 seconds.
When the rear doors are closed, the rear dome
light will automatically shut off after approxi -
mately 27 seconds. The timing stops once the
ignition is placed in the RUN or ON position.
The dome light will turn off under any of the
following conditions:
The dome light is disabled when the ignition is
placed in the RUN or ON position.
The dome lights will turn off automatically when
the doors are locked.
NOTE:
The front courtesy overhead console and door
courtesy lights will not turn off if the dimmer
control is in the “Dome ON” position.
The illuminated entry system will not operate if the
dimmer control is in the “Dome OFF” position.
2
22_VF_OM_EN_USC_t.book Page 37
Page 48 of 268
46GETTING TO KNOW YOUR VEHICLE
(Continued)
NOTE:Do not connect devices with power higher than
180 W to the socket. Do not damage the socket by
using unsuitable adapters.
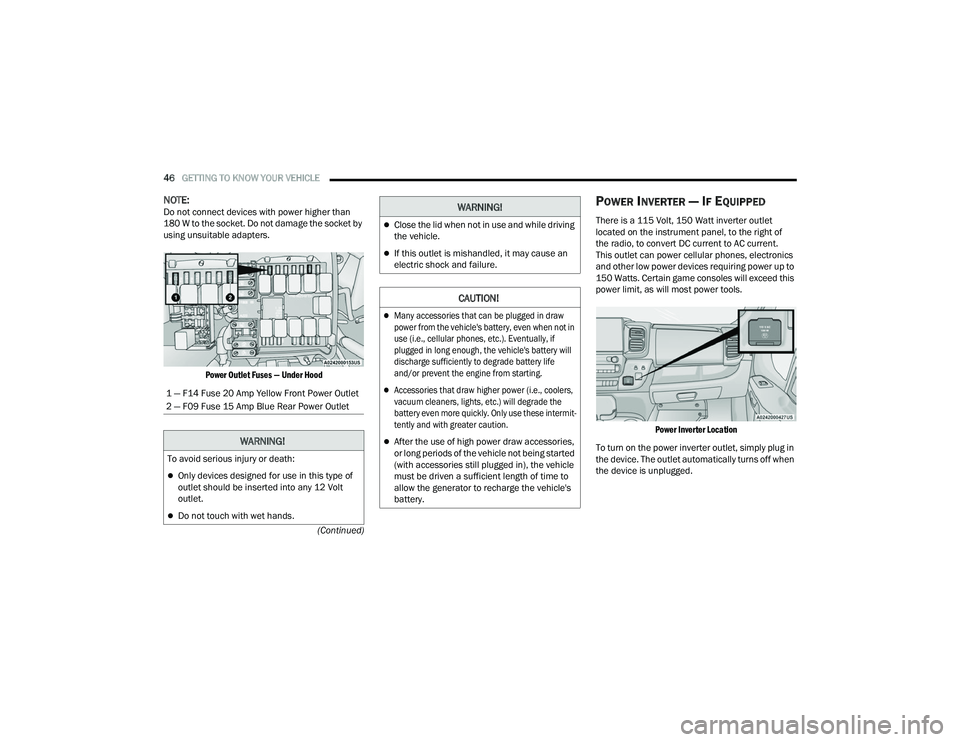
Power Outlet Fuses — Under Hood
POWER INVERTER — IF EQUIPPED
There is a 115 Volt, 150 Watt inverter outlet
located on the instrument panel, to the right of
the radio, to convert DC current to AC current.
This outlet can power cellular phones, electronics
and other low power devices requiring power up to
150 Watts. Certain game consoles will exceed this
power limit, as will most power tools.
Power Inverter Location
To turn on the power inverter outlet, simply plug in
the device. The outlet automatically turns off when
the device is unplugged.
1 — F14 Fuse 20 Amp Yellow Front Power Outlet
2 — F09 Fuse 15 Amp Blue Rear Power Outlet
WARNING!
To avoid serious injury or death:
Only devices designed for use in this type of
outlet should be inserted into any 12 Volt
outlet.
Do not touch with wet hands.
Close the lid when not in use and while driving
the vehicle.
If this outlet is mishandled, it may cause an
electric shock and failure.
CAUTION!
Many accessories that can be plugged in draw
power from the vehicle's battery, even when not in
use (i.e., cellular phones, etc.). Eventually, if
plugged in long enough, the vehicle's battery will
discharge sufficiently to degrade battery life
and/or prevent the engine from starting.
Accessories that draw higher power (i.e., coolers,
vacuum cleaners, lights, etc.) will degrade the
battery even more quickly. Only use these intermit
-
tently and with greater caution.
After the use of high power draw accessories,
or long periods of the vehicle not being started
(with accessories still plugged in), the vehicle
must be driven a sufficient length of time to
allow the generator to recharge the vehicle's
battery.
WARNING!
22_VF_OM_EN_USC_t.book Page 46
Page 61 of 268
GETTING TO KNOW YOUR INSTRUMENT PANEL59
WARNING LIGHTS AND MESSAGES
The warning/indicator lights will illuminate in the
instrument panel together with a dedicated message
and/or acoustic signal when applicable. These
indications are indicative and precautionary and as
such must not be considered as exhaustive and/or
alternative to the information contained in the Owner’s
Manual, which you are advised to read carefully in all
cases. Always refer to the information in this chapter in
the event of a failure indication. All active telltales will
display first if applicable. The system check menu may
appear different based upon equipment options and
current vehicle status. Some telltales are optional and
may not appear.
RED WARNING LIGHTS
Air Bag Warning Light
This light will turn on for four to eight seconds
as a bulb check when the ignition is placed in
the ON/RUN or MAR/ON/RUN position. If the
light is either not on during startup, stays on,
or turns on while driving, have the system inspected at
an authorized dealer as soon as possible. This light will
illuminate with a single chime when a fault with the
Air Bag Warning Light has been detected, it will stay
on until the fault is cleared. If the light comes on
intermittently or remains on while driving, have an
authorized dealer service the vehicle immediately.
Brake Warning Light
This warning light monitors various brake
functions, including brake fluid level and
parking brake application. If the brake
light turns on it may indicate that the
parking brake is applied, that the brake fluid level
is low, or that there is a problem with the Anti-Lock
Brake System reservoir.
If the light remains on when the parking brake has
been disengaged, and the fluid level is at the full
mark on the master cylinder reservoir, it indicates
a possible brake hydraulic system malfunction or
that a problem with the Brake Booster has been
detected by the Anti-Lock Brake System (ABS) /
Electronic Stability Control (ESC) system. In this
case, the light will remain on until the condition has
been corrected. If the problem is related to the
brake booster, the ABS pump will run when
applying the brake, and a brake pedal pulsation
may be felt during each stop.
The dual brake system provides a reserve braking
capacity in the event of a failure to a portion of the
hydraulic system. A leak in either half of the dual
brake system is indicated by the Brake Warning
Light, which will turn on when the brake fluid level
in the master cylinder has dropped below a
specified level.
The light will remain on until the cause is corrected.
NOTE:The light may flash momentarily during sharp
cornering maneuvers, which change fluid level
conditions. The vehicle should have service
performed, and the brake fluid level checked.
If brake failure is indicated, immediate repair is
necessary.
Vehicles equipped with the Anti-Lock Brake System
(ABS) are also equipped with Electronic Brake
Force Distribution (EBD). In the event of an EBD
failure, the Brake Warning Light will turn on along
with the ABS Light. Immediate repair to the ABS
system is required.
Operation of the Brake Warning Light can be
checked by turning the ignition switch from the OFF
position to the ON/RUN position. The light should
illuminate for approximately two seconds. The light
should then turn off unless the parking brake is
applied or a brake fault is detected. If the light does
not illuminate, have the light inspected by an
authorized dealer.
WARNING!
Driving a vehicle with the red brake light on is
dangerous. Part of the brake system may have
failed. It will take longer to stop the vehicle.
You could have a collision. Have the vehicle
checked immediately.
3
22_VF_OM_EN_USC_t.book Page 59
Page 63 of 268
GETTING TO KNOW YOUR INSTRUMENT PANEL61
Rear Cargo Door Open Warning Light -
If Equipped
This warning light will illuminate when the
rear cargo door is open.
NOTE:This light will flash at a fast rate for approximately
15 seconds when the vehicle security system is
arming, and then will flash slowly until the vehicle
is disarmed.
Oil Pressure Warning Light
This warning light will illuminate to
indicate low engine oil pressure. If the
light turns on while driving, stop the
vehicle, shut off the engine as soon
as possible, and contact an authorized dealer.
A chime will sound when this light turns on.
Do not operate the vehicle until the cause is
corrected. This light does not indicate how much oil
is in the engine. The engine oil level must be
checked under the hood.
Seat Belt Reminder Warning Light
When the ignition is first placed in the
ON/RUN or MAR/ON/RUN position, if the
driver’s seat belt is unbuckled, a chime
will sound and the light will turn on. When
driving, if the driver or front passenger seat belt
remains unbuckled, the Seat Belt Reminder Light
will flash or remain on continuously and a chime
will sound Ú page 154.
Transmission Fault Warning Light
This light will illuminate (together with a
message in the instrument cluster display
and a buzzer) to indicate a transmission
fault. Contact an authorized dealer if the
message remains after restarting the engine.
Vehicle Security Warning Light —
If Equipped
This light will flash at a fast rate for
approximately 15 seconds when the vehicle
security system is arming, and then will flash
slowly until the vehicle is disarmed.
YELLOW WARNING LIGHTS
Adaptive Cruise Control (ACC) Fault
Warning Light — If Equipped
This warning light will illuminate to
indicate a fault in the ACC system.
Contact a local authorized dealer for
service Ú page 82.
Anti-Lock Brake System (ABS) Warning
Light
This light monitors the ABS. The light will
turn on when the ignition is placed in the
ON/RUN or MAR/ON/RUN position and
may stay on for as long as four seconds.
If the ABS light remains on or turns on while
driving, then the Anti-Lock portion of the brake
system is not functioning and service is required.
However, the conventional brake system will
continue to operate normally if the brake warning
light is not on.
If the ABS light is on, the brake system should be
serviced as soon as possible to restore the
benefits of Anti-Lock Brakes. If the ABS light
does not turn on when the ignition is placed in the
ON/RUN or MAR/ON/RUN position, have the light
inspected by an authorized dealer.
3
22_VF_OM_EN_USC_t.book Page 61
Page 67 of 268

GETTING TO KNOW YOUR INSTRUMENT PANEL65
Transmission Temperature Warning Light
This warning light will illuminate to warn
of a high transmission fluid temperature.
This may occur with strenuous usage
such as trailer towing. If this light turns
on, stop the vehicle and run the engine at idle or
slightly faster, with the transmission in PARK (P) or
NEUTRAL (N), until the light turns off. Once the light
turns off, you may continue to drive normally.
YELLOW INDICATOR LIGHTS
Forward Collision Warning (FCW) OFF
Indicator Light — If Equipped
This indicator light will illuminate when
you switch FCW off or when driving
conditions obscure the sensor with snow,
heavy rain, or sun.
TOW/HAUL Indicator Light
This indicator light will illuminate when
TOW/HAUL mode is selected
Ú
page 110.
Keyless System Failure Light
The telltale will illuminate in the event of
keyless system failure.
Contact an authorized dealer as soon as possible.
Rain Sensor Failure Light
The telltale will illuminate in the case of
failure of the automatic windshield wiper.
Contact an authorized dealer as soon as
possible.
Exterior Lights Failure Light
The telltale will illuminate to indicate a
failure on the following lights: Daytime
Running Lights (DRLs) / parking lights /
trailer turn signal indicators (if present) /
trailer lights (if present) / side lights / turn signal
indicators / rear fog light / reversing light / brake
lights / license plate lights.
The failure may be caused by a blown bulb, a blown
protection fuse, or an interruption of the electrical
connection. Replace the bulb or the relevant fuse.
Contact an authorized dealer.
Fuel Cutoff Failure Light — If Equipped
This light will illuminate if there is a fuel
cutoff failure. If this light illuminates, take
it to an authorized dealer and have them
inspect it.
GREEN INDICATOR LIGHTS
Active Lane Management Indicator Light —
If Equipped
The Active Lane Management indicator light
illuminates solid green when both lane
markings have been detected and the
system is “armed” and ready to provide
visual and torque warnings if an unintentional lane
departure occurs
Ú
page 102.
WARNING!
If you continue operating the vehicle when the
Transmission Temperature Warning Light is
illuminated you could cause the fluid to boil over,
come in contact with hot engine or exhaust
components and cause a fire.
CAUTION!
Continuous driving with the Transmission
Temperature Warning Light illuminated will
eventually cause severe transmission damage
or transmission failure.
3
22_VF_OM_EN_USC_t.book Page 65
Page 68 of 268
66GETTING TO KNOW YOUR INSTRUMENT PANEL
Active Speed Limiter Set Indicator Light —
If Equipped With A Premium Instrument
Cluster
This indicator light will illuminate when
the Active Speed Limiter is on and set to
a specific speed Úpage 79.
Automatic High Beam Indicator Light —
If Equipped
This indicator shows that the automatic
high beam headlights are on Úpage 32.
Cruise Control Indicator Light —
If Equipped
This indicator light will illuminate when the
cruise control is activated
Ú
page 80.
NOTE:There will be no change in the indicator light when
the desired speed is set.
Front Fog Indicator Light — If Equipped
This indicator light will illuminate when
the front fog lights are on Ú page 32.
Parking/Headlights On Indicator Light
This indicator light will illuminate when
the parking lights or headlights are
turned on Úpage 32.
Turn Signal Indicator/Hazard Warning
Lights
The turn signal arrows will flash
independently when left or right turn
signals are selected. Turn signals can be
activated when the multifunction lever is
moved down (left) or up (right).
Pressing the Hazard Warning Flashers button will
illuminate both right and left turn signal arrows
simultaneously Ú page 176.
NOTE:Check for an inoperative outside light bulb if either
indicator flashes at a rapid rate.
BLUE INDICATOR LIGHTS
High Beam Indicator Light
This indicator light will illuminate to
indicate that the high beam headlights
are on. With the low beams activated,
push the multifunction lever forward
(toward the front of the vehicle) to turn on the high
beams. Pull the multifunction lever rearward
(toward the rear of the vehicle) to turn off the high
beams. If the high beams are off, pull the lever
toward you for a temporary high beam on, “flash to
pass” scenario.
WHITE INDICATOR LIGHTS
Adaptive Cruise Control (ACC) Set With
Target Indicator Light — If Equipped
This will display when the ACC is set and
a vehicle in front is detected Ú page 82.
22_VF_OM_EN_USC_t.book Page 66