hood open RAM PROMASTER 2023 Owners Manual
[x] Cancel search | Manufacturer: RAM, Model Year: 2023, Model line: PROMASTER, Model: RAM PROMASTER 2023Pages: 296, PDF Size: 12.31 MB
Page 5 of 296

3
INTERIOR STORAGE AND EQUIPMENT ............... 44 Storage..............................................................44
USB Control — If Equipped ..............................45
Power Outlets ...................................................46
Power Inverter — If Equipped...........................47
Auxiliary Switches — If Equipped .....................47
Wireless Charging Pad —
If Equipped .......................................................48
WINDOWS ............................................................. 49
Power Windows ...............................................49
Window Bar Grates — If Equipped...................49
Wind Buffeting .................................................50
HOOD....................................................................... 50
Opening .............................................................50
Closing...............................................................51
CARGO AREA FEATURES ...................................... 51
GETTING TO KNOW YOUR
INSTRUMENT PANEL
BASE / MIDLINE INSTRUMENT CLUSTER........... 52
Base / Midline Instrument Cluster
Descriptions ......................................................53
INSTRUMENT CLUSTER......................................... 54
Instrument Cluster Descriptions .....................55
INSTRUMENT CLUSTER DISPLAY ........................ 56
Location And Controls ......................................56
Change Engine Oil — If Equipped ....................57
Main Menu........................................................57
Settings .............................................................59 WARNING LIGHTS AND MESSAGES ....................65
Red Warning Lights ..........................................65
Yellow Warning Lights ......................................68
Yellow Indicator Lights .....................................72
Green Indicator Lights .....................................72
Blue Indicator Lights ........................................73
White Indicator Lights ......................................73
ONBOARD DIAGNOSTIC SYSTEM — OBD II ........ 74
Onboard Diagnostic System
(OBD II) Cybersecurity ......................................74
EMISSIONS INSPECTION AND MAINTENANCE
PROGRAMS.............................................................74
STARTING AND OPERATING
STARTING THE ENGINE ........................................76
Automatic Transmission ..................................76
Normal Starting ................................................76
Tip Start Feature .............................................76
Cold Weather Operation
(Below –22°F Or −30°C) ...............................76
Extended Park Starting ....................................76
If Engine Fails To Start .....................................77
After Starting ....................................................77
ENGINE BLOCK HEATER — IF EQUIPPED ...........77
ENGINE BREAK-IN RECOMMENDATIONS ..........78
PARKING BRAKE ....................................................78
Electric Park Brake (EPB) ................................78 AUTOMATIC TRANSMISSION .............................. 81
Ignition Park Interlock (Keyless Vehicle) ........ 81
Brake/Transmission Shift Interlock (BTSI)
System ............................................................. 81
9-Speed Automatic Transmission ................... 82
POWER STEERING ................................................ 85
ACTIVE SPEED LIMITER — IF EQUIPPED ............ 86
Activation .......................................................... 86
Exceeding The Set Speed ................................ 86
Deactivation ..................................................... 86
INTELLIGENT SPEED ASSIST (ISA) —
IF EQUIPPED ........................................................... 87
Activation .......................................................... 87
Exceeding The Set Speed ................................ 87
Deactivation ..................................................... 87
CRUISE CONTROL SYSTEMS — IF EQUIPPED ... 87
Cruise Control .................................................. 88
Adaptive Cruise Control (ACC) ......................... 89
TRAFFIC SIGN ASSIST SYSTEM —
IF EQUIPPED ........................................................... 98
Activation/Deactivation ................................... 98
Traffic Sign Assist Modes ................................ 98
Indications On The Display .............................. 99
ACTIVE DRIVING ASSIST SYSTEM —
IF EQUIPPED ......................................................... 100
Operation ....................................................... 100Turning Active Driving Assist
On Or Off ........................................................ 101
23_VF_OM_EN_USC_t.book Page 3
Page 12 of 296

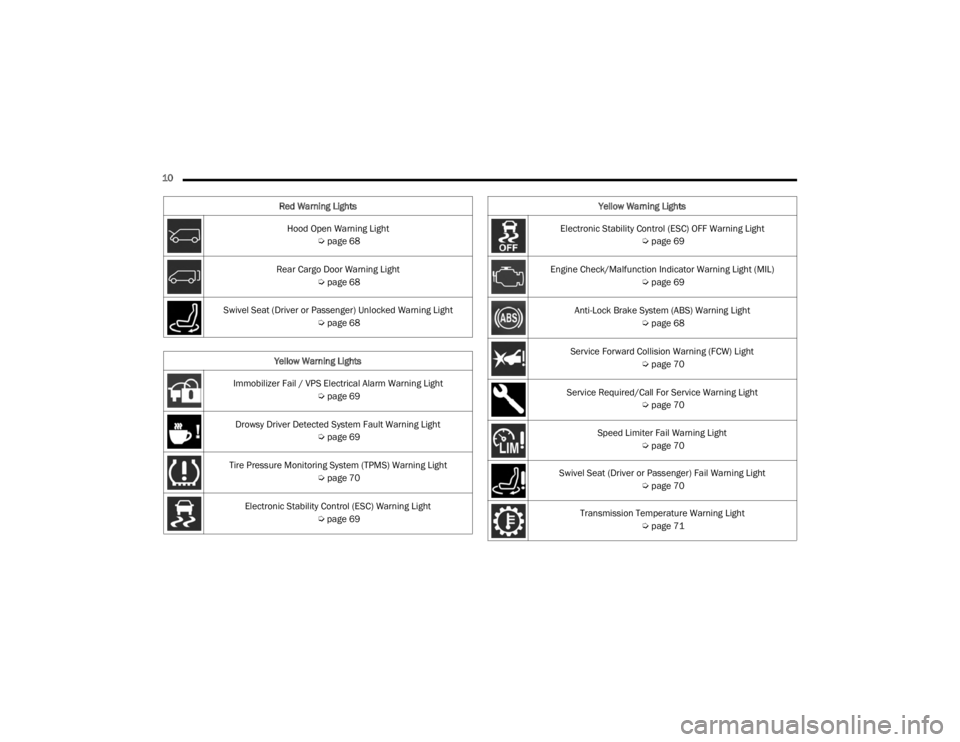
10 Hood Open Warning Light Úpage 68
Rear Cargo Door Warning Light Úpage 68
Swivel Seat (Driver or Passenger) Unlocked Warning Light Úpage 68
Yellow Warning Lights
Immobilizer Fail / VPS Electrical Alarm Warning Light Úpage 69
Drowsy Driver Detected System Fault Warning Light Úpage 69
Tire Pressure Monitoring System (TPMS) Warning Light Úpage 70
Electronic Stability Control (ESC) Warning Light Úpage 69
Red Warning Lights
Electronic Stability Control (ESC) OFF Warning Light
Úpage 69
Engine Check/Malfunction Indicator Warning Light (MIL) Úpage 69
Anti-Lock Brake System (ABS) Warning Light Úpage 68
Service Forward Collision Warning (FCW) Light Úpage 70
Service Required/Call For Service Warning Light Úpage 70
Speed Limiter Fail Warning Light Úpage 70
Swivel Seat (Driver or Passenger) Fail Warning Light Úpage 70
Transmission Temperature Warning Light Úpage 71
Yellow Warning Lights
23_VF_OM_EN_USC_t.book Page 10
Page 22 of 296

20GETTING TO KNOW YOUR VEHICLE
REMOTE START ABORT MESSAGE
One of the following messages will display in the
instrument cluster display if the vehicle fails to
remote start or exits Remote Start prematurely:
Remote Start Canceled — Door Open
Remote Start Canceled — Hood Open
Remote Start Canceled — Fuel Low
Remote Start Canceled — Rear Cargo Door Open
Remote Start Canceled — Too Cold
Remote Start Canceled — Time Expired
Remote Start Canceled — System Fault
Remote Start Disabled — Start Vehicle to Reset
The message will stay active until the ignition is
placed in the ON/RUN position.
VEHICLE SECURITY SYSTEM — IF EQUIPPED
The Vehicle Security system monitors the vehicle
doors and ignition for unauthorized operation.
When the Vehicle Security system is activated,
interior switches for door locks are disabled.
The system provides both audible and visible
signals. For the first three minutes, the horn will
sound, and the turn signal lights will flash. For an
additional 15 minutes, only the turn signal lights
will flash.
TO ARM THE SYSTEM
Follow these steps to arm the Vehicle Security
system:
1. Make sure the vehicle’s ignition is placed in the OFF position.
2. If any doors are open, close them.
3. Perform one of the following methods to lock the vehicle:
Push the lock button on the exterior Passive
Entry door handle with a valid key fob avail -
able in the same exterior zone Ú page 22.
Push the lock button on the key fob.
When the Vehicle Security system is armed, the
Vehicle Security Light (on the lock/unlock button
on the instrument panel) will begin to flash every
three seconds until it is disarmed.
NOTE:If a door or the hood is not properly closed, the
system will not be armed.
TO DISARM THE SYSTEM
The Vehicle Security system can be disarmed using
any of the following methods:
Push the unlock button on the key fob.
Push the Passive Entry button next to the door
handle to unlock the door Ú page 22.
Cycle the ignition out of the OFF position to
disarm the system.
The Vehicle Security system is designed to protect
your vehicle. However, you can create conditions
where the system will give you a false alarm. If one
of the previously described arming sequences has
occurred, the Vehicle Security system will arm
regardless of whether you are in the vehicle or not.
If you remain in the vehicle and open a door, the
alarm will sound. If this occurs, disarm the Vehicle
Security system.
REARMING OF THE SYSTEM
If the system has not been disabled, the
Vehicle Security system will rearm itself after
the 15 additional minutes of the turn signals
flashing. If the condition which initiated the alarm is
still present, the system will ignore that condition
and monitor the remaining doors and ignition.
23_VF_OM_EN_USC_t.book Page 20
Page 52 of 296

50GETTING TO KNOW YOUR VEHICLE
WIND BUFFETING
Wind buffeting can be described as the perception of
pressure on the ears or a helicopter-type sound in the
ears. Your vehicle may exhibit wind buffeting with the
windows down, or the sunroof (if equipped) in certain
open or partially open positions. This is a normal
occurrence and can be minimized. If the buffeting
occurs with the rear windows open, open the front
and rear windows together to minimize the buffeting.
If the buffeting occurs with the sunroof open, adjust the
sunroof opening to minimize the buffeting or open
any window.
HOOD
OPENING
To open the hood, two latches must be released.
1. Pull the hood release lever located on the
side of the instrument panel.
Hood Release
2. Move to the outside of the vehicle, reach into
the opening beneath the center of the hood
and push the safety latch lever to the right to
release it, before raising the hood.
Hood Safety Latch Lever Location
WARNING!
The metal grates over the sliding door windows
are designed to protect you in the event of an
accident. Modification or removal of the grates
could lead to serious injury or death.
23_VF_OM_EN_USC_t.book Page 50
Page 53 of 296

GETTING TO KNOW YOUR VEHICLE51
3. Raise the hood and place the hood prop rod in hood slot to secure the hood in the open position.
Hood Prop Rod Slot
NOTE:
Vehicle must be at a stop and the gear selector
must be in PARK.
While lifting the hood, use both hands.
Before lifting the hood, check that the wiper arms
are not in motion and not in the lifted position.
CLOSING
CARGO AREA FEATURES
The cargo area may be equipped with different
options such as optional side panels, rear seats
and an optional floor.
CAUTION!
Be sure to disengage the rod and secure it in
closed position before closing the hood. Damage
may occur.
WARNING!
Be sure the hood is fully latched before driving
your vehicle. If the hood is not fully latched, it
could open when the vehicle is in motion and
block your vision. Failure to follow this warning
could result in serious injury or death.
CAUTION!
To prevent possible damage:
Before closing hood, make sure the hood prop rod
is fully seated into its storage retaining clips.
Do not slam the hood to close it. Use a firm
downward push at the center front edge of the
hood to ensure that both latches engage.
Never drive your vehicle unless the hood is
fully closed, with both latches engaged.2
23_VF_OM_EN_USC_t.book Page 51
Page 70 of 296

68GETTING TO KNOW YOUR INSTRUMENT PANEL
Hood Open Warning Light
The telltale turns on when the hood is not
properly closed. Along with the icon, an
image of the vehicle with an open hood
cap appears on the display.
Close the hood properly.
Rear Door Open Warning Light —
If Equipped
This warning light will illuminate when the
rear door is open.
NOTE:This light will flash at a fast rate for approximately
15 seconds when the vehicle security system is
arming, and then will flash slowly until the vehicle
is disarmed.
Oil Pressure Warning Light
This warning light will illuminate to
indicate low engine oil pressure. If the
light turns on while driving, stop the
vehicle, shut off the engine as soon
as possible, and contact an authorized dealer.
A chime will sound when this light turns on.
Do not operate the vehicle until the cause is
corrected. This light does not indicate how much
oil is in the engine. The engine oil level must be
checked under the hood.
Seat Belt Reminder Warning Light
When the ignition is first placed in the
ON/RUN or MAR/ON/RUN position, if the
driver’s seat belt is unbuckled, a chime
will sound and the light will turn on. When
driving, if the driver or front passenger seat belt
remains unbuckled, the Seat Belt Reminder Light
will flash or remain on continuously and a chime
will sound Ú page 170.
Transmission Fault Warning Light
This light will illuminate (together with
a message in the instrument cluster display
and a buzzer) to indicate a transmission
fault. Contact an authorized dealer if the
message remains after restarting the engine.
Vehicle Security Warning Light —
If Equipped
This light will flash at a fast rate for
approximately 15 seconds when the
vehicle security system is arming, and
then will flash slowly until the vehicle is
disarmed.
Swivel Seat (Driver or Passenger)
Unlocked Warning Light — If Equipped
This light will illuminate when the driver
or passenger seat is unlocked.
YELLOW WARNING LIGHTS
Adaptive Cruise Control (ACC) Fault
Warning Light — If Equipped
This warning light will illuminate to
indicate a fault in the ACC system.
Contact a local authorized dealer for
service Ú page 89.
Anti-Lock Brake System (ABS) Warning
Light
This light monitors the ABS. The light will
turn on when the ignition is placed in the
ON/RUN or MAR/ON/RUN position and
may stay on for as long as four seconds.
If the ABS light remains on or turns on while
driving, then the Anti-Lock portion of the brake
system is not functioning and service is required.
However, the conventional brake system will
continue to operate normally if the brake warning
light is not on.
If the ABS light is on, the brake system should
be serviced as soon as possible to restore the
benefits of Anti-Lock Brakes. If the ABS light
does not turn on when the ignition is placed in
the ON/RUN or MAR/ON/RUN position, have the
light inspected by an authorized dealer.
23_VF_OM_EN_USC_t.book Page 68
Page 219 of 296

IN CASE OF EMERGENCY217
GEAR SELECTOR OVERRIDE
If a malfunction occurs and the gear selector
cannot be moved out of the PARK (P) position, you
can use the following procedure to temporarily
move the gear selector:
1. Turn the engine OFF.
2. Firmly apply the parking brake.
3. Using a small screwdriver or similar tool,
remove the shifter boot material of the gear
selector by pulling up to carefully separate the
gear selector bezel and boot assembly from
the console.
Shifter Boot And Bezel
4. Press and maintain firm pressure on the brake
pedal.
5. Insert the screwdriver or similar tool into the gear selector override release and push down
while depressing the shifter button at the
same time.
Gear Selector Override Release Lever
6. Move the gear selector to the NEUTRAL (N) position.
7. The vehicle may then be started in NEUTRAL.
8. Reinstall the shifter boot and bezel.
WARNING!
You or others can be badly burned by hot engine
coolant (antifreeze) or steam from your radiator.
If you see or hear steam coming from under the
hood, do not open the hood until the radiator
has had time to cool. Never try to open a cooling
system pressure cap when the radiator or
coolant bottle is hot.
CAUTION!
Driving with a hot cooling system could damage
your vehicle. If the temperature gauge reads
HOT (H), pull over and stop the vehicle. Idle the
vehicle with the air conditioner turned off until
the pointer drops back into the normal range.
If the pointer remains on HOT (H), and you
hear continuous chimes, turn the engine off
immediately and call for service.
7
23_VF_OM_EN_USC_t.book Page 217
Page 235 of 296

SERVICING AND MAINTENANCE233
COOLING SYSTEM
Coolant Checks
Check the engine coolant (antifreeze) protection
every 12 months (before the onset of freezing
weather, where applicable). If the engine coolant is
dirty, the system should be drained, flushed, and
refilled with fresh OAT coolant (conforming to
MS-12106) only by an authorized dealer. Check
the front of the A/C condenser for any accumulation of bugs, leaves, etc. If dirty, clean by
gently spraying water from a garden hose vertically
down the face of the condenser.
Cooling System — Drain, Flush And Refill
NOTE:Some vehicles require special tools to add coolant
properly. Failure to fill these systems properly
could lead to severe internal engine damage. If any
coolant is needed to be added to the system
please contact an authorized dealer.
If the engine coolant (antifreeze) is dirty or
contains visible sediment, have an authorized
dealer clean and flush with OAT coolant
(conforming to MS.90032).
For the proper maintenance intervals
Úpage 222.
Selection Of Coolant
For further information Ú page 273.
NOTE:
Mixing of engine coolant (antifreeze) other than
specified Organic Additive Technology (OAT)
engine coolant, may result in engine damage
and may decrease corrosion protection. OAT
engine coolant is different and should not be
mixed with Hybrid Organic Additive Technology
(HOAT) engine coolant or any “globally compat -
ible” coolant. If a non-OAT engine coolant is
introduced into the cooling system in an emer -
gency, the cooling system will need to be drained, flushed, and refilled with fresh OAT
coolant (conforming to MS.90032), by an autho
-
rized dealer as soon as possible.
Do not use water alone or alcohol-based engine
coolant products. Do not use additional rust
inhibitors or antirust products, as they may not
be compatible with the radiator engine coolant
and may plug the radiator.
This vehicle has not been designed for use with
propylene glycol-based engine coolant. Use of
propylene glycol-based engine coolant is not
recommended.
Some vehicles require special tools to add
coolant properly. Failure to fill these systems
properly could lead to severe internal engine
damage. If any coolant is needed to be added to
the system please contact an authorized dealer.
Adding Coolant
The vehicle has been built with an improved engine
coolant (OAT coolant conforming to MS.90032)
that allows extended maintenance intervals.
This engine coolant (antifreeze) can be used up to
10 years or 150,000 miles (240,000 km) before
replacement. To prevent reducing this extended
maintenance period, it is important to use the
same engine coolant (OAT coolant conforming to
MS.90032) throughout the life of your vehicle.
WARNING!
You or others can be badly burned by hot
engine coolant (antifreeze) or steam from your
radiator. If you see or hear steam coming from
under the hood, do not open the hood until the
radiator has had time to cool. Never open a
cooling system pressure cap when the radi -
ator or coolant bottle is hot.
Keep hands, tools, clothing, and jewelry away from
the radiator cooling fan when the hood is raised.
The fan starts automatically and may start at any
time, whether the engine is running or not.
When working near the radiator cooling fan,
disconnect the fan motor lead and turn the
ignition to the OFF mode. The fan is tempera -
ture controlled and can start at any time the
ignition is in the ON mode.
8
23_VF_OM_EN_USC_t.book Page 233
Page 237 of 296

SERVICING AND MAINTENANCE235
If an examination of your engine compartment
shows no evidence of radiator or hose leaks, the
vehicle may be safely driven. The vapor will soon
dissipate.
Do not overfill the coolant expansion bottle.
Check the coolant freeze point in the radiator
and in the coolant expansion bottle. If engine
coolant needs to be added, the contents of the
coolant expansion bottle must also be protected
against freezing.
If frequent engine coolant additions are
required, the cooling system should be pressure
tested for leaks.
Maintain engine coolant concentration at a
minimum of 50% OAT coolant (conforming to
MS.90032) and distilled water for proper corro -
sion protection of your engine which contains
aluminum components.
Make sure that the coolant expansion bottle
overflow hoses are not kinked or obstructed.
Keep the front of the radiator clean. If your
vehicle is equipped with air conditioning, keep
the front of the condenser clean.
Do not change the thermostat for Summer or
Winter operation. If replacement is ever neces -
sary, install ONLY the correct type thermostat.
Other designs may result in unsatisfactory
engine cooling performance, poor gas mileage,
and increased emissions.
BRAKE SYSTEM
In order to ensure brake system performance, all
brake system components should be inspected
periodically Ú page 222.
Fluid Level Check — Brake Master Cylinder
The fluid level of the master cylinder should be
checked when performing under the hood service
or immediately if the Brake System Warning Light
indicates system failure. If necessary, add fluid to
bring level within the designated marks on the side
of the reservoir of the brake master cylinder. Be
sure to clean the top of the master cylinder area
before removing cap. With disc brakes the fluid
level can be expected to fall as the brake linings
wear. However, an unexpected drop in fluid level
may be caused by a leak and a system check
should be conducted Ú page 273.
WARNING!
Riding the brakes can lead to brake failure and
possibly a collision. Driving with your foot resting or
riding on the brake pedal can result in abnormally
high brake temperatures, excessive lining wear, and
possible brake damage. You would not have your full
braking capacity in an emergency.
WARNING!
Use only the manufacturer recommended
brake fluid Úpage 273. Using the wrong type
of brake fluid can severely damage your brake
system and/or impair its performance. The
proper type of brake fluid for your vehicle is
also identified on the original factory installed
hydraulic master cylinder reservoir.
To avoid contamination from foreign matter or
moisture, use only new brake fluid or fluid that
has been in a tightly closed container. Keep
the master cylinder reservoir cap secured at
all times. Brake fluid in an open container
absorbs moisture from the air resulting in a
lower boiling point. This may cause it to boil
unexpectedly during hard or prolonged
braking, resulting in sudden brake failure.
This could result in a collision.
Overfilling the brake fluid reservoir can result
in spilling brake fluid on hot engine parts,
causing the brake fluid to catch fire. Brake
fluid can also damage painted and vinyl
surfaces, care should be taken to avoid its
contact with these surfaces.
Do not allow petroleum-based fluid to contami -
nate the brake fluid. Brake seal components could
be damaged, causing partial or complete brake
failure. This could result in a collision.
8
23_VF_OM_EN_USC_t.book Page 235
Page 291 of 296

289
Sentry Key (Immobilizer)
.................................. 16Service Assistance......................................... 275Service Contract............................................ 277Service Manuals............................................ 279Settings Personal.................................................... 134Shift Lever Override....................................... 217Shoulder Belts............................................... 172Side Distance Warning.................................. 110Signals, Turn.................................................. 191Snow Chains (Tire Chains)............................. 263Snow Tires..................................................... 260Spare Tires.......................................... 260, 261Speed Limiter, Active....................................... 86Starting............................................................ 76Automatic Transmission.............................. 76Button......................................................... 16Cold Weather.............................................. 76Engine Fails To Start................................... 77Steering........................................................... 23Column Lock............................................... 23Power.......................................................... 85Storage, Vehicle...................................... 43, 265Storing Your Vehicle...................................... 265Supplemental Restraint System – Air Bag..... 179Surround View Camera.................................. 120Sway Control, Trailer...................................... 157Symbol Glossary................................................ 9Synthetic Engine Oil....................................... 228
T
Telescoping Steering Column.......................... 23Tip Start........................................................... 76Tire And Loading Information Placard........... 253Tire Markings................................................ 249Tire Safety Information................................. 249Tire Service
Kit................... 203, 209, 210, 211, 212, 213
Tire Service Kit — If Equipped
S
................ 203Tires...................................191, 256, 260, 264Aging (Life Of Tires).................................. 258Air Pressure.............................................. 256Chains...................................................... 263Changing.................................................. 196Compact Spare......................................... 260General Information........................ 256, 260High Speed............................................... 257Inflation Pressure..................................... 256Jacking..................................................... 196Life Of Tires.............................................. 258Load Capacity........................................... 253Pressure Monitoring System (TPMS)..70, 168Quality Grading......................................... 264Radial....................................................... 257Replacement............................................ 259Rotation.................................................... 264Safety.............................................. 249, 256
Sizes......................................................... 250Snow Tires................................................ 260Spare Tires...................................... 260, 261Spinning................................................... 258Trailer Towing........................................... 128Tread Wear Indicators.............................. 258Wheel Nut Torque..................................... 269To Open Hood..................................................50Tongue Weight/Trailer Weight...................... 127Towing.................................................. 124, 219Disabled Vehicle....................................... 219Guide........................................................ 126Recreational............................................. 130Weight...................................................... 126Towing Behind A Motorhome........................ 130Traction......................................................... 131Traction Control............................................ 156Traffic Sign Assist.............................................98Trailer Sway Control (TSC)............................. 157Trailer Towing................................................ 124Hitches..................................................... 126Minimum Requirements........................... 127Tips........................................................... 130Trailer And Tongue Weight........................ 127Wiring....................................................... 129Trailer Towing Guide..................................... 126Trailer Weight................................................ 12611
23_VF_OM_EN_USC_t.book Page 289