Ram ProMaster City 2016 Owner's Manual
Manufacturer: RAM, Model Year: 2016, Model line: ProMaster City, Model: Ram ProMaster City 2016Pages: 438, PDF Size: 3.26 MB
Page 101 of 438
WARNING!(Continued)
•Seats should be adjusted before fastening the seat
belts and while the vehicle is parked. Serious
injury or death could result from a poorly adjusted
seat belt.
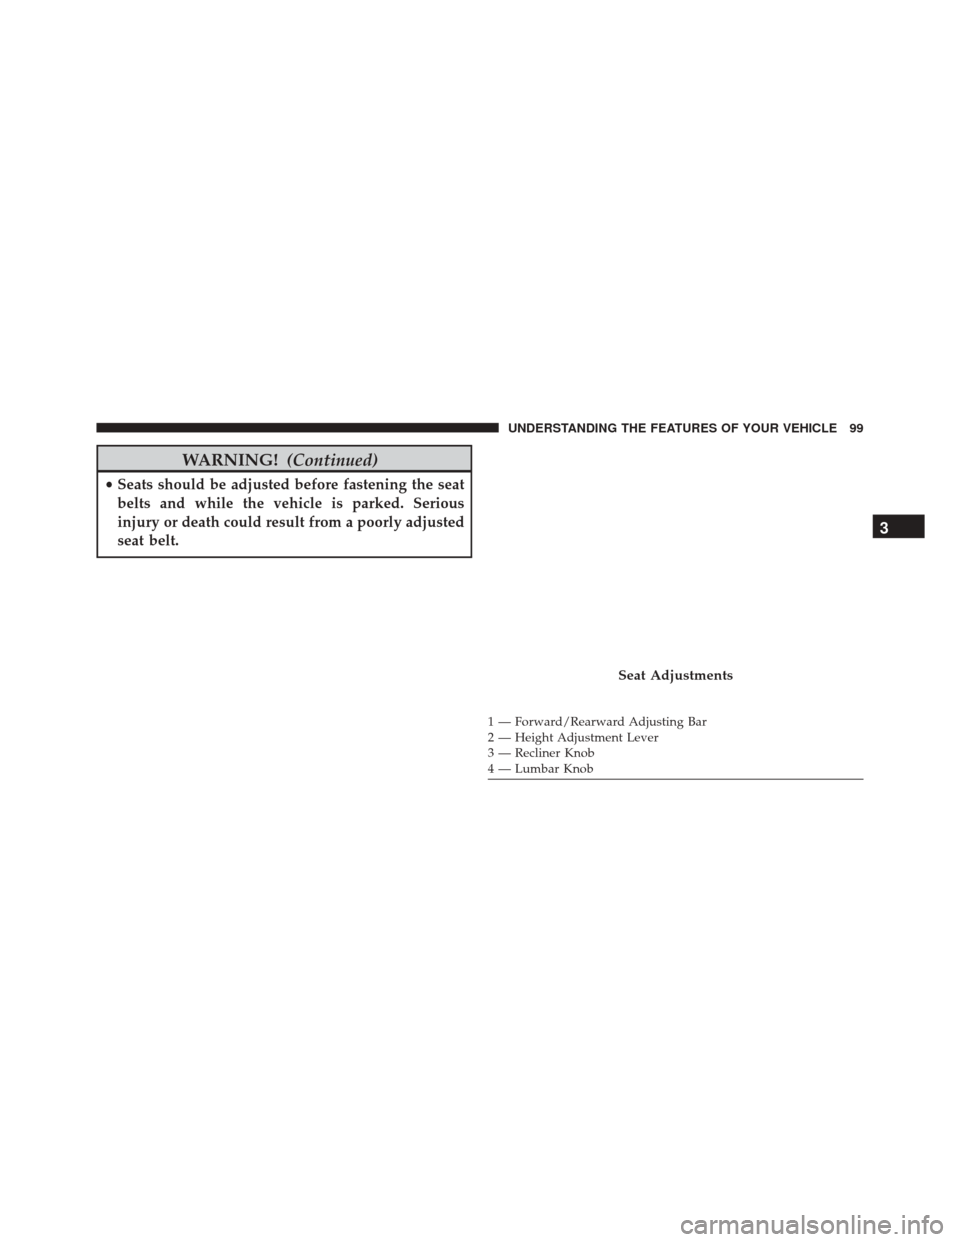
Seat Adjustments
1 — Forward/Rearward Adjusting Bar
2 — Height Adjustment Lever
3 — Recliner Knob
4 — Lumbar Knob
3
UNDERSTANDING THE FEATURES OF YOUR VEHICLE 99
Page 102 of 438
Forward And Rearward Adjustment
The adjusting bar is at the front of the seat, near the floor.
Pull the bar upward to move the seat forward or rear-
ward. Release the bar once the seat is in the desired
position. Then, using body pressure, move forward and
rearward on the seat to be sure that the seat adjusters
have latched.
Height Adjustment — If Equipped
The height adjusting lever is located on the center
outboard side of the seat. Lift up or push down on the
front lever to adjust the front of the seat up or down.
Recliner Adjustment — If Equipped
The recliner knob is on the rear outboard side of the seat.
To recline the seatback, rotate the knob rearward without
leaning back. To return the seatback to its normal upright
position, lean forward, rotate the knob forward until the
seatback is in the upright position.Lumbar Support — If Equipped
This feature allows you to increase or decrease the
amount of lumbar support. The lumbar control knob is
located on the rear upper outboard side of the seatback.
Rotate the control forward to increase and rearward to
decrease the desired amount of lumbar support.
WARNING!
•
Adjusting a seat while the vehicle is moving is
dangerous. The sudden movement of the seat could
cause you to lose control. The seat belt might not be
adjusted properly and you could be injured. Adjust
the seat only while the vehicle is parked.
• Do not ride with the seatback reclined so that the
shoulder belt is no longer resting against your
chest. In a collision you could slide under the seat
belt and be seriously or even fatally injured. Use
the recliner only when the vehicle is parked.
100 UNDERSTANDING THE FEATURES OF YOUR VEHICLE
Page 103 of 438
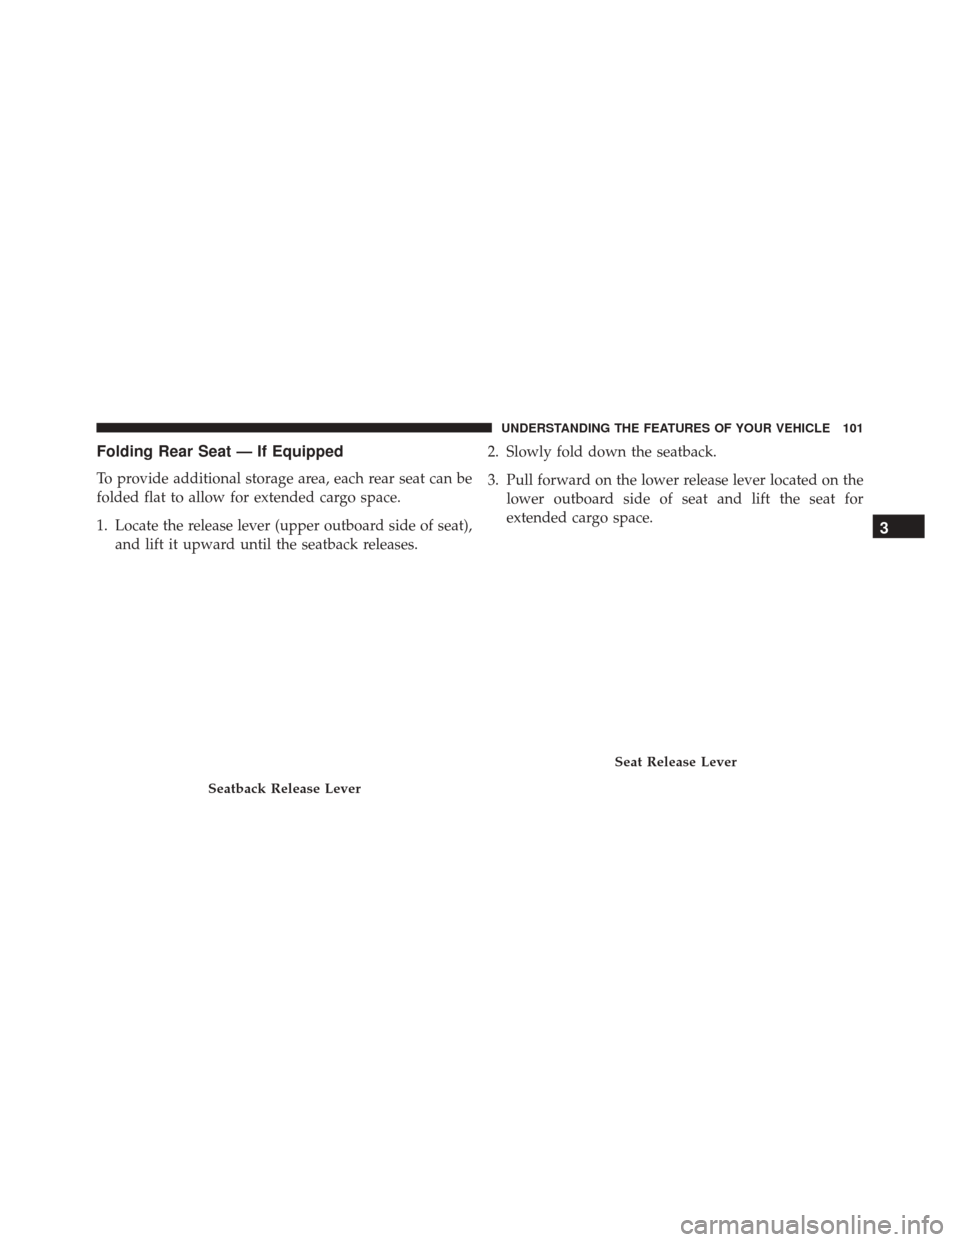
Folding Rear Seat — If Equipped
To provide additional storage area, each rear seat can be
folded flat to allow for extended cargo space.
1. Locate the release lever (upper outboard side of seat),and lift it upward until the seatback releases. 2. Slowly fold down the seatback.
3. Pull forward on the lower release lever located on the
lower outboard side of seat and lift the seat for
extended cargo space.
Seatback Release Lever
Seat Release Lever
3
UNDERSTANDING THE FEATURES OF YOUR VEHICLE 101
Page 104 of 438
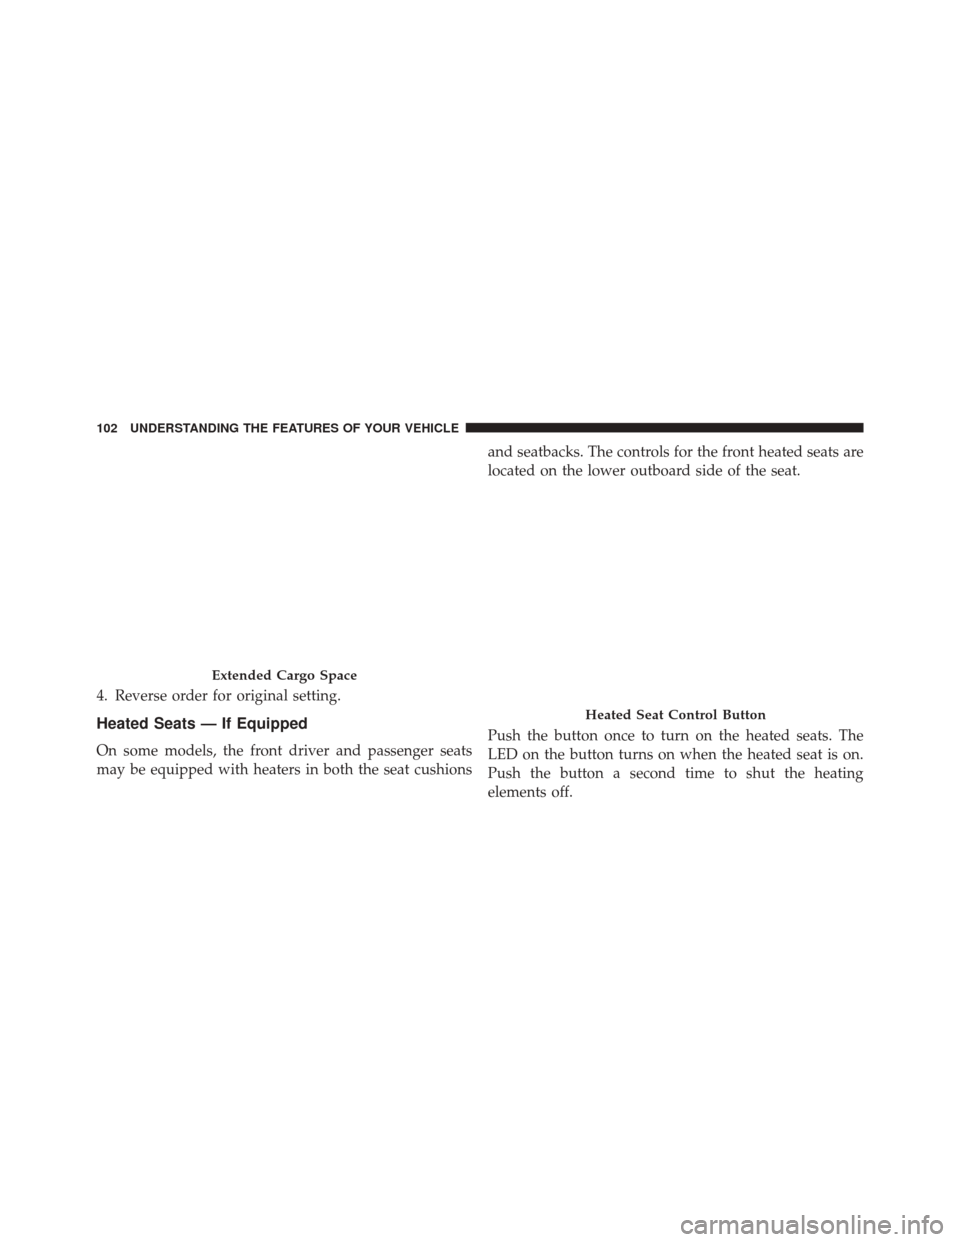
4. Reverse order for original setting.
Heated Seats — If Equipped
On some models, the front driver and passenger seats
may be equipped with heaters in both the seat cushionsand seatbacks. The controls for the front heated seats are
located on the lower outboard side of the seat.
Push the button once to turn on the heated seats. The
LED on the button turns on when the heated seat is on.
Push the button a second time to shut the heating
elements off.
Extended Cargo Space
Heated Seat Control Button
102 UNDERSTANDING THE FEATURES OF YOUR VEHICLE
Page 105 of 438
NOTE:
•This features is allowed only with ignition key at MAR
(ACC/ON/RUN) position.
• Once a heat setting is selected, heat will be felt within
two to five minutes.
WARNING!
• Persons who are unable to feel pain to the skin
because of advanced age, chronic illness, diabetes,
spinal cord injury, medication, alcohol use, exhaus-
tion or other physical condition must exercise care
when using the seat heater. It may cause burns
even at low temperatures, especially if used for
long periods of time.
• Do not place anything on the seat or seatback that
insulates against heat, such as a blanket or cushion.
(Continued)
WARNING! (Continued)
This may cause the seat heater to overheat. Sitting
in a seat that has been overheated could cause
serious burns due to the increased surface tempera-
ture of the seat.
Head Restraints
Head restraints are designed to reduce the risk of injury
by restricting head movement in the event of a rear
impact. Head restraints should be adjusted so that the top
of the head restraint is located above the top of your ear.
WARNING!
The head restraints for all occupants must be prop-
erly installed and adjusted prior to operating the
vehicle or occupying a seat. Head restraints should
(Continued)
3
UNDERSTANDING THE FEATURES OF YOUR VEHICLE 103
Page 106 of 438
WARNING!(Continued)
never be adjusted while the vehicle is in motion.
Driving a vehicle with the head restraints improperly
adjusted or removed could cause serious injury or
death in the event of a collision.
Front Head Restraints
To raise the head restraint, push the adjustment button,
located on the base of the head restraint, pull upward on
the head restraint. To lower the head restraint, push the
adjustment button, located on the base of the head
restraint, and push downward on the head restraint.
To remove the head restraint, raise it as far as it can go
then push the release button and the adjustment button
at the base of each post while pulling the head restraint
up. To reinstall the head restraint, put the head restraint
posts into the holes and push downward. Then adjust the
head restraint to the appropriate height.
Front Head Restraint
1 — Release Button
2 — Adjustment Button
104 UNDERSTANDING THE FEATURES OF YOUR VEHICLE
Page 107 of 438
WARNING!
•A loose head restraint thrown forward in a colli-
sion or hard stop could cause serious injury or
death to occupants of the vehicle. Always securely
stow removed head restraints in a location outside
the occupant compartment.
• ALL the head restraints MUST be reinstalled in the
vehicle to properly protect the occupants. Follow
the re-installation instructions above prior to oper-
ating the vehicle or occupying a seat.
Rear Head Restraints
The outboard head restraints can be removed by pushing
the release buttons, located at the base of the head
restraint and pull upward on the whole assembly. To reinstall the head restraint, put the head restraint posts
into the holes and push downward. Then adjust it to the
appropriate height.
WARNING!
A loose head restraint thrown forward in a collision
or hard stop could cause serious injury or death to
occupants of the vehicle. Always securely stow re-
moved head restraints in a location outside the occu-
pant compartment.
3
UNDERSTANDING THE FEATURES OF YOUR VEHICLE 105
Page 108 of 438
The center head restraint is adjustable and removable. To
raise the head restraint, push and hold the adjustment
button, located on the base of the head restraint and pull
upward on the head restraint. To lower the head restraint,push and hold the adjustment button, and push down-
ward on the head restraint till the desired height is
reached.
To remove the head restraint, push the release button and
adjustment button while pulling upward on the whole
assembly and raise it as far as it can go. To reinstall the
headrest, put the headrest posts into the holes while
pushing the release button and adjustment button. Then
adjust it to the appropriate height.
Outboard Head Restraint Release Buttons
106 UNDERSTANDING THE FEATURES OF YOUR VEHICLE
Page 109 of 438
WARNING!
ALL the head restraints MUST be reinstalled in the
vehicle to properly protect the occupants. Follow the
re-installation instructions above prior to operating
the vehicle or occupying a seat.
Center Head Restraint
1 — Release Button
2 — Adjustment Button
3
UNDERSTANDING THE FEATURES OF YOUR VEHICLE 107
Page 110 of 438
TO OPEN AND CLOSE THE HOOD
To open the hood, two latches must be released.
1. Pull the release lever located below the instrumentpanel and in front of the driver’s door. 2. Move to the outside of the vehicle, reach into the
opening beneath the center of the hood and push up
the safety latch lever to release it, before raising the
hood.
Hood Release Lever
Hood Safety Latch Lever Location
108 UNDERSTANDING THE FEATURES OF YOUR VEHICLE