brake fluid Ram ProMaster City 2018 User Guide
[x] Cancel search | Manufacturer: RAM, Model Year: 2018, Model line: ProMaster City, Model: Ram ProMaster City 2018Pages: 180, PDF Size: 7.52 MB
Page 33 of 180
•UP Arrow Button
Push and release the uparrow button to
scroll upward through the main menu and
submenus.
• DOWN Arrow Button
Push and release the downarrow button to
scroll downward through the main menu
and submenus.
NOTE:
If equipped with a Uconnect system, some of
the menu items will be present in the radio
head unit. Refer to “Uconnect Settings” in
“Multimedia” in the Owner’s Manual at
www.mopar.com/en-us/care/owners-manual.html
(U.S. Residents) or www.owners.mopar.ca
(Canadian Residents) for further information.
Dimmer:
With headlights on and without entering in
the menu, push the upordown arrow button
to increase or decrease the brightness of the
instrument panel, graphics and command
buttons. Selecting An Option Of The Main Menu With
Submenu:
1. Briefly push and release the
MENUbutton
to display the first submenu option.
2. Push and release the upordown arrow
button (by single pushes) to scroll through
all the submenu options.
3. Briefly push and release the MENUbutton
to select the displayed submenu option
and to open the relevant setup menu.
4. Push and release the upordown arrow
button (by single pushes) to select the
new setting for this submenu option.
5. Briefly push and release the MENUbutton
to store the new setting and go back to the
previously selected submenu option.
6. Push and hold the MENUbutton to return
to the main menu (short hold) or the main
screen (longer hold).
WARNING LIGHTS AND MESSAGES
Red Warning Lights
— Air Bag Warning Light
This light will turn on for four to eight seconds
as a bulb check when the ignition is placed in
the ON/RUN or MAR/ON/RUN position. If the
light is either not on during startup, stays on,
or turns on while driving, have the system
inspected at an authorized dealer as soon as
possible. This light will illuminate with a
single chime when a fault with the Air Bag
Warning Light has been detected, it will stay
on until the fault is cleared. If the light comes
on intermittently or remains on while driving,
have an authorized dealer service the vehicle
immediately.
— Brake Warning Light
This light monitors various brake functions,
including brake fluid level and parking brake
application. If the brake light turns on it may
indicate that the parking brake is applied,
that the brake fluid level is low, or that there
is a problem with the anti-lock brake system
reservoir.
31
Page 34 of 180
If the light remains on when the parking
brake has been disengaged, and the fluid
level is at the full mark on the master cylinder
reservoir, it indicates a possible brake hy-
draulic system malfunction or that a problem
with the Brake Booster has been detected by
the Anti-Lock Brake System (ABS) / Elec-
tronic Stability Control (ESC) system. In this
case, the light will remain on until the condi-
tion has been corrected. If the problem is
related to the brake booster, the ABS pump
will run when applying the brake, and a brake
pedal pulsation may be felt during each stop.
The dual brake system provides a reserve
braking capacity in the event of a failure to a
portion of the hydraulic system. A leak in
either half of the dual brake system is indi-
cated by the Brake Warning Light, which will
turn on when the brake fluid level in the
master cylinder has dropped below a speci-
fied level.
The light will remain on until the cause is
corrected.NOTE:
The light may flash momentarily during sharp
cornering maneuvers, which change fluid
level conditions. The vehicle should have
service performed, and the brake fluid level
checked.
If brake failure is indicated, immediate repair
is necessary.
WARNING!
Driving a vehicle with the red brake light
on is dangerous. Part of the brake system
may have failed. It will take longer to stop
the vehicle. You could have a collision.
Have the vehicle checked immediately.
Vehicles equipped with the Anti-Lock Brake
System (ABS) are also equipped with Elec-
tronic Brake Force Distribution (EBD). In the
event of an EBD failure, the Brake Warning
Light will turn on along with the ABS Light.
Immediate repair to the ABS system is re-
quired.
Operation of the Brake Warning Light can be
checked by turning the ignition switch from
the OFF position to the ON/RUN position. The light should illuminate for approximately
two seconds. The light should then turn off
unless the parking brake is applied or a brake
fault is detected. If the light does not illumi-
nate, have the light inspected by your autho-
rized dealer.
The light also will turn on when the parking
brake is applied with the ignition switch in
the ON/RUN position.
NOTE:
This light shows only that the parking brake is
applied. It does not show the degree of brake
application.
— Battery Charge Warning Light
This light illuminates when the battery is not
charging properly. If it stays on while the
engine is running, there may be a malfunc-
tion with the charging system. Contact your
authorized dealer as soon as possible.
This indicates a possible problem with the
electrical system or a related component.
— Door Open Warning Light
This indicator will illuminate when one or
more door(s) are not fully closed.
GETTING TO KNOW YOUR INSTRUMENT PANEL
32
Page 36 of 180
WARNING!
Light is illuminated you could cause the
fluid to boil over, come in contact with hot
engine or exhaust components and cause a
fire.
CAUTION!
Continuous driving with the Transmission
Temperature Warning Light illuminated
will eventually cause severe transmission
damage or transmission failure.
— Seat Belt Reminder Warning Light
When the ignition is first placed in the ON/
RUN or MAR/ON/RUN position, if the driver’s
seat belt is unbuckled, a chime will sound
and the light will turn on. When driving, if the
driver or front passenger seat belt remains
unbuckled, the Seat Belt Reminder Light will
flash or remain on continuously and a chime
will sound. Refer to “Occupant Restraints
Systems” in “Safety” for further information.
— Transmission Fault Warning Light
This light will illuminate (together with a
message in the instrument cluster display
and a buzzer) to indicate a transmission
fault. Contact your authorized dealer if the
message remains after restarting the engine.
— Engine Oil Level Warning Light
This warning light appears on the panel when
the engine oil level falls below the minimum
recommended value. Restore the correct en-
gine oil level or contact your authorized
dealer for service.
Yellow Warning Lights
— Anti-Lock Brake (ABS) Warning
Light
This light monitors the Anti-Lock Brake Sys-
tem (ABS). The light will turn on when the
ignition is placed in the ON/RUN or MAR/ON/
RUN position and may stay on for as long as
four seconds.
If the ABS light remains on or turns on while
driving, then the Anti-Lock portion of the
brake system is not functioning and service is required. However, the conventional brake
system will continue to operate normally if
the brake warning light is not on.
If the ABS light is on, the brake system
should be serviced as soon as possible to
restore the benefits of Anti-Lock Brakes. If
the ABS light does not turn on when the
ignition is placed in the ON/RUN or MAR/ON/
RUN position, have the light inspected by an
authorized dealer.
— Low Fuel Warning Light
When the fuel level reaches approximately
2–6 gal (9–11 L) this light will turn on, and
remain on until fuel is added.
— Generic Warning Light
The Generic Warning Light will illuminate if
any of the following conditions occur: Engine
Oil Pressure Sensor Failure, External Light
Failure, Parking Sensor Failure, DST System
Failure, Stop/Start failure, or Air Bag telltale
recovery.
The telltale will blink in case of Air Bag
Warning Light Failure. Contact an authorized
dealer immediately for service.
GETTING TO KNOW YOUR INSTRUMENT PANEL
34
Page 80 of 180
Periodic Safety Checks You
Should Make Outside The Vehicle
Tires
Examine tires for excessive tread wear and
uneven wear patterns. Check for stones,
nails, glass, or other objects lodged in the
tread or sidewall. Inspect the tread for cuts
and cracks. Inspect sidewalls for cuts,
cracks, and bulges. Check the wheel bolts for
tightness. Check the tires (including spare)
for proper cold inflation pressure.
Lights
Have someone observe the operation of brake
lights and exterior lights while you work the
controls. Check turn signal and high beam
indicator lights on the instrument panel.
Door Latches
Check for proper closing, latching, and lock-
ing.
Fluid Leaks
Check area under the vehicle after overnight
parking for fuel, coolant, oil, or other fluid
leaks. Also, if gasoline fumes are detected or
if fuel, or brake fluid leaks are suspected. The
cause should be located and corrected imme-
diately.
SAFETY
78
Page 113 of 180
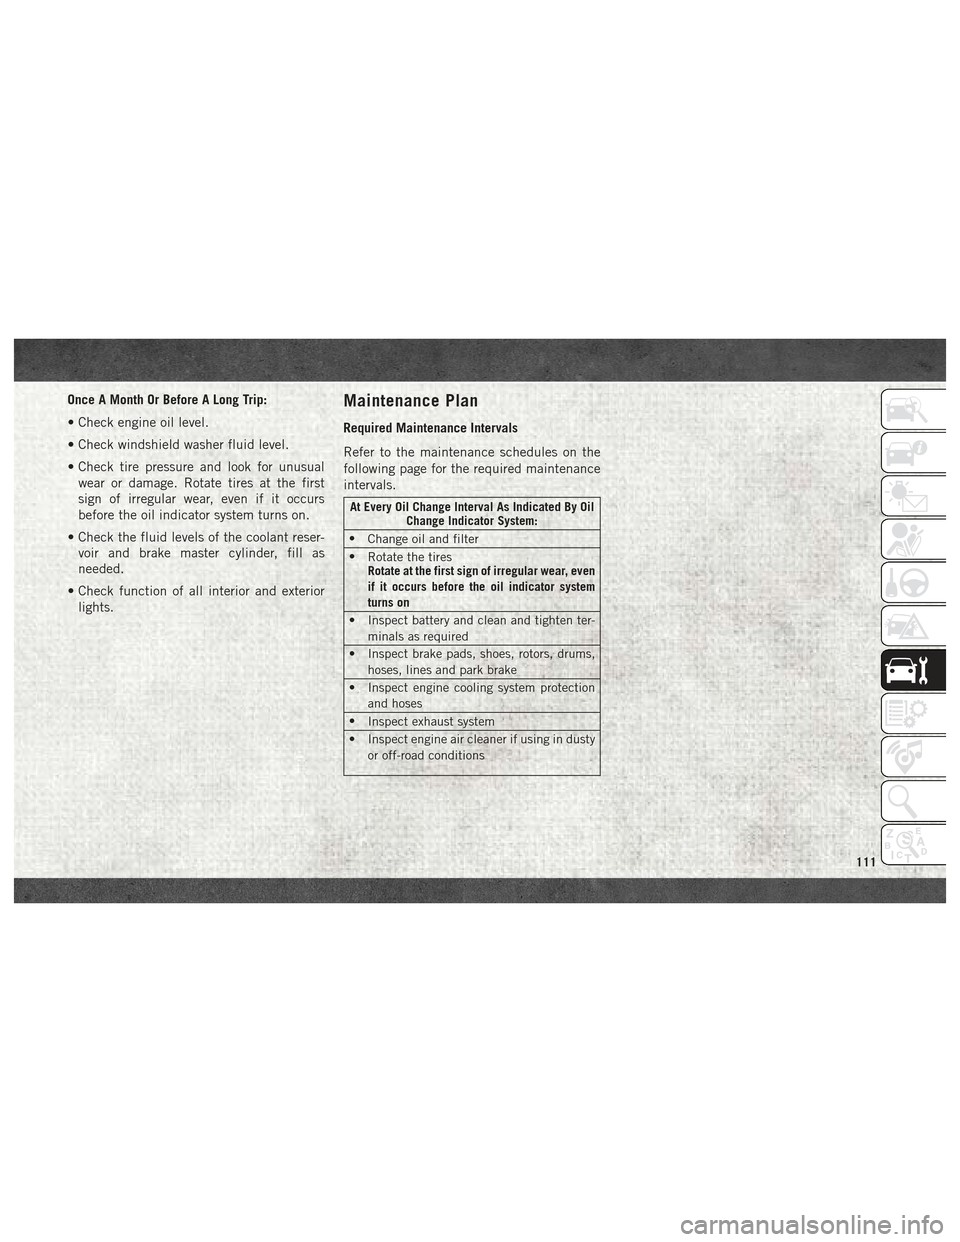
Once A Month Or Before A Long Trip:
• Check engine oil level.
• Check windshield washer fluid level.
• Check tire pressure and look for unusualwear or damage. Rotate tires at the first
sign of irregular wear, even if it occurs
before the oil indicator system turns on.
• Check the fluid levels of the coolant reser- voir and brake master cylinder, fill as
needed.
• Check function of all interior and exterior lights.Maintenance Plan
Required Maintenance Intervals
Refer to the maintenance schedules on the
following page for the required maintenance
intervals.
At Every Oil Change Interval As Indicated By Oil Change Indicator System:
• Change oil and filter
• Rotate the tires
Rotate at the first sign of irregular wear, even
if it occurs before the oil indicator system
turns on
• Inspect battery and clean and tighten ter- minals as required
• Inspect brake pads, shoes, rotors, drums, hoses, lines and park brake
• Inspect engine cooling system protection and hoses
• Inspect exhaust system
• Inspect engine air cleaner if using in dusty or off-road conditions
111
Page 114 of 180
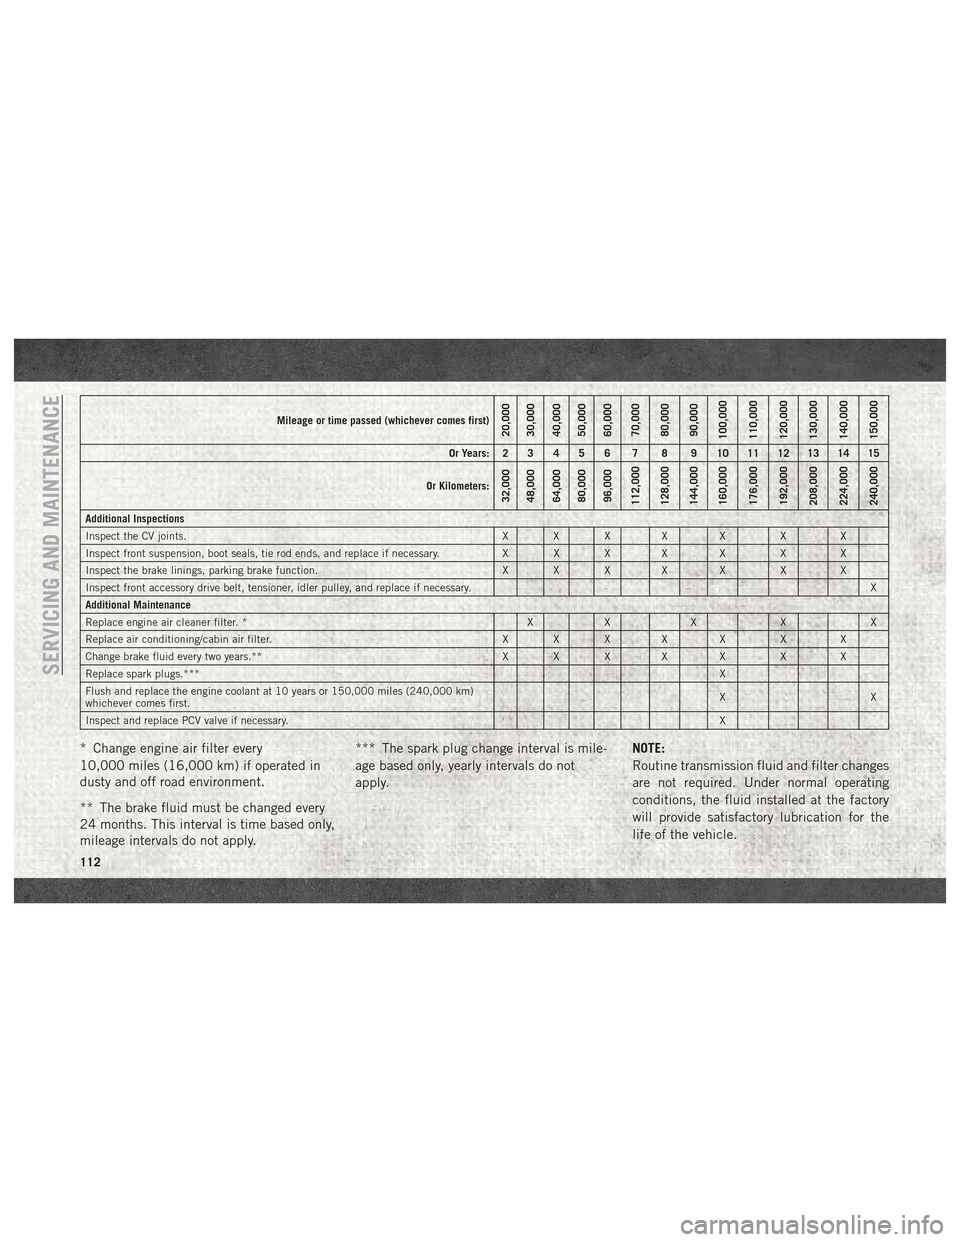
Mileage or time passed (whichever comes first)20,000
30,000
40,000
50,000
60,000
70,000
80,000
90,000
100,000
110,000
120,000
130,000
140,000
150,000
Or Years: 2 3 4 5 6 7 8 9 10 11 12 13 14 15
Or Kilometers:
32,000
48,000
64,000
80,000
96,000
112,000
128,000
144,000
160,000
176,000
192,000
208,000
224,000
240,000
Additional Inspections
Inspect the CV joints. X X X X X X X
Inspect front suspension, boot seals, tie rod ends, and replace if necessary. X X X X X X X
Inspect the brake linings, parking brake function. X X X X X X X
Inspect front accessory drive belt, tensioner, idler pulley, and replace if necessary. X
Additional Maintenance
Replace engine air cleaner filter. * X X X X X
Replace air conditioning/cabin air filter. X X X X X X X
Change brake fluid every two years.** X X X X X X X
Replace spark plugs.*** X
Flush and replace the engine coolant at 10 years or 150,000 miles (240,000 km)
whichever comes first. XX
Inspect and replace PCV valve if necessary. X
* Change engine air filter every
10,000 miles (16,000 km) if operated in
dusty and off road environment.
** The brake fluid must be changed every
24 months. This interval is time based only,
mileage intervals do not apply.*** The spark plug change interval is mile-
age based only, yearly intervals do not
apply.
NOTE:
Routine transmission fluid and filter changes
are not required. Under normal operating
conditions, the fluid installed at the factory
will provide satisfactory lubrication for the
life of the vehicle.
SERVICING AND MAINTENANCE
112
Page 116 of 180
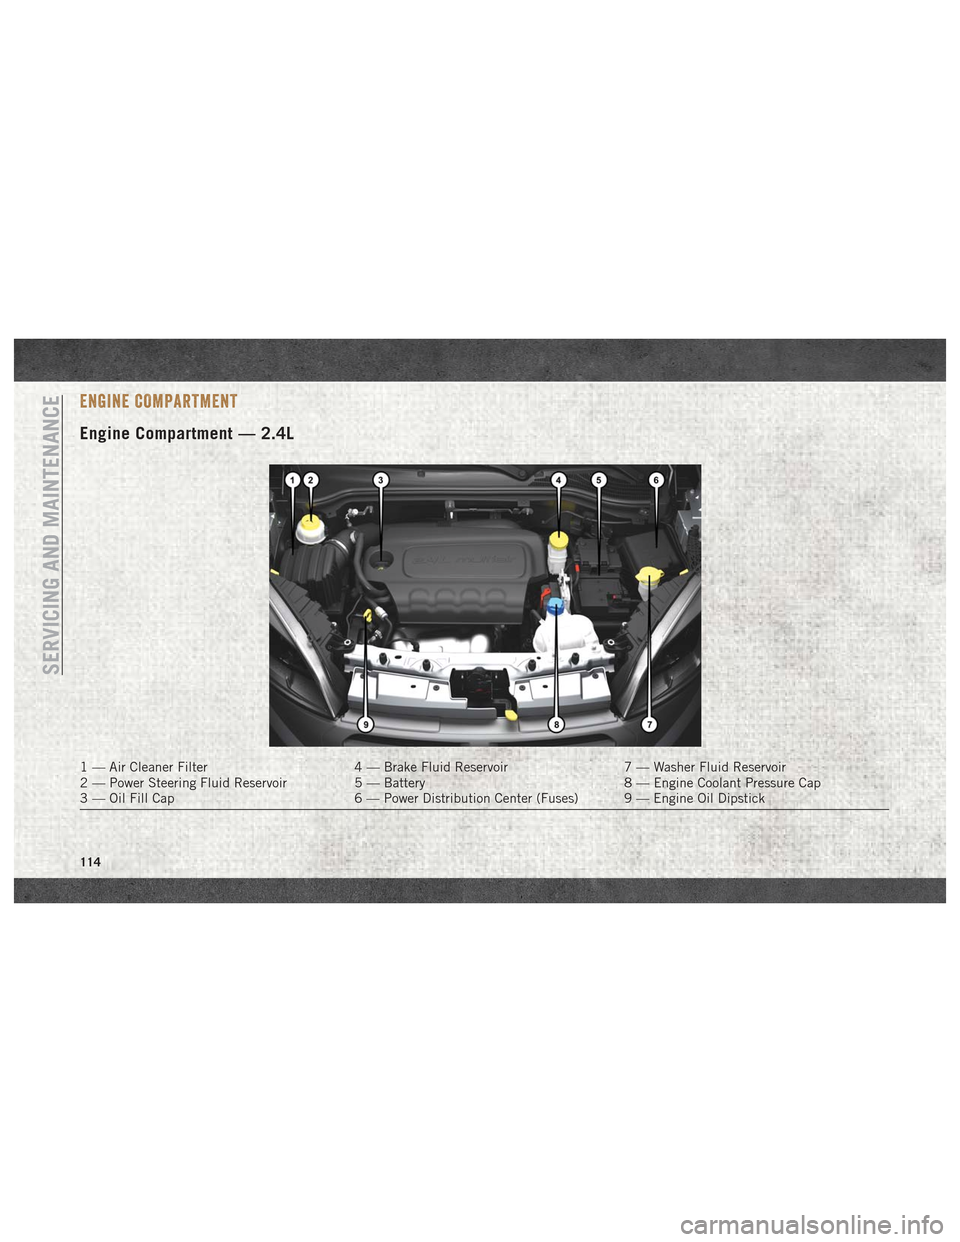
ENGINE COMPARTMENT
Engine Compartment — 2.4L
1 — Air Cleaner Filter4 — Brake Fluid Reservoir7 — Washer Fluid Reservoir
2 — Power Steering Fluid Reservoir 5 — Battery8 — Engine Coolant Pressure Cap
3 — Oil Fill Cap 6 — Power Distribution Center (Fuses) 9 — Engine Oil Dipstick
SERVICING AND MAINTENANCE
114
Page 140 of 180
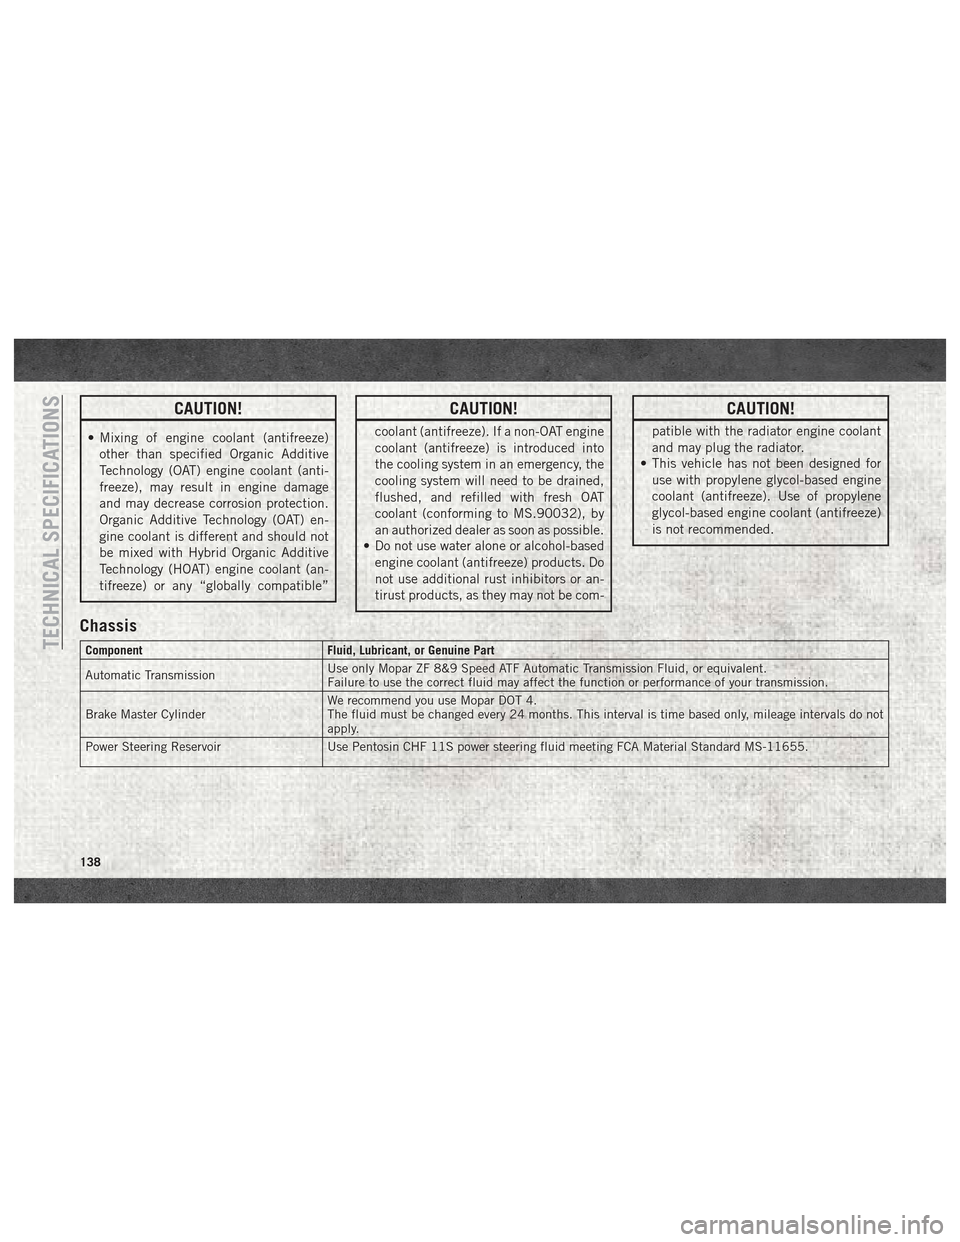
CAUTION!
• Mixing of engine coolant (antifreeze)other than specified Organic Additive
Technology (OAT) engine coolant (anti-
freeze), may result in engine damage
and may decrease corrosion protection.
Organic Additive Technology (OAT) en-
gine coolant is different and should not
be mixed with Hybrid Organic Additive
Technology (HOAT) engine coolant (an-
tifreeze) or any “globally compatible”
CAUTION!
coolant (antifreeze). If a non-OAT engine
coolant (antifreeze) is introduced into
the cooling system in an emergency, the
cooling system will need to be drained,
flushed, and refilled with fresh OAT
coolant (conforming to MS.90032), by
an authorized dealer as soon as possible.
• Do not use water alone or alcohol-based
engine coolant (antifreeze) products. Do
not use additional rust inhibitors or an-
tirust products, as they may not be com-
CAUTION!
patible with the radiator engine coolant
and may plug the radiator.
• This vehicle has not been designed for
use with propylene glycol-based engine
coolant (antifreeze). Use of propylene
glycol-based engine coolant (antifreeze)
is not recommended.
Chassis
Component Fluid, Lubricant, or Genuine Part
Automatic Transmission Use only Mopar ZF 8&9 Speed ATF Automatic Transmission Fluid, or equivalent.
Failure to use the correct fluid may affect the function or performance of your transmission.
Brake Master Cylinder We recommend you use Mopar DOT 4.
The fluid must be changed every 24 months. This interval is time based only, mileage intervals do not
apply.
Power Steering Reservoir Use Pentosin CHF 11S power steering fluid meeting FCA Material Standard MS-11655.TECHNICAL SPECIFICATIONS
138
Page 169 of 180
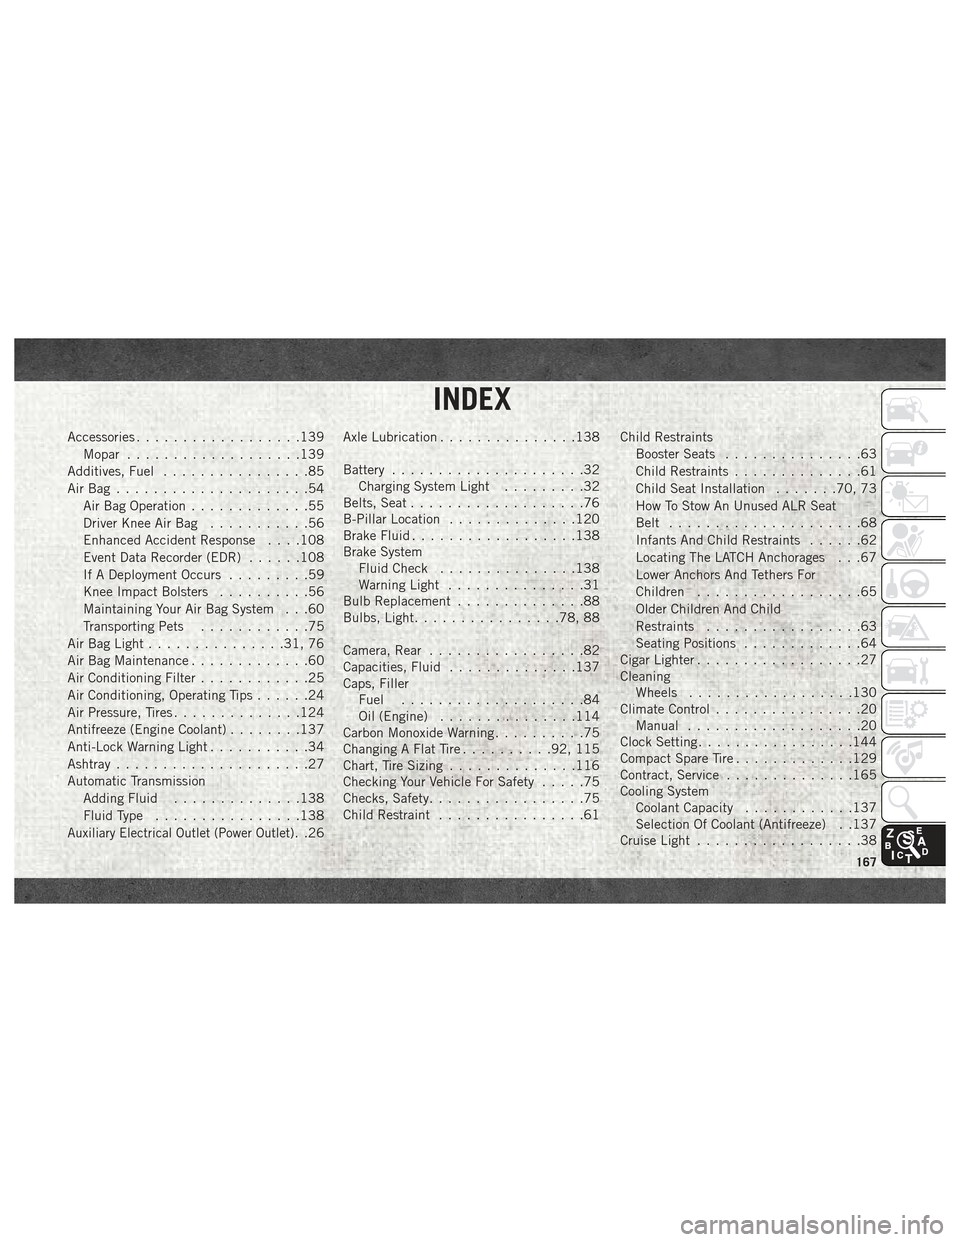
Accessories..................139
Mopar ...................139
Additives, Fuel ................85
AirBag .....................54 Air Bag Operation .............55
Driver Knee Air Bag ...........56
Enhanced Accident Response . . . .108
Event Data Recorder (EDR) ......108
If A Deployment Occurs .........59
Knee Impact Bolsters ..........56
Maintaining Your Air Bag System . . .60
Transporting Pets ............75
Air Bag Light ...............31, 76
Air Bag Maintenance .............60
Air Conditioning Filter ............25
Air Conditioning, Operating Tips ......24
Air Pressure, Tires ..............124
Antifreeze (Engine Coolant) ........137
Anti-Lock Warning Light ...........34
Ashtray .....................27
Automatic Transmission Adding Fluid ..............138
Fluid Type ................138
Auxiliary Electrical Outlet (Power Outlet). .26Axle Lubrication
...............138
Battery .....................32
Charging System Light .........32
Belts, Seat ...................76
B-Pillar Location ..............120
Brake Fluid ..................138
Brake System Fluid Check ...............138
Warning Light ...............31
Bulb Replacement ..............88
Bulbs, Light ................78, 88
Camera, Rear .................82
Capacities, Fluid ..............137
Caps, Filler Fuel ....................84
Oil (Engine) ...............114
Carbon Monoxide Warning ..........75
Changing A Flat Tire ..........92, 115
Chart, Tire Sizing ..............116
Checking Your Vehicle For Safety .....75
Checks, Safety .................75
Child Restraint ................61 Child Restraints
Booster Seats ...............63
Child Restraints ..............61
Child Seat Installation .......70, 73
How To Stow An Unused ALR Seat
Belt .....................68
Infants And Child Restraints ......62
Locating The LATCH Anchorages . . .67
Lower Anchors And Tethers For
Children ..................65
Older Children And Child
Restraints .................63
Seating Positions .............64
Cigar Lighter ..................27
Cleaning Wheels ..................130
Climate Control ................20
Manual ...................20
Clock Setting .................144
Compact Spare Tire .............129
Contract, Service ..............165
Cooling System Coolant Capacity ............137
Selection Of Coolant (Antifreeze) . .137
Cruise Light ..................38
INDEX
167
Page 170 of 180
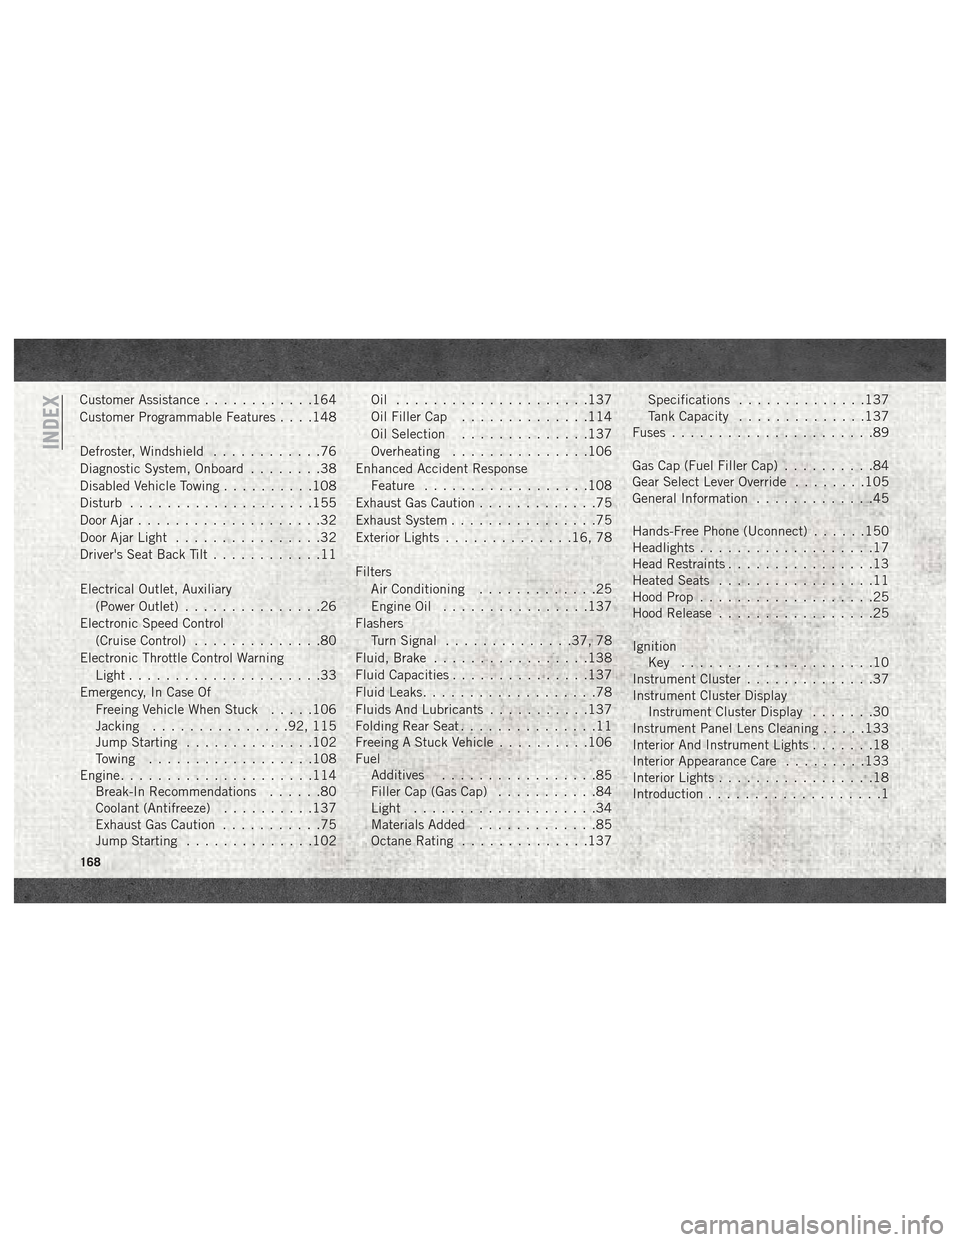
Customer Assistance............164
Customer Programmable Features . . . .148
Defroster, Windshield ............76
Diagnostic System, Onboard ........38
Disabled Vehicle Towing ..........108
Disturb ....................155
Door Ajar ....................32
Door Ajar Light ................32
Driver's Seat Back Tilt ............11
Electrical Outlet, Auxiliary (Power Outlet) ...............26
Electronic Speed Control (Cruise Control) ..............80
Electronic Throttle Control Warning Light .....................33
Emergency, In Case Of Freeing Vehicle When Stuck .....106
Jacking ...............92, 115
Jump Starting ..............102
Towing ..................108
Engine .....................114
Break-In Recommendations ......80
Coolant (Antifreeze) ..........137
Exhaust Gas Caution ...........75
Jump Starting ..............102 Oil .....................137
Oil Filler Cap
..............114
Oil Selection ..............137
Overheating ...............106
Enhanced Accident Response Feature ..................108
Exhaust Gas Caution .............75
Exhaust System ................75
Exterior Lights ..............16, 78
Filters Air Conditioning .............25
Engine Oil ................137
Flashers Turn Signal ..............37, 78
Fluid, Brake .................138
Fluid Capacities ...............137
Fluid Leaks ...................78
Fluids And Lubricants ...........137
Folding Rear Seat ...............11
Freeing A Stuck Vehicle ..........106
Fuel Additives .................
85
Filler Cap (Gas Cap) ...........84
Light ....................34
Materials Added .............85
Octane Rating ..............137 Specifications
..............137
Tank Capacity ..............137
Fuses ......................89
Gas Cap (Fuel Filler Cap) ..........84
Gear Select Lever Override ........105
General Information .............45
Hands-Free Phone (Uconnect) ......150
Headlights ...................17
Head Restraints ................13
Heated Seats .................11
Hood Prop ...................25
Hood Release .................25
Ignition Key .....................10
Instrument Cluster ..............37
Instrument Cluster Display Instrument Cluster Display .......30
Instrument Panel Lens Cleaning .....133
Interior And Instrument Lights .......18
Interior Appearance Care .........133
Interior Lights .................18
Introduction ...................1
INDEX
168