height Ram ProMaster City 2018 User Guide
[x] Cancel search | Manufacturer: RAM, Model Year: 2018, Model line: ProMaster City, Model: Ram ProMaster City 2018Pages: 180, PDF Size: 7.52 MB
Page 16 of 180

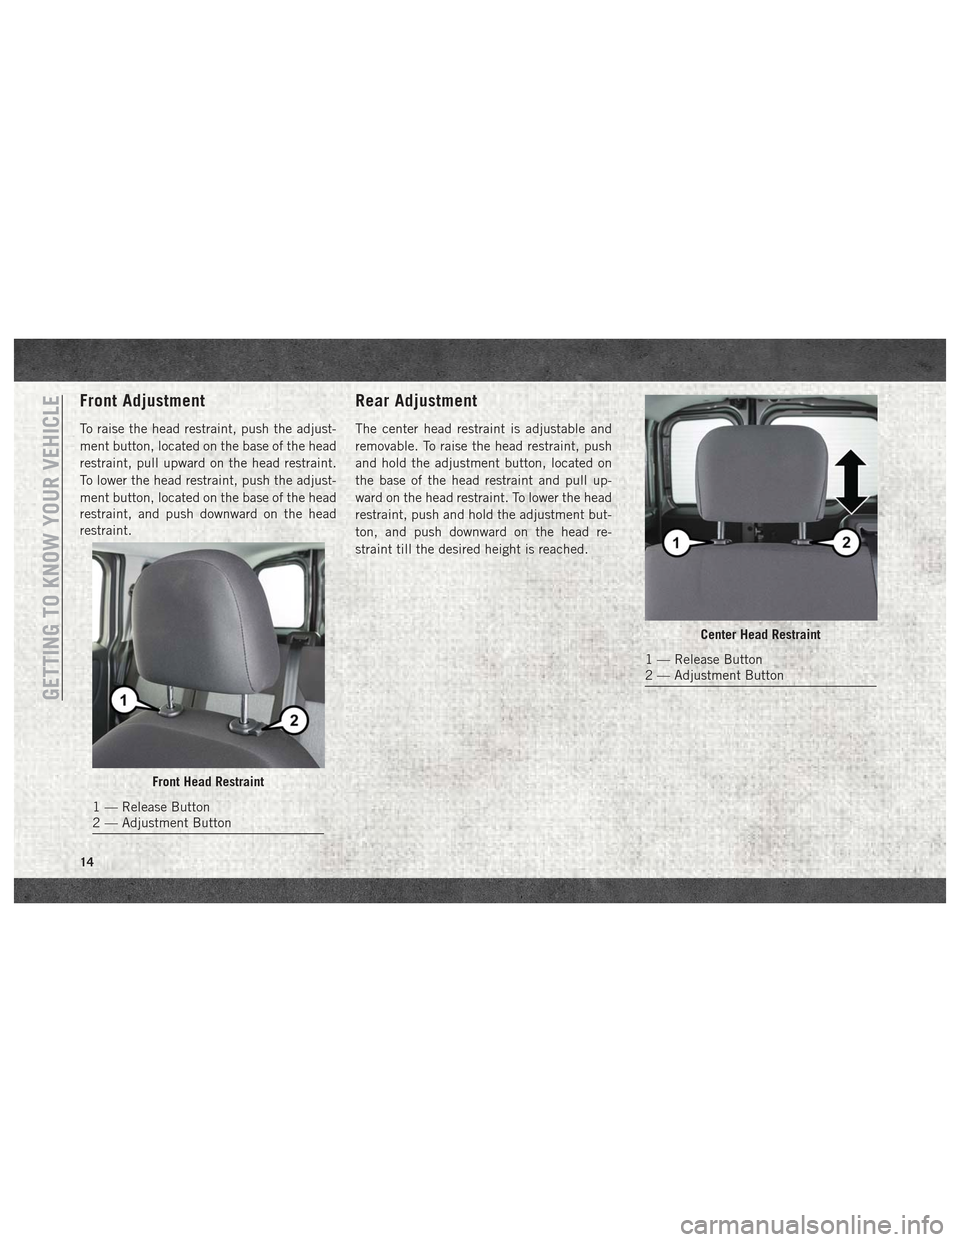
Front Adjustment
To raise the head restraint, push the adjust-
ment button, located on the base of the head
restraint, pull upward on the head restraint.
To lower the head restraint, push the adjust-
ment button, located on the base of the head
restraint, and push downward on the head
restraint.
Rear Adjustment
The center head restraint is adjustable and
removable. To raise the head restraint, push
and hold the adjustment button, located on
the base of the head restraint and pull up-
ward on the head restraint. To lower the head
restraint, push and hold the adjustment but-
ton, and push downward on the head re-
straint till the desired height is reached.
Front Head Restraint
1 — Release Button
2 — Adjustment Button
Center Head Restraint
1 — Release Button
2 — Adjustment Button
GETTING TO KNOW YOUR VEHICLE
14
Page 17 of 180

WARNING!
A loose head restraint thrown forward in a
collision or hard stop could cause serious
injury or death to occupants of the vehicle.
Always securely stow removed head re-
straints in a location outside the occupant
compartment.
Front Removal
To remove the head restraint, raise it as far as
it can go then push the release button and the
adjustment button at the base of each post
while pulling the head restraint up. To rein-
stall the head restraint, put the head restraint
posts into the holes and push downward.
Then adjust the head restraint to the appro-
priate height.
WARNING!
• A loose head restraint thrown forward ina collision or hard stop could cause se-
rious injury or death to occupants of the
vehicle. Always securely stow removed
WARNING!
head restraints in a location outside the
occupant compartment.
• ALL the head restraints MUST be rein-
stalled in the vehicle to properly protect
the occupants. Follow the re-installation
instructions above prior to operating the
vehicle or occupying a seat.
Rear Removal
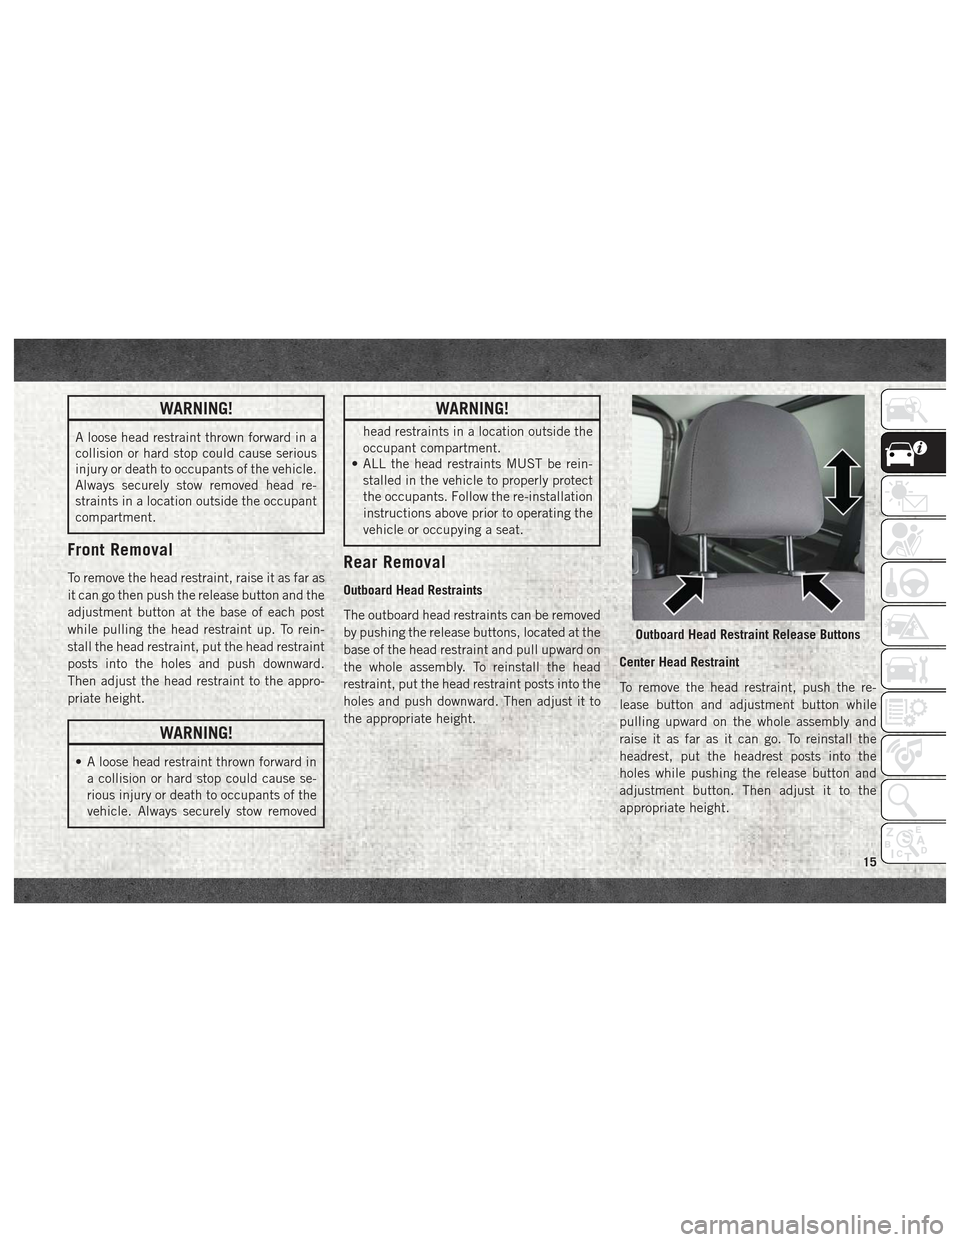
Outboard Head Restraints
The outboard head restraints can be removed
by pushing the release buttons, located at the
base of the head restraint and pull upward on
the whole assembly. To reinstall the head
restraint, put the head restraint posts into the
holes and push downward. Then adjust it to
the appropriate height. Center Head Restraint
To remove the head restraint, push the re-
lease button and adjustment button while
pulling upward on the whole assembly and
raise it as far as it can go. To reinstall the
headrest, put the headrest posts into the
holes while pushing the release button and
adjustment button. Then adjust it to the
appropriate height.
Outboard Head Restraint Release Buttons
15
Page 64 of 180

Before buying any restraint system, make
sure that it has a label certifying that it meets
all applicable Safety Standards. You should
also make sure that you can install it in the
vehicle where you will use it.NOTE:
• For additional information, refer to
www.safercar.gov/parents/index.htm or call
1-888-327-4236. •Canadian residents should refer to Transport
Canada’s website for additional information:
http://www.tc.gc.ca/eng/motorvehiclesafety/
safedrivers-childsafety-index-53.htm
.
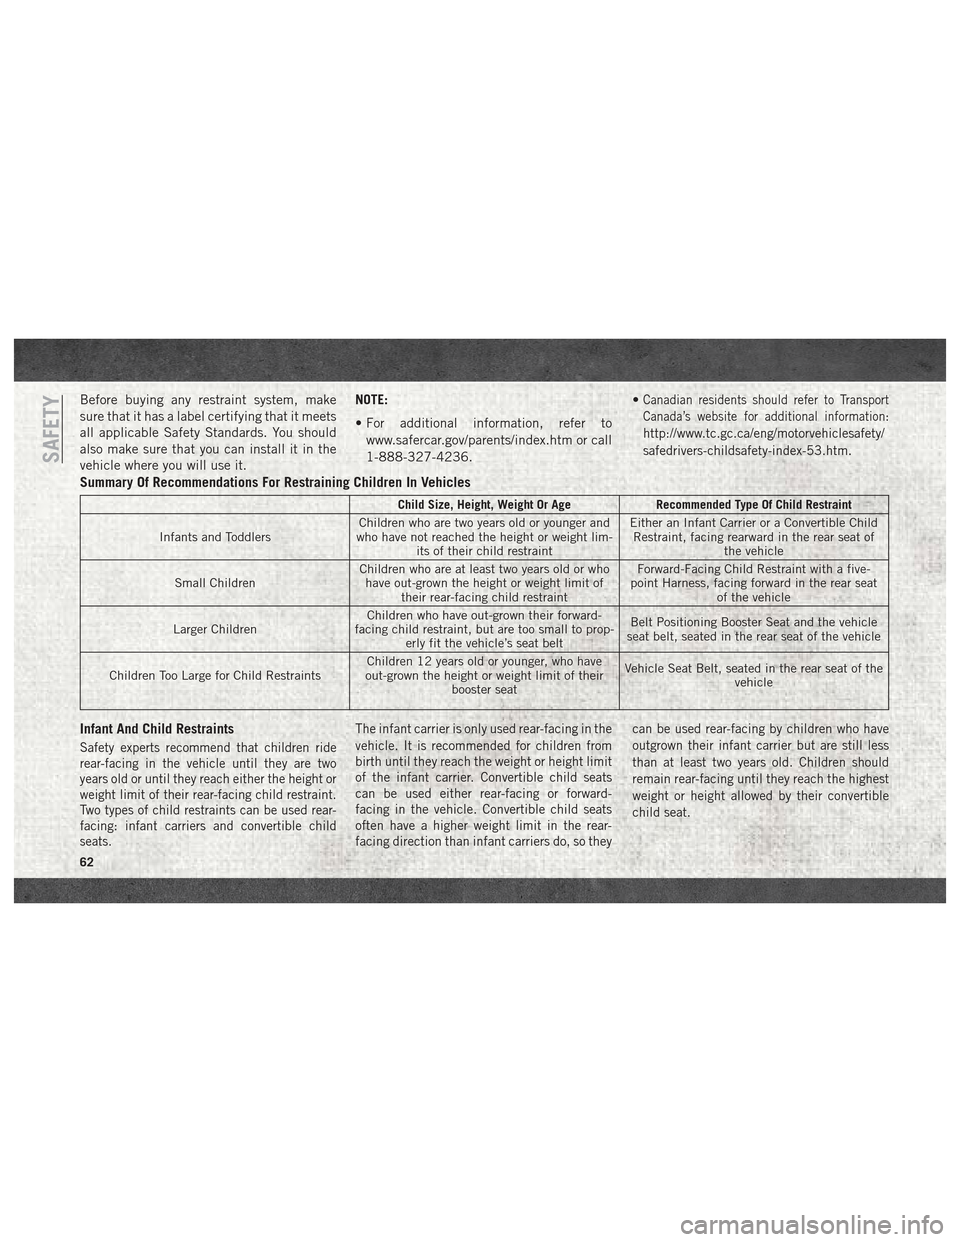
Summary Of Recommendations For Restraining Children In Vehicles
Child Size, Height, Weight Or Age
Recommended Type Of Child Restraint
Infants and Toddlers Children who are two years old or younger and
who have not reached the height or weight lim- its of their child restraint Either an Infant Carrier or a Convertible Child
Restraint, facing rearward in the rear seat of the vehicle
Small Children Children who are at least two years old or who
have out-grown the height or weight limit of their rear-facing child restraint Forward-Facing Child Restraint with a five-
point Harness, facing forward in the rear seat of the vehicle
Larger Children Children who have out-grown their forward-
facing child restraint, but are too small to prop- erly fit the vehicle’s seat belt Belt Positioning Booster Seat and the vehicle
seat belt, seated in the rear seat of the vehicle
Children Too Large for Child Restraints Children 12 years old or younger, who have
out-grown the height or weight limit of their booster seat Vehicle Seat Belt, seated in the rear seat of the
vehicle
Infant And Child Restraints
Safety experts recommend that children ride
rear-facing in the vehicle until they are two
years old or until they reach either the height or
weight limit of their rear-facing child restraint.
Two types of child restraints can be used rear-
facing: infant carriers and convertible child
seats.
The infant carrier is only used rear-facing in the
vehicle. It is recommended for children from
birth until they reach the weight or height limit
of the infant carrier. Convertible child seats
can be used either rear-facing or forward-
facing in the vehicle. Convertible child seats
often have a higher weight limit in the rear-
facing direction than infant carriers do, so they can be used rear-facing by children who have
outgrown their infant carrier but are still less
than at least two years old. Children should
remain rear-facing until they reach the highest
weight or height allowed by their convertible
child seat.
SAFETY
62
Page 65 of 180

WARNING!
• Never place a rear-facing child restraintin front of an air bag. A deploying pas-
senger front air bag can cause death or
serious injury to a child 12 years or
younger, including a child in a rear-
facing child restraint.
• Only use a rear-facing child restraint in a
vehicle with a rear seat.
Older Children And Child Restraints
Children who are two years old or who have
outgrown their rear-facing convertible child
seat can ride forward-facing in the vehicle.
Forward-facing child seats and convertible
child seats used in the forward-facing direc-
tion are for children who are over two years
old or who have outgrown the rear-facing
weight or height limit of their rear-facing
convertible child seat. Children should re-
main in a forward-facing child seat with a
harness for as long as possible, up to the
highest weight or height allowed by the child
seat. All children whose weight or height is above
the forward-facing limit for the child seat
should use a belt-positioning booster seat
until the vehicle’s seat belts fit properly. If
the child cannot sit with knees bent over the
vehicle’s seat cushion while the child’s back
is against the seatback, they should use a
belt-positioning booster seat. The child and
belt-positioning booster seat are held in the
vehicle by the seat belt.
WARNING!
• Improper installation can lead to failure
of an infant or child restraint. It could
come loose in a collision. The child
could be badly injured or killed. Follow
the child restraint manufacturer’s direc-
tions exactly when installing an infant or
child restraint.
• After a child restraint is installed in the
vehicle, do not move the vehicle seat
forward or rearward because it can
loosen the child restraint attachments.
Remove the child restraint before ad-
justing the vehicle seat position. When
WARNING!
the vehicle seat has been adjusted, re-
install the child restraint.
• When your child restraint is not in use,
secure it in the vehicle with the seat belt
or LATCH anchorages, or remove it from
the vehicle. Do not leave it loose in the
vehicle. In a sudden stop or accident, it
could strike the occupants or seatbacks
and cause serious personal injury.
Children Too Large For Booster Seats
Children who are large enough to wear the
shoulder belt comfortably, and whose legs are
long enough to bend over the front of the seat
when their back is against the seatback,
should use the seat belt in a rear seat. Use
this simple 5-step test to decide whether the
child can use the vehicle’s seat belt alone:
1. Can the child sit all the way back against
the back of the vehicle seat?
2. Do the child’s knees bend comfortably over the front of the vehicle seat – while
the child is still sitting all the way back?
63
Page 118 of 180

Tire Sizing Chart
EXAMPLE:
Example Size Designation: P215/65R15XL 95H, 215/65R15 96H, LT235/85R16C, T145/80D18 103M, 31x10.5 R15 LT
P = Passenger car tire size based on U.S. design standards, or
"....blank...." = Passenger car tire based on European design standards, or
LT = Light truck tire based on U.S. design standards, or
TorS= Temporary spare tire or
31 = Overall diameter in inches (in)
215, 235, 145 = Section width in millimeters (mm)
65, 85, 80 = Aspect ratio in percent (%)
• Ratio of section height to section width of tire, or
10.5 = Section width in inches (in)
R = Construction code
• "R" means radial construction, or
• "D" means diagonal or bias construction
15, 16, 18 = Rim diameter in inches (in)
SERVICING AND MAINTENANCE
116