jacking Ram ProMaster City 2018 User Guide
[x] Cancel search | Manufacturer: RAM, Model Year: 2018, Model line: ProMaster City, Model: Ram ProMaster City 2018Pages: 180, PDF Size: 7.52 MB
Page 89 of 180
IN CASE OF EMERGENCY
BULB REPLACEMENT............88
Replacement Bulbs..............88
FUSES......................89
Underhood Fuses ...............89
Interior Fuses .................91
Central Unit Fuse Panel ...........92
JACKING AND TIRE CHANGING ......92
Jack Location.................93
Removing The Spare Tire ..........93
Preparations For Jacking ..........95Jacking Instructions
.............95
Vehicles With Alloy Wheels .........98
Vehicles Equipped With Wheel Covers. . .99
TIRE SERVICE KIT — IF EQUIPPED . .100
Tire Service Kit Storage ..........100
Tire Service Kit Usage ...........100
JUMP STARTING..............102
Preparations For Jump Starting ......102
Jump Starting Procedure ..........103
IGNITION KEY REMOVAL OVERRIDE . . .104 GEAR SELECTOR OVERRIDE
.......105
IF YOUR ENGINE OVERHEATS ......106
FREEING A STUCK VEHICLE .......106
TOWING A DISABLED VEHICLE .....108
ENHANCED ACCIDENT RESPONSE
SYSTEM (EARS) ...............108
EVENT DATA RECORDER (EDR) ......108
IN CASE OF EMERGENCY
87
Page 94 of 180
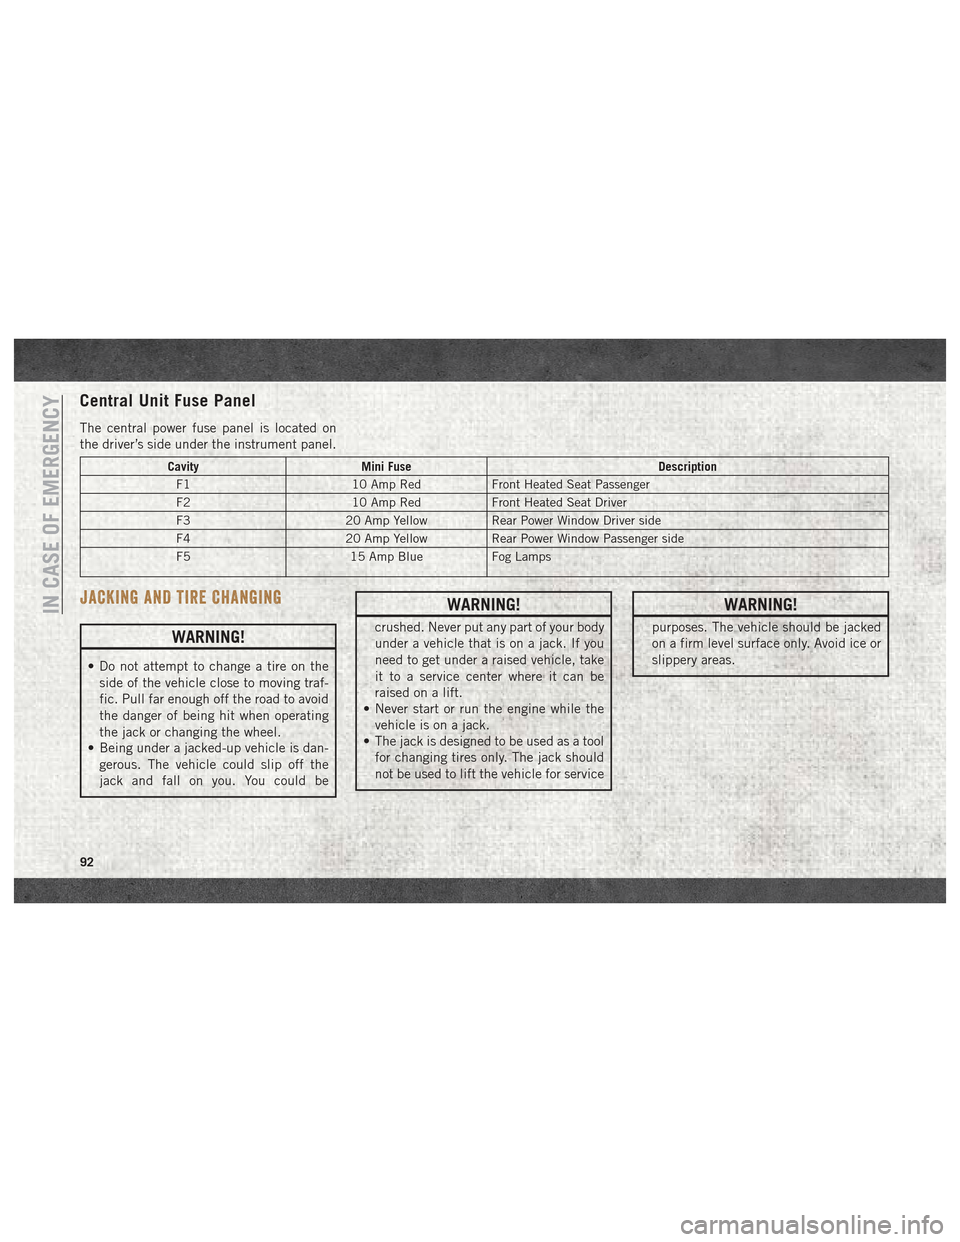
Central Unit Fuse Panel
The central power fuse panel is located on
the driver’s side under the instrument panel.
CavityMini Fuse Description
F1 10 Amp RedFront Heated Seat Passenger
F2 10 Amp RedFront Heated Seat Driver
F3 20 Amp YellowRear Power Window Driver side
F4 20 Amp YellowRear Power Window Passenger side
F5 15 Amp BlueFog Lamps
JACKING AND TIRE CHANGING
WARNING!
• Do not attempt to change a tire on the
side of the vehicle close to moving traf-
fic. Pull far enough off the road to avoid
the danger of being hit when operating
the jack or changing the wheel.
• Being under a jacked-up vehicle is dan-
gerous. The vehicle could slip off the
jack and fall on you. You could be
WARNING!
crushed. Never put any part of your body
under a vehicle that is on a jack. If you
need to get under a raised vehicle, take
it to a service center where it can be
raised on a lift.
• Never start or run the engine while the
vehicle is on a jack.
• The jack is designed to be used as a tool
for changing tires only. The jack should
not be used to lift the vehicle for service
WARNING!
purposes. The vehicle should be jacked
on a firm level surface only. Avoid ice or
slippery areas.
IN CASE OF EMERGENCY
92
Page 97 of 180
• When winching the tire back into place, thewinch will make three audible noises once
secure. Reach underneath and shake tire
by hand to confirm that it is secure. The tire
should not move. If tire is still loose and/or
three audible noises are not heard, place
and secure damaged wheel into the vehicle
and seek dealer assistance for the winch
mechanism.
Preparations For Jacking
1. Park the vehicle on a firm level surface as
far from the edge of the roadway as pos-
sible. Avoid icy or slippery areas.
WARNING!
Do not attempt to change a tire on the side
of the vehicle close to moving traffic, pull
far enough off the road to avoid being hit
when operating the jack or changing the
wheel.
2. Turn on the Hazard Warning flasher.
3. Apply the parking brake. 4. Place the gear selector into PARK.
5. Turn the ignition off to the LOCK position.
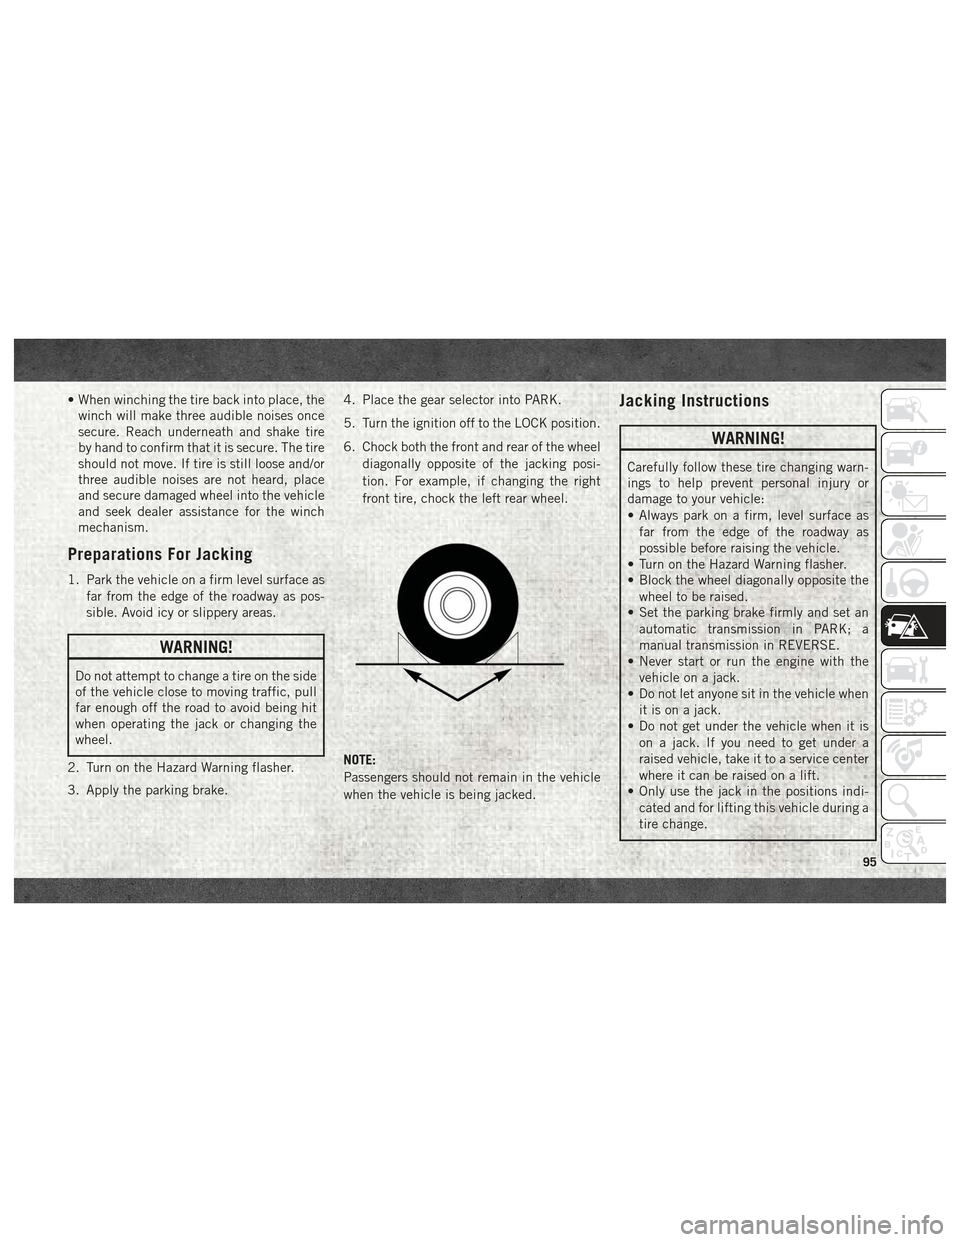
6. Chock both the front and rear of the wheel
diagonally opposite of the jacking posi-
tion. For example, if changing the right
front tire, chock the left rear wheel.
NOTE:
Passengers should not remain in the vehicle
when the vehicle is being jacked.
Jacking Instructions
WARNING!
Carefully follow these tire changing warn-
ings to help prevent personal injury or
damage to your vehicle:
• Always park on a firm, level surface as far from the edge of the roadway as
possible before raising the vehicle.
• Turn on the Hazard Warning flasher.
• Block the wheel diagonally opposite the
wheel to be raised.
• Set the parking brake firmly and set an
automatic transmission in PARK; a
manual transmission in REVERSE.
• Never start or run the engine with the
vehicle on a jack.
• Do not let anyone sit in the vehicle when
it is on a jack.
• Do not get under the vehicle when it is
on a jack. If you need to get under a
raised vehicle, take it to a service center
where it can be raised on a lift.
• Only use the jack in the positions indi-
cated and for lifting this vehicle during a
tire change.
95
Page 98 of 180
WARNING!
• If working on or near a roadway, beextremely careful of motor traffic.
• To assure that spare tires, flat or in-
flated, are securely stowed, spares must
be stowed with the valve stem facing the
ground.
• The stowed spare tire should always be
checked for security by pushing on it
with your hand , at the location under
the rear bumper, behind the vehicle. The
spare tire should not move when fully
secured by the winch under the vehicle.
CAUTION!
Do not attempt to raise the vehicle by
jacking on locations other than those indi-
cated in the Jacking Instructions for this
vehicle.
1. Loosen (but do not remove) the wheel lug bolts with the wrench handle by turning
them to the left one turn while the wheel
is still on the ground. 2. There are two jack engagement locations
on each side of the vehicle body.
NOTE:
Place the jack underneath the jack engage-
ment location that is closest to the flat tire.
WARNING!
Being under a jacked-up vehicle is danger-
ous. The vehicle could slip off the jack and
fall on you. You could be crushed. Never
get any part of your body under a vehicle
that is on a jack. If you need to get under a
raised vehicle, take it to a service center
where it can be raised on a lift.
CAUTION!
Do not attempt to raise the vehicle by
jacking on locations other than those indi-
cated in the Jacking Instructions for this
vehicle.
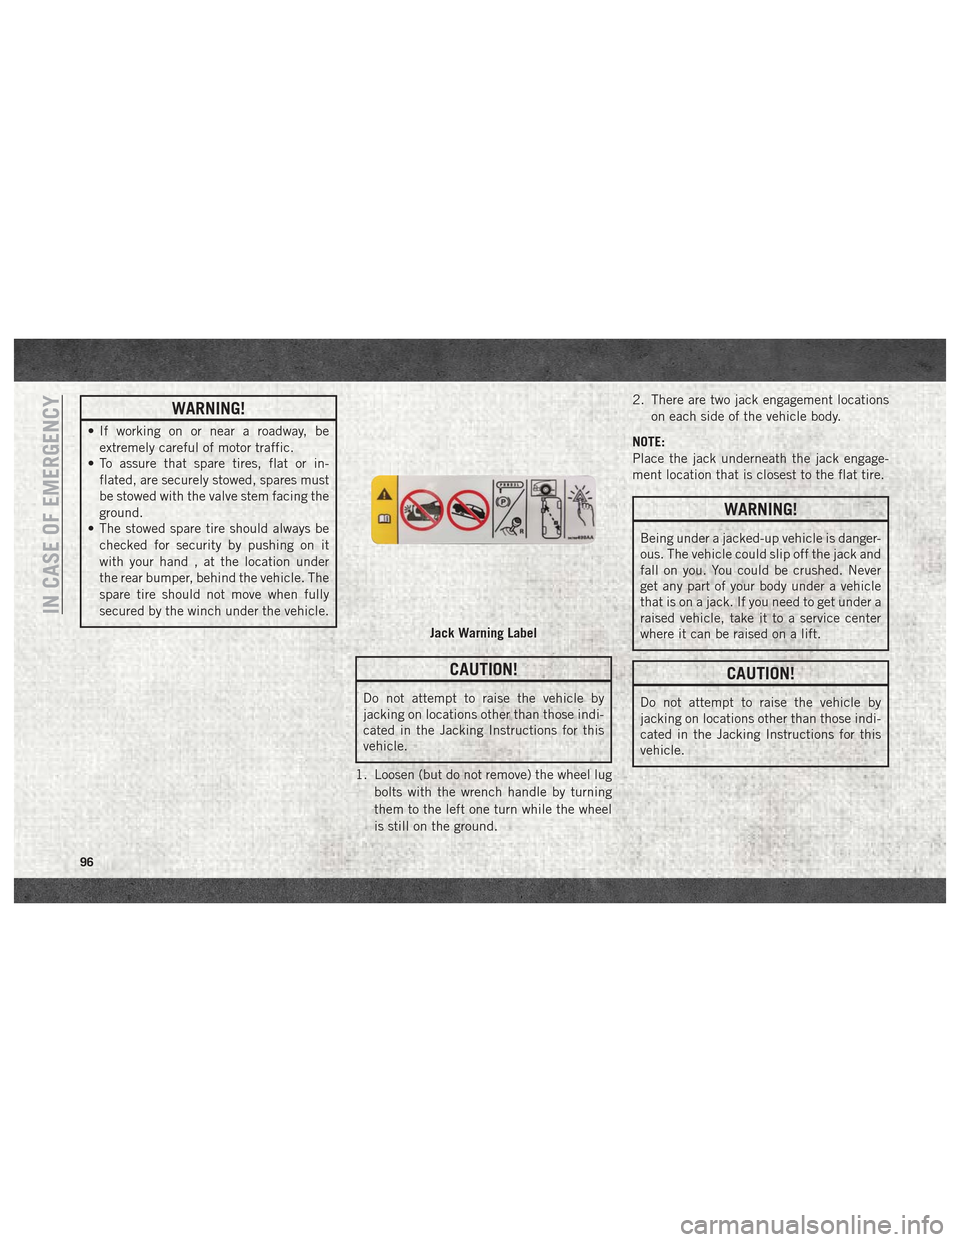
Jack Warning Label
IN CASE OF EMERGENCY
96
Page 99 of 180
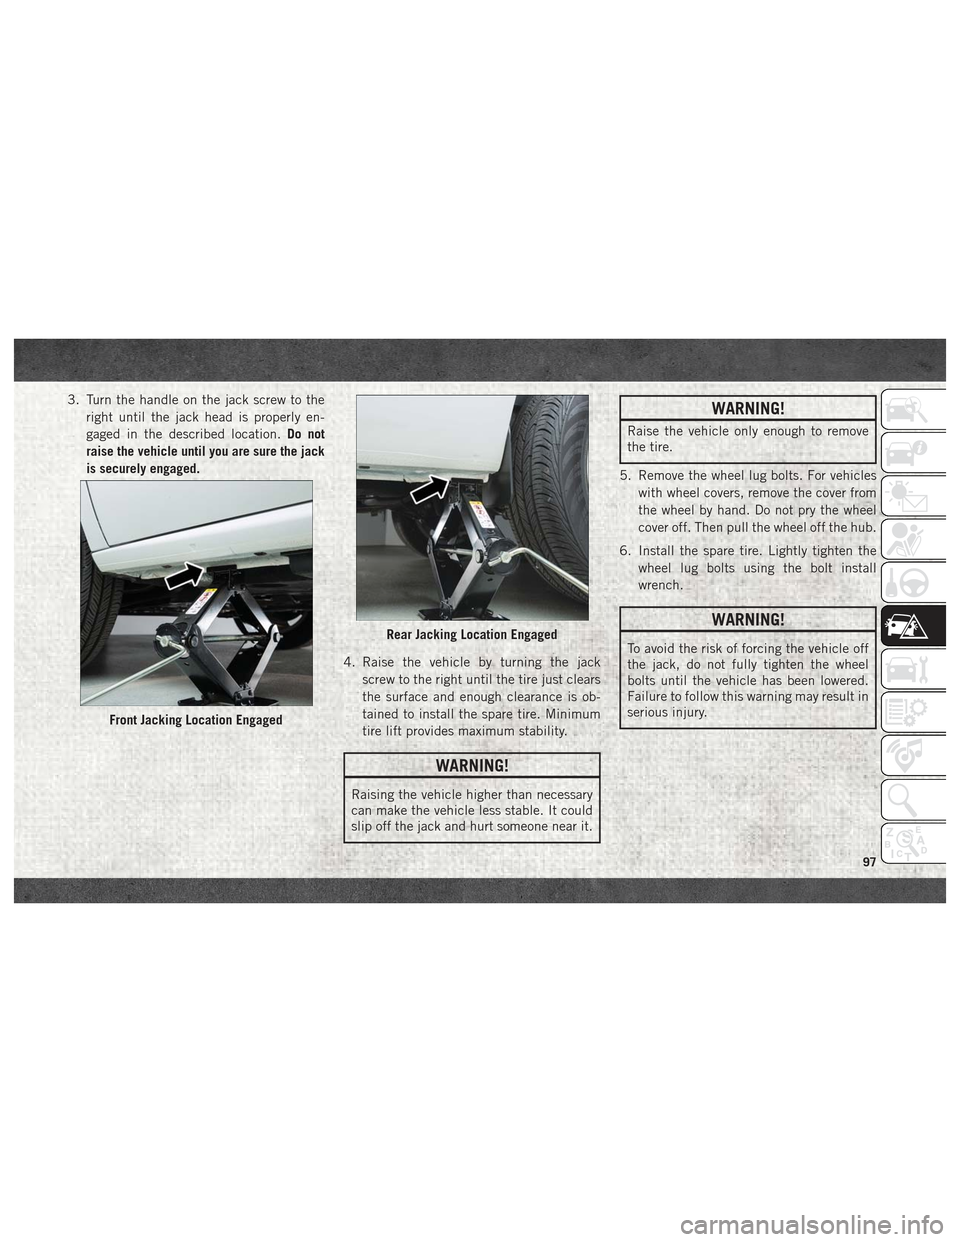
3. Turn the handle on the jack screw to theright until the jack head is properly en-
gaged in the described location. Do not
raise the vehicle until you are sure the jack
is securely engaged.
4. Raise the vehicle by turning the jackscrew to the right until the tire just clears
the surface and enough clearance is ob-
tained to install the spare tire. Minimum
tire lift provides maximum stability.
WARNING!
Raising the vehicle higher than necessary
can make the vehicle less stable. It could
slip off the jack and hurt someone near it.
WARNING!
Raise the vehicle only enough to remove
the tire.
5. Remove the wheel lug bolts. For vehicles with wheel covers, remove the cover from
the wheel by hand. Do not pry the wheel
cover off. Then pull the wheel off the hub.
6. Install the spare tire. Lightly tighten the wheel lug bolts using the bolt install
wrench.
WARNING!
To avoid the risk of forcing the vehicle off
the jack, do not fully tighten the wheel
bolts until the vehicle has been lowered.
Failure to follow this warning may result in
serious injury.
Front Jacking Location Engaged
Rear Jacking Location Engaged
97
Page 170 of 180
Customer Assistance............164
Customer Programmable Features . . . .148
Defroster, Windshield ............76
Diagnostic System, Onboard ........38
Disabled Vehicle Towing ..........108
Disturb ....................155
Door Ajar ....................32
Door Ajar Light ................32
Driver's Seat Back Tilt ............11
Electrical Outlet, Auxiliary (Power Outlet) ...............26
Electronic Speed Control (Cruise Control) ..............80
Electronic Throttle Control Warning Light .....................33
Emergency, In Case Of Freeing Vehicle When Stuck .....106
Jacking ...............92, 115
Jump Starting ..............102
Towing ..................108
Engine .....................114
Break-In Recommendations ......80
Coolant (Antifreeze) ..........137
Exhaust Gas Caution ...........75
Jump Starting ..............102 Oil .....................137
Oil Filler Cap
..............114
Oil Selection ..............137
Overheating ...............106
Enhanced Accident Response Feature ..................108
Exhaust Gas Caution .............75
Exhaust System ................75
Exterior Lights ..............16, 78
Filters Air Conditioning .............25
Engine Oil ................137
Flashers Turn Signal ..............37, 78
Fluid, Brake .................138
Fluid Capacities ...............137
Fluid Leaks ...................78
Fluids And Lubricants ...........137
Folding Rear Seat ...............11
Freeing A Stuck Vehicle ..........106
Fuel Additives .................
85
Filler Cap (Gas Cap) ...........84
Light ....................34
Materials Added .............85
Octane Rating ..............137 Specifications
..............137
Tank Capacity ..............137
Fuses ......................89
Gas Cap (Fuel Filler Cap) ..........84
Gear Select Lever Override ........105
General Information .............45
Hands-Free Phone (Uconnect) ......150
Headlights ...................17
Head Restraints ................13
Heated Seats .................11
Hood Prop ...................25
Hood Release .................25
Ignition Key .....................10
Instrument Cluster ..............37
Instrument Cluster Display Instrument Cluster Display .......30
Instrument Panel Lens Cleaning .....133
Interior And Instrument Lights .......18
Interior Appearance Care .........133
Interior Lights .................18
Introduction ...................1
INDEX
168
Page 171 of 180
iPod/USB/MP3 ControlBluetooth Streaming Audio ......150
Jack Operation .............92, 115
Jump Starting ................102
Keys .......................10
Lane Change Assist ..............17
Lap/Shoulder Belts ..............47
Latches .....................78
Hood ....................25
Leaks, Fluid ..................78
Life Of Tires .................126
Light Bulbs ................78, 88
Lights ...................17, 78
AirBag ................31, 76
Brake Warning ..............31
Bulb Replacement ............88
Cruise ...................38
Engine Temperature Warning .....33
Exterior ..................78
Interior ...................18
Low Fuel ..................34
Malfunction Indicator
(Check Engine) ..............36
Park ..................17, 37 Seat Belt Reminder
...........34
Service ...................88
Tire Pressure Monitoring
(TPMS) ................35, 42
Turn Signal ..............37, 78
Warning (Instrument Cluster
Description) .............33, 37
Loading Vehicle Tires ...................120
Low Tire Pressure System ..........42
Lug Nuts ...................136
Maintenance Schedule ...........110
Malfunction Indicator Light (Check Engine) ...................36
Manual, Service ...............166
Media Center Radio .............160
Memory Feature (Memory Seat) ......11
Memory Seat ..................11
Memory Seats And Radio ..........11
Monitor, Tire Pressure System .......42
Mopar .....................139
Mopar Accessories .............139
Multi-Function Control Lever ........17
Navigation ..................148 New
Vehicle Break-In Period
........80
Occupant Restraints .............45
Octane Rating, Gasoline (Fuel) ......137
Oil, Engine ..................137
Capacity .................137
Filter ...................137
Pressure Warning Light .........33
Recommendation ............137
Viscosity .................137
Oil Pressure Light ...............33
Onboard Diagnostic System .........38
Operating Precautions ............38
Overheating, Engine ............106
Owner's Manual (Operator Manual) . . .166
ParkSense System, Rear ...........82
Pets .......................75
Phone, Hands-Free (Uconnect) ......150
Phone (Pairing) ...............151
Phone (Uconnect) ..............150
Placard, Tire And Loading Information ................120
Pregnant Women And Seat Belts ......50
Preparation For Jacking ...........95
Radial Ply Tires ...............125
169
Page 173 of 180
Supplemental Restraint System - Air Bag. .54
Telescoping Steering Column ........16
Text Messaging ................156
Tilt Steering Column .............16
Tire And Loading Information Placard . .120
Tire Markings .................115
Tires ............78, 123, 128, 132
Aging (Life Of Tires) ..........126
Air Pressure ...............123
Changing ..............92, 115
Compact Spare .............129
General Information .......123, 128
High Speed ...............124
Inflation Pressures ...........124
Jacking ................92, 115
Life Of Tires ...............126
Load Capacity ..............120
Pressure Monitor System (TPMS) . . .42
Pressure Warning Light .........35
Quality Grading .............132
Radial ..................125
Replacement ..............126
Safety ...............115, 123 Sizes
...................116
Snow Tires ................128
Spare Tire .............128, 130
Spinning .................125
Tread Wear Indicators .........126
Wheel Nut Torque ...........136
Tire Safety Information ...........115
Tire Service Kit ...............100
To Open Hood .................25
Towing ......................85
Disabled Vehicle ............108
Guide ....................85
Recreational ...............85
Weight ...................85
Towing Vehicle Behind A Motorhome . . .85
Trailer Towing .................85
Trailer Towing Guide .............85
Trailer Weight .................85
Transporting Pets ...............
75
Tread Wear Indicators ............126
Turn Signals ..................37
Uconnect (Hands-Free Phone) Making A Phone Call ......150, 154 Receiving A Call
............150
Uconnect Phone ........150, 154, 156
Uconnect Voice Command . .154, 158, 160
Uniform Tire Quality Grades ........132
Untwisting Procedure, Seat Belt ......49
Vehicle Loading ...............120
Vehicle Storage ................24
Voice Command ...........154, 160
Voice Recognition System (VR) ..........154, 155, 158, 160
Warning Lights (Instrument Cluster Description) .................37
Washers, Windshield .............18
Wheel And Wheel Trim ...........130
Wheel And Wheel Trim Care ........130
Window Fogging ................25
Windshield Defroster .............76
Windshield Washers .............18
Windshield Wipers ..............18
Wrecker Towing ...............108
171