display Ram ProMaster City 2020 Owner's Guide
[x] Cancel search | Manufacturer: RAM, Model Year: 2020, Model line: ProMaster City, Model: Ram ProMaster City 2020Pages: 350, PDF Size: 13.27 MB
Page 182 of 350

STARTING AND OPERATING 179
If it’s necessary to keep the ball mount and hitch ball
assembly mounted for a long period, it is possible to filter out
the ball mount and hitch ball assembly presence in sensor
field of view. The filtering operation must be performed only
by an authorized dealer.
PARKVIEW REAR BACK UP CAMERA
Your vehicle is equipped with the ParkView Rear Back Up
Camera that allows you to see an on-screen image of the rear
surroundings of your vehicle whenever the gear selector is
put into REVERSE. The image will be displayed on the
touchscreen display along with a caution note to “check
entire surroundings” across the top of the screen. After five
seconds this note will disappear. The ParkView camera is
located on the rear of the vehicle above the rear license plate.
The Rear Back Up Camera can also be activated when the
vehicle is not in REVERSE through the Uconnect System. Refer
to “Uconnect Settings” in “Multimedia” for further information.
NOTE:
If one of the rear cargo doors is not completely closed, the
Back Up Camera cannot provide an accurate image of the
area behind the vehicle. A dedicated message will appear on
the Uconnect display indicating the camera is not in the
correct position.
• Before using ParkSense, it is strongly recommended
that the ball mount and hitch ball assembly is discon -
nected from the vehicle when the vehicle is not used for
towing. Failure to do so can result in injury or damage
to vehicles or obstacles because the hitch ball will be
much closer to the obstacle than the rear fascia when
the loudspeaker sounds the continuous tone. Also, the
sensors could detect the ball mount and hitch ball
assembly, depending on its size and shape, giving a
false indication that an obstacle is behind the vehicle.
CAUTION!
• ParkSense is only a parking aid and it is unable to recognize every obstacle, including small obstacles.
Parking curbs might be temporarily detected or not
detected at all. Obstacles located above or below the
sensors will not be detected when they are in close
proximity.
• The vehicle must be driven slowly when using Park -
Sense in order to be able to stop in time when an
obstacle is detected. It is recommended that the driver
looks over his/her shoulder when using ParkSense.
WARNING! (Continued)
5
2020_RAM_PROMASTER_CITY_OM_USA=GUID-7B6A7FCA-79B0-423F-95C5-ED2A949C3D13=1=en=.book Page 179
Page 183 of 350
180 STARTING AND OPERATING
The Camera Delay setting can be set to on/off in the rear
camera settings menu. When the vehicle is shifted out of
REVERSE and the Camera Delay is turned off, the rear
camera mode is exited and the navigation or audio screen
appears on display again.
When the transmission is shifted out of REVERSE, and
Camera Delay is activated in the menu screen, the camera
image will continue to be displayed for up to 10 seconds,
unless the speed of the vehicle is greater than 8 mph (13 km/h), the transmission is in PARK, or the ignition is placed in
the OFF position.
When displayed, static grid lines will illustrate the width of
the vehicle and will show separate zones that will help
indicate the distance to the rear of the vehicle. The following
table shows the approximate distances for each zone:
NOTE:
If snow, ice, mud, or any foreign substance builds up on the
camera lens, clean the lens, rinse with water, and dry with a
soft cloth. Do not cover the lens.
Zone
Distance To The Rear Of The
Vehicle
Red 0 - 1 ft (0 - 30 cm)
Yellow 1 ft - 3 ft (30 cm - 1 m)
Green 3 ft or greater (1 m or greater)WARNING!
Drivers must be careful when backing up even when
using the ParkView Rear Back Up Camera. Always check
carefully behind your vehicle, and be sure to check for
pedestrians, animals, other vehicles, obstructions, or
blind spots before backing up. You are responsible for
the safety of your surroundings and must continue to
pay attention while backing up. Failure to do so can
result in serious injury or death.
CAUTION!
• To avoid vehicle damage, ParkView should only be used as a parking aid. The ParkView camera is unable
to view every obstacle or object in your drive path.
• To avoid vehicle damage, the vehicle must be driven slowly when using ParkView to be able to stop in time
when an obstacle is seen. It is recommended that the
driver look frequently over his/her shoulder when
using ParkView.
2020_RAM_PROMASTER_CITY_OM_USA=GUID-7B6A7FCA-79B0-423F-95C5-ED2A949C3D13=1=en=.book Page 180
Page 244 of 350

241
SERVICING AND MAINTENANCE
SCHEDULED SERVICING
Your vehicle is equipped with an automatic oil change indicator
system. The oil change indicator system will remind you that it is
time to take your vehicle in for scheduled maintenance.
Based on engine operation conditions, the oil change indi-
cator message will illuminate. This means that service is
required for your vehicle. Operating conditions such as
frequent short-trips, trailer tow, extended engine idle time,
extremely hot or cold ambient temperatures will influence
when the “Oil Change Required” message is displayed.
Severe Operating Conditions can cause the change oil
message to illuminate as early as 3,500 miles (5,600 km) since
last reset. Have your vehicle serviced as soon as possible,
within the next 500 miles (805 km).
Your authorized dealer will reset the oil change indicator message
after completing the scheduled oil change. If a scheduled oil change
is performed by someone other than your authorized dealer, the
message can be reset by referring to the steps described under “Oil
Change Reset” in “Instrument Cluster Display” in “Getting To
Know Your Instrument Panel” for further information.
NOTE:
Under no circumstances should oil change intervals exceed
10,000 miles (16,000 km), 350 hours of engine run time or
12 months, whichever comes first. The 350 hours of engine run
or idle time is generally only a concern for fleet customers.
Severe Duty All Models
Change Engine Oil at 4,000 miles (6,500 km) or 350 hours of engine
run time if the vehicle is operated in a dusty and off road environ -
ment or is operated predominantly at idle, or only very low engine
RPM. This type of vehicle use is considered Severe Duty.
Once A Month Or Before A Long Trip:
• Check engine oil level.
• Check windshield washer fluid level.
• Check tire pressure and look for unusual wear or damage. Rotate tires at the first sign of irregular wear, even if it
occurs before the oil indicator system turns on.
• Check the fluid levels of the coolant reservoir and brake master cylinder, fill as needed.
• Check function of all interior and exterior lights.
7
2020_RAM_PROMASTER_CITY_OM_USA=GUID-7B6A7FCA-79B0-423F-95C5-ED2A949C3D13=1=en=.book Page 241
Page 310 of 350
MULTIMEDIA 307
Uconnect 3/3 NAV With 5-inch Display Buttons On The Touchscreen And Buttons On The Faceplate
Uconnect 3/3 NAV Settings
Push the Settings button on the faceplate to display the menu
setting screen. In this mode the Uconnect system allows you
to access programmable features that may be equipped such
as Language, Display, Units (if equipped), Voice, Clock, Safety & Driving Assistance (if equipped), Lights, Doors &
Locks, Engine Off Options, Audio, Phone (if equipped), Siri
-
usXM® Setup (if equipped), Radio Setup, Restore Settings,
and Clear Personal Data.
NOTE:
• Only one category may be selected at a time.
• The Back Arrow will change into a Done button if any changes are made.
When making a selection, press the button on the touch -
screen to enter the desired mode. Once in the desired mode,
press and release the preferred setting. Once the setting is
complete, either press the Back Arrow button on the touch -
screen or the Back button on the faceplate to return to the
previous menu or press the X button on the touchscreen to
return to the Main Settings screen. Pressing the Up or Down
Arrow buttons on the touchscreen on the right side of the
screen will allow you to toggle up or down through the avail -
able settings.
1 — Uconnect Buttons On The Touchscreen
2 — Uconnect Buttons On The Faceplate
9
2020_RAM_PROMASTER_CITY_OM_USA=GUID-7B6A7FCA-79B0-423F-95C5-ED2A949C3D13=1=en=.book Page 307
Page 311 of 350
308 MULTIMEDIA
Display
After pressing the Display button on the touchscreen, the following settings will be available:Setting Name Selectable Options
Set Language English/Français/Español
NOTE:
When the “Set Language” feature is selected, you may select one of multiple languages (English/Français/Español) for all
display nomenclature, including the trip functions and the navigation system (if equipped). Press the Set Language button
on the touchscreen, then press the desired language button on the touchscreen until a check-mark appears next to the
language, showing that setting has been selected. Display Mode Manual Auto
Brightness With Headlights ON With Headlights OFF
NOTE:
To make changes to the “Brightness” setting, the headlights must be on and the interior dimmer switch must not be in the
"party" or "parade" positions. Units — If Equipped USMetric
NOTE:
When selecting the “Units” setting, the changes can be made to the Distance (mi, km), Fuel Consumption (MPG if set to mi,
L/100 km or km/L if set to km), and Temperature (°C, °F). Touchscreen Beep On Off
Display Trip B On Off
NOTE:
Press the relevant button to activate/deactivate the displaying of the Trip B on the instrument cluster display.
2020_RAM_PROMASTER_CITY_OM_USA=GUID-7B6A7FCA-79B0-423F-95C5-ED2A949C3D13=1=en=.book Page 308
Page 312 of 350
MULTIMEDIA 309
Voice
After pressing the Voice button on the touchscreen, the following settings will be available:
Units — If Equipped
After pressing the Units button on the touchscreen, the following settings will be available:Setting Name
Selectable Options
Voice Response Length Brief Detailed
Show Command List NeverWith Help Always
NOTE:
This setting will display the possible options while in a voice session.
Setting Name Selectable Options
Units USMetric Custom
NOTE:
The “Custom” option allows you to set the “Distance” (mi, or km), “Fuel Consumption” [MPG (US), L/100 km, or km/L],
and “Temperature” (°C, or °F) units of measurement independently (if equipped).
9
2020_RAM_PROMASTER_CITY_OM_USA=GUID-7B6A7FCA-79B0-423F-95C5-ED2A949C3D13=1=en=.book Page 309
Page 314 of 350
MULTIMEDIA 311
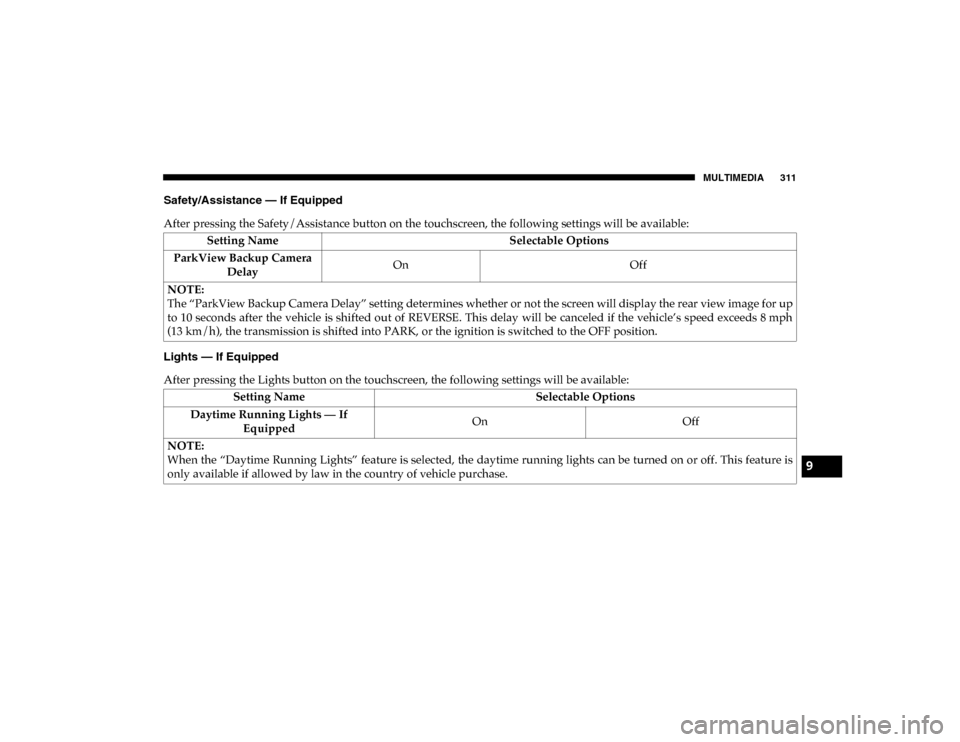
Safety/Assistance — If Equipped
After pressing the Safety/Assistance button on the touchscreen, the following settings will be available:
Lights — If Equipped
After pressing the Lights button on the touchscreen, the following settings will be available:Setting Name
Selectable Options
ParkView Backup Camera Delay On
Off
NOTE:
The “ParkView Backup Camera Delay” setting determines whether or not the screen will display the rear view image for up
to 10 seconds after the vehicle is shifted out of REVERSE. This delay will be canceled if the vehicle’s speed exceeds 8 mph
(13 km/h), the transmission is shifted into PARK, or the ignition is switched to the OFF position.
Setting Name Selectable Options
Daytime Running Lights — If Equipped On
Off
NOTE:
When the “Daytime Running Lights” feature is selected, the daytime running lights can be turned on or off. This feature is
only available if allowed by law in the country of vehicle purchase.
9
2020_RAM_PROMASTER_CITY_OM_USA=GUID-7B6A7FCA-79B0-423F-95C5-ED2A949C3D13=1=en=.book Page 311
Page 316 of 350
MULTIMEDIA 313
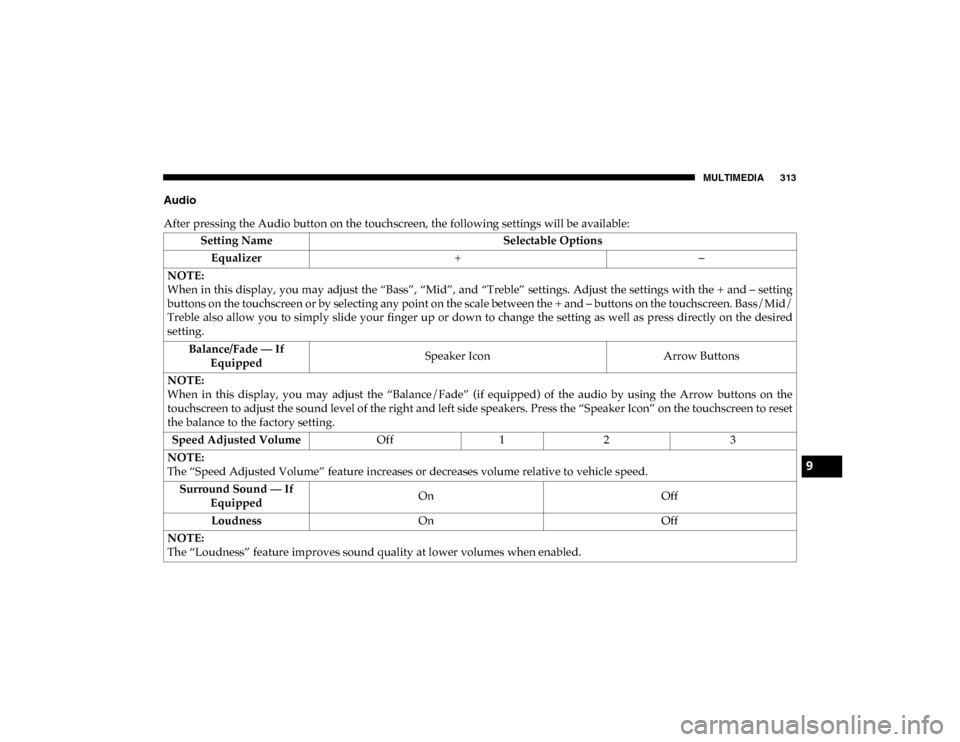
Audio
After pressing the Audio button on the touchscreen, the following settings will be available:Setting Name Selectable Options
Equalizer + –
NOTE:
When in this display, you may adjust the “Bass”, “Mid”, and “Treble” settings. Adjust the settings with the + and – setting
buttons on the touchscreen or by selecting any point on the scale between the + and – buttons on the touchscreen. Bass/Mid/
Treble also allow you to simply slide your finger up or down to change the setting as well as press directly on the desired
setting. Balance/Fade — If Equipped Speaker Icon
Arrow Buttons
NOTE:
When in this display, you may adjust the “Balance/Fade” (if equipped) of the audio by using the Arrow buttons on the
touchscreen to adjust the sound level of the right and left side speakers. Press the “Speaker Icon” on the touchscreen to reset
the balance to the factory setting. Speed Adjusted Volume Off12 3
NOTE:
The “Speed Adjusted Volume” feature increases or decreases volume relative to vehicle speed. Surround Sound — If Equipped On
Off
Loudness On Off
NOTE:
The “Loudness” feature improves sound quality at lower volumes when enabled.
9
2020_RAM_PROMASTER_CITY_OM_USA=GUID-7B6A7FCA-79B0-423F-95C5-ED2A949C3D13=1=en=.book Page 313
Page 319 of 350
316 MULTIMEDIA
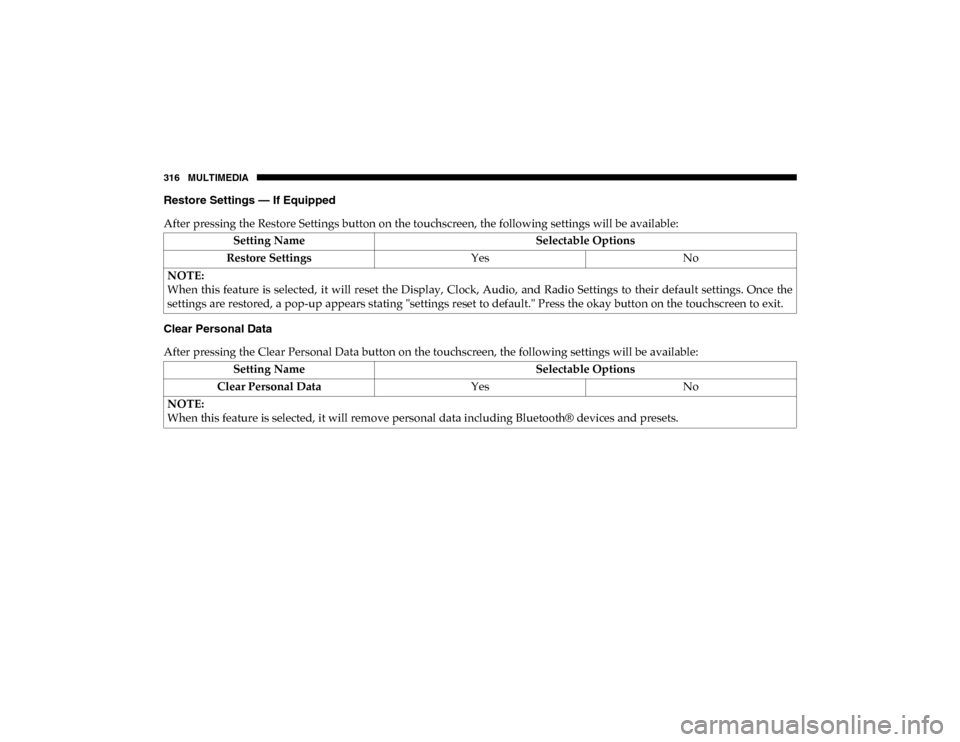
Restore Settings — If Equipped
After pressing the Restore Settings button on the touchscreen, the following settings will be available:
Clear Personal Data
After pressing the Clear Personal Data button on the touchscreen, the following settings will be available:Setting Name
Selectable Options
Restore Settings YesNo
NOTE:
When this feature is selected, it will reset the Display, Clock, Audio, and Radio Settings to their default settings. Once the
settings are restored, a pop-up appears stating "settings reset to default." Press the okay button on the touchscreen to exit.
Setting Name Selectable Options
Clear Personal Data YesNo
NOTE:
When this feature is selected, it will remove personal data including Bluetooth® devices and presets.
2020_RAM_PROMASTER_CITY_OM_USA=GUID-7B6A7FCA-79B0-423F-95C5-ED2A949C3D13=1=en=.book Page 316
Page 328 of 350
MULTIMEDIA 325
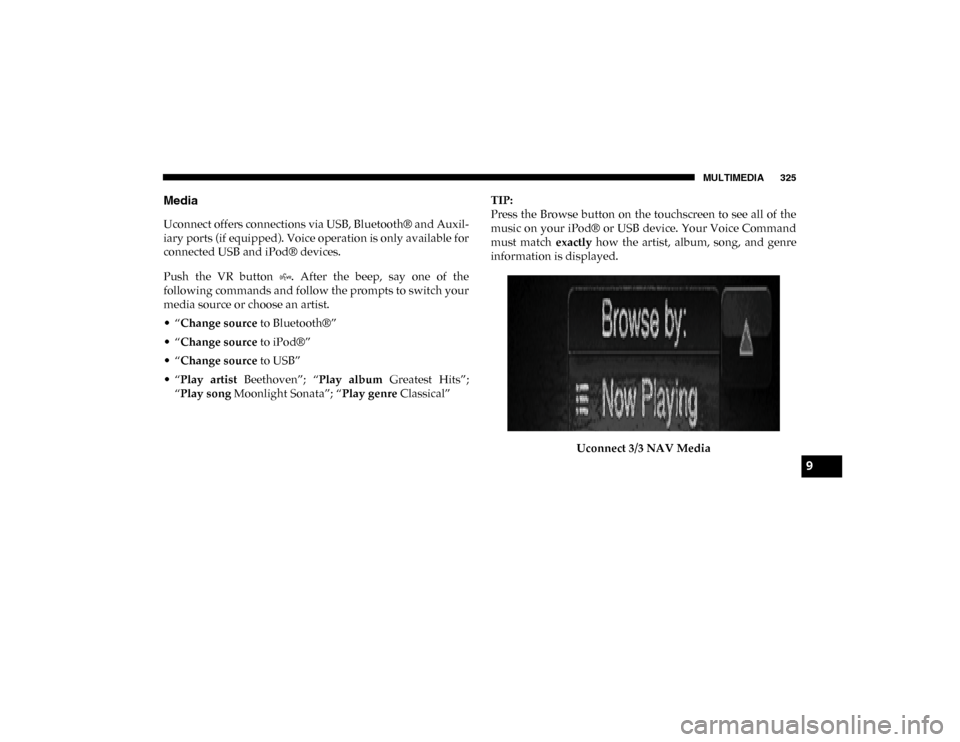
Media
Uconnect offers connections via USB, Bluetooth® and Auxil-
iary ports (if equipped). Voice operation is only available for
connected USB and iPod® devices.
Push the VR button . After the beep, say one of the
following commands and follow the prompts to switch your
media source or choose an artist.
• “Change source to Bluetooth®”
• “Change source to iPod®”
• “Change source to USB”
• “Play artist Beethoven”; “ Play album Greatest Hits”;
“Play song Moonlight Sonata”; “ Play genre Classical” TIP:
Press the Browse button on the touchscreen to see all of the
music on your iPod® or USB device. Your Voice Command
must match
exactly how the artist, album, song, and genre
information is displayed.
Uconnect 3/3 NAV Media
9
2020_RAM_PROMASTER_CITY_OM_USA=GUID-7B6A7FCA-79B0-423F-95C5-ED2A949C3D13=1=en=.book Page 325