seats RAM PROMASTER CITY 2021 Owners Manual
[x] Cancel search | Manufacturer: RAM, Model Year: 2021, Model line: PROMASTER CITY, Model: RAM PROMASTER CITY 2021Pages: 280, PDF Size: 15.78 MB
Page 4 of 280
2
INTRODUCTION
Symbols Key ............................................................ 7
WARNINGS AND CAUTIONS ................................. 7
VAN CONVERSIONS/CAMPERS ............................ 7
VEHICLE MODIFICATIONS/ALTERATIONS .......... 8
Symbol Glossary ..................................................... 8
GETTING TO KNOW YOUR VEHICLE
KEYS ......................................................................10
Key Fob......................................................... 10
SENTRY KEY ..........................................................12
IGNITION SWITCH ................................................12
VEHICLE SECURITY SYSTEM — IF EQUIPPED ...13
To Arm The System ...................................... 13
To Disarm The System................................. 13
Rearming Of The System............................. 13
Security System Manual Override .............. 13
DOORS ..................................................................14
Power Door Locks ....................................... 14
Auto Unlock Doors ....................................... 14
Sliding Side Door ......................................... 14
Double Rear Swing Doors ........................... 16
Child-Protection Door Lock System ............ 17
SEATS ....................................................................17
Manual Adjustment (Front Seats)............... 18
Folding Rear Seat — If Equipped ................ 20
Heated Seats — If Equipped........................ 20 HEAD RESTRAINTS ............................................. 21
Front Adjustment ......................................... 21
Rear Adjustment — If Equipped .................. 22
Front Removal.............................................. 22
Rear Removal — If Equipped....................... 23
STEERING WHEEL ................................................ 23
Tilt/Telescoping Steering Column .............. 23
UCONNECT VOICE RECOGNITION QUICK
TIPS ........................................................................ 24
Introducing Voice Recognition .................... 24
Get Started ................................................... 24
Basic Voice Commands............................... 24
Additional Information ................................. 24
MIRRORS ............................................................. 25
Inside Rearview Mirror ................................ 25
Outside Mirrors ........................................... 25
Vanity Mirror................................................. 26
EXTERIOR LIGHTS ................................................ 27
Multifunction Lever...................................... 27
Headlights ................................................... 27
Daytime Running Lights (DRLs) —
If Equipped .................................................. 27 High/Low Beam Switch ............................... 28
Flash-To-Pass .............................................. 28
Parking Lights ............................................. 28
Follow Me Home/Headlight Delay .............. 28
Fog Lights — If Equipped ............................ 28
Turn Signals ................................................. 28
Lane Change Assist ..................................... 28
INTERIOR LIGHTS ................................................ 29
Courtesy/Interior Lights .............................. 29 WIPERS AND WASHERS .....................................30
Front Wiper Operation ................................. 30
Rear Wiper Operation — If Equipped .......... 31
CLIMATE CONTROLS ...........................................31
Manual Climate Control Descriptions And
Functions ..................................................... 31 Operating Tips.............................................. 33
WINDOWS ............................................................35
Power Window Controls — If Equipped ...... 35
Automatic Window Features ....................... 35
Power Windows System Initialization......... 36
Window Bar Grates — If Equipped .............. 36
Wind Buffeting ............................................ 36
HOOD .....................................................................37
Opening ........................................................ 37
Closing.......................................................... 37
CARGO AREA FEATURES .....................................38
Rear Cargo Tie-Downs ................................. 38
INTERIOR STORAGE AND EQUIPMENT ..............38
Storage ......................................................... 38
USB Control — If Equipped .......................... 40
Power Outlets .............................................. 40
ROOF RACK — IF EQUIPPED................................41
GETTING TO KNOW YOUR INSTRUMENT PANEL
INSTRUMENT CLUSTER........................................43
Instrument Cluster Descriptions................. 44
21_VM_OM_EN_USC_t.book Page 2
Page 7 of 280
5
SERVICING AND MAINTENANCE
SCHEDULED SERVICING .................................. 217Maintenance Plan......................................217
ENGINE COMPARTMENT .................................. 221
Engine Compartment — 2.4L ...................221Checking Oil Level......................................222
Adding Washer Fluid .................................222
Maintenance-Free Battery .......................222
Pressure Washing ......................................223
DEALER SERVICE .............................................. 223
Engine Oil ...................................................223
Engine Oil Filter ..........................................224Engine Air Cleaner Filter ............................224
Air Conditioner Maintenance ....................225
Body Lubrication ........................................225
Windshield Wiper Blades ..........................225
Exhaust System ........................................226
Cooling System ..........................................227Brake System ............................................230
Automatic Transmission ...........................231
Upfitter Connectors — If Equipped ............232
TIRES ................................................................... 234
Tire Safety Information .............................. 234
Tires — General Information .....................242Tire Types ...................................................246
Spare Tires — If Equipped .........................247
Wheel And Wheel Trim Care .....................248Tire Chains and Traction Devices ............249
Tire Rotation Recommendations ..............250 DEPARTMENT OF TRANSPORTATION UNIFORM
TIRE QUALITY GRADES .....................................250
Treadwear .................................................. 250
Traction Grades ......................................... 251
Temperature Grades ................................. 251
STORING THE VEHICLE ......................................251
BODYWORK ........................................................ 252
Protection From Atmospheric Agents....... 252
Body And Underbody Maintenance .......... 252Preserving The Bodywork .......................... 252
INTERIORS ......................................................... 253
Seats And Fabric Parts .............................. 253
Plastic And Coated Parts ........................... 253
Leather Surfaces ....................................... 254Glass Surfaces .......................................... 254
TECHNICAL SPECIFICATIONS
VEHICLE IDENTIFICATION NUMBER.................255
BRAKE SYSTEM .................................................. 255
WHEEL AND TIRE TORQUE
SPECIFICATIONS ................................................ 255
Torque Specifications ................................ 255
FUEL REQUIREMENTS .......................................256
Gasoline Engine ......................................... 256
Reformulated Gasoline ............................. 256Gasoline/Oxygenate Blends .................... 257
E-85 Usage In Non-Flex Fuel Vehicles ...... 257
CNG And LP Fuel System Modifications... 257
MMT In Gasoline ........................................ 257
Materials Added To Fuel ........................... 257 Fuel System Cautions................................ 258
Carbon Monoxide Warnings ..................... 258
FLUID CAPACITIES ............................................. 259
ENGINE FLUIDS AND LUBRICANTS ................. 259
CHASSIS FLUIDS AND LUBRICANTS .............. 261
CUSTOMER ASSISTANCE
SUGGESTIONS FOR OBTAINING SERVICE FOR
YOUR VEHICLE .................................................. 262 Prepare For The Appointment .................. 262Prepare A List............................................. 262
Be Reasonable With Requests ................. 262
IF YOU NEED ASSISTANCE .............................. 262
FCA US LLC Customer Center ................... 262
FCA Canada Inc. Customer Center ........... 262
Mexico ........................................................ 263
Puerto Rico And US Virgin Islands ............ 263
Customer Assistance For The Hearing Or
Speech Impaired (TDD/TTY) ..................... 263 Service Contract ....................................... 263
WARRANTY INFORMATION .............................. 264
MOPAR PARTS................................................... 264
REPORTING SAFETY DEFECTS ........................ 264
In The 50 United States And
Washington, D.C. ....................................... 264 In Canada ................................................... 264
PUBLICATION ORDER FORMS ........................ 264
General Information.......................................... 265
21_VM_OM_EN_USC_t.book Page 5
Page 19 of 280
GETTING TO KNOW YOUR VEHICLE17
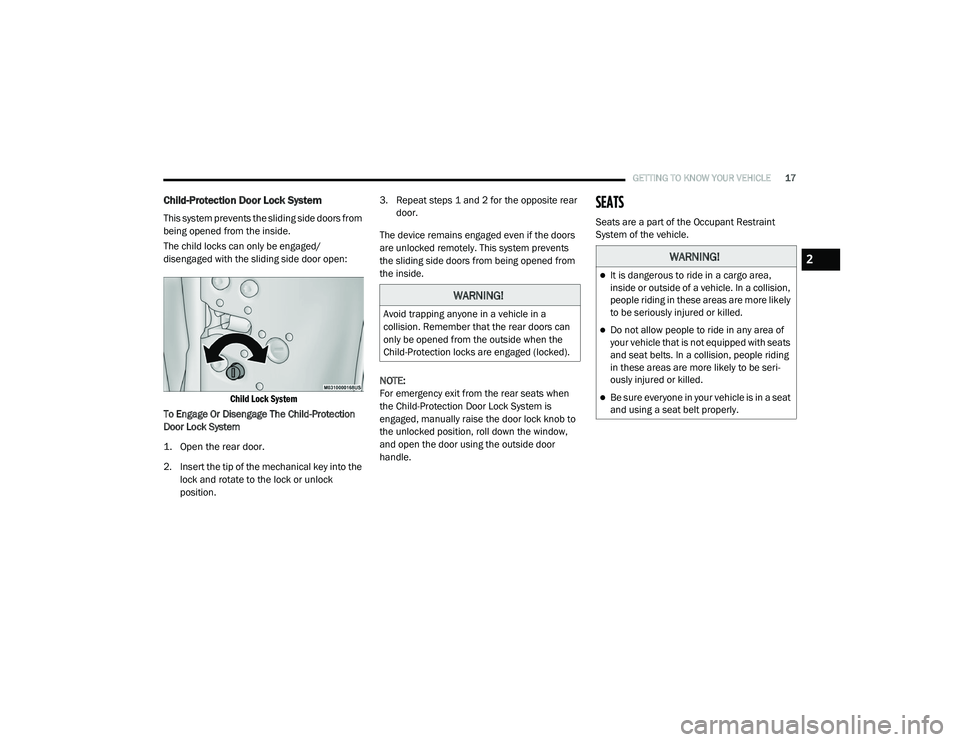
Child-Protection Door Lock System
This system prevents the sliding side doors from
being opened from the inside.
The child locks can only be engaged/
disengaged with the sliding side door open:
Child Lock System
To Engage Or Disengage The Child-Protection
Door Lock System
1. Open the rear door.
2. Insert the tip of the mechanical key into the lock and rotate to the lock or unlock
position. 3. Repeat steps 1 and 2 for the opposite rear
door.
The device remains engaged even if the doors
are unlocked remotely. This system prevents
the sliding side doors from being opened from
the inside.
NOTE:
For emergency exit from the rear seats when
the Child-Protection Door Lock System is
engaged, manually raise the door lock knob to
the unlocked position, roll down the window,
and open the door using the outside door
handle.
SEATS
Seats are a part of the Occupant Restraint
System of the vehicle.
WARNING!
Avoid trapping anyone in a vehicle in a
collision. Remember that the rear doors can
only be opened from the outside when the
Child-Protection locks are engaged (locked).
WARNING!
It is dangerous to ride in a cargo area,
inside or outside of a vehicle. In a collision,
people riding in these areas are more likely
to be seriously injured or killed.
Do not allow people to ride in any area of
your vehicle that is not equipped with seats
and seat belts. In a collision, people riding
in these areas are more likely to be seri -
ously injured or killed.
Be sure everyone in your vehicle is in a seat
and using a seat belt properly.
2
21_VM_OM_EN_USC_t.book Page 17
Page 20 of 280
18GETTING TO KNOW YOUR VEHICLE
Manual Adjustment (Front Seats)
The front driver and passenger seats can be
adjusted forward and rearward, and (if
equipped), may be reclined and the height and
lumbar can be adjusted.
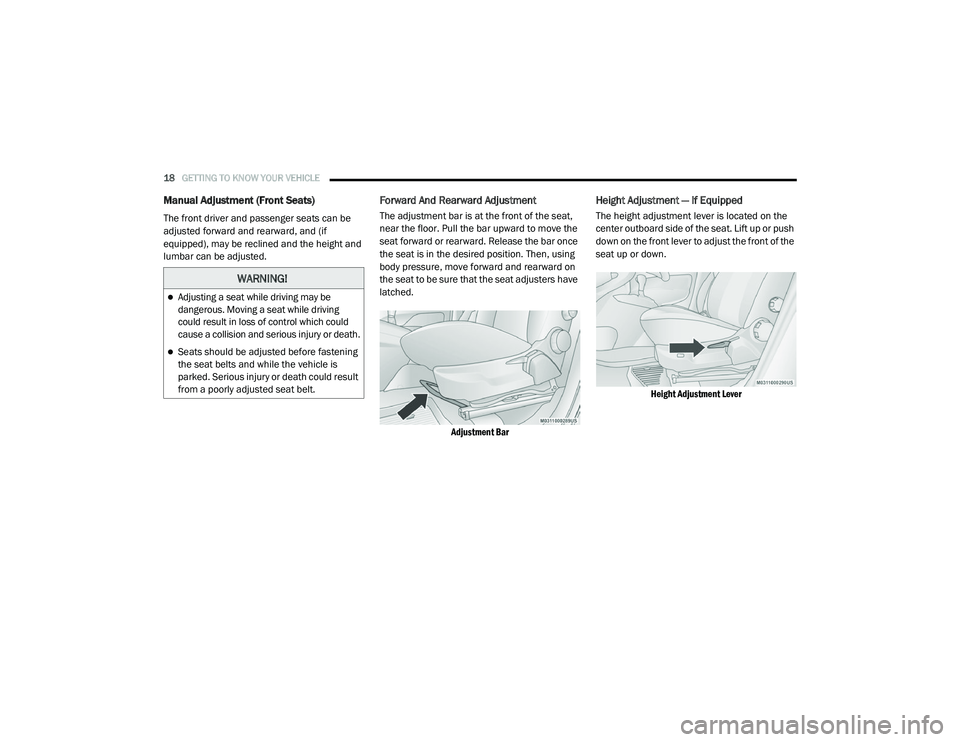
Forward And Rearward Adjustment
The adjustment bar is at the front of the seat,
near the floor. Pull the bar upward to move the
seat forward or rearward. Release the bar once
the seat is in the desired position. Then, using
body pressure, move forward and rearward on
the seat to be sure that the seat adjusters have
latched.
Adjustment Bar
Height Adjustment — If Equipped
The height adjustment lever is located on the
center outboard side of the seat. Lift up or push
down on the front lever to adjust the front of the
seat up or down.
Height Adjustment Lever
WARNING!
Adjusting a seat while driving may be
dangerous. Moving a seat while driving
could result in loss of control which could
cause a collision and serious injury or death.
Seats should be adjusted before fastening
the seat belts and while the vehicle is
parked. Serious injury or death could result
from a poorly adjusted seat belt.
21_VM_OM_EN_USC_t.book Page 18
Page 22 of 280
20GETTING TO KNOW YOUR VEHICLE
Folding Rear Seat — If Equipped
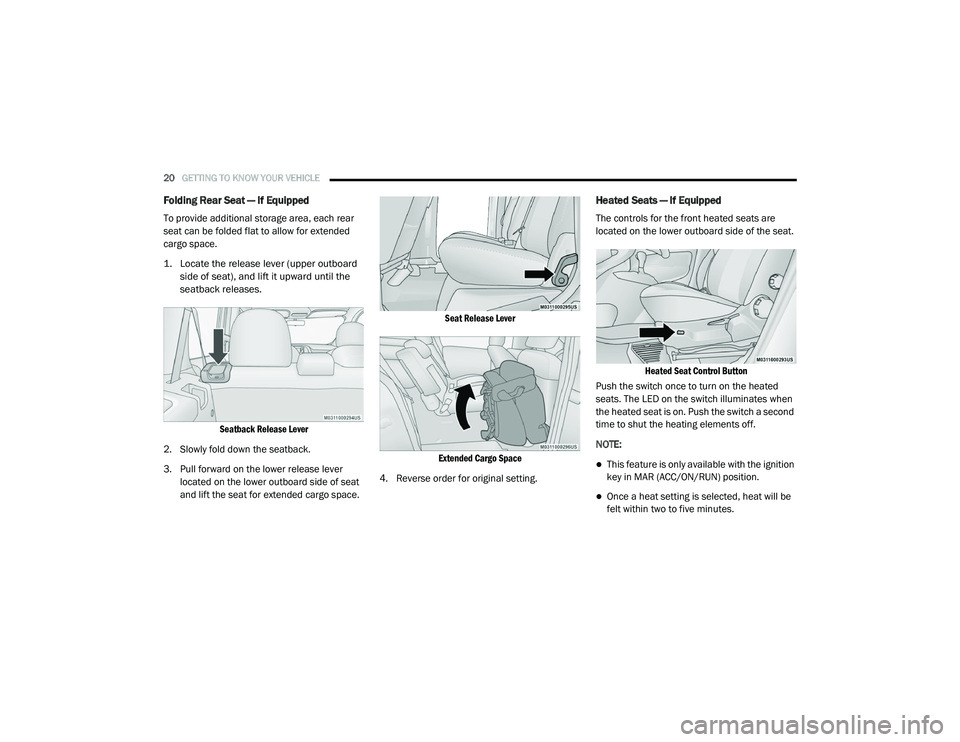
To provide additional storage area, each rear
seat can be folded flat to allow for extended
cargo space.
1. Locate the release lever (upper outboard
side of seat), and lift it upward until the
seatback releases.
Seatback Release Lever
2. Slowly fold down the seatback.
3. Pull forward on the lower release lever located on the lower outboard side of seat
and lift the seat for extended cargo space.
Seat Release Lever
Extended Cargo Space
4. Reverse order for original setting.
Heated Seats — If Equipped
The controls for the front heated seats are
located on the lower outboard side of the seat.
Heated Seat Control Button
Push the switch once to turn on the heated
seats. The LED on the switch illuminates when
the heated seat is on. Push the switch a second
time to shut the heating elements off.
NOTE:
This feature is only available with the ignition
key in MAR (ACC/ON/RUN) position.
Once a heat setting is selected, heat will be
felt within two to five minutes.
21_VM_OM_EN_USC_t.book Page 20
Page 40 of 280
38GETTING TO KNOW YOUR VEHICLE
(Continued)
CARGO AREA FEATURES
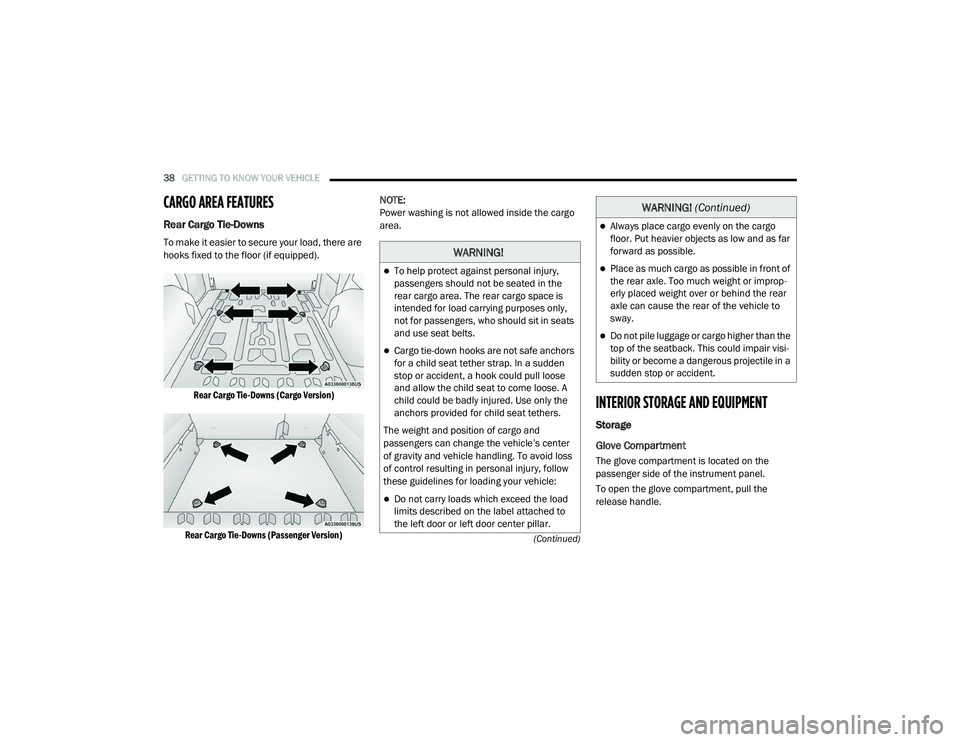
Rear Cargo Tie-Downs
To make it easier to secure your load, there are
hooks fixed to the floor (if equipped).
Rear Cargo Tie-Downs (Cargo Version)
Rear Cargo Tie-Downs (Passenger Version)
NOTE:
Power washing is not allowed inside the cargo
area.
INTERIOR STORAGE AND EQUIPMENT
Storage
Glove Compartment
The glove compartment is located on the
passenger side of the instrument panel.
To open the glove compartment, pull the
release handle.
WARNING!
To help protect against personal injury,
passengers should not be seated in the
rear cargo area. The rear cargo space is
intended for load carrying purposes only,
not for passengers, who should sit in seats
and use seat belts.
Cargo tie-down hooks are not safe anchors
for a child seat tether strap. In a sudden
stop or accident, a hook could pull loose
and allow the child seat to come loose. A
child could be badly injured. Use only the
anchors provided for child seat tethers.
The weight and position of cargo and
passengers can change the vehicle’s center
of gravity and vehicle handling. To avoid loss
of control resulting in personal injury, follow
these guidelines for loading your vehicle:
Do not carry loads which exceed the load
limits described on the label attached to
the left door or left door center pillar.
Always place cargo evenly on the cargo
floor. Put heavier objects as low and as far
forward as possible.
Place as much cargo as possible in front of
the rear axle. Too much weight or improp -
erly placed weight over or behind the rear
axle can cause the rear of the vehicle to
sway.
Do not pile luggage or cargo higher than the
top of the seatback. This could impair visi-
bility or become a dangerous projectile in a
sudden stop or accident.
WARNING! (Continued)
21_VM_OM_EN_USC_t.book Page 38
Page 42 of 280

40GETTING TO KNOW YOUR VEHICLE
USB Control — If Equipped
The USB Input is located on the instrument
panel below the Climate Controls. This feature
allows an external USB device to be plugged
into the USB port.
USB Port
Power Outlets
Your vehicle is equipped with 12 Volt (15 Amp)
power outlets that can be used to power cellular
phones, small electronics and other low
powered electrical accessories. The power
outlets are labeled with either a “key” or a
“battery” symbol to indicate how the outlet is powered. Power outlets labeled with a “key” are
powered when the ignition is in the MAR (ACC/
ON/RUN) position, while the outlets labeled
with a “battery” are connected directly to the
battery and powered at all times.
Driver And Front Passenger Power Outlets
The power outlets are located in between the
driver and front passenger seats.
Driver And Front Passenger Power Outlets
Load Compartment Power Outlet
The Load Compartment Power Outlet is located
on the left side of the rear cargo compartment.
Depending on trim levels, the power outlet
location may vary.
Load Compartment Power Outlet
1 — AUX Port
2 — USB Port CAUTION!
Do not connect devices with power higher
than 180 Watts to the outlet. Using
unsuitable adapters may damage the outlet.
21_VM_OM_EN_USC_t.book Page 40
Page 77 of 280
STARTING AND OPERATING75
4. Fill the vehicle with fuel.
NOTE:
When the fuel nozzle “clicks” or shuts off, the
fuel tank is full.
5. Remove gasoline nozzle, reinstall fuel cap
and close fuel filler door.
NOTE:
Tighten the fuel filler cap until you hear a
“clicking” sound. This is an indication that the
fuel filler cap is properly tightened.
If the gas cap is not tightened properly, the
MIL may come on. Be sure the gas cap is
tightened every time the vehicle is refueled.
VEHICLE LOADING
As required by National Highway Traffic Safety
Administration regulations, your vehicle has a
certification label affixed to the driver's side
door or B-Pillar. If seats are removed for carrying cargo, do not
exceed the specified GVWR and GAWR.
Vehicle Certification Label
Your vehicle has a Vehicle Certification Label
affixed to the driver’s side B-Pillar or the rear of
the driver’s door.
The label contains the following information:
Name of manufacturer
Month and year of manufacture
Gross Vehicle Weight Rating (GVWR)
Gross Axle Weight Rating (GAWR) front and
rear
Vehicle Identification Number (VIN)
Type of vehicle
Month, Day, and Hour of manufacture (MDH)
The bar code allows a computer scanner to read
the VIN.
WARNING!
Never have any smoking materials lit in or
near the vehicle when the gas cap is
removed or the tank is being filled.
Never add fuel when the engine is running.
This is in violation of most state and federal
fire regulations and may cause the
“Malfunction Indicator Light (MIL)”to turn
on.
A fire may result if gasoline is pumped into
a portable container that is inside of a
vehicle. You could be burned. Always place
gas containers on the ground while filling.
CAUTION!
Damage to the fuel system or emissions
control system could result from using an
improper fuel tank filler tube cap. A poorly
fitting cap could let impurities into the fuel
system and may cause the “Malfunction
Indicator Light (MIL)” to turn on, due to fuel
vapors escaping from the system.
To avoid fuel spillage and overfilling, do not
“top off” the fuel tank after filling.4
21_VM_OM_EN_USC_t.book Page 75
Page 155 of 280
SAFETY153
OCCUPANT RESTRAINT SYSTEMS
Some of the most important safety features in
your vehicle are the restraint systems:
Occupant Restraint Systems
Seat Belt Systems
Supplemental Restraint Systems (SRS) Air
Bags
Child Restraints
Some of the safety features described in this
section may be standard equipment on some
models, or may be optional equipment on
others. If you are not sure, ask an authorized
dealer.
Important Safety Precautions
Please pay close attention to the information in
this section. It tells you how to use your restraint
system properly, to keep you and your
passengers as safe as possible.
Here are some simple steps you can take to
minimize the risk of harm from a deploying air
bag:
1. Children 12 years old and under should
always ride buckled up in the rear seat of a
vehicle with a rear seat.
2. A child who is not big enough to wear the vehicle seat belt properly must be secured
in the appropriate child restraint or
belt-positioning booster seat in a rear
seating position Ú page 182.
3. If a child from 2 to 12 years old (not in a rear-facing child restraint) must ride in the
front passenger seat, move the seat as far
back as possible and use the proper child
restraint Ú page 182.
4. Never allow children to slide the shoulder belt behind them or under their arm.
5. You should read the instructions provided with your child restraint to make sure that
you are using it properly.
6. All occupants should always wear their lap and shoulder belts properly.
7. The driver and front passenger seats should be moved back as far as practical to allow
the front air bags room to inflate. 8. Do not lean against the door or window. If
your vehicle has side air bags, and
deployment occurs, the side air bags will
inflate forcefully into the space between
occupants and the door and occupants
could be injured.
9. If the air bag system in this vehicle needs to be modified to accommodate a disabled
person, see Ú page 262 for customer
service contact information.
WARNING!
Never place a rear-facing child restraint in
front of an air bag. A deploying passenger
front air bag can cause death or serious
injury to a child 12 years or younger,
including a child in a rear-facing child
restraint.
Never install a rear-facing child restraint in
the front seat of a vehicle. Only use a
rear-facing child restraint in the rear seat. If
the vehicle does not have a rear seat, do
not transport a rear-facing child restraint in
that vehicle.
6
21_VM_OM_EN_USC_t.book Page 153
Page 157 of 280
SAFETY155
(Continued)
BeltAlert can be activated or deactivated by an
authorized dealer. FCA US LLC does not
recommend deactivating BeltAlert.
NOTE:
If BeltAlert has been deactivated and the driver
or outboard front seat passenger (if equipped
with outboard front passenger seat BeltAlert) is
unbuckled the Seat Belt Reminder Light will
turn on and remain on until the driver and
outboard front seat passenger seat belts are
buckled.
Lap/Shoulder Belts
All seating positions in your vehicle are
equipped with lap/shoulder belts.
The seat belt webbing retractor will lock only
during very sudden stops or collisions. This
feature allows the shoulder part of the seat belt
to move freely with you under normal
conditions. However, in a collision the seat belt
will lock and reduce your risk of striking the
inside of the vehicle or being thrown out of the
vehicle.
WARNING!
Relying on the air bags alone could lead to
more severe injuries in a collision. The air
bags work with your seat belt to restrain you
properly. In some collisions, the air bags
won’t deploy at all. Always wear your seat
belt even though you have air bags.
In a collision, you and your passengers can
suffer much greater injuries if you are not
properly buckled up. You can strike the inte -
rior of your vehicle or other passengers, or
you can be thrown out of the vehicle. Always
be sure you and others in your vehicle are
buckled up properly.
It is dangerous to ride in a cargo area,
inside or outside of a vehicle. In a collision,
people riding in these areas are more likely
to be seriously injured or killed.
Do not allow people to ride in any area of
your vehicle that is not equipped with seats
and seat belts.
Be sure everyone in your vehicle is in a seat
and using a seat belt properly. Occupants,
including the driver, should always wear
their seat belts whether or not an air bag is
also provided at their seating position to
minimize the risk of severe injury or death
in the event of a crash.
Wearing your seat belt incorrectly could
make your injuries in a collision much
worse. You might suffer internal injuries, or
you could even slide out of the seat belt.
Follow these instructions to wear your seat
belt safely and to keep your passengers
safe, too.
Two people should never be belted into a
single seat belt. People belted together can
crash into one another in a collision, hurting
one another badly. Never use a lap/
shoulder belt or a lap belt for more than one
person, no matter what their size.
WARNING! (Continued)
6
21_VM_OM_EN_USC_t.book Page 155