clutch RENAULT ALASKAN 2017 Owners Manual
[x] Cancel search | Manufacturer: RENAULT, Model Year: 2017, Model line: ALASKAN, Model: RENAULT ALASKAN 2017Pages: 340, PDF Size: 6.93 MB
Page 17 of 340
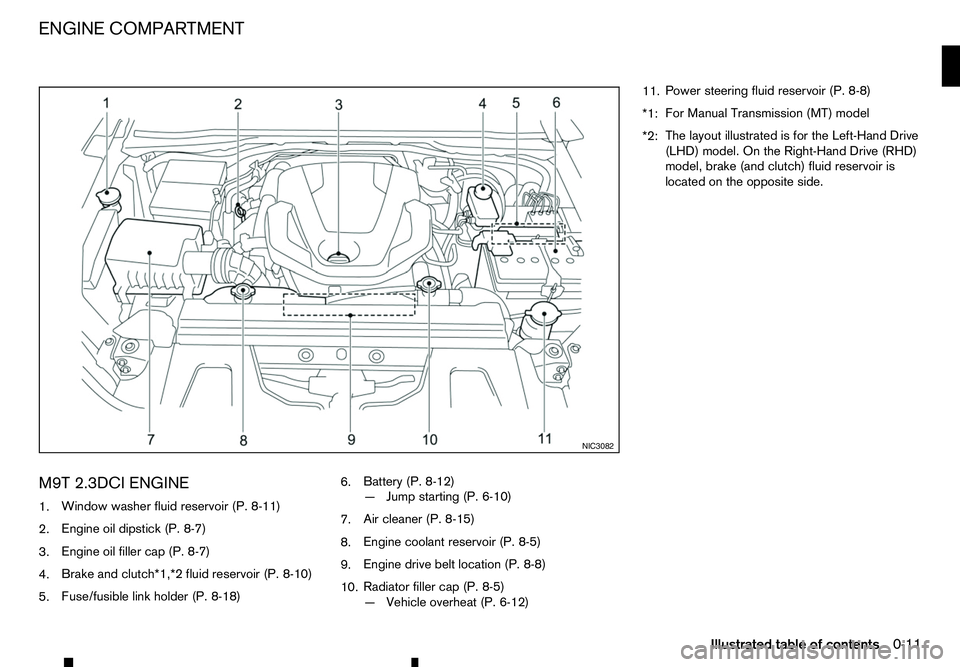
M9T 2.3DCI ENGINE
1. Window washer fluid reservoir (P. 8-11)
2. Engine oil dipstick (P. 8-7)
3. Engine oil filler cap (P. 8-7)
4. Brake and clutch*1,*2 fluid reservoir (P. 8-10)
5. Fuse/fusible link holder (P. 8-18) 6.
Battery (P. 8-12)
—J
ump starting (P. 6-10)
7. Air cleaner (P. 8-15)
8. Engine coolant reservoir (P. 8-5)
9. Engine drive belt location (P. 8-8)
10. Radiator filler cap (P. 8-5)
—V
ehicle overheat (P. 6-12) 11.
Power steering fluid reservoir (P. 8-8)
*1: For Manual Transmission (MT) model
*2: The layout illustrated is for the Left-Hand Drive
(LHD) model. On the Right-Hand Drive (RHD)
model, brake (and clutch) fluid reservoir is
located on the opposite side. NIC3082
ENGINE COMPARTMENT
Illustrated table of contents0-11
Page 83 of 340
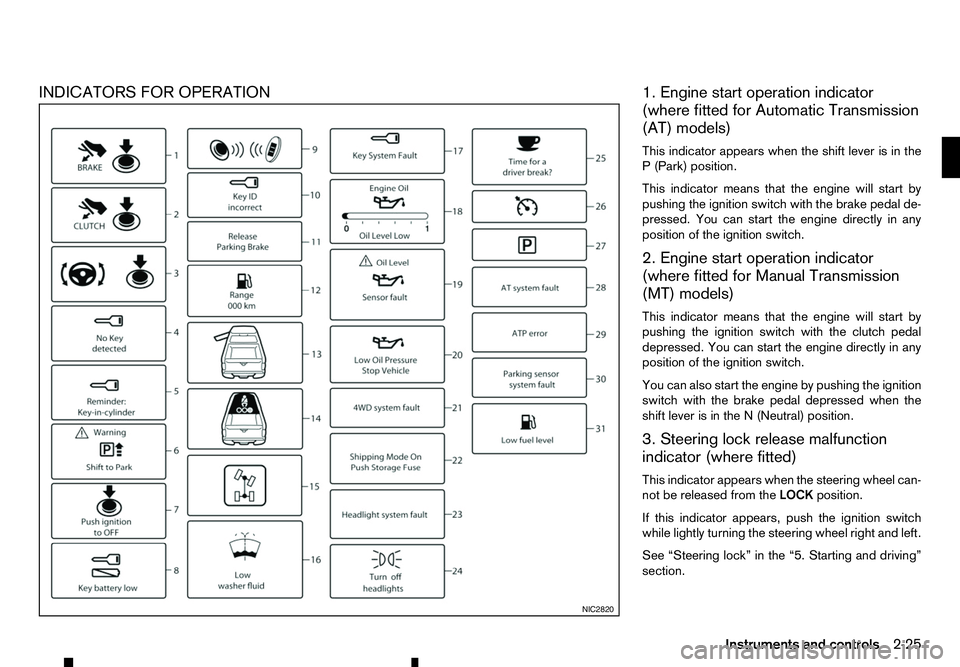
INDICATORS FOR OPERATION
1. Engine start operation indicator
(where fitted for Automatic Transmission
(AT) models)
This indicator appears when the shift lever is in the P( Park) position.
This indicator means that the engine will start by
pushing the ignition switch with the brake pedal de-
pressed. You can start the engine directly in any
position of the ignition switch.
2. Engine start operation indicator
(where fitted for Manual Transmission
(MT) models)
This indicator means that the engine will start by
pushing the ignition switch with the clutch pedal depressed. You can start the engine directly in any
position of the ignition switch.
You can also start the engine by pushing the ignition
switch with the brake pedal depressed when the
shift lever is in the N(Neutral) position.
3. Steering lock release malfunction
indicator (where fitted)
This indicator appears when the steering wheel can-
not be released from the LOCKposition.
If this indicator appears, push the ignition switch
while lightly turning the steering wheel right and left.
See “Steering lock” in the “5. Starting and driving”
section. NIC2820
Instruments and controls
2-25
Page 204 of 340
During the first 1,600 km (1,000 miles), follow these
recommendations to obtain maximum engine per-
formance and ensure the future reliability and
economy of your new vehicle. Failure to follow these
recommendations may result in shortened engine
life and reduced engine performance.
• Do not drive at
aconstant speed, either fast or
slow, for long periods of time.
• Do not run the engine over 4,000 rpm.
• Do not accelerate at full throttle in any gear.
• Do not start quickly.
• Do not brake hard as much as possible.
• Do not tow
atrailer for at least the first 800 km
(500 miles). WARNING
The driving characteristics of your vehicle will
change remarkably by any additional load and its
distribution, as well as by adding optional equip-
ment (trailer coupling, roof rail, etc.). Your driv-
ing style and speed must be adjusted according
to the circumstances. Especially when carrying
heavy loads, your speed must be reduced ad-
equately.
• Make sure the area around the vehicle is clear.
• Check fluid levels such as engine oil, coolant,
brake (and clutch) fluid, window washer fluid as
frequently as possible, at least whenever you
refuel.
• Visually inspect tyres for their appearance and
condition. Measure and check the tyre pressure
for proper inflation.
• Check that all windows and lights are clean.
• Adjust the seat and head restraint positions.
• Adjust the inside and outside rearview mirror po-
sitions.
• Fasten your seat belt and ask all passengers to
do the same.
• Check that all doors are closed.
• Check the operation of the warning lights when
the ignition switch is placed in the “ON” position. •
Maintenance items in the “8. Maintenance and
do-it-yourself” section should be checked peri-
odically.
RUNNING-IN SCHEDULE
BEFORE STARTING ENGINE
5-2 Starting and driving
Page 209 of 340
•
Do not drive across steep slopes. Instead
drive either straight up or straight down the
slopes. Off-road vehicles can tip over side-
ways much more easily than they can forward
or backward.
• Many hills are too steep for any vehicle. If you
drive up them, you may stall. If you drive down
them, you may not be able to control your
speed. If you drive across them, you may roll
over.
• Do not shift ranges while driving on downhill
grades as this could cause loss of control of
the vehicle.
• Stay alert when driving to the top of
ahill. At
the top there could be adrop-off or other haz-
ard that could cause an accident.
• If your engine stalls or you cannot make it to
the top of
asteep hill, never attempt to turn
around. Your vehicle could tip or roll over.
Always back straight down in R(Reverse)
range. Never back down in N(Neutral) or with
the clutch pedal depressed (MT model) using
only the brake, as this could cause loss of
control.
• Heavy braking going down
ahill could cause
your brakes to overheat and fade, resulting in
loss of control and an accident. Apply brakes
lightly and use alow range to control your
speed.
• Unsecured cargo can be thrown around when
driving over rough terrain. Properly secure all cargo so it will not be thrown forward and
cause injury to you or your passengers.
• To avoid raising the centre of gravity exces-
sively, do not exceed the rated capacity of the
roof rail (where fitted) and evenly distribute
the load. Secure heavy loads in the cargo area
as far forward and as low as possible. Do not
equip the vehicle with tyres larger than speci-
fied in this manual. This could cause your ve-
hicle to roll over.
• Do not grip the inside or spokes of the steer-
ing wheel when driving off-road. The steering
wheel could move suddenly and injure your
hands. Instead drive with your fingers and
thumbs on the outside of the rim.
• Before operating the vehicle, ensure that the
driver and all passengers have their seat belts
fastened.
• Always drive with the floor mats in place as
the floor may became hot.
• Lower your speed when encountering strong
crosswinds. With
ahigher centre of gravity,
your vehicle is more affected by strong side
winds. Slower speeds ensure better vehicle
control.
• Do not drive beyond the performance capabil-
ity of the tyres, even with 4WD engaged.
• Do not attempt to raise two wheels off the
ground and shift the transmission to any drive
or reverse position with the engine running.
Doing so may result in drivetrain damage or unexpected vehicle movement which could
result in serious vehicle damage or personal
injury.
• Do not attempt to test
a4WD equipped ve-
hicle on a2-wheel dynamometer or similar
equipment even if the other two wheels are
raised off the ground. Make sure you inform
test facility personnel that your vehicle is
equipped with 4WD before it is placed on a dynamometer. Using the wrong test equip-
ment may result in drivetrain damage or unex-
pected vehicle movement which could result
in serious vehicle damage or personal injury.
• When
awheel is off the ground due to an
unlevel surface, do not spin the wheel exces-
sively.
• Accelerating quickly, sharp steering manoeu-
vres or sudden braking may cause loss of con-
trol.
• If at all possible, avoid sharp turning manoeu-
vres, particularly at high speeds. Your vehicle
has
ahigher centre of gravity than aconven-
tional passenger car. The vehicle is not de-
signed for cornering at the same speeds as
conventional passenger cars. Failure to oper- ate this vehicle correctly could result in loss
of control and/or arollover accident.
• Always use tyres of the same type, size, brand,
construction (bias, bias-belted or radial), and
tread pattern on all four wheels. Install tyre
chains on the rear wheels when driving on
slippery roads and drive carefully.
Starting and driving 5-7
Page 219 of 340
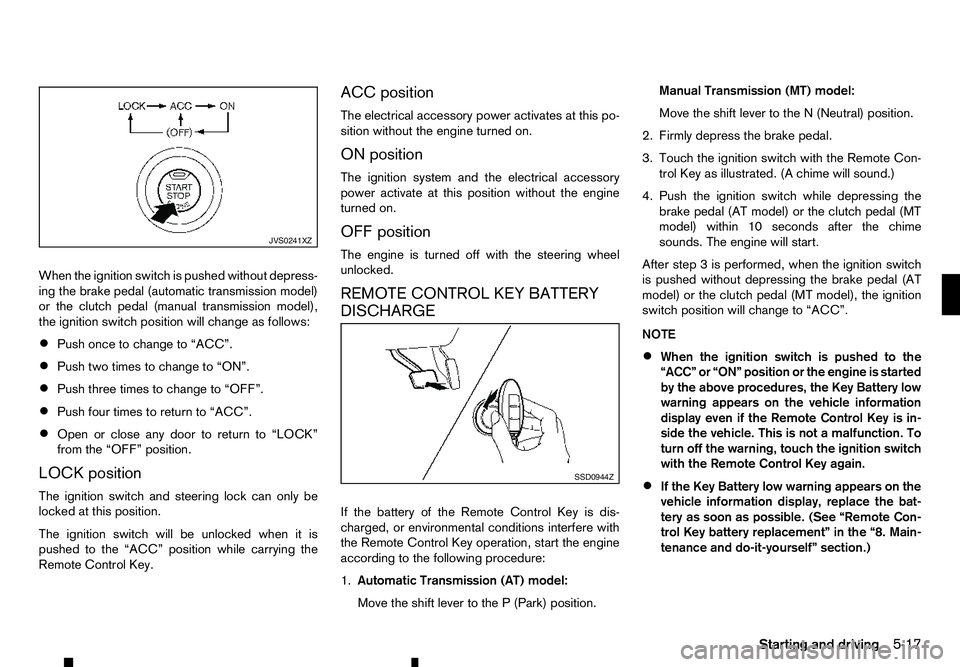
When the ignition switch is pushed without depress-
ing the brake pedal (automatic transmission model)
or the clutch pedal (manual transmission model),
the ignition switch position will change as follows:
• Push once to change to “ACC”.
• Push two times to change to “ON”.
• Push three times to change to “OFF”.
• Push four times to return to “ACC”.
• Open or close any door to return to “LOCK”
from the “OFF” position.
LOCK position
The ignition switch and steering lock can only be
locked at this position.
The ignition switch will be unlocked when it is
pushed to the “ACC” position while carrying the
Remote Control Key. ACC position
The electrical accessory power activates at this po-
sition without the engine turned on.
ON position
The ignition system and the electrical accessory
power activate at this position without the engine
turned on.
OFF position
The engine is turned off with the steering wheel
unlocked.
REMOTE CONTROL KEY BATTERY
DISCHARGE
If the battery of the Remote Control Key is dis-
charged, or environmental conditions interfere with
the Remote Control Key operation, start the engine
according to the following procedure:
1.
Automatic Transmission (AT) model:
Move the shift lever to the P(Park) position. Manual Transmission (MT) model:
Move the shift lever to the
N(Neutral) position.
2. Firmly depress the brake pedal.
3. Touch the ignition switch with the Remote Con- trol Key as illustrated. (A chime will sound.)
4. Push the ignition switch while depressing the brake pedal (AT model) or the clutch pedal (MT
model) within 10 seconds after the chime
sounds. The engine will start.
After step 3isperformed, when the ignition switch
is pushed without depressing the brake pedal (AT
model) or the clutch pedal (MT model), the ignition
switch position will change to “ACC”.
NOTE
• When the ignition switch is pushed to the
“ACC” or “ON” position or the engine is started
by the above procedures, the Key Battery low
warning appears on the vehicle information
display even if the Remote Control Key is in-
side the vehicle. This is not
amalfunction. To
turn off the warning, touch the ignition switch
with the Remote Control Key again.
• If the Key Battery low warning appears on the
vehicle information display, replace the bat-
tery as soon as possible. (See “Remote Con-
trol Key battery replacement” in the “8. Main-
tenance and do-it-yourself” section.) JVS0241XZ
SSD0944Z
Starting and driving
5-17
Page 220 of 340
1. Apply the parking brake.
2. Depress the footbrake pedal.
3. Automatic Transmission (AT) model:
Move the shift lever to the P(Park) or the N(Neu-
tral) position.
The starter is designed to operate only when
the shift lever is in the proper position.
Manual Transmission (MT) model:
Move the shift lever to the N(Neutral) position
and depress the clutch pedal to the floor while
starting the engine.
4. Crank the engine with your foot off the accelera- tor pedal by turning the ignition switch to the
For diesel engine models: Turn the ignition
switch to the
glow plug indicator light turns off.
5. Immediately release the ignition switch when the engine starts. If the engine starts, but fails to run,
repeat the above procedures.
6. Allow the engine to idle for at least 30 seconds after starting the engine to warm-up. Drive at
moderate speeds for ashort distance first, espe-
cially in cold weather.
CAUTION
Do not leave the vehicle unattended while the
engine is warming up. 1. Apply the parking brake.
2.
Automatic Transmission (AT) model:
Move the shift lever to the P(Park) or the N(Neu-
tral) position.
The starter is designed to operate only when
the shift lever is in the proper position.
Manual Transmission (MT) model:
Move the shift lever to the N(Neutral) position.
The Remote Control Key must be carried when operating the ignition switch.
3. Place the ignition switch in the “ON” position. Depress the brake pedal (AT model) or the clutch
pedal (MT model) and push the ignition switch to
start the engine.
For diesel engine models: Wait until the glow
plug indicator light goes out.
To start the engine immediately, push and re-
lease the ignition switch while depressing the
brake pedal or clutch pedal with the ignition
switch in any position.
4. Immediately release the ignition switch when the engine starts. If the engine starts, but fails to run,
repeat the above procedures.
5. Allow the engine to idle for at least 30 seconds after starting the engine to warm-up. Drive at
moderate speeds for ashort distance first, espe-
cially in cold weather. CAUTION
Do not leave the vehicle unattended while the
engine is warming up.
6. To stop the engine, move the shift lever to the P (Park) (AT model) or N(Neutral) (MT model) po-
sition, apply the parking brake, and push the igni-
tion switch to the “OFF” position.
STARTING ENGINE (models
without Remote Control Key system)
STARTING ENGINE (models with
Remote Control Key system)
5-18 Starting and driving
Page 224 of 340
its normal operating condition. If it does not re-
turn to its normal operating condition, have an
approved dealer or qualified workshop check the
transmission and repair it if necessary.
DRIVING WITH MANUAL
TRANSMISSION (MT) WARNING
• Do not downshift abruptly on slippery roads.
This may cause aloss of control.
• Do not over-rev the engine when shifting to a
lower gear. This may cause
aloss of vehicle
control or engine damage.
CAUTION
• Do not rest your foot on the clutch pedal while
driving. This may damage the clutch system.
• Fully depress the clutch pedal before shifting
to help prevent transmission damage.
• Stop the vehicle completely before shifting
into the
R(Reverse) position.
• When the vehicle is stopped for
aperiod of
time, for example, waiting at stoplights, shift
to the N(Neutral) position and release the
clutch pedal with the footbrake pedal
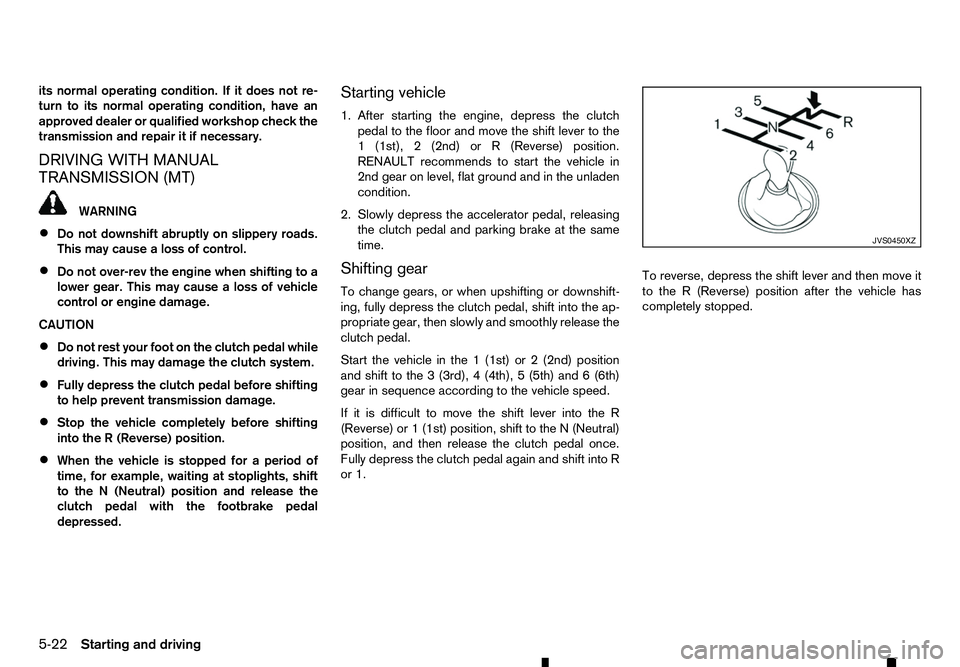
depressed. Starting vehicle
1. After starting the engine, depress the clutch
pedal to the floor and move the shift lever to the
1( 1st), 2(2nd) or R(Reverse) position.
RENAULT recommends to start the vehicle in
2nd gear on level, flat ground and in the unladen
condition.
2. Slowly depress the accelerator pedal, releasing the clutch pedal and parking brake at the same
time.
Shifting gear
To change gears, or when upshifting or downshift-
ing, fully depress the clutch pedal, shift into the ap-
propriate gear, then slowly and smoothly release the
clutch pedal.
Start the vehicle in the 1(1st) or 2(2nd) position
and shift to the 3(3rd), 4(4th), 5(5th) and 6(6th)
gear in sequence according to the vehicle speed.
If it is difficult to move the shift lever into the R
(Reverse) or 1(1st) position, shift to the N(Neutral)
position, and then release the clutch pedal once.
Fully depress the clutch pedal again and shift into R
or 1. To reverse, depress the shift lever and then move it
to the
R(Reverse) position after the vehicle has
completely stopped. JVS0450XZ
5-22 Starting and driving
Page 225 of 340
The Stop/Start System is designed to prevent un-
necessary fuel consumption, exhaust emissions,
and noise during ajourney:
• When you stop the vehicle with the shift lever in
N(
Neutral) and clutch pedal released, the en-
gine is turned off automatically.
• When you push the clutch pedal, the engine is
automatically turned on.
CAUTION
At the end of the journey the engine must be
stopped and ignition turned off. Lock the vehicle
as normal. Turning the ignition switch OFF will
shut down all electrical systems. Failure to do
this may result in aflat battery.
NOTE
For model with Stop/Start System, use the spe-
cial battery that is enhanced in regard to the
charge-discharge capacity and life performance.
Avoid using anon-special battery for the Stop/
Start System, as this may cause early deteriora-
tion of the battery or amalfunction of the Stop/
Start System. For the battery, it is recommended
to use Genuine RENAULT parts. For more infor-
mation, contact an approved dealer or qualified
workshop.
NOTE
The Stop/Start System will not activate under
the following conditions:
• When the engine is kept idling without any
driving after the engine is turned on. •
When the engine coolant temperature is low.
• When the battery capacity is low.
• When the battery temperature is low.
• When the vehicle is moved.
• When the vacuum in the brake servo
decreases.
• When the engine bonnet is opened with the
engine running.
• When the engine is turned on with the engine
bonnet open.
• When the driver’s seat belt is not fastened.
• When the driver’s door is open.
• When the Stop/Start System indicator blinks
at
alow speed.
• When the fan speed control is in any position
other than OFF (0) while the air flow control is
in the front defogger position.
• When the front defogger switch is on.
• When the temperature inside the vehicle is
too high or low. (When the Auto air condition-
ing system is off, the Stop/Start System will
operate.)
• When the fan speed of the air conditioner is
set to the maximum speed.
• When the Stop/Start OFF switch is turned on.
• When the power consumption is large. •
When the vehicle is travelling at altitudes
higher than 2000
m(6562 ft) (MT model).
• For Manual Transmission (MT) models
• When the shift lever is in any position except
the
N(Neutral) position.
• When the clutch pedal is depressed.
• When the Remote Control Key is not in the
vehicle.
• When the steering wheel is turning or turned
more than 45 degrees.
NOTE
The engine will not restart even if the clutch pedal
is pressed while the Stop/Start System is acti-
vated under the following condition:
• When the engine bonnet is opened.
• When the driver seat belt is unfastened and
the driver’s door is opened.
• When the shift lever is not in the
N(Neutral)
position.
NOTE
It may take some time until the Stop/Start Sys-
tem activates under the following conditions:
• When the battery is discharged.
• When the outside temperature is low or high.
• When the battery is replaced or the battery
terminal is disconnected for extended peri-
ods and then reconnected.
STOP/START SYSTEM
(where fitted)
Starting and driving5-23
Page 226 of 340
NOTE
When the Stop/Start System indicator illumi-
nates, the engine starts running automatically
under at least one of the following conditions:
• The battery voltage becomes low (due to elec-
trical load from other vehicle systems like
headlights, heaters, etc., or auxiliary devices
connected to the 12 volt socket inside the
vehicle).
• The vehicle speed is above about
2km/h (1
MPH).
• The front defogger is operated.
• When the temperature inside the vehicle is
too high or low. (When the air conditioner is
off, the Stop/Start System will operate.)
• When the front defogger is turned on. (The
engine may not start depending on the out-
side temperature.)
• When the battery capacity is low.
• When the power consumption is high.
• When the clutch pedal is depressed.
CAUTION
Only engage gear when the clutch pedal is fully
depressed. NOTE
The following conditions will prevent the Stop/
Start System from automatically restarting the
engine. Starting the engine with the ignition
switch operation is then necessary:
• The driver’s seat belt is unfastened, and driv-
er’s door is open.
• The bonnet is open.
Use this system while waiting at stoplight, etc. When
the vehicle is stopped for long periods of time, turn
off the engine.
When the engine is stopped by the Stop/Start Sys-
tem, heating, cooling and dehumidifying functions
will be deactivated. To avoid the air conditioning
functions from being deactivated, turn off the Idling
Stop mode by pressing the Stop/Start OFF switch.
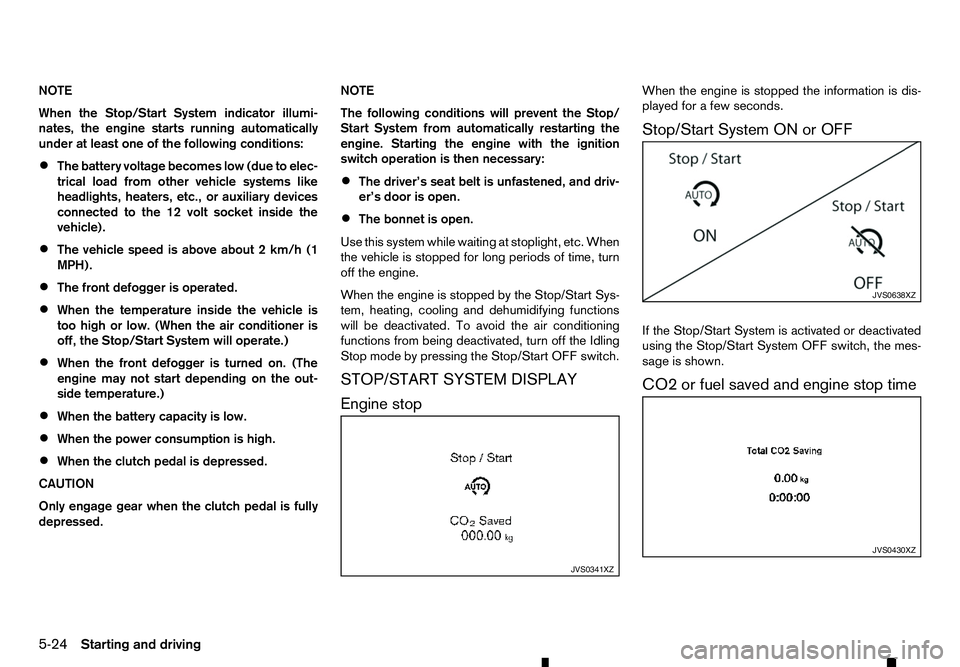
STOP/START SYSTEM DISPLAY
Engine stop When the engine is stopped the information is dis-
played for
afew seconds.
Stop/Start System ON or OFF
If the Stop/Start System is activated or deactivated
using the Stop/Start System OFF switch, the mes-
sage is shown.
CO2 or fuel saved and engine stop time JVS0341XZ JVS0638XZ
JVS0430XZ
5-24 Starting and driving
Page 230 of 340
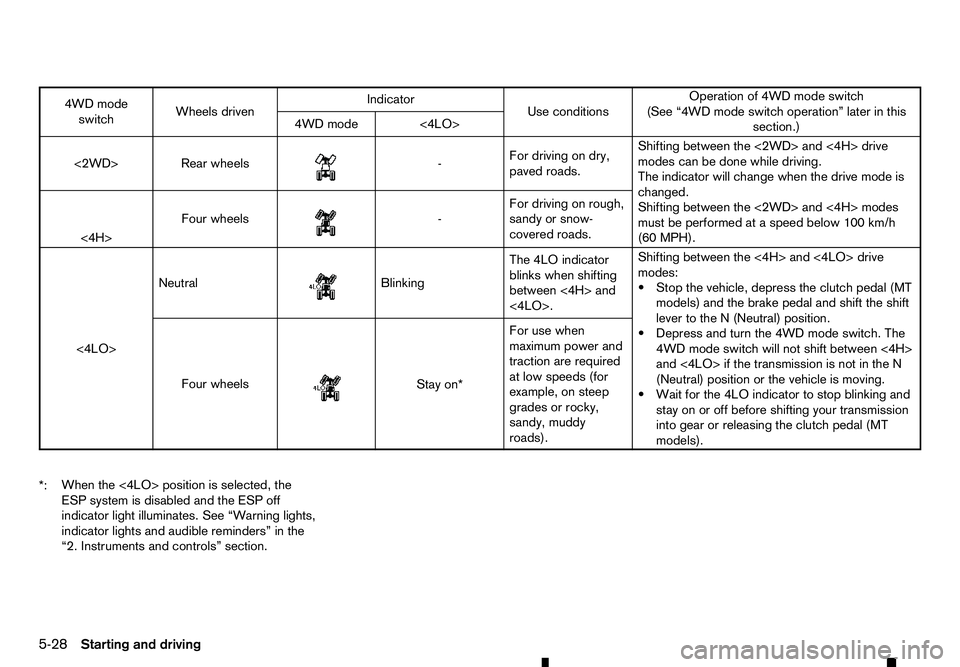
4WD mode
switch Wheels driven Indicator
Use conditions Operation of 4WD mode switch
(See “4WD mode switch operation” later in this section.)
4WD mode <4LO>
<2WD> Rear wheels
m -
For
driving on dry,
paved roads. Shifting between the <2WD> and <4H> drive
modes can be done while driving.
The indicator will change when the drive mode is
changed.
Shifting between the <2WD> and <4H> modes
must be performed at
aspeed below 100 km/h
(60 MPH).
<4H> Four wheels
m -
For
driving on rough,
sandy or snow-
covered roads.
<4LO> Neutral
m Blinking
The
4LO indicator
blinks when shifting
between <4H> and
<4LO>. Shifting between the <4H> and <4LO> drive
modes:
•S
top the vehicle, depress the clutch pedal (MT
models) and the brake pedal and shift the shift
lever to the N(Neutral) position.
•D epress and turn the 4WD mode switch. The
4WD mode switch will not shift between <4H>
and <4LO> if the transmission is not in the N
(Neutral) position or the vehicle is moving.
•W ait for the 4LO indicator to stop blinking and
stay on or off before shifting your transmission into gear or releasing the clutch pedal (MT
models).
Four wheels
m Stay
on*
For use when
maximum power and
traction are required
at low speeds (for
example, on steep
grades or rocky,
sandy, muddy
roads).
*: When the <4LO> position is selected, the
ESP system is disabled and the ESP off
indicator light illuminates. See “Warning lights,
indicator lights and audible reminders” in the
“2. Instruments and controls” section.
5-28 Starting and driving