phone RENAULT ALASKAN 2017 Owners Manual
[x] Cancel search | Manufacturer: RENAULT, Model Year: 2017, Model line: ALASKAN, Model: RENAULT ALASKAN 2017Pages: 340, PDF Size: 6.93 MB
Page 11 of 340

1.
Inside rearview mirror (P. 3-23)
2. Sunglasses holder* (P. 2-40)
3. Microphone*
—B
luetooth® Hands-Free Phone System*
(P. 4-59, P. 4-65)
4. Sunroof switch* (P. 2-42)
5. Map lights (P. 2-43) 6.
Sun visors (P. 2-41)
7. Room light* (P. 2-44)
8. Rear personal light* (P. 2-45)
9. Console box* (P. 2-40)
—P
ower outlet (P. 2-38)
10. Cup holders* (P. 2-40) 11.
Door armrest
—P
ower window controls* (P. 2-36)
—P ower door lock switch (driver’s door)*
(P. 3-4)
—O utside rearview mirror remote control
switch (driver’s door)* (P. 3-25)
*: where fitted NIC2792
PASSENGER COMPARTMENT
Illustrated table of contents0-5
Page 12 of 340

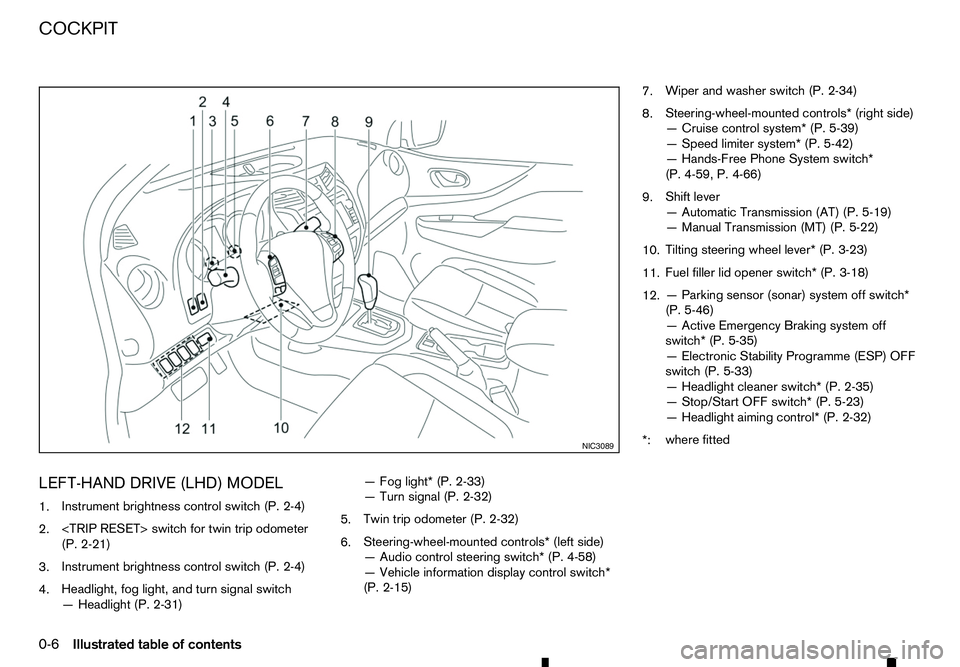
LEFT-HAND DRIVE (LHD) MODEL
1. Instrument brightness control switch (P. 2-4)
2.
(P. 2-21)
3. Instrument brightness control switch (P. 2-4)
4. Headlight, fog light, and turn signal switch
—H
eadlight (P. 2-31) —F
og light* (P. 2-33)
—T urn signal (P. 2-32)
5. Twin trip odometer (P. 2-32)
6. Steering-wheel-mounted controls* (left side)
—A
udio control steering switch* (P. 4-58)
—V ehicle information display control switch*
(P. 2-15) 7.
Wiper and washer switch (P. 2-34)
8. Steering-wheel-mounted controls* (right side)
—C
ruise control system* (P. 5-39)
—S peed limiter system* (P. 5-42)
—H ands-Free Phone System switch*
(P. 4-59, P. 4-66)
9. Shift lever
—A
utomatic Transmission (AT) (P. 5-19)
—M anual Transmission (MT) (P. 5-22)
10. Tilting steering wheel lever* (P. 3-23)
11. Fuel filler lid opener switch* (P. 3-18)
12. —P
arking sensor (sonar) system off switch*
(P. 5-46)
—A ctive Emergency Braking system off
switch* (P. 5-35)
—E lectronic Stability Programme (ESP) OFF
switch (P. 5-33)
—H eadlight cleaner switch* (P. 2-35)
—S top/Start OFF switch* (P. 5-23)
—H eadlight aiming control* (P. 2-32)
*: where fitted NIC3089
COCKPIT
0-6
Illustrated table of contents
Page 13 of 340

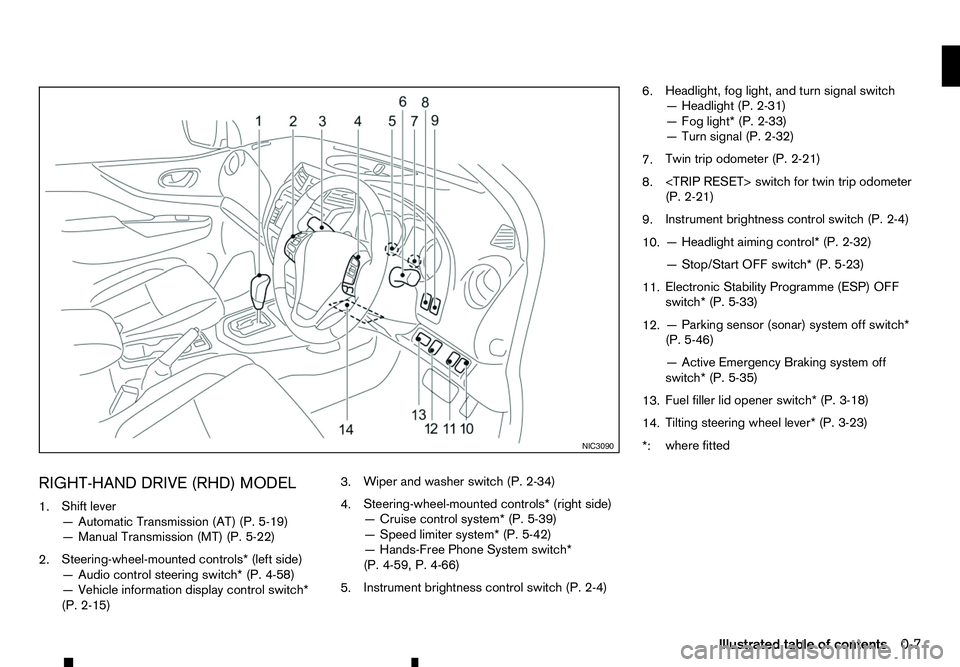
RIGHT-HAND DRIVE (RHD) MODEL
1. Shift lever
—A
utomatic Transmission (AT) (P. 5-19)
—M anual Transmission (MT) (P. 5-22)
2. Steering-wheel-mounted controls* (left side)
—A
udio control steering switch* (P. 4-58)
—V ehicle information display control switch*
(P. 2-15) 3.
Wiper and washer switch (P. 2-34)
4. Steering-wheel-mounted controls* (right side)
—C
ruise control system* (P. 5-39)
—S peed limiter system* (P. 5-42)
—H ands-Free Phone System switch*
(P. 4-59, P. 4-66)
5. Instrument brightness control switch (P. 2-4) 6.
Headlight, fog light, and turn signal switch
—H
eadlight (P. 2-31)
—F og light* (P. 2-33)
—T urn signal (P. 2-32)
7. Twin trip odometer (P. 2-21)
8.
(P. 2-21)
9. Instrument brightness control switch (P. 2-4)
10. —H
eadlight aiming control* (P. 2-32)
—S top/Start OFF switch* (P. 5-23)
11. Electronic Stability Programme (ESP) OFF
switch* (P. 5-33)
12. —P
arking sensor (sonar) system off switch*
(P. 5-46)
—A ctive Emergency Braking system off
switch* (P. 5-35)
13. Fuel filler lid opener switch* (P. 3-18)
14. Tilting steering wheel lever* (P. 3-23)
*: where fitted NIC3090
Illustrated table of contents
0-7
Page 76 of 340
![RENAULT ALASKAN 2017 Owners Manual [Turn Indicator]:
Select this sub-menu to enable/disable the items
described below to ONorOFF.
• [3 Flash On]
Select this sub-menu to enable/disable the [3
Flash On] lane change signal feature. See, RENAULT ALASKAN 2017 Owners Manual [Turn Indicator]:
Select this sub-menu to enable/disable the items
described below to ONorOFF.
• [3 Flash On]
Select this sub-menu to enable/disable the [3
Flash On] lane change signal feature. See,](/img/7/58394/w960_58394-75.png)
[Turn Indicator]:
Select this sub-menu to enable/disable the items
described below to ONorOFF.
• [3 Flash On]
Select this sub-menu to enable/disable the [3
Flash On] lane change signal feature. See, “Turn
signal switch” in the “2. Instruments and
controls” section.
[Unlocking] (where fitted):
Select this sub-menu to enable/disable the items
described below to ONorOFF.
• [I-Key Door Lock]
Select this item to activate/deactivate the request
switch on the door. See, “Doors” in the “3. Pre-
driving checks and adjustments” section.
[Wipers]:
Select this sub-menu to enable/disable the items
described below to ONorOFF.
• [Speed Dependent]
Select this item to activate/deactivate the speed
dependent wiper speed feature. See, “Wiper
and washer switch” in the “2. Instruments and
controls” section.
[Maintenance]
The following sub-menus are available under the
[Maintenance] menu.
• [Service] •
[Filter]
• [Tyre]
• [Other]
[Service] (where fitted):
Select this item to show the remaining distance until
servicing is required.
To reset the service indicator, push
select [Yes].
The distance to service interval cannot be adjusted
manually. The interval is set automatically.
NOTE
Be sure the distance to service indicator is reset
after servicing. Otherwise, the service indicator
will continue to be displayed.
[Filter] (where fitted):
Select this item to set or reset the distance for re-
placing the oil filter.
The distance can be set from [———](off) to
30.000 km in 500 km increments.
[Tyre]:
Select this item to set or reset the distance for re-
placing the tyres.
The distance can be set from [———](off) to
30.000 km in 500 km increments. [Other]:
Select this item to set or reset
areminder for replac-
ing something other than service, the oil filter, or
tyres.
The distance can be set from [———](off) to
30.000 km in 500 km increments.
[Alert]
The following items are available under the [Alert]
menu.
• [Timer]
• [Navigation] (where fitted)
• [Phone] (where fitted)
• [Mail] (where fitted)
[Timer]:
Select this sub-menu to specify when the [Time for
ad river break?] message activates.
The time can be set from [———](off) to6hours
in increments of 30 minutes.
[Navigation] (where fitted):
Select this item to enable/disable the navigation sys-
tem information in the vehicle information display.
[Phone] (where fitted):
Select this item to enable/disable incoming call in-
formation in the vehicle information display.
[Mail] (where fitted):
Select this item to enable/disable incoming mail in-
formation in the vehicle information display.
2-18 Instruments and controls
Page 112 of 340

The Remote Control Key is always communicating
with the vehicle as it receives radio waves. The Re-
mote Control Key system transmits weak radio
waves. Environmental conditions may interfere with
the operation of the Remote Control Key system
under the following operating conditions.
• When operating near
alocation where strong
radio waves are transmitted, such as aTVtower,
power station and broadcasting station.
• When in possession of wireless equipment, such
as am obile telephone, transceiver, and CB ra-
dio.
• When the Remote Control Key is in contact with
or covered by metallic materials.
• When any type of radio wave remote control is
used nearby.
• When the Remote Control Key is placed near an
electric appliance such as
apersonal computer.
In such cases, correct the operating conditions be-
fore using the Remote Control Key function or use
the mechanical key.
Although the life of the battery varies depending on
the operating conditions, the battery’s life is approxi-
mately 2years. If the battery is discharged, replace
it with anew one.
For information regarding replacement of abattery,
see “Remote Control Key battery replacement” in
the “8. Maintenance and do-it-yourself” section.
Since the Remote Control Key is continuously re-
ceiving radio waves, if the key is left near equipment which transmits strong radio waves, such as signals
from
aTVa nd personal computer, the battery life
may become shorter.
Because the steering wheel is locked electrically,
unlocking the steering wheel with the ignition switch
in the LOCK position is impossible when the vehicle
battery is completely discharged. Pay special atten-
tion that the vehicle battery is not completely dis-
charged.
As many as 4Remote Control Keys can be regis-
tered and used with one vehicle. For information
about the purchase and use of additional Remote
Control Keys, contact an approved dealer or quali-
fied workshop.
CAUTION
• Do not allow the Remote Control Key, which
contains electrical components, to come into
contact with water or salt water. This could
affect the system function.
• Do not drop the Remote Control Key.
• Do not strike the Remote Control Key sharply
against another object.
• Do not change or modify the Remote Control
Key.
• Wetting may damage the Remote Control Key.
If the Remote Control Key gets wet, immedi-
ately wipe until it is completely dry.
• If the outside temperature is below −10°C
(14°F), the battery of the Remote Control Key
may not function properly. •
Do not place the Remote Control Key for an
extended period in an area where tempera-
tures exceed 60°C (140°F).
• Do not attach the Remote Control Key to a
key holder that contains
amagnet.
• Do not place the Remote Control Key near
equipment that produces
amagnetic field,
such as aTV, audio equipment and personal
computers.
If an Remote Control Key is lost or stolen, RENAULT
recommends erasing the ID code of that Remote
Control Key from the vehicle. This may prevent the
unauthorised use of the Remote Control Key to op-
erate the vehicle. For information regarding the eras-
ing procedure, contact an approved dealer or quali-
fied workshop.
The Remote Control Key function can be disabled.
For information about disabling the Remote Control
Key function, contact an approved dealer or quali-
fied workshop.
3-8 Pre-driving checks and adjustments
Page 133 of 340

Phone control buttons ......................................... 4-58
Bluetooth® Hands-Free Phone System (without
navigation system and colour display)....................... 4-59 Bluetooth® mobile phone feature ........................ 4-59
Hands-free telephone control .............................. 4-61Steering wheel switches (where fitted)................ 4-64
Bluetooth® Hands-Free Phone System (with
navigation system) ................................................... 4-65 Regulatory information ........................................ 4-65 Control buttons and microphone ......................... 4-66
Pairing procedure ............................................... 4-66
Phonebook ......................................................... 4-67
Making
acall ...................................................... 4-67
Receiving acall................................................... 4-67
During acall ....................................................... 4-67
Ending acall ....................................................... 4-67
Bluetooth® settings ............................................ 4-67
Telephone setup ................................................. 4-68
Page 134 of 340

WARNING
• Do not adjust the heater and air conditioner
controls or audio controls while driving so that full attention may be given to vehicle opera-
tion.
• If you noticed any foreign objects entering the
system hardware, spilled liquid on the sys-
tem, or noticed smoke or fumes coming out
from the system, or any other unusual opera-
tion is observed, stop using the system imme-
diately and contact the nearest approved
dealer or qualified workshop. Ignoring such
conditions may lead to an accident, fire or electric shock.
• Do not disassemble or modify this system. If
you do, it may lead to an accident, fire, or
electric shock.
CAUTION
Do not use the system when the engine is not
running for extended periods of time to prevent
battery discharge.
1.Phone button (P. 4-65)
2. Power/VOL (volume) dial
3. Display screen (P. 4-3)
4.
5.
6. Audio control buttons 7.
8. For navigation system control buttons refer to
the separate Navigation System Owner’s
Manual.
9. Brightness control/display ON·OFF button
(P. 4-3)
10.
SAFETY PRECAUTIONS
CENTRE MULTI-FUNCTION CONTROL PANEL (models with navigation
system)
4-2 Display screen, heater and air conditioner, and audio system
Page 137 of 340
![RENAULT ALASKAN 2017 Owners Manual –[
Software Licenses]
• [Navigation]
• [Telephone
&Bluetooth]
• [Traffic Messages]
• [Radio]
[Audio] settings
Audio settings can be adjusted from the audio setup
screen.
This item is availab RENAULT ALASKAN 2017 Owners Manual –[
Software Licenses]
• [Navigation]
• [Telephone
&Bluetooth]
• [Traffic Messages]
• [Radio]
[Audio] settings
Audio settings can be adjusted from the audio setup
screen.
This item is availab](/img/7/58394/w960_58394-136.png)
–[
Software Licenses]
• [Navigation]
• [Telephone
&Bluetooth]
• [Traffic Messages]
• [Radio]
[Audio] settings
Audio settings can be adjusted from the audio setup
screen.
This item is available only when the audio system is
turned on.
1. Push the
2. Touch the [Audio] key.
3. Select the item you wish to adjust.
[Bass]/[Treble]/[Balance]/[Fade]:
Touch the adjustment bar next to the corresponding
keys on the display to adjust the tone quality and
speaker balance.
The levels of these features can also be adjusted
with the
[Speed Sensitive Vol.]:
Speed sensitive volume function increases the vol-
ume of the audio system as the speed of the vehicle
increases. Choose the desired effect level from 0
(OFF) to 5. The higher the setting, the more the vol-
ume increases in relation to vehicle speed. [AUX Level]:
This feature controls the volume level of incoming
sound when an auxiliary device is connected to the
system. Select the level from [Quiet], [Medium], and
[Loud].
[System settings]
Various system settings can be adjusted from the
system settings.
1. Push the
2. Select the [System] key.
3. Select the item you wish to adjust.
[Display]:
Select the corresponding keys to adjust the set-
tings.
• [Brightness]:
Adjusts the brightness of the display.
• [Display Mode]:
Adjusts to fit the level of lighting in the vehicle.
Touch the [Display Mode] key to cycle through
options of the mode ([Day], [Night] and [Auto]).
• [Scroll Direction]:
Adjusts the direction of the menu scroll. Choose
either the up arrow or down arrow. [Clock]:
Select the corresponding keys to adjust the set-
tings.
• [Time Format]:
The time format setting can be selected from 12
hour and 24 hour formats.
• [Date Format]:
The day, month and year display can be selected
from five formats.
• [Clock Mode]:
Select the clock mode from [Manual], [Time
Zone] and [Auto].
When [Manual] is selected, you can set the clock
mode manually with the [Set Clock Manually]
key.
Select [Auto] to automatically maintain the time
using GPS.
• [Set Clock Manually]:
Mode (AM/PM) (where fitted), Hours, Minutes,
Day, Month and Year can be set manually if
“Manual” is selected in the Clock Mode setting.
• [Daylight Savings Time]:
Turns the daylight savings time ON or OFF.
• [Time Zone]:
Select the applicable time zone from the list.
Display screen, heater and air conditioner, and audio system 4-5
Page 138 of 340
![RENAULT ALASKAN 2017 Owners Manual [Language]:
Select
alanguage to be displayed on the screen.
[Camera Settings] (where fitted):
See “How to adjust the screen” later in this section
for details.
[Temperature Unit]:
Select the tempe RENAULT ALASKAN 2017 Owners Manual [Language]:
Select
alanguage to be displayed on the screen.
[Camera Settings] (where fitted):
See “How to adjust the screen” later in this section
for details.
[Temperature Unit]:
Select the tempe](/img/7/58394/w960_58394-137.png)
[Language]:
Select
alanguage to be displayed on the screen.
[Camera Settings] (where fitted):
See “How to adjust the screen” later in this section
for details.
[Temperature Unit]:
Select the temperature unit from °C and °F.
[Touch Click]:
Turns the touch screen click feature on or off. When
turned on, aclick sound will be heard every time a
key on the screen is touched.
[Beep Tones]:
Turns the beep tones feature on or off. When turned
on, abeep sound will be heard as apop-up mes-
sage appears on the screen.
[Factory Settings]:
Select this key to return all settings to default.
[Software Licenses] (where fitted):
Select this key to view software licence information.
[System Software Version:]:
This key shows the current software version num-
ber.
[Navigation] settings
Navigation settings can be changed. See Naviga-
tion System Owner’s Manual for details. [Telephone
&Bluetooth] settings
Telephone &Bluetooth settings can be changed.
See “Bluetooth® Hands-Free Phone System (with
navigation system)” later in this section for details.
[Traffic Messages] settings
Traffic information guidance, announcement and
warning settings can be adjusted.
Traffic Announcement (TA) information can be re-
ceived only in areas where the service is available.
[Radio] settings
[RDS Reg]:
RDS messages can be turned ON or OFF. When
this item is turned ON, the received RDS informa-
tion will be shown on the audio screen.
RDS information can be received only in areas
where the service is available.
[Traffic Announcement]:
Traffic Announcement (TA) related messages can
be turned ON or OFF. When this item is turned ON,
the received traffic announcement information will
be tuned to automatically when received.
Traffic Announcement (TA) information can be re-
ceived only in areas where the service is available.
4-6 Display screen, heater and air conditioner, and audio system
Page 163 of 340

Air conditioner filter
The air conditioner system is equipped with an air
conditioner filter which collects and neutralises dirt,
pollen, dust, etc. To make sure that the air condi-
tioner heats, defogs and ventilates efficiently, re-
place the filter in accordance with the specified
maintenance intervals listed in the separate mainte-
nance booklet. To replace the filter, contact an ap- proved dealer or qualified workshop.
The filter should be replaced if the air flow decreases
significantly or if windows fog up easily when oper-
ating the heater or air conditioner. AUDIO OPERATION PRECAUTIONS WARNING
Do not adjust the audio system while driving so
that full attention may be given to vehicle opera-
tion.
Radio
• Radio reception is affected by station signal
strength, distance from radio transmitter, build-
ings, bridges, mountains and other external influ-
ences. Intermittent changes in reception quality
normally are caused by these external influences.
• Using
amobile phone in or near the vehicle may
influence radio reception quality. Compact Disc (CD) player
•
During cold weather or rainy days, the player
may malfunction due to the humidity. If this oc-
curs, remove the CD from CD player and dehu-
midify or ventilate the player completely.
• The player may skip while driving on rough roads. SAA0480
AUDIO SYSTEM (where fitted)
Display screen, heater and air conditioner, and audio system 4-31