display RENAULT CLIO 2012 X85 / 3.G Owner's Manual
[x] Cancel search | Manufacturer: RENAULT, Model Year: 2012, Model line: CLIO, Model: RENAULT CLIO 2012 X85 / 3.GPages: 268, PDF Size: 8.73 MB
Page 79 of 268
Downloaded from www.Manualslib.com manuals search engine clock ..................................................... (up to the end of the DU)
clock ..................................................... (up to the end of the DU)
control instruments ............................... (up to the end of the DU)
1.73
ENG_UD24926_3
Heure et température extérieure (X85 - B85 - C85 - S85 - K85 - Re\
nault)
ENG_NU_853-7_BCSK85_Renault_1
Clock and exterior temperature
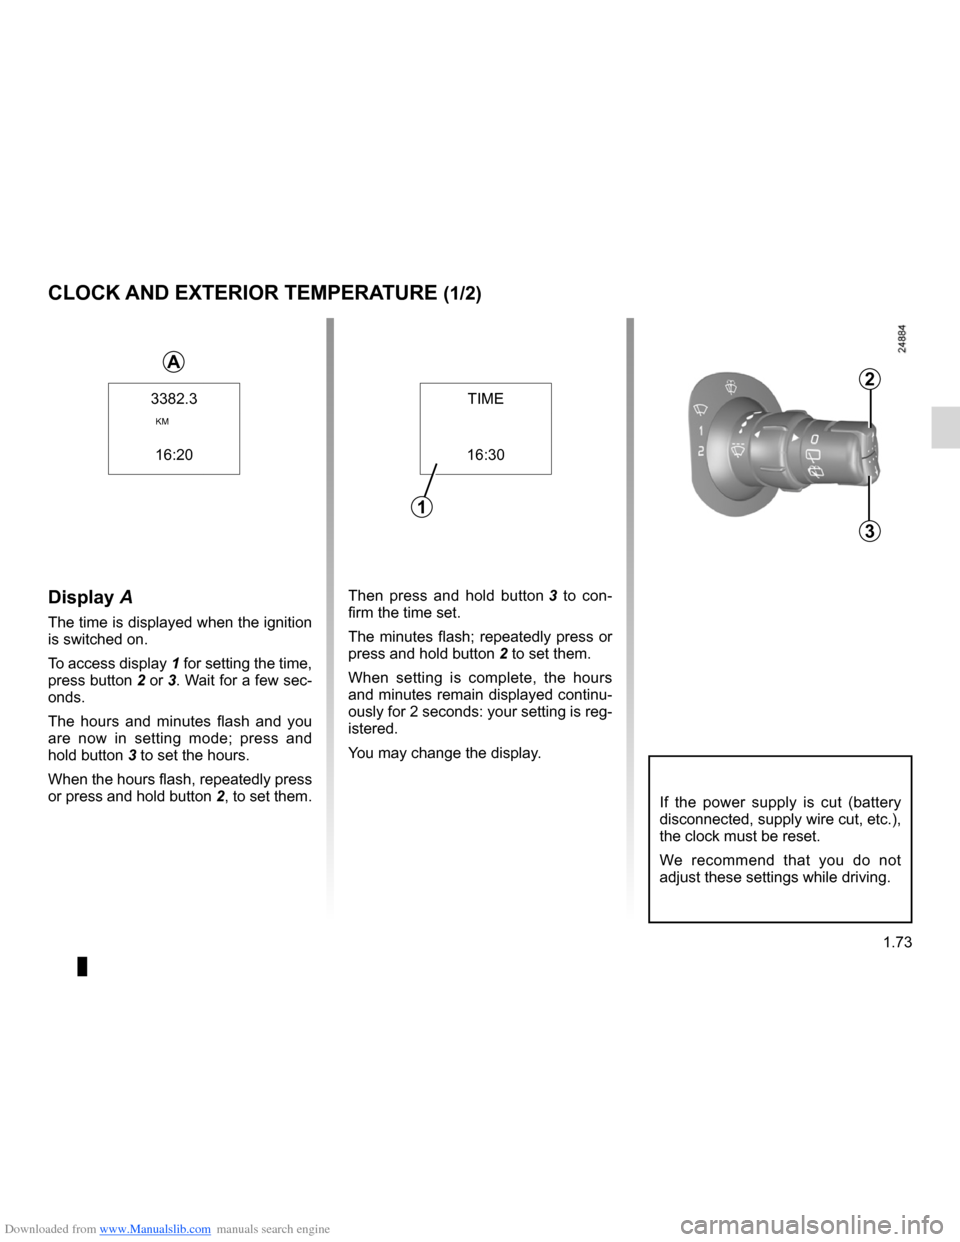
Then press and hold button 3 to con -
firm the time set.
The minutes flash; repeatedly press or
press and hold button 2 to set them.
When setting is complete, the hours
and minutes remain displayed continu -
ously for 2 seconds: your setting is reg-
istered.
You may change the display.Display A
The time is displayed when the ignition
is switched on.
To access display 1 for setting the time,
press button 2 or 3. Wait for a few sec-
onds.
The hours and minutes flash and you
are now in setting mode; press and
hold button 3 to set the hours.
When the hours flash, repeatedly press
or press and hold button 2, to set them.
CLOCK AND EXTERIOR TEMPERATURE (1/2)
2
3
If the power supply is cut (battery
disconnected, supply wire cut, etc.),
the clock must be reset.
We recommend that you do not
adjust these settings while driving.
TIME
16:30
1
3382.3
KM
16:20
A
Page 80 of 268
Downloaded from www.Manualslib.com manuals search engine external temperature ............................................. (current page)
1.74
ENG_UD24926_3
Heure et température extérieure (X85 - B85 - C85 - S85 - K85 - Re\
nault)
ENG_NU_853-7_BCSK85_Renault_1
Vehicles fitted with navigation aid
systems, telephones, etc.
Refer to the separate instructions for
the function to understand the special
features of this equipment.External temperature
indicator
Special note:
When the exterior temperature is - 3°C
to + 3°C, the °C characters flash (sig -
nalling a risk of ice on the road).
External temperature in -
dicator
As ice formation is related
to climatic exposure, local
air humidity and temperature, the
external temperature alone is not
sufficient to detect ice.
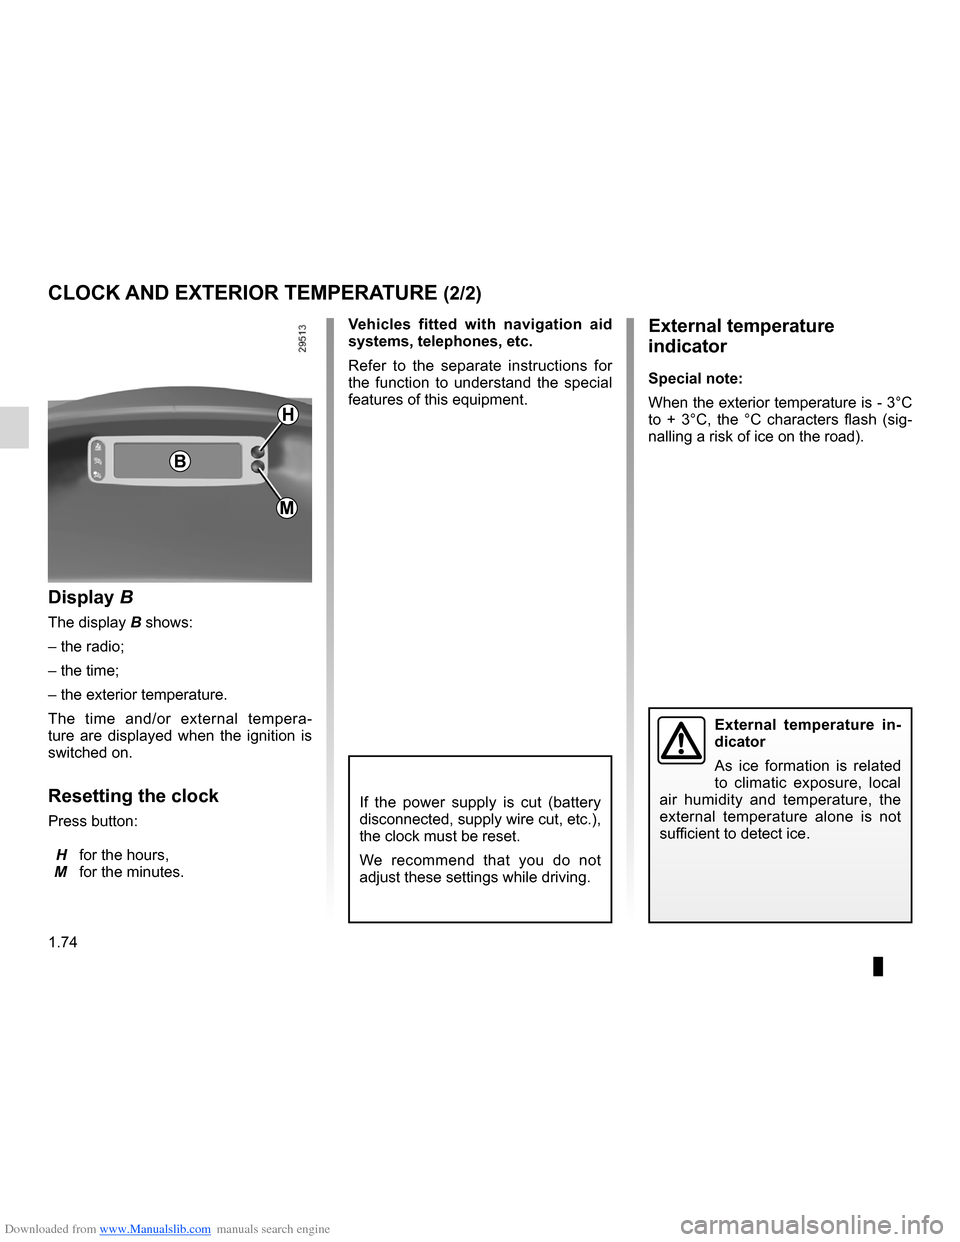
Display B
The display B shows:
– the radio;
– the time;
– the exterior temperature.
The time and/or external tempera -
ture are displayed when the ignition is
switched on.
Resetting the clock
Press button:
H for the hours,
M for the minutes.
CLOCK AND EXTERIOR TEMPERATURE (2/2)
B
H
M
If the power supply is cut (battery
disconnected, supply wire cut, etc.),
the clock must be reset.
We recommend that you do not
adjust these settings while driving.
Page 84 of 268

Downloaded from www.Manualslib.com manuals search engine lights:dipped beam headlights ................................... (current page)
lighting: see-me-home ................................................... (current page)
1.78
ENG_UD10541_1
Éclairages et signalisations extérieures (X85 - B85 - C85 - S85 -\
K85 - Renault)
ENG_NU_853-7_BCSK85_Renault_1
Jaune NoirNoir texte
EXTERIOR LIGHTING AND SIGNALS (2/5)
kDipped beam
headlights
Manual operation
Turn the end of stalk 1 until the symbol
is opposite mark 2.
An indicator light on the instrument
panel will come on. Automatic operation (depending on
vehicle)
With the engine running, the dipped
beam headlights are switched on or off
automatically depending on the level of
ambient light, without the need to oper-
ate stalk 1 (position 0).
This function can be deactivated or re-
activated.
–
To activate it, with the ignition on,
press button 4 for at least four sec-
onds. An instrument panel message
confirms this action.
– To deactivate it , with the ignition
on and the vehicle stopped, press
button 4 for at least four seconds.
The ‘Auto lights OFF’ message is
displayed on the instrument panel.
If stalk 1 is operated, it overrides and
cancels the automatic function tempo -
rarily.
See-me-home lighting
function
This function (useful, for example, for
opening a gate, a garage, etc.) enables
you to switch on dipped headlights mo-
mentarily.
With the ignition off and the headlights
off, pull stalk 1 towards you: the dipped
beam headlights come on for approxi -
mately thirty seconds.
This action may be carried out no more
than four times for a maximum lighting
period of two minutes.
To switch off the lights before they
go out automatically, turn the end of
stalk 1, then return it to position 0.
4
12
Page 97 of 268
Downloaded from www.Manualslib.com manuals search engine engine start/stop button ........................ (up to the end of the DU)
ignition switch ....................................... (up to the end of the DU)
starting the engine ................................ (up to the end of the DU)
starting the engine ................................ (up to the end of the DU)
switching on the vehicle ignition ........... (up to the end of the DU)
2.3
ENG_UD25390_2
Contacteur de démarrage : véhicule avec clé / télécommand\
e à radiofréquence (X85 - B85 - C85 - S85 - K85 - Renault)
ENG_NU_853-7_BCSK85_Renault_2
Ignition switch
Special note on vehicles with an au-
tomatic gearbox
Before starting, move the lever to posi-
tion N or P.
Special note on vehicles with a
Quickshift gearbox
Depress the brake pedal with the lever
in the N position.
Note:
If a gear other than neutral is displayed,
it flashes; starting is not possible unless
you depress the brake pedal, while
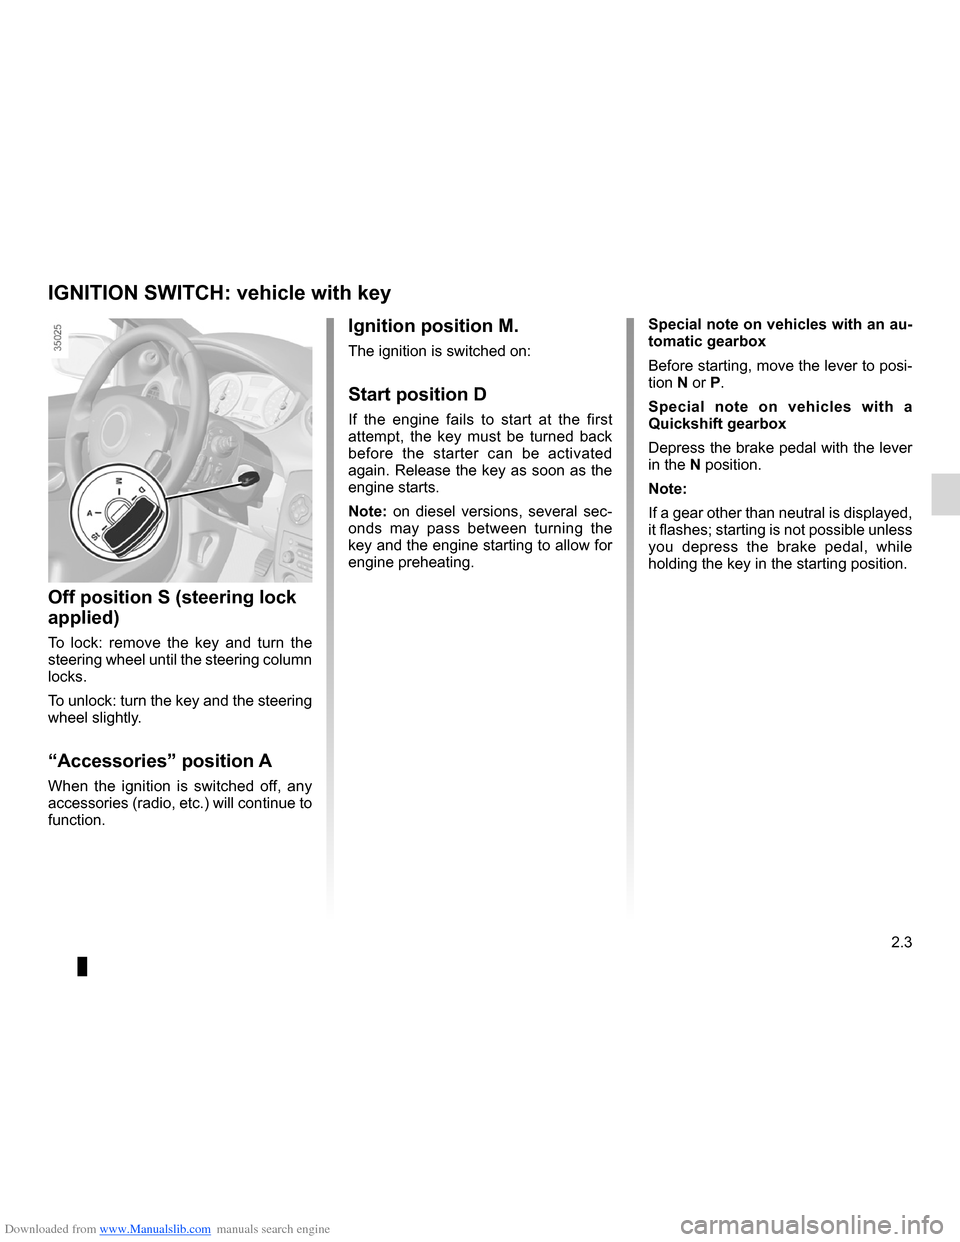
holding the key in the starting position.Ignition position M.
The ignition is switched on:
Start position D
If the engine fails to start at the first
attempt, the key must be turned back
before the starter can be activated
again. Release the key as soon as the
engine starts.
Note: on diesel versions, several sec -
onds may pass between turning the
key and the engine starting to allow for
engine preheating.
Off position S (steering lock
applied)
To lock: remove the key and turn the
steering wheel until the steering column
locks.
To unlock: turn the key and the steering
wheel slightly.
“Accessories” position A
When the ignition is switched off, any
accessories (radio, etc.) will continue to
function.
IGNITION SWITCH: vehicle with key
Page 116 of 268
Downloaded from www.Manualslib.com manuals search engine 2.22
ENG_UD10563_1
Système antipatinage : A.S.R. (X85 - B85 - C85 - S85 - K85 - Renault)
ENG_NU_853-7_BCSK85_Renault_2
Deactivating the A.S.R.
function results in the E.S.P.
function being deactivated.
Refer to the information on
the “Electronic stability program:
E.S.P.” on the following pages.
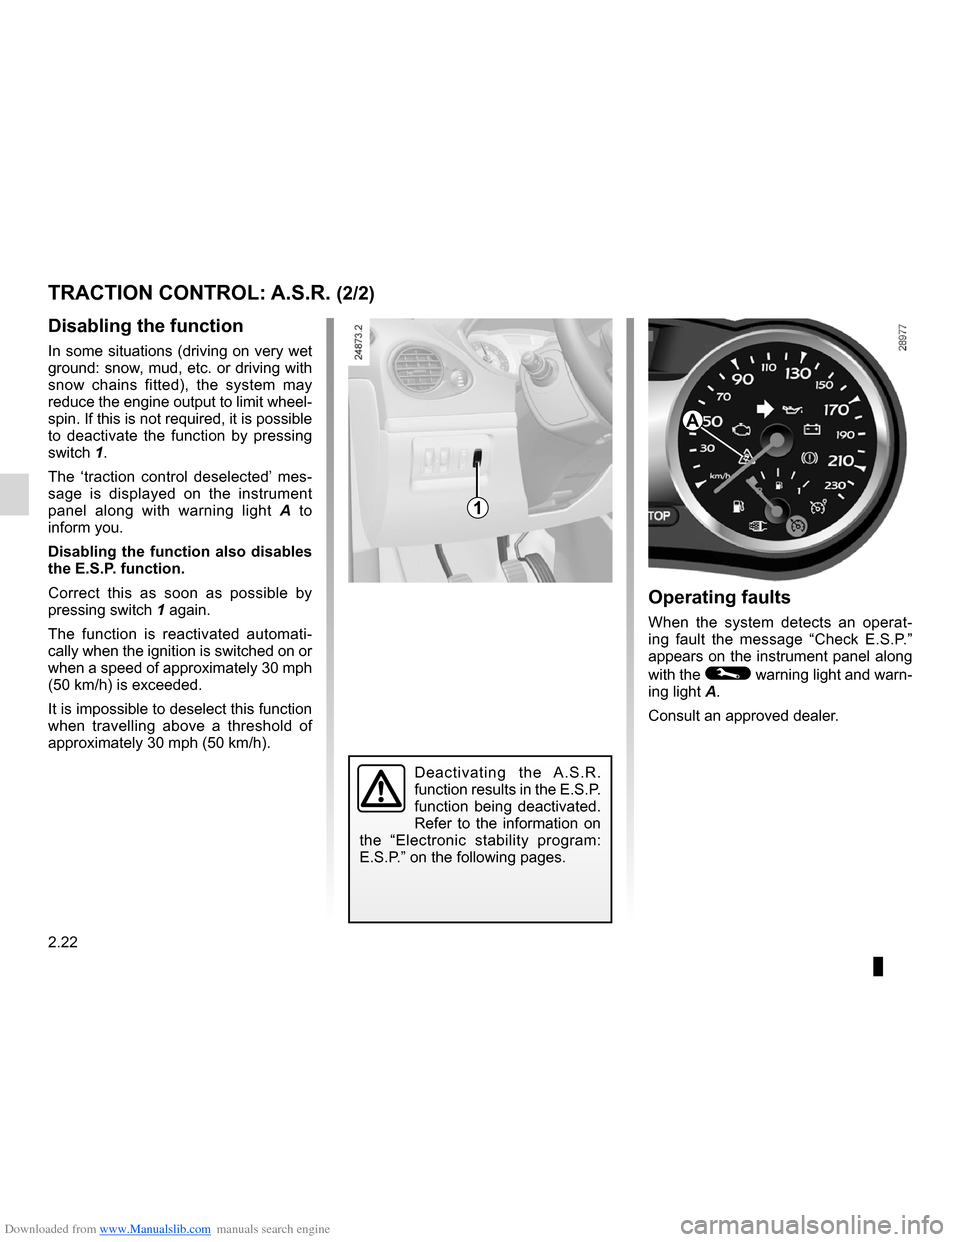
Operating faults
When the system detects an operat -
ing fault the message “Check E.S.P.”
appears on the instrument panel along
with the
© warning light and warn-
ing light A.
Consult an approved dealer.
Disabling the function
In some situations (driving on very wet
ground: snow, mud, etc. or driving with
snow chains fitted), the system may
reduce the engine output to limit wheel -
spin. If this is not required, it is possible
to deactivate the function by pressing
switch 1.
The ‘traction control deselected’ mes -
sage is displayed on the instrument
panel along with warning light A to
inform you.
Disabling the function also disables
the E.S.P. function.
Correct this as soon as possible by
pressing switch 1 again.
The function is reactivated automati -
cally when the ignition is switched on or
when a speed of approximately 30 mph
(50 km/h) is exceeded.
It is impossible to deselect this function
when travelling above a threshold of
approximately 30 mph (50 km/h).
TRACTION CONTROL: A.S.R. (2/2)
1
A
Page 120 of 268
Downloaded from www.Manualslib.com manuals search engine 2.26
ENG_UD10565_1
Régulateur-limiteur de vitesses : fonction limiteur (X85 - B85 - C85\
- S85 - K85 - Renault)
ENG_NU_853-7_BCSK85_Renault_2
CRUISE CONTROL/SPEED LIMITER: speed limiter function (3/3)
Recalling the limit speed
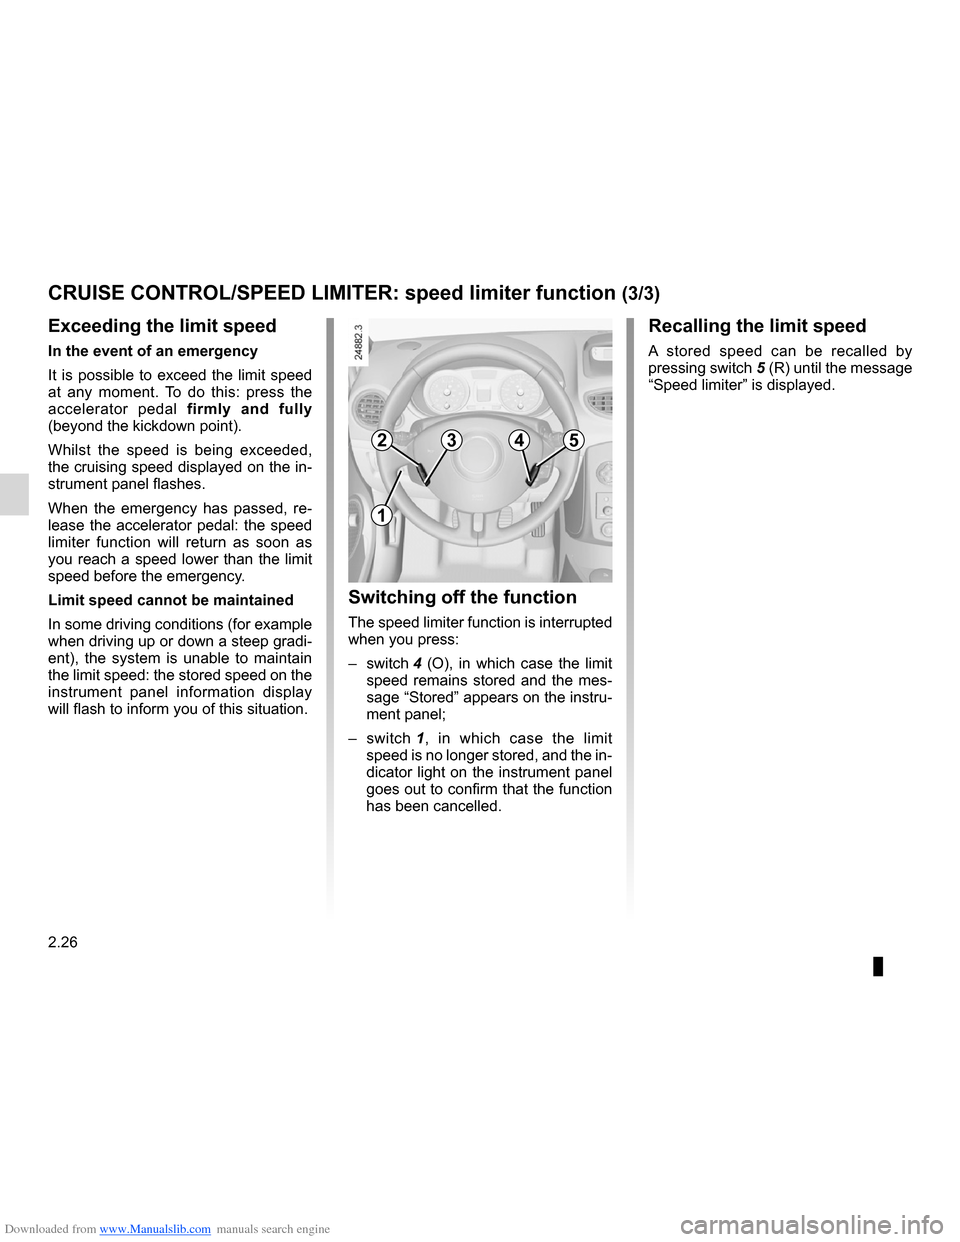
A stored speed can be recalled by
pressing switch 5 (R) until the message
“Speed limiter” is displayed.
Exceeding the limit speed
In the event of an emergency
It is possible to exceed the limit speed
at any moment. To do this: press the
accelerator pedal firmly and fully
(beyond the kickdown point).
Whilst the speed is being exceeded,
the cruising speed displayed on the in-
strument panel flashes.
When the emergency has passed, re -
lease the accelerator pedal: the speed
limiter function will return as soon as
you reach a speed lower than the limit
speed before the emergency.
Limit speed cannot be maintained
In some driving conditions (for example
when driving up or down a steep gradi -
ent), the system is unable to maintain
the limit speed: the stored speed on the
instrument panel information display
will flash to inform you of this situation.
Switching off the function
The speed limiter function is interrupted
when you press:
– switch 4 (O), in which case the limit
speed remains stored and the mes-
sage “Stored” appears on the instru-
ment panel;
– switch 1 , in which case the limit
speed is no longer stored, and the in-
dicator light on the instrument panel
goes out to confirm that the function
has been cancelled.
1
5423
Page 123 of 268
Downloaded from www.Manualslib.com manuals search engine JauneNoirNoir texte
2.29
ENG_UD22304_2
Régulateur-limiteur de vitesses : fonction régulateur (X85 - B85 \
- C85 - S85 - K85 - Renault)
ENG_NU_853-7_BCSK85_Renault_2
CRUISE CONTROL/SPEED LIMITER: cruise control function (3/4)
Exceeding the cruising speed
In the event of an emergency
The cruising speed may be exceeded
at any time by depressing the accelera -
tor pedal. While it is being exceeded,
the cruising speed flashes on the in -
strument panel.
Cruising speed cannot be main -
tained
In some driving conditions (for exam -
ple when driving down a steep gradi -
ent), the system is unable to maintain
the cruising speed: the speed on the in-
strument panel information display will
flash to inform you of this situation.
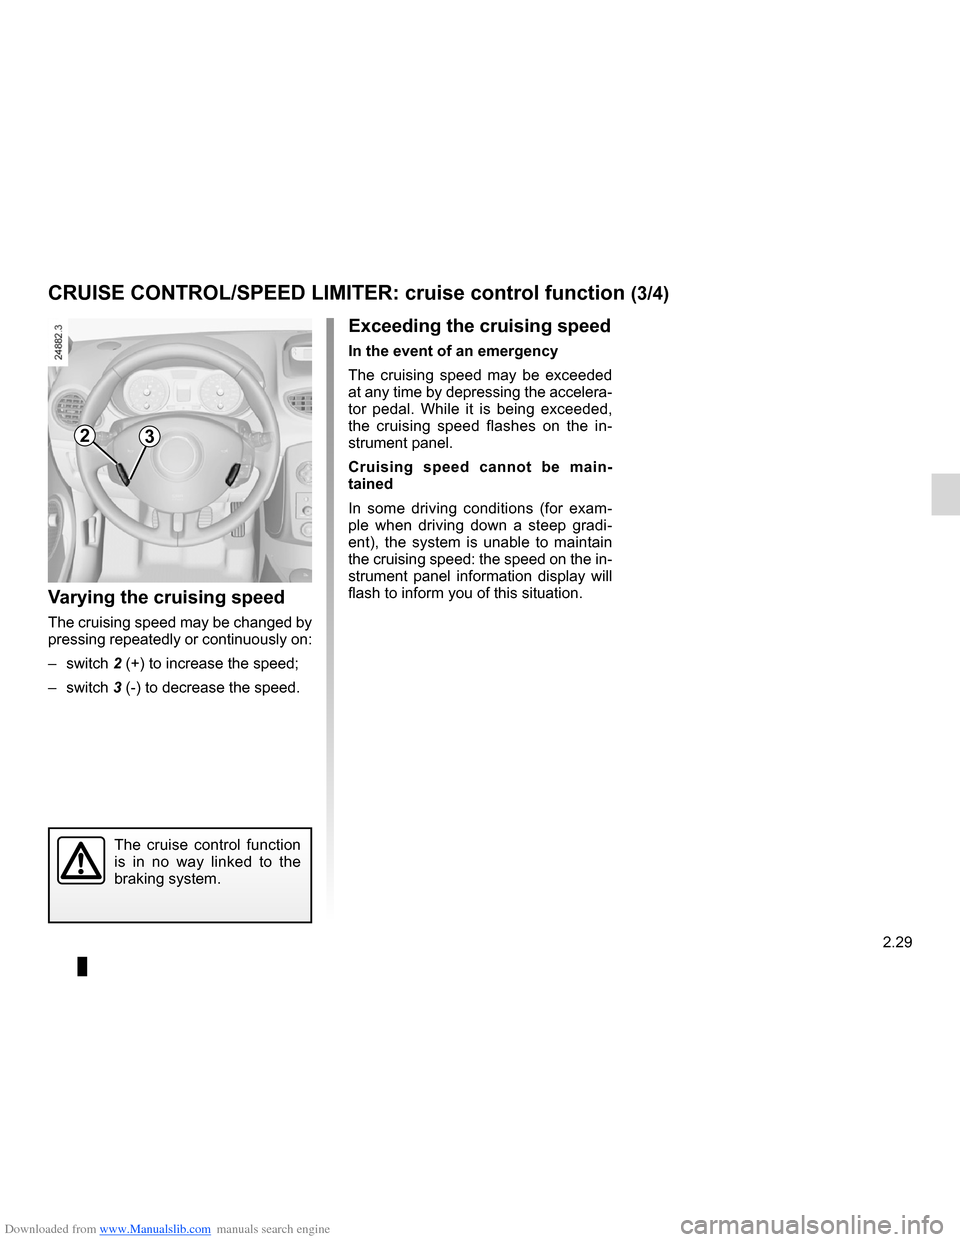
Varying the cruising speed
The cruising speed may be changed by
pressing repeatedly or continuously on:
– switch 2 (+) to increase the speed;
– switch 3 (-) to decrease the speed.
The cruise control function
is in no way linked to the
braking system.
23
Page 125 of 268
Downloaded from www.Manualslib.com manuals search engine automatic gearbox (use) ....................... (up to the end of the DU)
changing gear ....................................... (up to the end of the DU)
driving ................................................... (up to the end of the DU)
automatic gearbox selector lever ..........(up to the end of the DU)
2.31
ENG_UD12577_2
Boîte automatique (X85 - B85 - C85 - S85 - K85 - Renault)
ENG_NU_853-7_BCSK85_Renault_2
Automatic gearbox
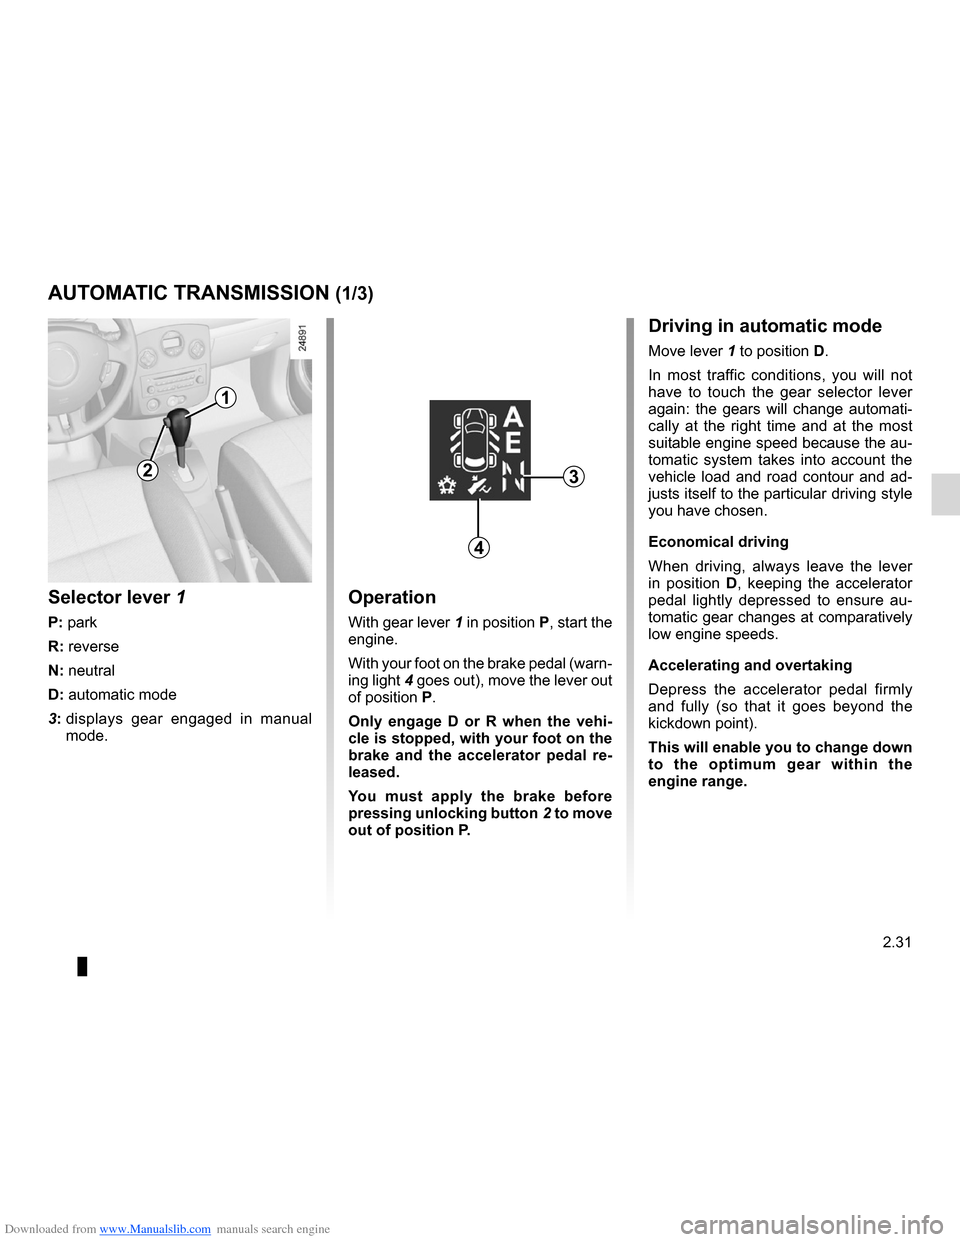
Operation
With gear lever 1 in position P, start the
engine.
With your foot on the brake pedal (warn-
ing light 4 goes out), move the lever out
of position P.
Only engage D or R when the vehi -
cle is stopped, with your foot on the
brake and the accelerator pedal re -
leased.
You must apply the brake before
pressing unlocking button 2 to move
out of position P.
Selector lever 1
P: park
R: reverse
N: neutral
D: automatic mode
3: displays gear engaged in manual
mode.
AUTOMATIC TRANSMISSION (1/3)
1
3
Driving in automatic mode
Move lever 1 to position D.
In most traffic conditions, you will not
have to touch the gear selector lever
again: the gears will change automati -
cally at the right time and at the most
suitable engine speed because the au-
tomatic system takes into account the
vehicle load and road contour and ad-
justs itself to the particular driving style
you have chosen.
Economical driving
When driving, always leave the lever
in position D, keeping the accelerator
pedal lightly depressed to ensure au -
tomatic gear changes at comparatively
low engine speeds.
Accelerating and overtaking
Depress the accelerator pedal firmly
and fully (so that it goes beyond the
kickdown point).
This will enable you to change down
to the optimum gear within the
engine range.
4
2
Page 126 of 268
Downloaded from www.Manualslib.com manuals search engine 2.32
ENG_UD12577_2
Boîte automatique (X85 - B85 - C85 - S85 - K85 - Renault)
ENG_NU_853-7_BCSK85_Renault_2
Jaune NoirNoir texte
AUTOMATIC TRANSMISSION (2/3)
1
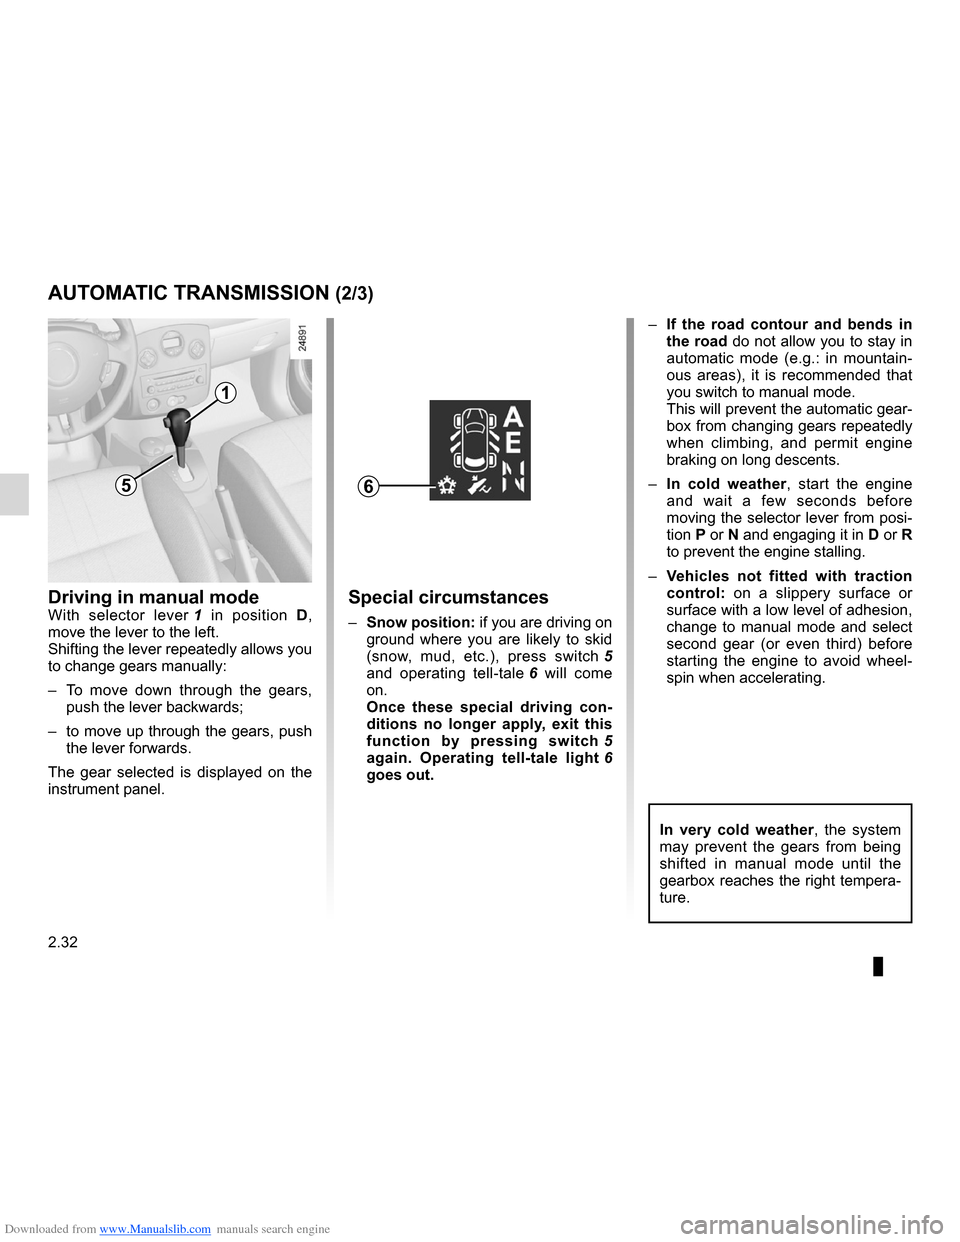
Driving in manual modeWith selector lever 1 in position D,
move the lever to the left.
Shifting the lever repeatedly allows you
to change gears manually:
– To move down through the gears,
push the lever backwards;
– to move up through the gears, push
the lever forwards.
The gear selected is displayed on the
instrument panel.Special circumstances
– Snow position: if you are driving on
ground where you are likely to skid
(snow, mud, etc.), press switch 5
and operating tell-tale 6 will come
on.
Once these special driving con -
ditions no longer apply, exit this
function by pressing switch 5
again. Operating tell-tale light 6
goes out. –
If the road contour and bends in
the road do not allow you to stay in
automatic mode (e.g.: in mountain -
ous areas), it is recommended that
you switch to manual mode.
This will prevent the automatic gear-
box from changing gears repeatedly
when climbing, and permit engine
braking on long descents.
– In cold weather , start the engine
and wait a few seconds before
moving the selector lever from posi-
tion P or N and engaging it in D or R
to prevent the engine stalling.
– Vehicles not fitted with traction
control: on a slippery surface or
surface with a low level of adhesion,
change to manual mode and select
second gear (or even third) before
starting the engine to avoid wheel -
spin when accelerating.
65
In very cold weather , the system
may prevent the gears from being
shifted in manual mode until the
gearbox reaches the right tempera-
ture.
Page 128 of 268
Downloaded from www.Manualslib.com manuals search engine Quickshift gearbox ................................ (up to the end of the DU)
driving ................................................... (up to the end of the DU)
changing gear ....................................... (up to the end of the DU)
2.34
ENG_UD12578_2
Boîte de vitesses Quickshift (X85 - B85 - C85 - S85 - K85 - Renault)\
ENG_NU_853-7_BCSK85_Renault_2
Jaune NoirNoir texte
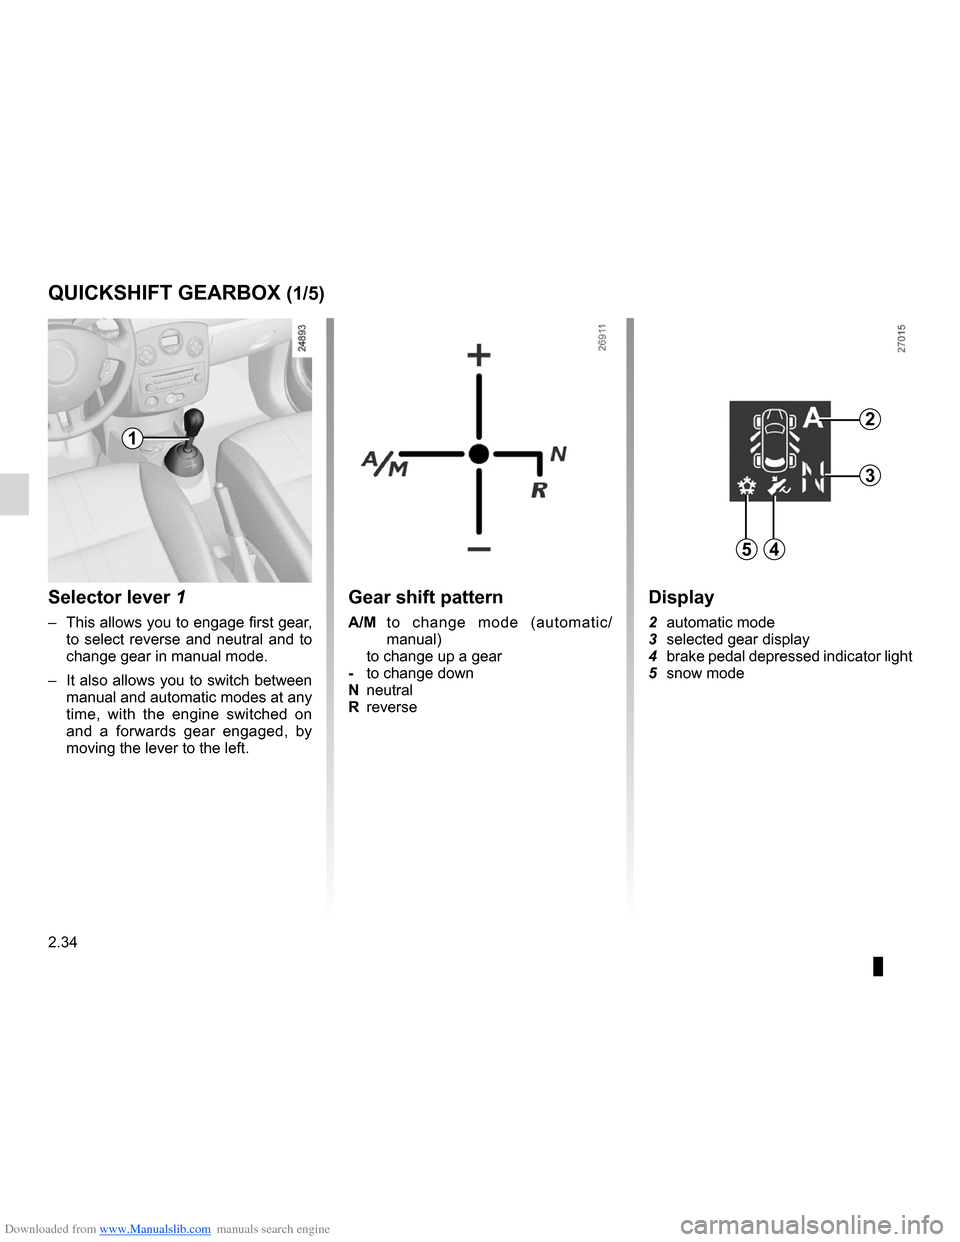
Selector lever 1
– This allows you to engage first gear,
to select reverse and neutral and to
change gear in manual mode.
– It also allows you to switch between
manual and automatic modes at any
time, with the engine switched on
and a forwards gear engaged, by
moving the lever to the left.
Quickshift gearbox
Gear shift pattern
A/M to change mode (automatic/
manual)
to change up a gear
- to change down
N neutral
R reverse
QUICkSHIFT GEARBOX (1/5)
1
54
2
3
Display
2 automatic mode
3 selected gear display
4 brake pedal depressed indicator light
5 snow mode