RENAULT CLIO SPORT TOURER 2015 X98 / 4.G Owners Manual
Manufacturer: RENAULT, Model Year: 2015, Model line: CLIO SPORT TOURER, Model: RENAULT CLIO SPORT TOURER 2015 X98 / 4.GPages: 252, PDF Size: 5.68 MB
Page 181 of 252
5.3
1
2
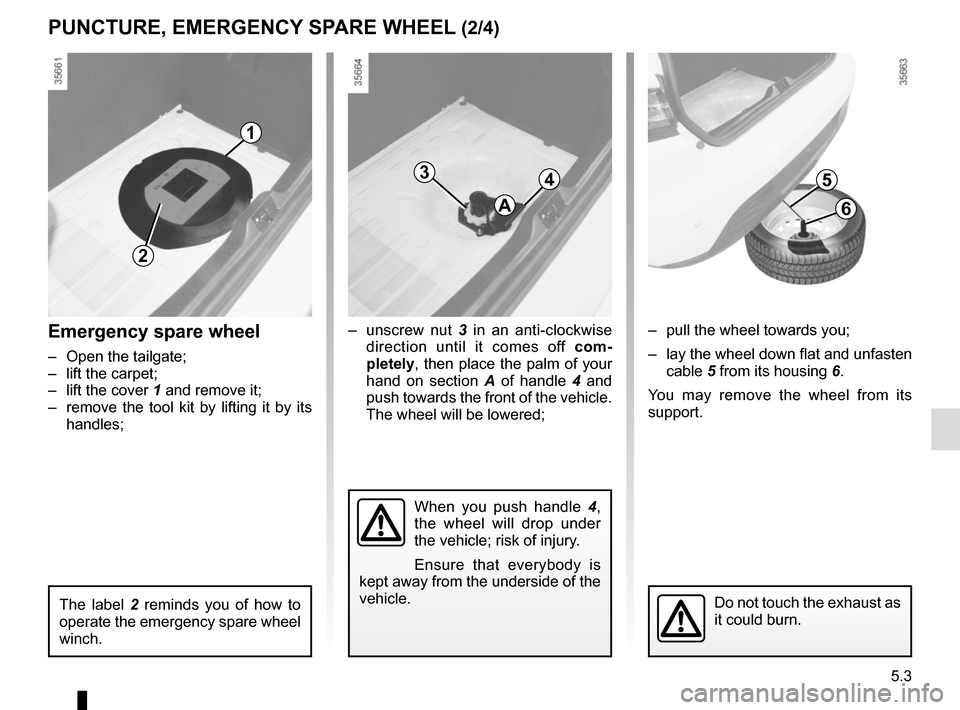
Emergency spare wheel
– Open the tailgate;
– lift the carpet;
– lift the cover 1 and remove it;– remove the tool kit by lifting it by its handles;
The label 2 reminds you of how to
operate the emergency spare wheel
winch.
34
A
– unscrew nut 3 in an anti-clockwise
direction until it comes off com-
pletely, then place the palm of your
hand on section A of handle 4 and
push towards the front of the vehicle.
The wheel will be lowered;
When you push handle 4,
the wheel will drop under
the vehicle; risk of injury.
Ensure that everybody is
kept away from the underside of the
vehicle.
5
6
– pull the wheel towards you;
– lay the wheel down flat and unfasten cable 5 from its housing 6.
You may remove the wheel from its
support.
Do not touch the exhaust as
it could burn.
PUNCTURE, EMERGENCY SPARE WHEEL (2/4)
Page 182 of 252
5.4
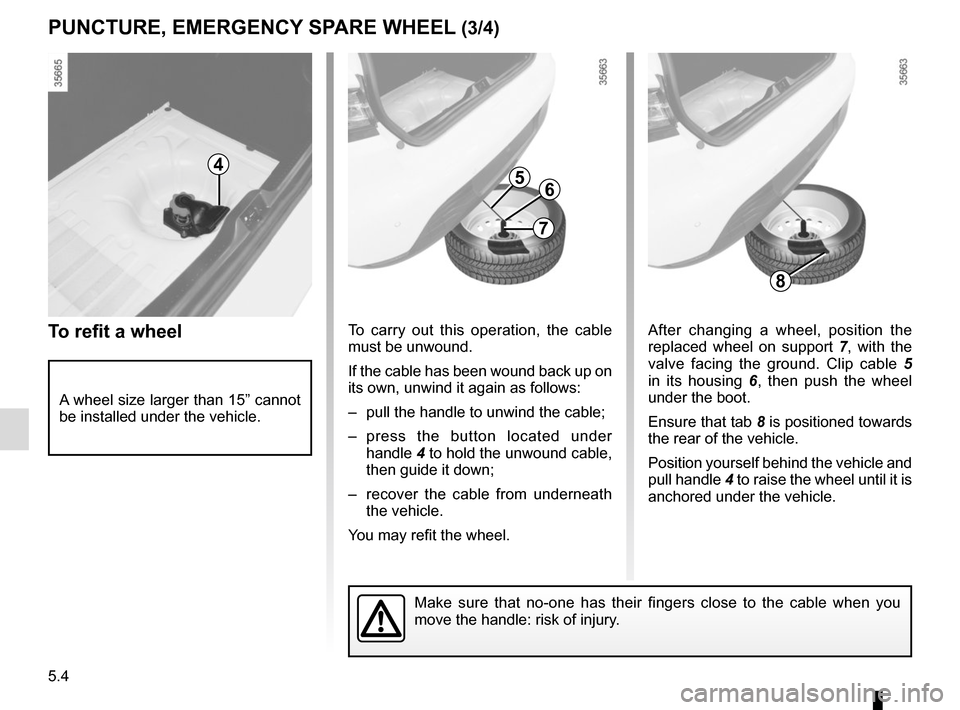
After changing a wheel, position the
replaced wheel on support 7, with the
valve facing the ground. Clip cable 5
in its housing 6, then push the wheel
under the boot.
Ensure that tab 8 is positioned towards
the rear of the vehicle.
Position yourself behind the vehicle and
pull handle 4 to raise the wheel until it is
anchored under the vehicle.
To carry out this operation, the cable
must be unwound.
If the cable has been wound back up on
its own, unwind it again as follows:
– pull the handle to unwind the cable;
– press the button located under
handle 4 to hold the unwound cable,
then guide it down;
– recover the cable from underneath the vehicle.
You may refit the wheel.To refit a wheel
PUNCTURE, EMERGENCY SPARE WHEEL (3/4)
456
7
8
A wheel size larger than 15” cannot
be installed under the vehicle.
Make sure that no-one has their fingers close to the cable when you
move the handle: risk of injury.
Page 183 of 252

5.5
NB: if the tool kit does not lock in place,
check the tightness of nut 3 and the
correct positioning of handle 4.
Special features
The emergency spare wheel holder
should always be present when you are
driving even when the wheel itself is not
present: risk of water entering the ve-
hicle.
If you have to release it when it is not
holding a wheel, push the centre of the
wheel holder towards the ground while
pressing handle 4.
To lock the system
– Press nut 3, screwing it on fully until
it locks in place. Several turns will
be necessary. This operation is es-
sential to ensure that the wheel is
secure;
– return handle 4 to its original posi-
tion;
– clip the tool kit;
– replace the cover, then lower it and replace the luggage compartment
carpet.
PUNCTURE, EMERGENCY SPARE WHEEL (4/4)
The system should only be
used with the original ve-
hicle wheels or identical
wheels.
It is essential to lock the nut
so that the wheel is held se-
curely.
4
3
Page 184 of 252
5.6
TYRE PRESSURE KIT (1/3)
The kit is only approved for
inflating the tyres of the ve-
hicle originally equipped
with the kit.
It must never be used to inflate
the tyres of another vehicle, or any
other inflatable object (rubber ring,
rubber boat, etc.).
Avoid spillage on skin when han-
dling the repair liquid bottle. If drop-
lets do leak out, rinse them off with
plenty of water.
Keep the repair kit away from chil-
dren.
Do not dispose of the empty bottle
in the countryside. Return it to your
approved dealer or to a recycling or-
ganisation.
The bottle has a limited service
life which is indicated on its label.
Check the expiry date.
Contact an approved dealer to re-
place the inflation tube and repair
product bottle.
A
B
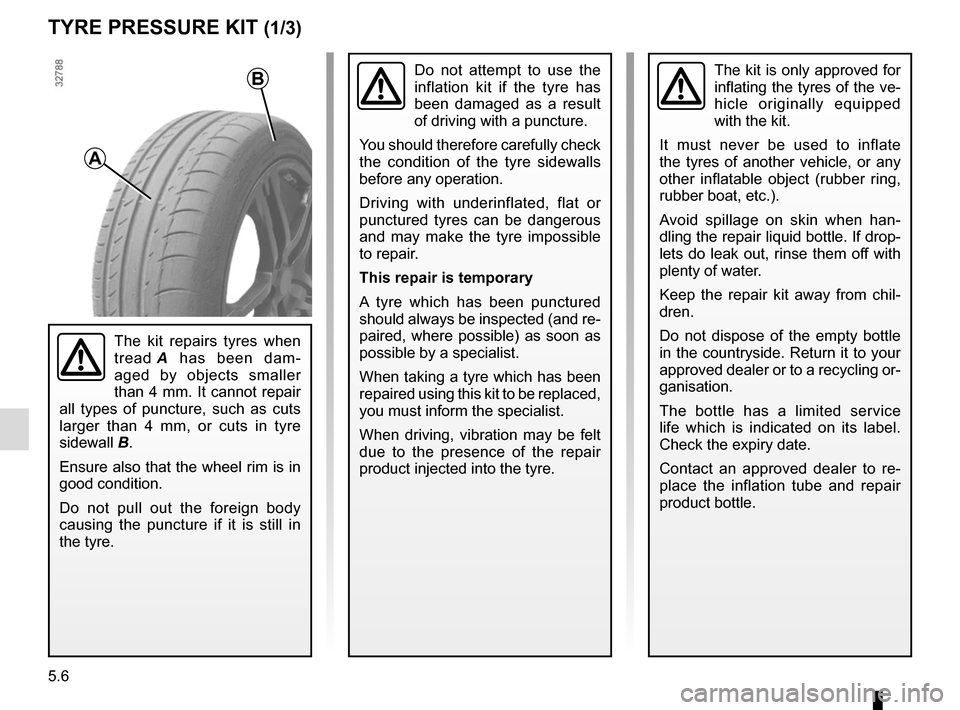
The kit repairs tyres when
tread A has been dam-
aged by objects smaller
than 4 mm. It cannot repair
all types of puncture, such as cuts
larger than 4 mm, or cuts in tyre
sidewall B.
Ensure also that the wheel rim is in
good condition.
Do not pull out the foreign body
causing the puncture if it is still in
the tyre.
Do not attempt to use the
inflation kit if the tyre has
been damaged as a result
of driving with a puncture.
You should therefore carefully check
the condition of the tyre sidewalls
before any operation.
Driving with underinflated, flat or
punctured tyres can be dangerous
and may make the tyre impossible
to repair.
This repair is temporary
A tyre which has been punctured
should always be inspected (and re-
paired, where possible) as soon as
possible by a specialist.
When taking a tyre which has been
repaired using this kit to be replaced,
you must inform the specialist.
When driving, vibration may be felt
due to the presence of the repair
product injected into the tyre.
Page 185 of 252
5.7
TYRE PRESSURE KIT (2/3)
Depending on the vehicle, in the event
of a puncture, use the kit located in the
boot or underneath the luggage com-
partment carpet.
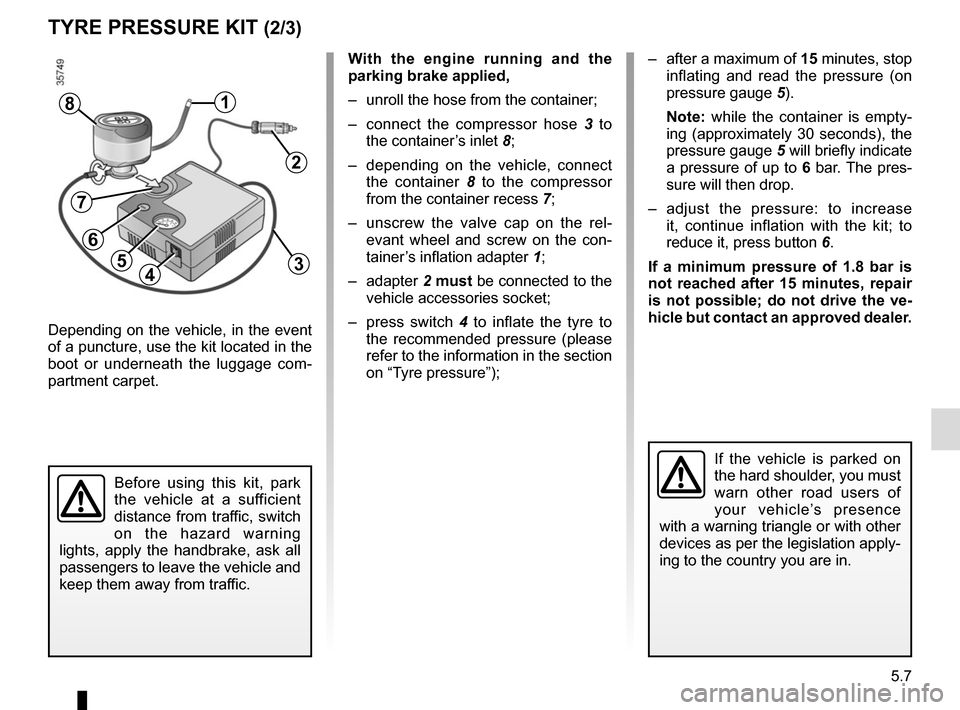
With the engine running and the
parking brake applied,
– unroll the hose from the container;
– connect the compressor hose 3 to
the container’s inlet 8;
– depending on the vehicle, connect the container 8 to the compressor
from the container recess 7;
– unscrew the valve cap on the rel- evant wheel and screw on the con-
tainer’s inflation adapter 1;
– adapter 2 must be connected to the
vehicle accessories socket;
– press switch 4 to inflate the tyre to
the recommended pressure (please
refer to the information in the section
on “Tyre pressure”);
45
1
Before using this kit, park
the vehicle at a sufficient
distance from traffic, switch
on the hazard warning
lights, apply the handbrake, ask all
passengers to leave the vehicle and
keep them away from traffic.
8
If the vehicle is parked on
the hard shoulder, you must
warn other road users of
your vehicle’s presence
with a warning triangle or with other
devices as per the legislation apply-
ing to the country you are in.
– after a maximum of 15 minutes, stop inflating and read the pressure (on
pressure gauge 5).
Note: while the container is empty-
ing (approximately 30 seconds), the
pressure gauge 5 will briefly indicate
a pressure of up to 6 bar. The pres-
sure will then drop.
– adjust the pressure: to increase it, continue inflation with the kit; to
reduce it, press button 6.
If a minimum pressure of 1.8 bar is
not reached after 15 minutes, repair
is not possible; do not drive the ve-
hicle but contact an approved dealer.
2
3
7
6
Page 186 of 252

5.8
TYRE PRESSURE KIT (3/3)
Once the tyre is correctly inflated,
remove the kit: slowly unscrew the in-
flation adapter 1 to prevent any repair
product from escaping and store the
container in plastic packaging to pre-
vent the product from escaping.
– Affix the driving recommendation label to the dashboard where it can
easily be seen by the driver;
– Put the kit away.
– At the end of this initial inflation op- eration, air will still escape from the
tyre. You must drive a short distance
in order to seal the hole.
– Start immediately and drive at be- tween 12 and 40 mph (20 and
60 km/h) in order to distribute the
product evenly in the tyre and, after
driving for 2 miles (3 km), stop and
check the pressure.
– If the pressure is greater than 1.3 bar but less than the recommended
pressure (refer to the label affixed to
the edge of the driver’s door), read-
just it. Otherwise, please contact an
authorised dealer: the tyre cannot be
repaired.Precautions when using the
kit
The kit should not be operated for more
than 15 consecutive minutes.
Nothing should be placed
around the driver’s feet
as such objects may slide
under the pedals during
sudden braking manoeuvres and
obstruct their use.
1
Please be aware that a
poorly tightened or miss-
ing valve cap can make the
tyres less airtight and may
lead to pressure loss.
Always use valve caps identical to
those fitted originally and tighten
them fully.
Following repair with the kit,
do not travel further than
120 miles (200 km). In addi-
tion, reduce your speed and
under no circumstances exceed
48 mph (80 km/h). The sticker,
which you must affix in a prominent
position on the dashboard, reminds
you of this.
Depending on the country or local
legislation, a tyre repaired with the
inflation kit may need to be replaced.
Page 187 of 252
5.9
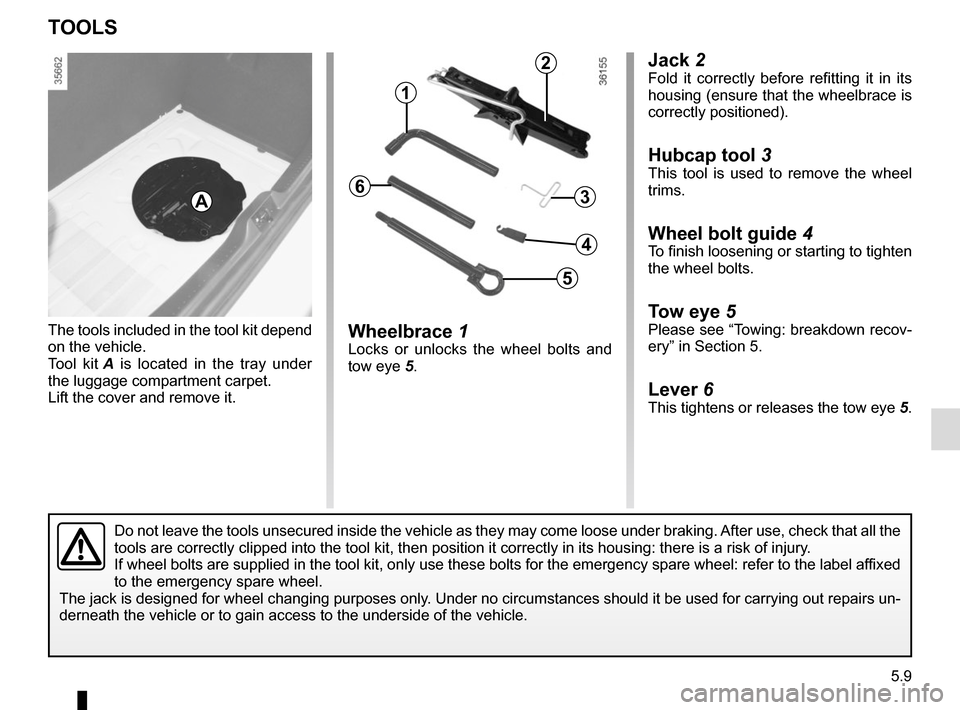
Jack 2Fold it correctly before refitting it in its
housing (ensure that the wheelbrace is
correctly positioned).
Hubcap tool 3
This tool is used to remove the wheel
trims.
Wheel bolt guide 4To finish loosening or starting to tighten
the wheel bolts.
Tow eye 5Please see “Towing: breakdown recov-
ery” in Section 5.
Lever 6This tightens or releases the tow eye 5.
Wheelbrace 1Locks or unlocks the wheel bolts and
tow eye 5.
The tools included in the tool kit depend
on the vehicle.
Tool kit
A is located in the tray under
the luggage compartment carpet.
Lift the cover and remove it.
TOOLS
A
Do not leave the tools unsecured inside the vehicle as they may come loo\
se under braking. After use, check that all the
tools are correctly clipped into the tool kit, then position it correctl\
y in its housing: there is a risk of injury.
If wheel bolts are supplied in the tool kit, only use these bolts for th\
e emergency spare wheel: refer to the label affixed
to the emergency spare wheel.
The jack is designed for wheel changing purposes only. Under no circumstances should it be used for carrying out repairs un-
derneath the vehicle or to gain access to the underside of the vehicle.
2
1
3
5
4
6
Page 188 of 252
5.10
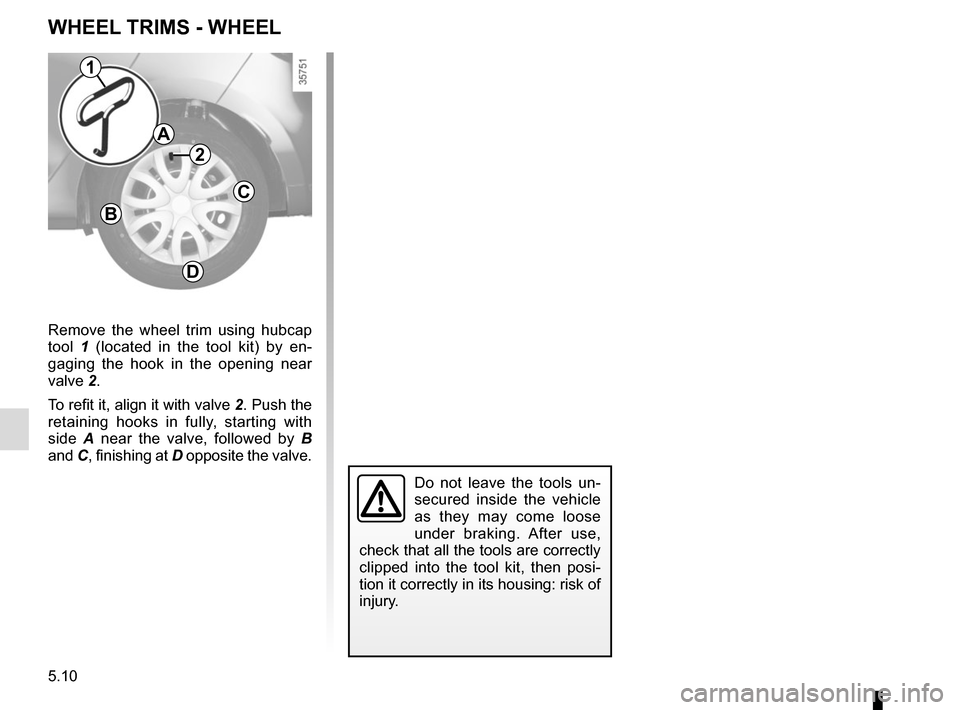
Remove the wheel trim using hubcap
tool 1 (located in the tool kit) by en-
gaging the hook in the opening near
valve 2.
To refit it, align it with valve 2. Push the
retaining hooks in fully, starting with
side A near the valve, followed by B
and C, finishing at D opposite the valve.
WHEEL TRIMS - WHEEL
Do not leave the tools un-
secured inside the vehicle
as they may come loose
under braking. After use,
check that all the tools are correctly
clipped into the tool kit, then posi-
tion it correctly in its housing: risk of
injury.
1
2
A
B
D
C
Page 189 of 252
5.11
Continue to crank the jack so that the
baseplate is correctly positioned (it
should be underneath the vehicle and
aligned with the jack head).
Turn it a few times to lift the wheel off
the ground.
Switch on the hazard war-
ning lights.
Keep the vehicle away from
traffic and on a level surface
where it will not slip.
Apply the parking brake and engage
a gear (first or reverse, or P for auto-
matic transmissions).
Ask all the passengers to leave the
vehicle and keep them away from
traffic.
CHANGING A WHEEL (1/2)
2
1
Vehicles equipped with a jack
and wheelbrace
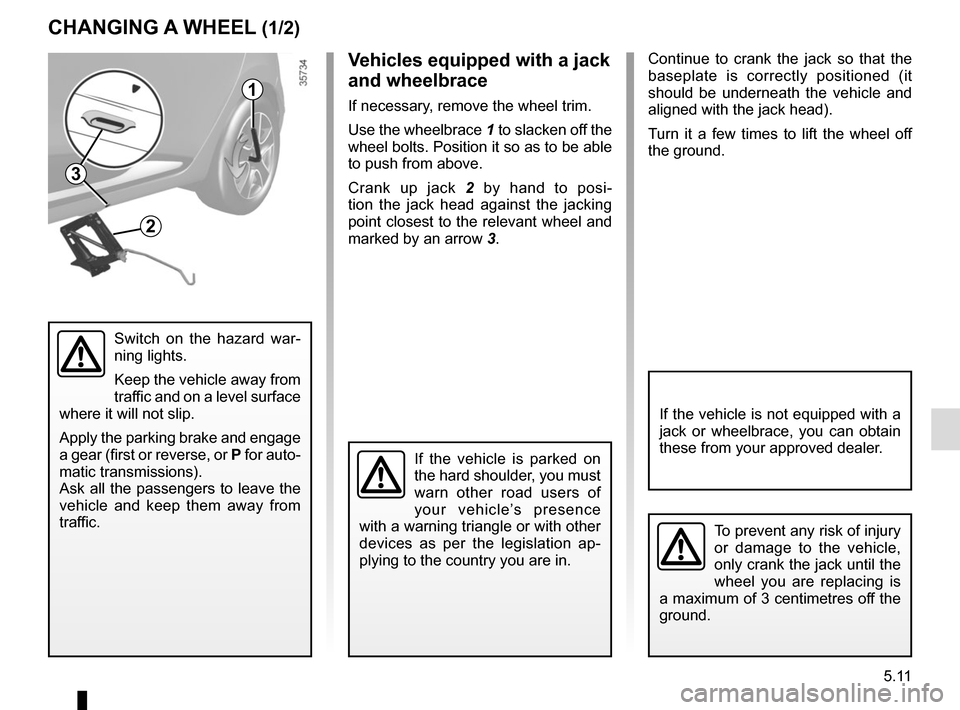
If necessary, remove the wheel trim.
Use the wheelbrace 1 to slacken off the
wheel bolts. Position it so as to be able
to push from above.
Crank up jack 2 by hand to posi-
tion the jack head against the jacking
point closest to the relevant wheel and
marked by an arrow 3.
To prevent any risk of injury
or damage to the vehicle,
only crank the jack until the
wheel you are replacing is
a maximum of 3 centimetres off the
ground.
If the vehicle is not equipped with a
jack or wheelbrace, you can obtain
these from your approved dealer.
3
If the vehicle is parked on
the hard shoulder, you must
warn other road users of
your vehicle’s presence
with a warning triangle or with other
devices as per the legislation ap-
plying to the country you are in.
Page 190 of 252
5.12
If you have a puncture, re-
place the wheel as soon as
possible.
A tyre which has been
punctured should always be inspec-
ted (and repaired, where possible)
by a specialist.
CHANGING A WHEEL (2/2)
Undo the bolts and take off the wheel.
Fit the emergency spare wheel on the
central hub and turn it to locate the
mounting holes in the wheel and the
hub.
Tighten the bolts, checking that the
wheel is correctly positioned on its hub.
Lower the jack.
With the wheel on the ground, tighten
the bolts fully and have the tightness
of the bolts checked (tightening torque:
105 N.m) and the emergency spare tyre
pressure checked as soon as possible.
Do not leave the tools unse-
cured inside the vehicle as
they may come loose under
braking. After use, check
that all the tools are correctly clip-
ped into the tool kit, then position it
correctly in its housing: risk of injury.
If wheel bolts are supplied in the
tool kit, only use these bolts for the
emergency spare wheel: refer to the
label affixed to the emergency spare
wheel.
The jack is designed for wheel
changing purposes only. Under no
circumstances should it be used for
carrying out repairs underneath the
vehicle or to gain access to the un-
derside of the vehicle.