mirror RENAULT DUSTER 2016 Owners Manual
[x] Cancel search | Manufacturer: RENAULT, Model Year: 2016, Model line: DUSTER, Model: RENAULT DUSTER 2016Pages: 256, PDF Size: 6.49 MB
Page 7 of 256
1.1
Section 1: Getting to know your vehicle
Keys, radio frequency remote control: general information . . . . . . . . . . . . . . . . . . . . . . . . . . . . . . . . 1.2
Locking/unlocking the doors . . . . . . . . . . . . . . . . . . . . . . . . . . . . . . . . . . . .\
. . . . . . . . . . . . . . . . . . . 1.5
Automatic locking when driving . . . . . . . . . . . . . . . . . . . . . . . . . . . . . . . . . . . . \
. . . . . . . . . . . . . . . . . 1.7
Opening and closing the doors . . . . . . . . . . . . . . . . . . . . . . . . . . . . . . . . . . . .\
. . . . . . . . . . . . . . . . . 1.8
Front headrests . . . . . . . . . . . . . . . . . . . . . . . . . . . . . . . . . . . . \
. . . . . . . . . . . . . . . . . . . . . . . . . . . . . 1.10
Front seats. . . . . . . . . . . . . . . . . . . . . . . . . . . . . . .\
. . . . . . . . . . . . . . . . . . . . . . . . . . . . . . . . . . . . . . 1.11
Seat belts. . . . . . . . . . . . . . . . . . . . . . . . . . . . . . . \
. . . . . . . . . . . . . . . . . . . . . . . . . . . . . . . . . . . . . . . 1.13
Methods of restraint in addition to the front seat belts . . . . . . . . . . . . . . . . . . . . . . . . . . . . . . . . . . . . 1.17
Side protection devices . . . . . . . . . . . . . . . . . . . . . . . . . . . . . . . . . . . . \
. . . . . . . . . . . . . . . . . . . . . . . 1.20
Additional methods of restraint . . . . . . . . . . . . . . . . . . . . . . . . . . . . . . . . . . . .\
. . . . . . . . . . . . . . . . . 1.21
Child safety: General information . . . . . . . . . . . . . . . . . . . . . . . . . . . . . . . . . . . .\
. . . . . . . . . . . . . . . 1.22 child seat mounting . . . . . . . . . . . . . . . . . . . . . . . . . . . . . . . . . . . .\
. . . . . . . . . . . . . . . . . . . . 1.25
fitting a child seat . . . . . . . . . . . . . . . . . . . . . . . . . . . . . . . . . . . . \
. . . . . . . . . . . . . . . . . . . . . . 1.27
Deactivating/activating the front passenger air bag . . . . . . . . . . . . . . . . . . . . . . . . . . . . . . . . 1.33
Rear view mirrors . . . . . . . . . . . . . . . . . . . . . . . . . . . . . . . . . . . .\
. . . . . . . . . . . . . . . . . . . . . . . . . . . 1.36
Driving position . . . . . . . . . . . . . . . . . . . . . . . . . . . . . . . . . . . .\
. . . . . . . . . . . . . . . . . . . . . . . . . . . . . 1.37
Instrument panel: warning lights . . . . . . . . . . . . . . . . . . . . . . . . . . . . . . . . . . . .\
. . . . . . . . . . . . . . . . 1.41
Display and indicators . . . . . . . . . . . . . . . . . . . . . . . . . . . . . . . . . . . . \
. . . . . . . . . . . . . . . . . . . . . . . . 1.48
Trip computer and warning system . . . . . . . . . . . . . . . . . . . . . . . . . . . . . . . . . . . . \
. . . . . . . . . . . . . . 1.50
Steering wheel, Power-assisted steering . . . . . . . . . . . . . . . . . . . . . . . . . . . . . . . . . . . .\
. . . . . . . . . 1.56
Clock . . . . . . . . . . . . . . . . . . . . . . . . . . . . . . . . . \
. . . . . . . . . . . . . . . . . . . . . . . . . . . . . . . . . . . . . . . . 1.57
Audible and visual signals . . . . . . . . . . . . . . . . . . . . . . . . . . . . . . . . . . . . \
. . . . . . . . . . . . . . . . . . . . . 1.58
Exterior lighting and signals. . . . . . . . . . . . . . . . . . . . . .\
. . . . . . . . . . . . . . . . . . . . . . . . . . . . . . . . . . 1.59
Adjusting the headlight beam height . . . . . . . . . . . . . . . . . . . . . . . . . . . . . . . . . . . . \
. . . . . . . . . . . . . 1.61
Screen washer/wiper . . . . . . . . . . . . . . . . . . . . . . . . . . . . . . . . . . . . \
. . . . . . . . . . . . . . . . . . . . . . . . . 1.63
Fuel tank (filling with fuel) . . . . . . . . . . . . . . . . . . . . . . . . . . . . . . . . . . . .\
. . . . . . . . . . . . . . . . . . . . . 1.65
Page 42 of 256
1.36
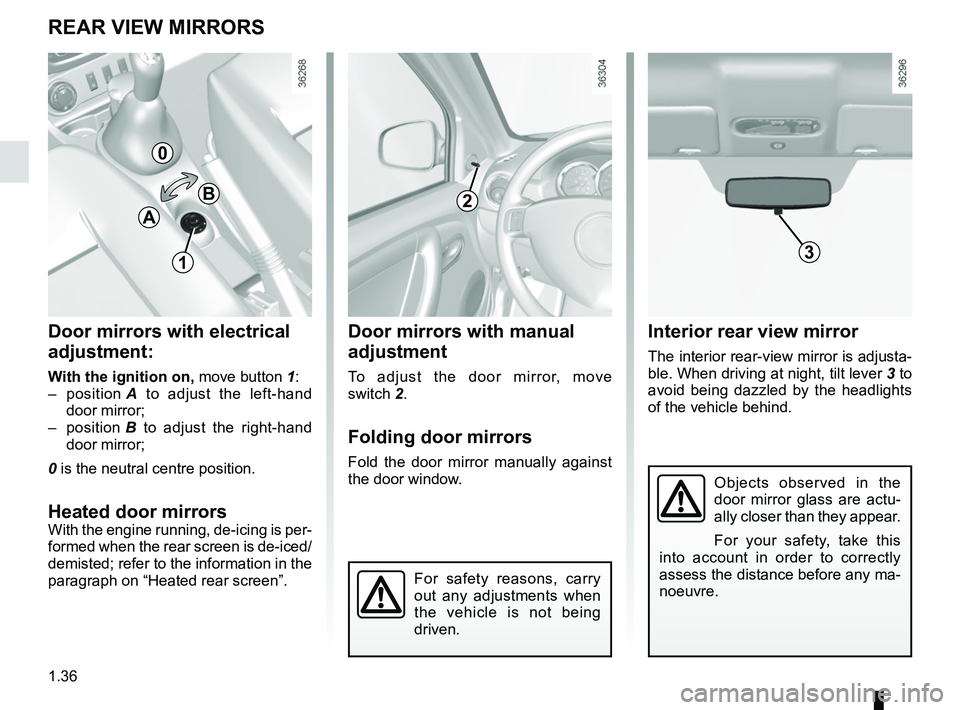
REAR VIEW MIRRORS
Door mirrors with electrical
adjustment:
With the ignition on, move button 1:
– position A to adjust the left-hand
door mirror;
– position B to adjust the right-hand
door mirror;
0 is the neutral centre position.
Heated door mirrors
With the engine running, de-icing is per-
formed when the rear screen is de-iced/
demisted; refer to the information in the
paragraph on “Heated rear screen”.
Interior rear view mirror
The interior rear-view mirror is adjusta-
ble. When driving at night, tilt lever 3 to
avoid being dazzled by the headlights
of the vehicle behind.
Door mirrors with manual
adjustment
To adjust the door mirror, move
switch 2.
Folding door mirrors
Fold the door mirror manually against
the door window.
For safety reasons, carry
out any adjustments when
the vehicle is not being
driven.
0
B
A
13
2
Objects observed in the
door mirror glass are actu-
ally closer than they appear.
For your safety, take this
into account in order to correctly
assess the distance before any ma-
noeuvre.
Page 44 of 256
1.38
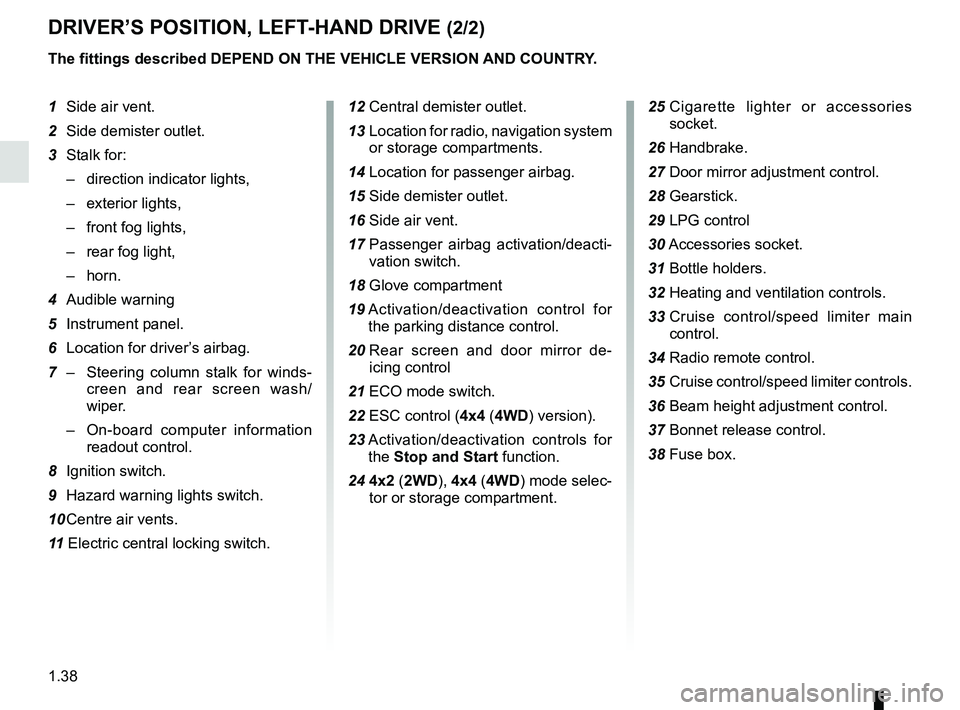
DRIVER’S POSITION, LEFT-HAND DRIVE (2/2)
The fittings described DEPEND ON THE VEHICLE VERSION AND COUNTRY.
1 Side air vent.
2 Side demister outlet.
3 Stalk for:
– direction indicator lights,
– exterior lights,
– front fog lights,
– rear fog light,
– horn.
4 Audible warning
5 Instrument panel.
6 Location for driver’s airbag.
7 – Steering column stalk for winds-
creen and rear screen wash/
wiper.
– On-board computer information
readout control.
8 Ignition switch.
9 Hazard warning lights switch.
10 Centre air vents.
11 Electric central locking switch. 12 Central demister outlet.
13 Location for radio, navigation system
or storage compartments.
14 Location for passenger airbag.
15 Side demister outlet.
16 Side air vent.
17 Passenger airbag activation/deacti-
vation switch.
18 Glove compartment
19 Activation/deactivation control for
the parking distance control.
20 Rear screen and door mirror de-
icing control
21 ECO mode switch.
22 ESC control (4x4 (4WD) version).
23 Activation/deactivation controls for
the Stop and Start function.
24 4x2 ( 2WD), 4x4 (4WD) mode selec-
tor or storage compartment. 25
Cigarette lighter or accessories
socket.
26 Handbrake.
27 Door mirror adjustment control.
28 Gearstick. 29 LPG control
30 Accessories socket.
31 Bottle holders.
32 Heating and ventilation controls.
33 Cruise control/speed limiter main
control.
34
Radio remote control.
35 Cruise control/speed limiter controls.
36 Beam height adjustment control.
37 Bonnet release control.
38 Fuse box.
Page 46 of 256
1.40
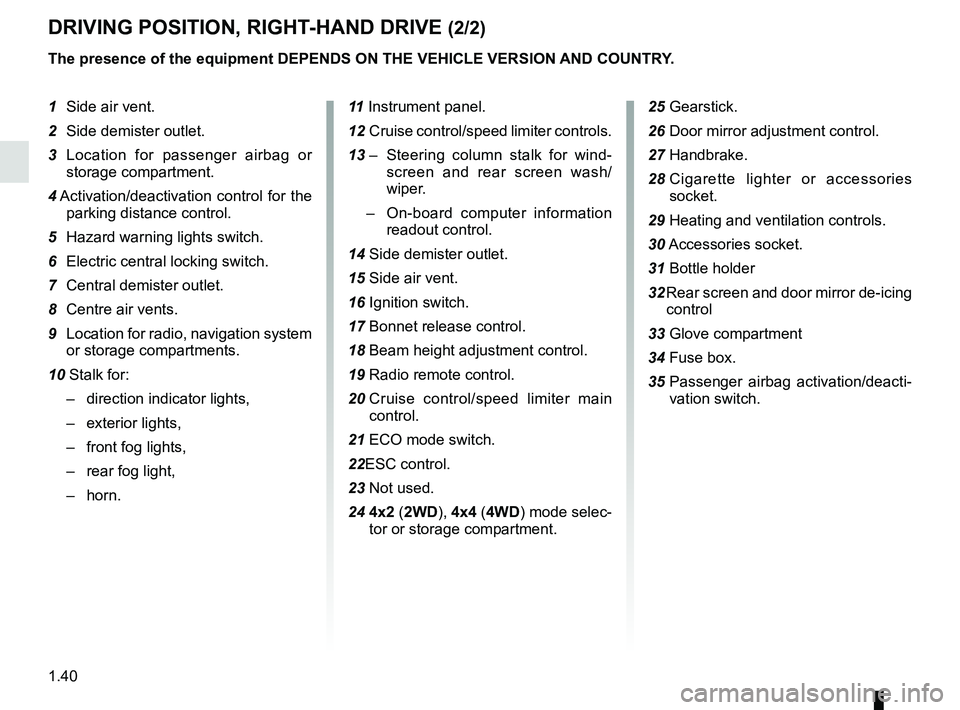
DRIVING POSITION, RIGHT-HAND DRIVE (2/2)
The presence of the equipment DEPENDS ON THE VEHICLE VERSION AND COUNTRY.
1 Side air vent.
2 Side demister outlet.
3 Location for passenger airbag or storage compartment.
4 Activation/deactivation control for the
parking distance control.
5 Hazard warning lights switch.
6 Electric central locking switch.
7 Central demister outlet.
8 Centre air vents.
9 Location for radio, navigation system or storage compartments.
10 Stalk for: – direction indicator lights,
– exterior lights,
– front fog lights,
– rear fog light,
– horn. 11
Instrument panel.
12 Cruise control/speed limiter controls.
13 – Steering column stalk for wind-
screen and rear screen wash/
wiper.
– On-board computer information
readout control.
14 Side demister outlet.
15 Side air vent.
16 Ignition switch.
17 Bonnet release control.
18 Beam height adjustment control.
19 Radio remote control.
20 Cruise control/speed limiter main
control.
21 ECO mode switch.
22ESC control.
23 Not used.
24 4x2 ( 2WD), 4x4 (4WD) mode selec-
tor or storage compartment.
25 Gearstick.
26 Door mirror adjustment control.
27 Handbrake.
28 Cigarette lighter or accessories
socket.
29 Heating and ventilation controls.
30 Accessories socket.
31 Bottle holder
32 Rear screen and door mirror de-icing control
33 Glove compartment
34 Fuse box.
35 Passenger airbag activation/deacti-
vation switch.
Page 132 of 256
3.4
HEATING, VENTILATION, AIR CONDITIONING (1/3)
23415
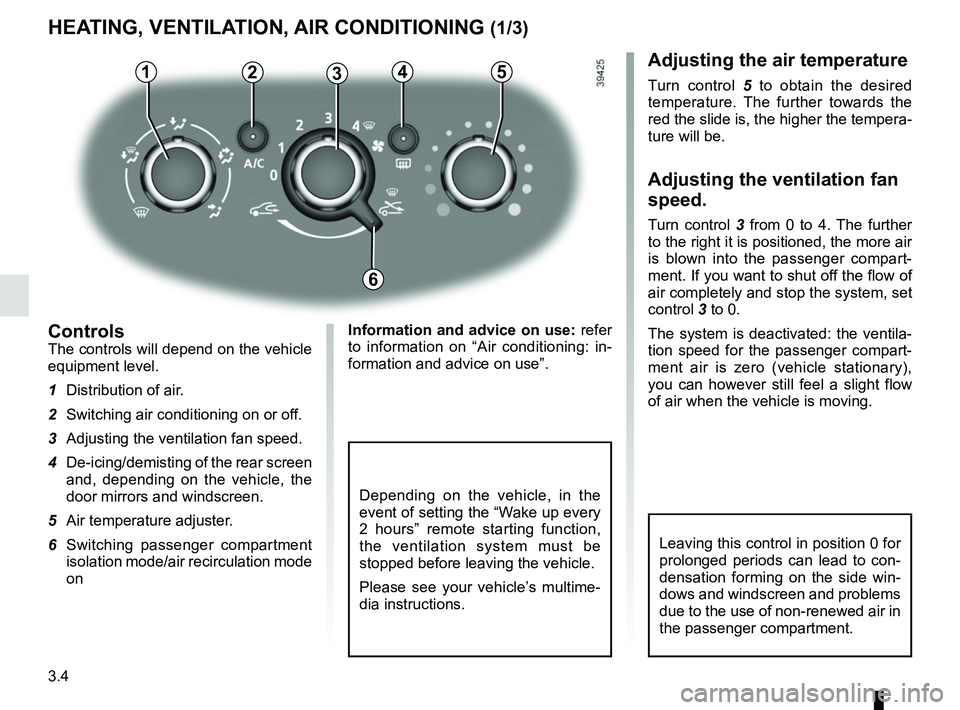
ControlsThe controls will depend on the vehicle
equipment level.
1 Distribution of air.
2 Switching air conditioning on or off.
3 Adjusting the ventilation fan speed.
4 De-icing/demisting of the rear screen and, depending on the vehicle, the
door mirrors and windscreen.
5 Air temperature adjuster.
6 Switching passenger compartment isolation mode/air recirculation mode
on
Adjusting the air temperature
Turn control 5 to obtain the desired
temperature. The further towards the
red the slide is, the higher the tempera-
ture will be.
Adjusting the ventilation fan
speed.
Turn control 3 from 0 to 4. The further
to the right it is positioned, the more air
is blown into the passenger compart-
ment. If you want to shut off the flow of
air completely and stop the system, set
control 3 to 0.
The system is deactivated: the ventila-
tion speed for the passenger compart-
ment air is zero (vehicle stationary),
you can however still feel a slight flow
of air when the vehicle is moving.
Leaving this control in position 0 for
prolonged periods can lead to con-
densation forming on the side win-
dows and windscreen and problems
due to the use of non-renewed air in
the passenger compartment.
6
Information and advice on use: refer
to information on “Air conditioning: in-
formation and advice on use”.
Depending on the vehicle, in the
event of setting the “Wake up every
2 hours” remote starting function,
the ventilation system must be
stopped before leaving the vehicle.
Please see your vehicle’s multime-
dia instructions.
Page 133 of 256
3.5
HEATING, VENTILATION, AIR CONDITIONING (2/3)
43
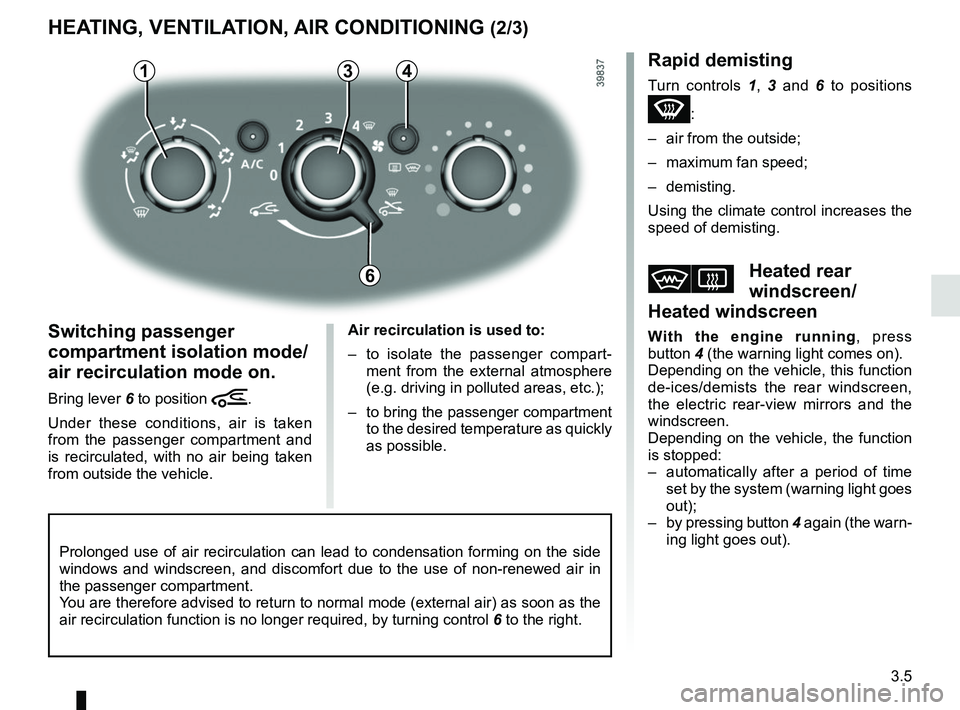
Switching passenger
compartment isolation mode/
air recirculation mode on.
Bring lever 6 to position â.
Under these conditions, air is taken
from the passenger compartment and
is recirculated, with no air being taken
from outside the vehicle. Air recirculation is used to:
– to isolate the passenger compart-
ment from the external atmosphere
(e.g. driving in polluted areas, etc.);
– to bring the passenger compartment to the desired temperature as quickly
as possible.
Rapid demisting
Turn controls 1, 3 and 6 to positions
W:
– air from the outside;
– maximum fan speed;
– demisting.
Using the climate control increases the
speed of demisting.
VHeated rear
windscreen/
Heated windscreen
With the engine running , press
button 4 (the warning light comes on).
Depending on the vehicle, this function
de-ices/demists the rear windscreen,
the electric rear-view mirrors and the
windscreen.
Depending on the vehicle, the function
is stopped:
– automatically after a period of time set by the system (warning light goes
out);
– by pressing button 4 again (the warn-
ing light goes out).
Prolonged use of air recirculation can lead to condensation forming on t\
he side
windows and windscreen, and discomfort due to the use of non-renewed air\
in
the passenger compartment.
You are therefore advised to return to normal mode (external air) as so\
on as the
air recirculation function is no longer required, by turning control 6 to the right.
1
6
Page 141 of 256
3.13
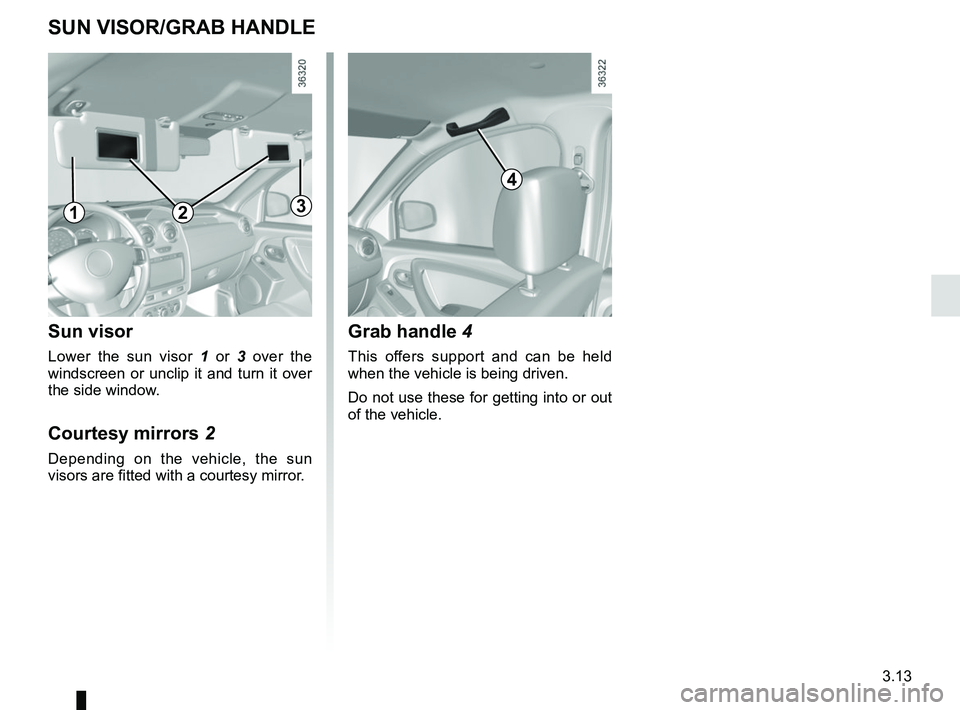
Grab handle 4
This offers support and can be held
when the vehicle is being driven.
Do not use these for getting into or out
of the vehicle.
SUN VISOR/GRAB HANDLE
4
132
Sun visor
Lower the sun visor 1 or 3 over the
windscreen or unclip it and turn it over
the side window.
Courtesy mirrors 2
Depending on the vehicle, the sun
visors are fitted with a courtesy mirror.
Page 175 of 256
4.17
Respect local regulations about wash-
ing vehicles (e.g. do not wash your ve-
hicle on a public highway).
Observe the vehicle stopping distances
when driving on gravelled surfaces to
prevent paint damage.
Repair, or have repaired quickly, areas
where the paint has been damaged, to
prevent corrosion spreading.
Remember to visit the body shop pe-
riodically in order to maintain your
anti-corrosion warranty. Refer to the
Maintenance Document.
If it is necessary to clean mechani-
cal components, hinges, etc., spray
them with products approved by our
Technical Department to protect them
after they have been cleaned.
BODYWORK MAINTENANCE (2/2)
We have selected special products
to care for your vehicle and you can
obtain these from the manufactur-
er’s accessory outlets.
Using a roller type car wash
Return the windscreen wiper stalk to
the Park position (refer to the informa-
tion on the “Windscreen washer, wiper”
in Section 1). Check the mounting of
external accessories, additional lights
and mirrors, and ensure that the wiper
blades are secured with adhesive tape.
Remove the radio aerial mast if your
vehicle is fitted with this equipment.
Remember to remove the tape and refit
the antenna after washing.
Cleaning the headlights
As the headlights are made of plastic
“glass”, use a soft cloth or cotton wool
to clean them. If this does not clean
them properly, moisten the cloth with
soapy water, then wipe clean with a soft
damp cloth or cotton wool.
Finally, carefully dry off with a soft dry
cloth.
Cleaning products containing alco-
hol must not be used.
Vehicles with a matte paint
finish
This type of paint requires certain pre-
cautions.
Do not do the following
– use wax-based products (polishing);
– rub hard;
– wash the vehicle in a roller-type car
wash;
– wash the vehicle using a high-pres-
sure device;
– attach stickers to the paintwork (risk
of leaving marks).
You should do the following
Wash the vehicle by hand using plenty
of water, using a soft cloth or a gentle
sponge.
Page 210 of 256
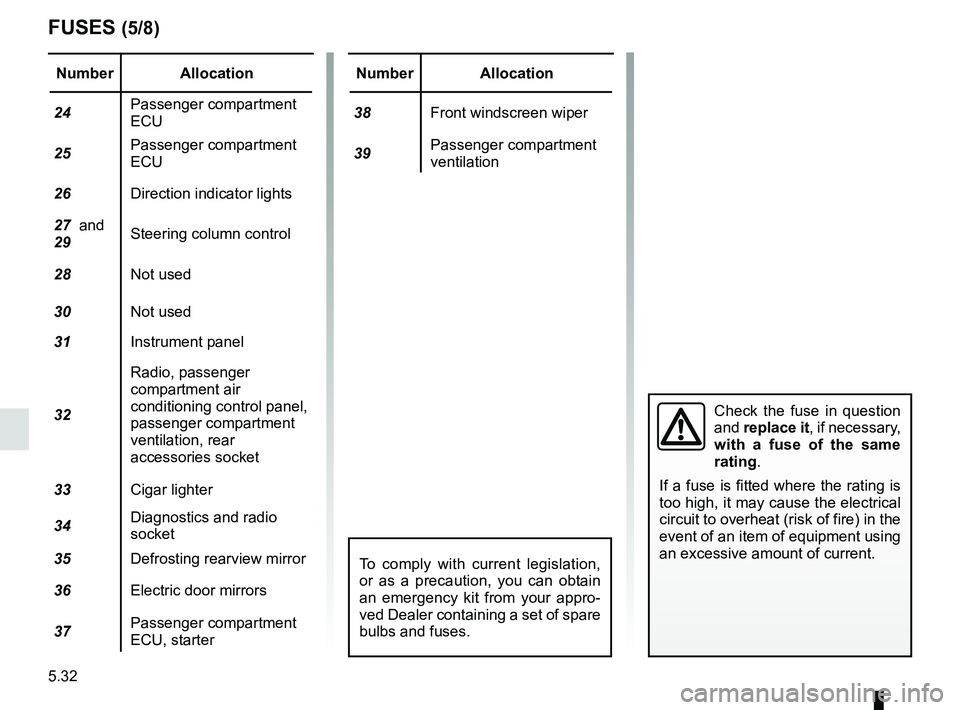
5.32
FUSES (5/8)
Number Allocation
24 Passenger compartment
ECU
25 Passenger compartment
ECU
26 Direction indicator lights
27 and
29 Steering column control
28 Not used
30 Not used
31 Instrument panel
32 Radio, passenger
compartment air
conditioning control panel,
passenger compartment
ventilation, rear
accessories socket
33 Cigar lighter
34 Diagnostics and radio
socket
35 Defrosting rearview mirror
36 Electric door mirrors
37 Passenger compartment
ECU, starterNumber Allocation
38 Front windscreen wiper
39 Passenger compartment
ventilation
Check the fuse in question
and
replace it, if necessary,
with a fuse of the same
rating.
If a fuse is fitted where the rating is
too high, it may cause the electrical
circuit to overheat (risk of fire) in the
event of an item of equipment using
an excessive amount of current.
To comply with current legislation,
or as a precaution, you can obtain
an emergency kit from your appro-
ved Dealer containing a set of spare
bulbs and fuses.
Page 213 of 256
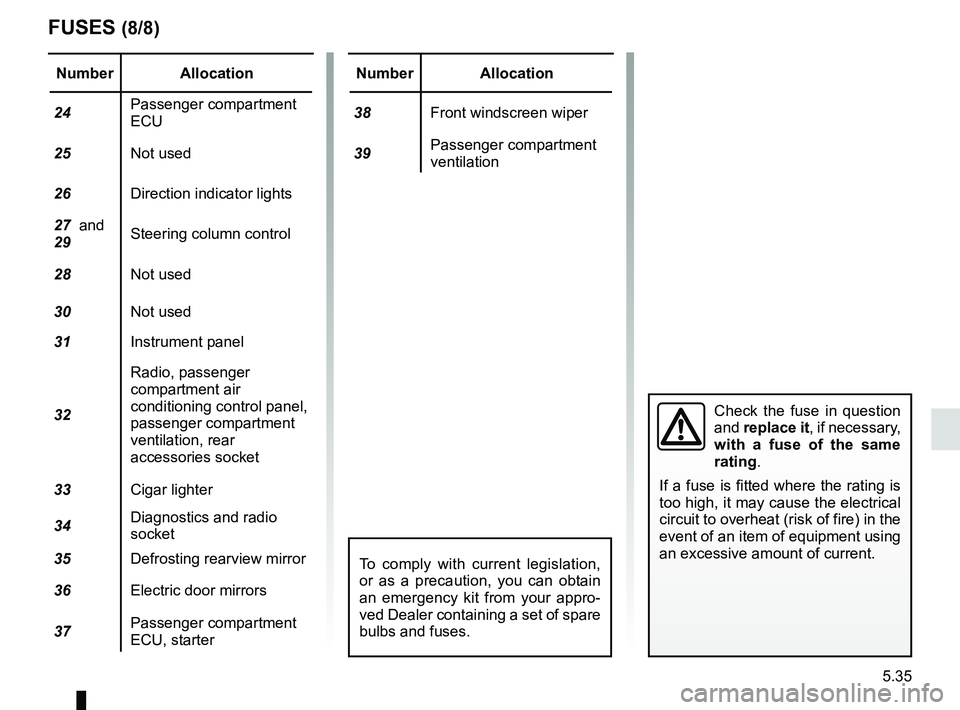
5.35
FUSES (8/8)
Number Allocation
24 Passenger compartment
ECU
25 Not used
26 Direction indicator lights
27 and
29 Steering column control
28 Not used
30 Not used
31 Instrument panel
32 Radio, passenger
compartment air
conditioning control panel,
passenger compartment
ventilation, rear
accessories socket
33 Cigar lighter
34 Diagnostics and radio
socket
35 Defrosting rearview mirror
36 Electric door mirrors
37 Passenger compartment
ECU, starterNumber Allocation
38 Front windscreen wiper
39 Passenger compartment
ventilation
Check the fuse in question
and
replace it, if necessary,
with a fuse of the same
rating.
If a fuse is fitted where the rating is
too high, it may cause the electrical
circuit to overheat (risk of fire) in the
event of an item of equipment using
an excessive amount of current.
To comply with current legislation,
or as a precaution, you can obtain
an emergency kit from your appro-
ved Dealer containing a set of spare
bulbs and fuses.