display RENAULT ESPACE 2015 5.G Repair Manual
[x] Cancel search | Manufacturer: RENAULT, Model Year: 2015, Model line: ESPACE, Model: RENAULT ESPACE 2015 5.GPages: 316, PDF Size: 6.98 MB
Page 203 of 316
3.11
AUTOMATIC CLIMATE CONTROL (5/5)
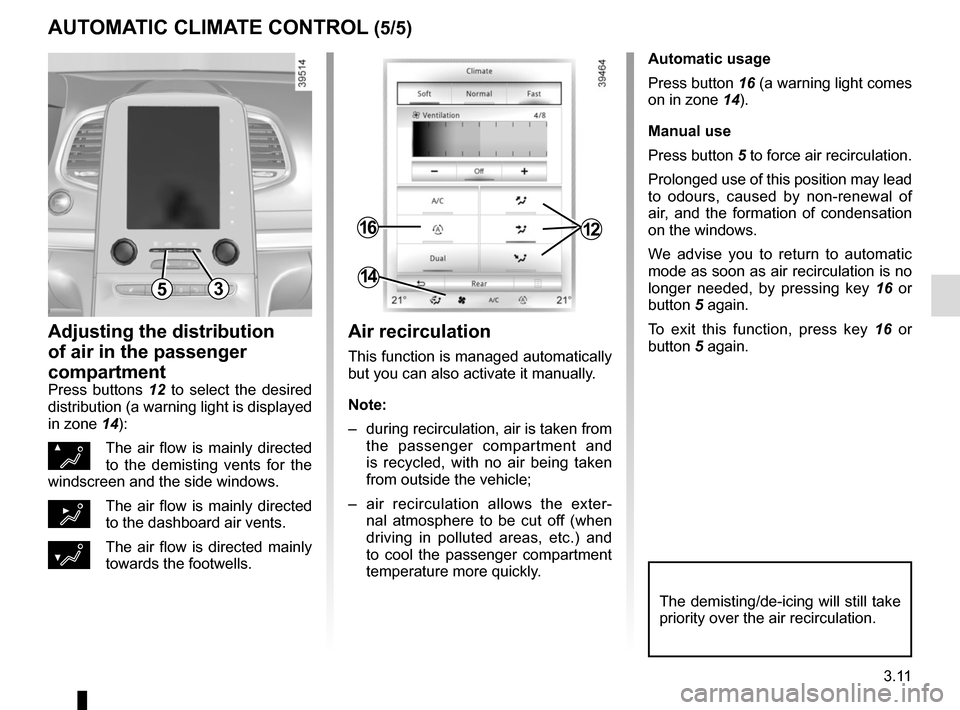
Automatic usage
Press button 16 (a warning light comes
on in zone 14).
Manual use
Press button 5 to force air recirculation.
Prolonged use of this position may lead
to odours, caused by non-renewal of
air, and the formation of condensation
on the windows.
We advise you to return to automatic
mode as soon as air recirculation is no
longer needed, by pressing key 16 or
button 5 again.
To exit this function, press key 16 or
button 5 again.
Adjusting the distribution
of air in the passenger
compartment
Press buttons 12 to select the desired
distribution (a warning light is displayed
in zone 14):
ØThe air flow is mainly directed
to the demisting vents for the
windscreen and the side windows.
½The air flow is mainly directed
to the dashboard air vents.
¿The air flow is directed mainly
towards the footwells.
The demisting/de-icing will still take
priority over the air recirculation.
53
1216
14
Air recirculation
This function is managed automatically
but you can also activate it manually.
Note:
– during recirculation, air is taken from the passenger compartment and
is recycled, with no air being taken
from outside the vehicle;
– air recirculation allows the exter- nal atmosphere to be cut off (when
driving in polluted areas, etc.) and
to cool the passenger compartment
temperature more quickly.
Page 205 of 316
3.13
4
ADDITIONAL AIR CONDITIONING (2/2)
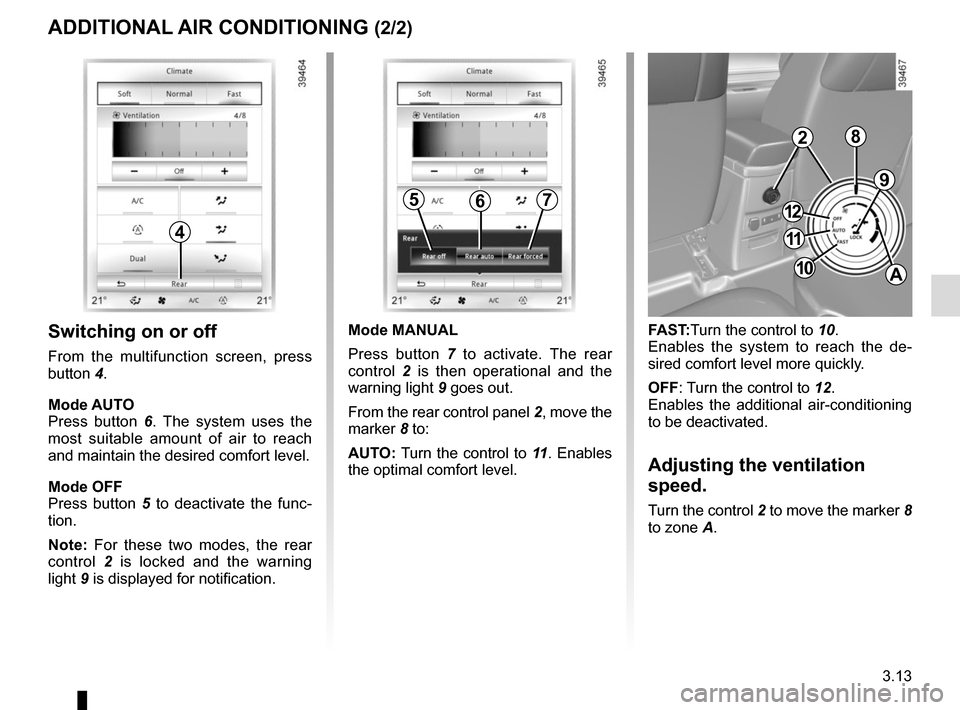
Switching on or off
From the multifunction screen, press
button 4.
Mode AUTO
Press button 6. The system uses the
most suitable amount of air to reach
and maintain the desired comfort level.
Mode OFF
Press button 5 to deactivate the func-
tion.
Note: For these two modes, the rear
control 2 is locked and the warning
light 9 is displayed for notification.
9
FAST:Turn the control to 10.
Enables the system to reach the de-
sired comfort level more quickly.
OFF: Turn the control to 12.
Enables the additional air-conditioning
to be deactivated.
Adjusting the ventilation
speed.
Turn the control 2 to move the marker 8
to zone A.
567
Mode MANUAL
Press button 7 to activate. The rear
control 2 is then operational and the
warning light 9 goes out.
From the rear control panel 2, move the
marker 8 to:
AUTO: Turn the control to 11 . Enables
the optimal comfort level.
2
11
10
12
A
8
Page 207 of 316

3.15
ELECTRIC WINDOWS (1/2)
1
2
34
5
6
These systems operate:
– with the engine running;
– with the ignition off until one of the front doors is opened (limited to ap-
proximately 12 minutes).
– before starting, with the front doors closed, after pressing the start
button.
Press the window switch down or pull it
up to lower or raise the window to the
desired height: the rear windows do not
open fully.
Safety of rear occupants
The driver can disable operation of the rear electric windows and doors \
by pressing switch 4. A confirmation message is displayed on the instru-
ment panel.
Driver’s responsibility
Never leave your vehicle with the RENAULT card inside and never leave a child
(or a pet) unsupervised, even for a short while. They may pose a risk to them-
selves or to others by starting the engine, activating equipment such as\
the elec-
tric windows or by locking the doors. If a body part gets trapped, rever\
se the direc-
tion of travel of the window as soon as possible by pressing the relevan\
t switch.
Risk of serious injury.
Avoid resting any objects against
a half-open window: there is a risk
that the electric window could be
damaged.
From the driver’s seat, use switch:
1 for the driver’s side;
2 for the front passenger side;
3 and 5 for the rear passenger win-
dows.
From the passenger seats, use
switch 6.
Note: if the window detects resistance
when closing (e.g.: fingers, branch of
a tree, etc.) it stops and then lowers
again by a few centimetres.
Page 235 of 316
3.43
MULTIMEDIA EQUIPMENT (1/2)
Using the telephone
We remind you of the need
to conform to the legislation
in force concerning the use
of such equipment.
5
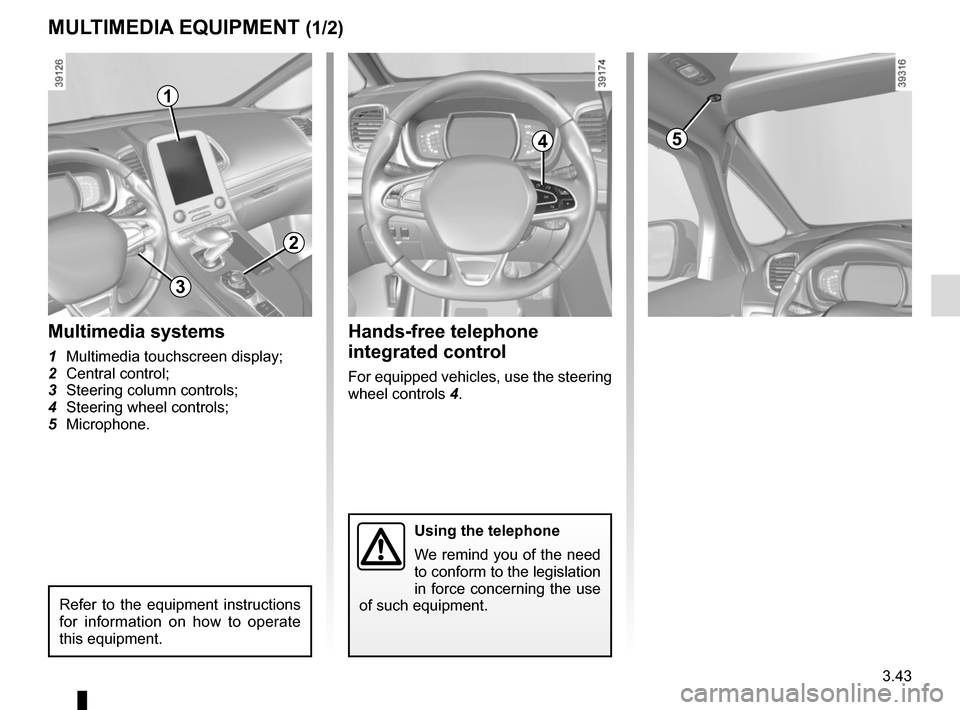
Hands-free telephone
integrated control
For equipped vehicles, use the steering
wheel controls 4.
Multimedia systems
1 Multimedia touchscreen display;
2 Central control;
3 Steering column controls;
4 Steering wheel controls;
5 Microphone.
1
2
4
Refer to the equipment instructions
for information on how to operate
this equipment.
3
Page 240 of 316
4.4
ENGINE OIL LEVEL: general information
It is normal for an engine to use oil for
lubrication and cooling of moving parts
and it is normal to top up the level be-
tween oil changes.
However, contact your approved
Dealer if more than 0.5 litres is being
consumed every 600 miles (1,000 km)
after the running in period.
Oil change frequency: check the oil
level from time to time and certainly
before any long journey to avoid the
risk of damaging your engine.
Reading the oil level
The oil level should be read with the ve-
hicle on level ground, after the engine
has been switched off for some time.
The dipstick must be used to read
the exact oil level and make sure
that the maximum level has not been
exceeded (risk of engine damage).
Refer to the following pages.
The instrument panel display only
alerts the driver when the oil level is at
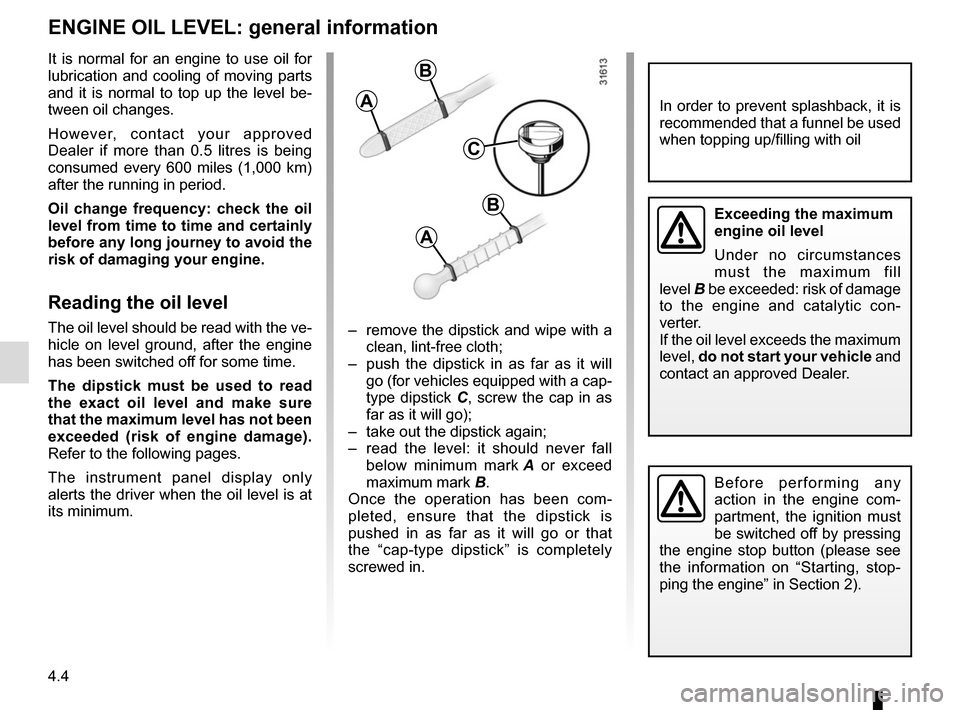
its minimum. – remove the dipstick and wipe with a
clean, lint-free cloth;
– push the dipstick in as far as it will go (for vehicles equipped with a cap-
type dipstick C, screw the cap in as
far as it will go);
– take out the dipstick again;
– read the level: it should never fall below minimum mark A or exceed
maximum mark B.
Once the operation has been com-
pleted, ensure that the dipstick is
pushed in as far as it will go or that
the “cap-type dipstick” is completely
screwed in.
C
A
B
A
B
In order to prevent splashback, it is
recommended that a funnel be used
when topping up/filling with oil
Before performing any
action in the engine com-
partment, the ignition must
be switched off by pressing
the engine stop button (please see
the information on “Starting, stop-
ping the engine” in Section 2).
Exceeding the maximum
engine oil level
Under no circumstances
must the maximum fill
level B be exceeded: risk of damage
to the engine and catalytic con-
verter.
If the oil level exceeds the maximum
level, do not start your vehicle and
contact an approved Dealer.
Page 246 of 316
4.10
BATTERY (1/2)
1
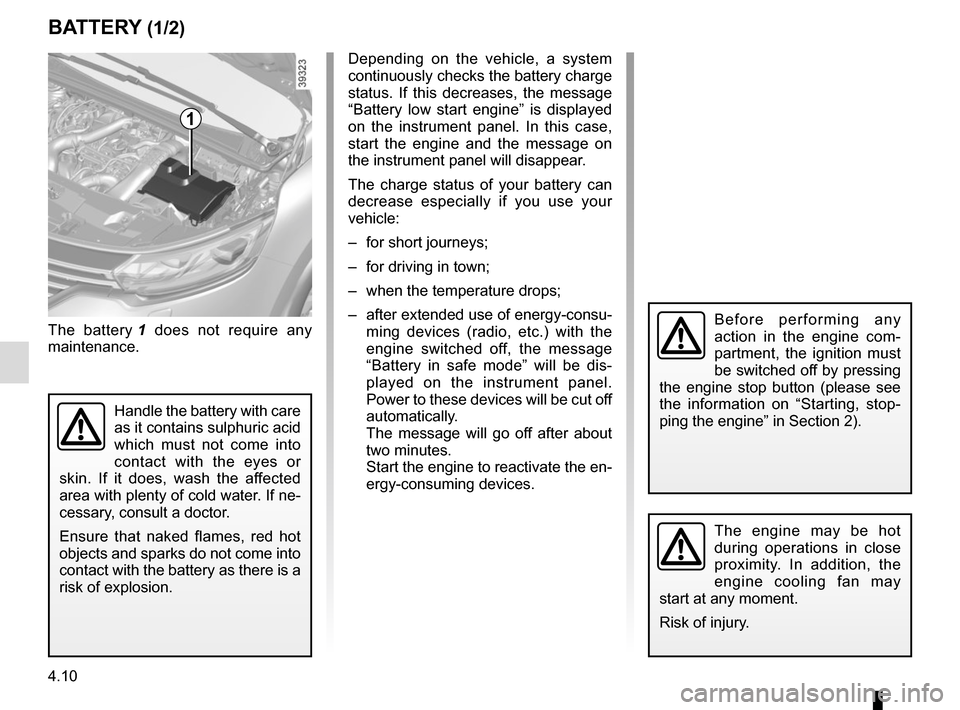
The battery 1 does not require any
maintenance.
Handle the battery with care
as it contains sulphuric acid
which must not come into
contact with the eyes or
skin. If it does, wash the affected
area with plenty of cold water. If ne-
cessary, consult a doctor.
Ensure that naked flames, red hot
objects and sparks do not come into
contact with the battery as there is a
risk of explosion.
Depending on the vehicle, a system
continuously checks the battery charge
status. If this decreases, the message
“Battery low start engine” is displayed
on the instrument panel. In this case,
start the engine and the message on
the instrument panel will disappear.
The charge status of your battery can
decrease especially if you use your
vehicle:
– for short journeys;
– for driving in town;
– when the temperature drops;
– after extended use of energy-consu- ming devices (radio, etc.) with the
engine switched off, the message
“Battery in safe mode” will be dis-
played on the instrument panel.
Power to these devices will be cut off
automatically.
The message will go off after about
two minutes.
Start the engine to reactivate the en-
ergy-consuming devices.
The engine may be hot
during operations in close
proximity. In addition, the
engine cooling fan may
start at any moment.
Risk of injury.
Before performing any
action in the engine com-
partment, the ignition must
be switched off by pressing
the engine stop button (please see
the information on “Starting, stop-
ping the engine” in Section 2).
Page 252 of 316
4.16
Glass instrument panel(e.g.: instrument panel, clock, exterior
temperature display, radio display, mul-
timedia or multifunction display etc.)
Use a soft cloth (or cotton wool).
If this does not clean them properly,
use a soft cloth (or cotton wool) slightly
moistened with soapy water and then
wipe clean with another soft damp cloth
or cotton wool.
Finally, carefully dry off with a soft dry
cloth.
Do not use products containing alco-
hol and/or spray fluids on the area.
Seat belts
These must be kept clean.
Use products selected by our Technical
Department (Approved outlets) or
warm, soapy water and a sponge and
wipe with a dry cloth.
Detergents or dyes must not be used
under any circumstances.
INTERIOR TRIM MAINTENANCE (1/2)
Textiles (seats, door trim, etc)
Vacuum-clean the textiles regularly.
Liquid stain
Use soapy water.
Dab lightly (never rub) with a soft cloth,
rinse and remove the excess.
Solid or pasty stain
Carefully remove the excess solid or
pasty material immediately with a spa-
tula (working from the edges to the
centre to avoid spreading the stain).
Clean as for a liquid stain.
Special instructions for sweets or
chewing gum
Put an ice cube on the stain to solidify
it, then proceed as for a solid stain.
A well-maintained vehicle will last
longer. It is therefore recommended to
maintain the interior of the vehicle re-
gularly.
A stain should always be dealt with
swiftly.
Whatever type of stain is on the trim,
use
cold (or warm) soapy water with
natural soap.
Detergents (washing-up liquid, pow-
dered products, alcohol-based pro-
ducts) should not be used.
Use a soft cloth.
Rinse and soak up the excess.
For further recommendations for
maintaining the interior, and/or for
any unsatisfactory results, please
see an authorised dealer.
Page 256 of 316
5.2
In case of puncture
Depending on the vehicle, a tyre infla-
tion kit or emergency spare wheel is
provided (refer to the following pages).
Special note
The Tyre Pressure Monitor function
does not check the emergency spare
wheel (the wheel replaced by the emer-
gency spare wheel disappears from the
instrument panel display).
Refer to the information on the “Tyre
pressure monitoring system” in
Section 2.
If the emergency spare wheel has been stored for several years, have it \
checked by your Dealer to ensure that it is safe to use.
Vehicles fitted with an emergency spare wheel smaller than the
four other wheels:
– Never fit more than one emergency spare wheel to the same vehicle.
– As the punctured wheel is wider than the emergency spare wheel, the vehi\
cle’s ground clearance is reduced.
– Replace the emergency spare wheel as soon as possible with a wheel with \
the same dimensions as the original.
– When this is fitted to the vehicle, which must only be a temporary measu\
re, the driving speed must not exceed the speed indicated on the label on the wh\
eel.
– Fitting an emergency spare wheel may alter the way the vehicle usually r\
uns. Avoid sudden acceleration or deceleration and reduce your speed when cor-\
nering.
– If you need to use snow chains, fit the emergency spare wheel to the rea\
r axle and check the tyre pressure.
PUNCTURE, EMERGENCY SPARE WHEEL (1/3)
If the vehicle is parked on
the hard shoulder, you must
warn other road users of
your vehicle’s presence
with a warning triangle or with other
devices as per the legislation ap-
plying to the country you are in.
Page 309 of 316
7.1
ALPHABETICAL INDEX (1/5)
A
ABS ....................................................................\
...2.26 → 2.37
accessories.............................................................\
........... 5.26
accessories socket ................................................... 3.28, 3.44
adaptive cruise control...........................................2.56 → 2.62
additional air conditioning ....................................... 3.12 – 3.13
additional methods of restraint .....................1.32 → 1.35, 1.38
side protection ............................................................. 1.37
to the rear seat belts ........................................1.32 → 1.36
adjusting your driving position ........................................... 1.28
advice on antipollution ....................................................... 2.21
air bag.................................................................\
...1.32 → 1.38
activating the front passenger air bags ........................ 1.61
deactivating the front passenger air bags .................... 1.59
air conditioning ........................................................3.7 → 3.14
air vents .....................................................................3.4 → 3.6
anti-corrosion check ..............................................6.14 → 6.18
anti-corrosion protection .................................................... 4.14
anti-lock braking system: ABS ...............................2.26 → 2.37
antipollution advice .................................................................\
......... 2.21
armrest: front ..................................................................\
............ 3.25
ashtray ................................................................\
............... 3.28
assisted parking............................... 2.63 → 2.66, 2.69 → 2.72
automatic gearbox (use) ........................................2.74 → 2.79
automatic gearbox selector lever...........................2.74 → 2.79
B
battery.................................................................\
.... 4.10 – 4.11 troubleshooting ................................................. 5.23 – 5.24
blind spot warning signal .......................................2.41 → 2.43
blind spot: warning signal ......................................2.41 → 2.43
bonnet..................................................................\
....... 4.2 – 4.3
brake fluid ........................................................................\
.... 4.8 bulbs
changing ..........................................................5.15 \
→ 5.18
C
catalytic converter................................................... 2.10 – 2.11
central door locking ........................................1.8 → 1.10, 1.14
changing a bulb .....................................................5.15 → 5.18
changing a wheel.................................................... 5.10 – 5.11
changing gear ...............................................2.12, 2.74 → 2.79
child restraint/seat .............................1.39 – 1.40, 1.42 → 1.58
child safety.........1.2, 1.5, 1.13, 1.39 – 1.40, 1.42 → 1.58, 3.15
child seats..........................................1.39 – 1.40, 1.4\
2 → 1.58
children .......................................................... 1.39 – 1.40, 1.40
children (safety) .......................................... 1.2, 1.5, 1.13, 3.15
cigar lighter ........................................................................\
3.28
cleaning: inside the vehicle .............................................. 4.16 – 4.17
clock ..................................................................\
................ 1.85
closing the doors .....................................................1.8 → 1.13
control instruments ................................................. 1.74 – 1.75
controls ................................................................... 1.62 – 1.63
coolant ................................................................\
................. 4.7
courtesy light ...................................... 3.20 – 3.21, 5.19 – 5.20
courtesy mirrors ................................................................. 3.22
cruise control ................................... 2.46 → 2.48, 2.52 → 2.55
cruise control-speed limiter.............. 2.46 → 2.48, 2.52 → 2.55
customised vehicle settings .............................................. 1.84
customising the vehicle settings ....................................... 1.84
D
dashboard...............................................................\
1.62 – 1.63
daytime running lights..................................................\
...... 1.93
dimensions .............................................................\
............. 6.4
display ..........................................................1.64 → 1.73, 3.43
doors...................................................................\
... 1.11 → 1.14
driver assistance....................................................2.2\
6 → 2.72
Page 311 of 316
7.3
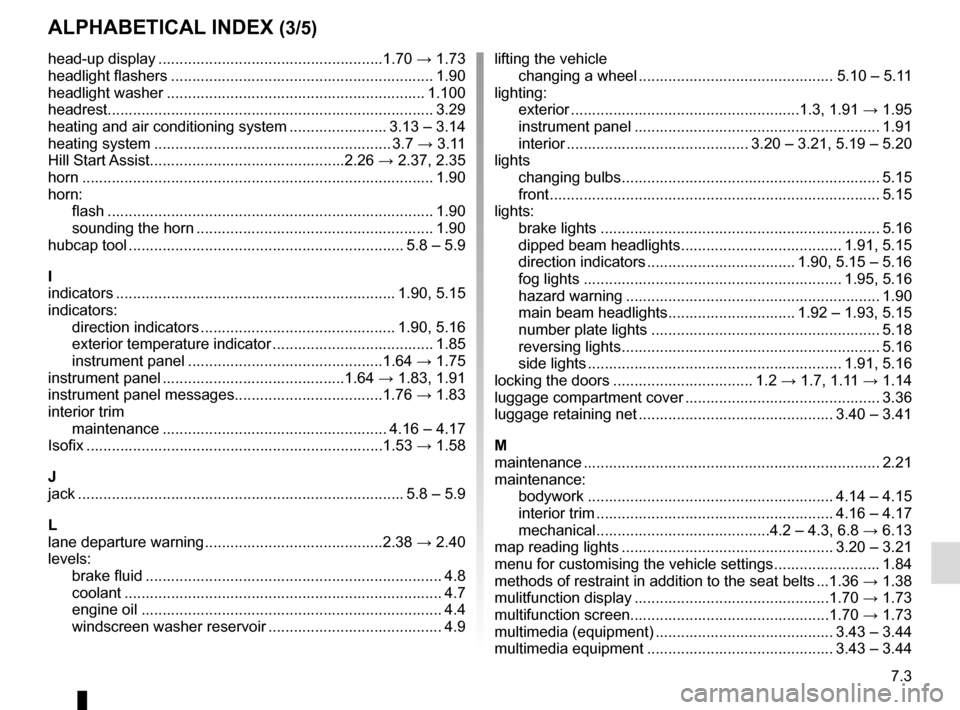
ALPHABETICAL INDEX (3/5)
head-up display .....................................................1.70 → 1.73
headlight flashers .............................................................. 1.90
headlight washer ............................................................. 1.100
headrest................................................................\
............. 3.29
heating and air conditioning system ....................... 3.13 – 3.14
heating system ........................................................ 3.7 → 3.11
Hill Start Assist..............................................2.26 → 2.37, 2.35
horn ...................................................................\
................ 1.90
horn: flash ..................................................................\
........... 1.90
sounding the horn ........................................................ 1.90
hubcap tool ................................................................. 5.8 – 5.9
I
indicators .............................................................\
..... 1.90, 5.15
indicators: direction indicators .............................................. 1.90, 5.16
exterior temperature indicator ...................................... 1.85
instrument panel ..............................................1.64 → 1.75
instrument panel ...........................................1.64 → 1.83, 1.91
instrument panel messages...................................1.76 → 1.83
interior trim maintenance ..................................................... 4.16 – 4.17
Isofix .................................................................\
.....1.53 → 1.58
J
jack ........................................................................\
..... 5.8 – 5.9
L
lane departure warning ..........................................2.38 → 2.40
levels: brake fluid ...................................................................... 4.8
coolant ................................................................\
........... 4.7
engine oil ....................................................................... 4.4
windscreen washer reservoir ......................................... 4.9 lifting the vehicle
changing a wheel .............................................. 5.10 – 5.11
lighting: exterior ......................................................1.3, 1.91 → 1.95
instrument panel .......................................................... 1.91
interior ........................................... 3.20 – 3.21, 5.19 – 5.20
lights changing bulbs ............................................................. 5.15
front ..................................................................\
............ 5.15
lights: brake lights .................................................................. 5.16
dipped beam headlights ...................................... 1.91, 5.15
direction indicators ................................... 1.90, 5.15 – 5.16
fog lights ............................................................. 1.95, 5.16
hazard warning ............................................................ 1.90
main beam headlights .............................. 1.92 – 1.93, 5.15
number plate lights ...................................................... 5.18
reversing lights ............................................................. 5.16
side lights ............................................................ 1.91, 5.16
locking the doors ................................. 1.2 → 1.7, 1.11 → 1.14
luggage compartment cover .............................................. 3.36
luggage retaining net .............................................. 3.40 – 3.41
M
maintenance ............................................................\
.......... 2.21
maintenance: bodywork .......................................................... 4.14 – 4.15
interior trim ........................................................ 4.16 – 4.17
mechanical .........................................4.2 – 4.3, 6.8 → 6.13
map reading lights .................................................. 3.20 – 3.21
menu for customising the vehicle settings ......................... 1.84
methods of restraint in addition to the seat belts ...1.36 → 1.38
mulitfunction display ..............................................1.70 → 1.73
multifunction screen...............................................1.70 \
→ 1.73
multimedia (equipment) .......................................... 3.43 – 3.44
multimedia equipment ............................................ 3.43 – 3.44