Agr RENAULT ESPACE 2015 5.G Owners Manual
[x] Cancel search | Manufacturer: RENAULT, Model Year: 2015, Model line: ESPACE, Model: RENAULT ESPACE 2015 5.GPages: 316, PDF Size: 6.98 MB
Page 51 of 316
1.45
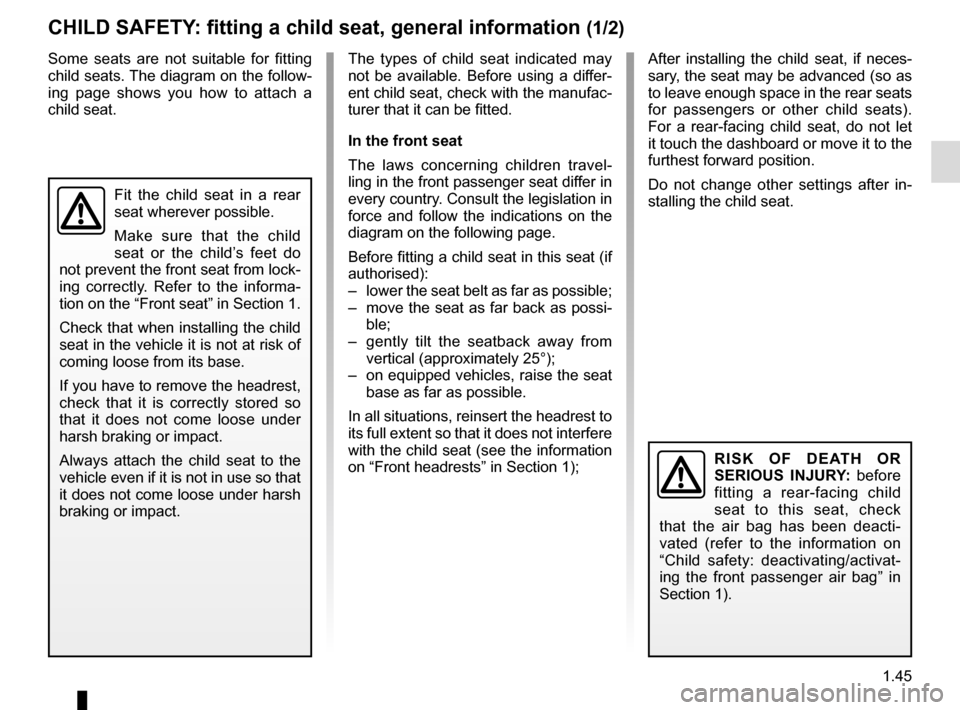
CHILD SAFETY: fitting a child seat, general information (1/2)
The types of child seat indicated may
not be available. Before using a differ-
ent child seat, check with the manufac-
turer that it can be fitted.
In the front seat
The laws concerning children travel-
ling in the front passenger seat differ in
every country. Consult the legislation in
force and follow the indications on the
diagram on the following page.
Before fitting a child seat in this seat (if
authorised):
– lower the seat belt as far as possible;
– move the seat as far back as possi-ble;
– gently tilt the seatback away from vertical (approximately 25°);
– on equipped vehicles, raise the seat base as far as possible.
In all situations, reinsert the headrest to
its full extent so that it does not interfere
with the child seat (see the information
on “Front headrests” in Section 1);
Some seats are not suitable for fitting
child seats. The diagram on the follow-
ing page shows you how to attach a
child seat.
Fit the child seat in a rear
seat wherever possible.
Make sure that the child
seat or the child’s feet do
not prevent the front seat from lock-
ing correctly. Refer to the informa-
tion on the “Front seat” in Section 1.
Check that when installing the child
seat in the vehicle it is not at risk of
coming loose from its base.
If you have to remove the headrest,
check that it is correctly stored so
that it does not come loose under
harsh braking or impact.
Always attach the child seat to the
vehicle even if it is not in use so that
it does not come loose under harsh
braking or impact.
RISK OF DEATH OR
SERIOUS INJURY: before
fitting a rear-facing child
seat to this seat, check
that the air bag has been deacti-
vated (refer to the information on
“Child safety: deactivating/activat-
ing the front passenger air bag” in
Section 1).
After installing the child seat, if neces-
sary, the seat may be advanced (so as
to leave enough space in the rear seats
for passengers or other child seats).
For a rear-facing child seat, do not let
it touch the dashboard or move it to the
furthest forward position.
Do not change other settings after in-
stalling the child seat.
Page 54 of 316
1.48
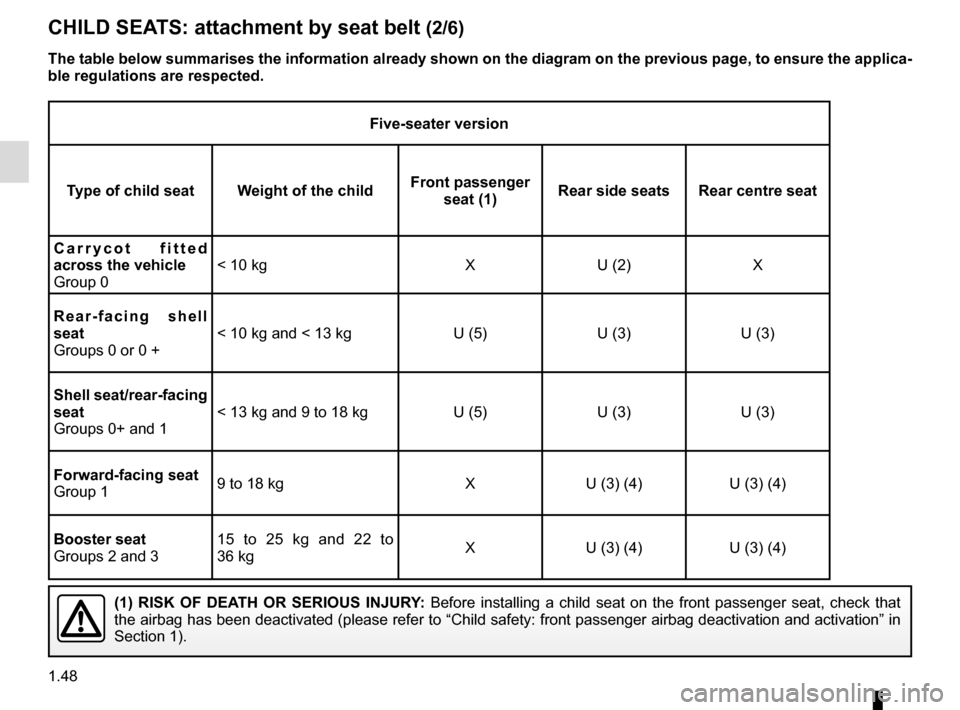
CHILD SEATS: attachment by seat belt (2/6)
Five-seater version
Type of child seat Weight of the child Front passenger
seat (1) Rear side seats Rear centre seat
Carrycot fitted
across the vehicle
Group 0 < 10 kg X U (2) X
Rear-facing shell
seat
Groups 0 or 0 + < 10 kg and < 13 kg U (5) U (3) U (3)
Shell seat/rear-facing
seat
Groups 0+ and 1 < 13 kg and 9 to 18 kg U (5) U (3) U (3)
Forward-facing seat
Group 1 9 to 18 kg X U (3) (4) U (3) (4)
Booster seat
Groups 2 and 3 15 to 25 kg and 22 to
36 kg
X U (3) (4) U (3) (4)
(1) RISK OF DEATH OR SERIOUS INJURY: Before installing a child seat on the front passenger seat, check that \
the airbag has been deactivated (please refer to “Child safety: fron\
t passenger airbag deactivation and activation” in
Section 1).
The table below summarises the information already shown on the diagram \
on the previous page, to ensure the applica-
ble regulations are respected.
Page 56 of 316
1.50
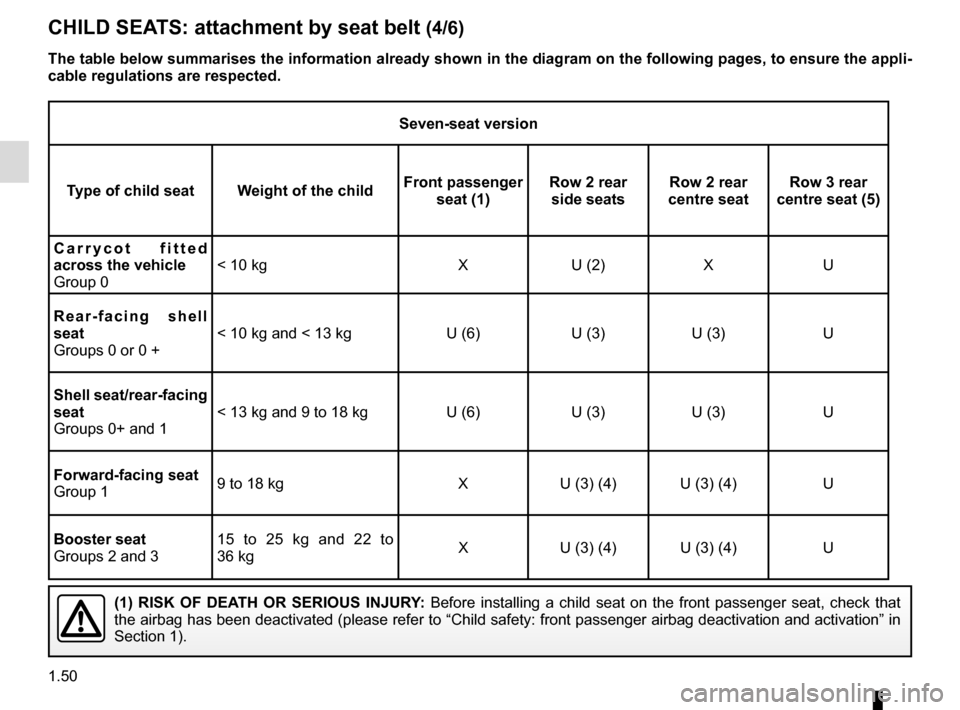
CHILD SEATS: attachment by seat belt (4/6)
Seven-seat version
Type of child seat Weight of the child Front passenger
seat (1) Row 2 rear
side seats Row 2 rear
centre seat Row 3 rear
centre seat (5)
Carrycot fitted
across the vehicle
Group 0 < 10 kg X U (2) X U
Rear-facing shell
seat
Groups 0 or 0 + < 10 kg and < 13 kg U (6) U (3) U (3) U
Shell seat/rear-facing
seat
Groups 0+ and 1 < 13 kg and 9 to 18 kg U (6) U (3) U (3) U
Forward-facing seat
Group 1 9 to 18 kg X U (3) (4) U (3) (4) U
Booster seat
Groups 2 and 3 15 to 25 kg and 22 to
36 kg
X U (3) (4) U (3) (4) U
(1) RISK OF DEATH OR SERIOUS INJURY: Before installing a child seat on the front passenger seat, check that \
the airbag has been deactivated (please refer to “Child safety: fron\
t passenger airbag deactivation and activation” in
Section 1).
The table below summarises the information already shown in the diagram \
on the following pages, to ensure the appli-
cable regulations are respected.
Page 58 of 316
1.52
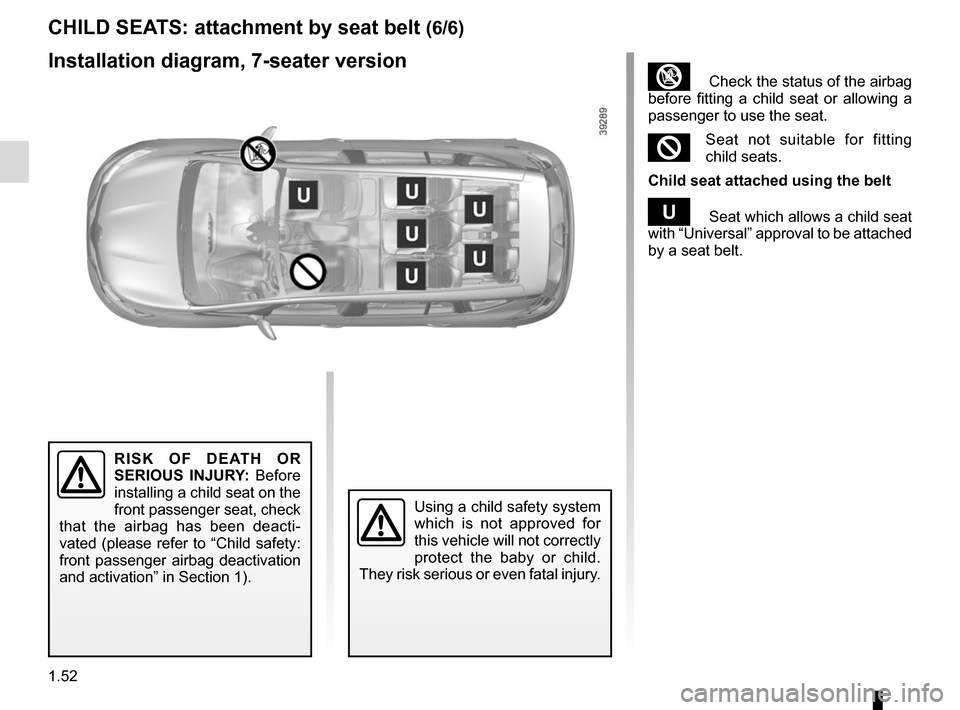
³ Check the status of the airbag
before fitting a child seat or allowing a
passenger to use the seat.
²Seat not suitable for fitting
child seats.
Child seat attached using the belt
¬ Seat which allows a child seat
with “Universal” approval to be attached
by a seat belt.
Using a child safety system
which is not approved for
this vehicle will not correctly
protect the baby or child.
They risk serious or even fatal injury.
RISK OF DEATH OR
SERIOUS INJURY: Before
installing a child seat on the
front passenger seat, check
that the airbag has been deacti-
vated (please refer to “Child safety:
front passenger airbag deactivation
and activation” in Section 1).
CHILD SEATS: attachment by seat belt (6/6)
Installation diagram, 7-seater version
Page 60 of 316
1.54
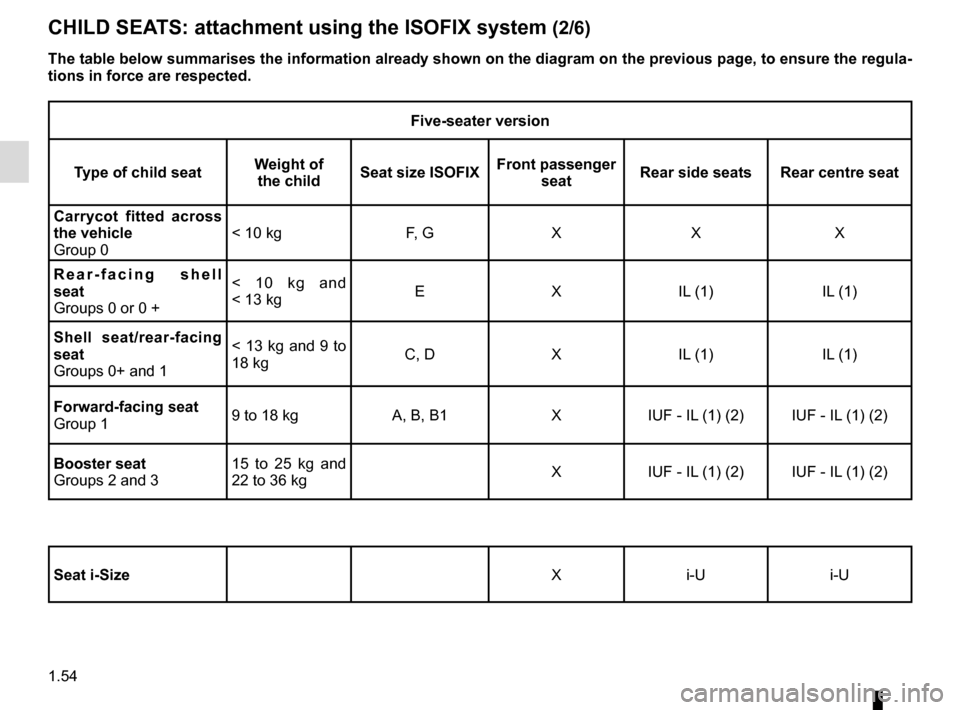
CHILD SEATS: attachment using the ISOFIX system (2/6)
Five-seater version
Type of child seat Weight of
the child Seat size ISOFIX Front passenger
seat Rear side seats Rear centre seat
Carrycot fitted across
the vehicle
Group 0 < 10 kg
F, GXX X
Rear-facing shell
seat
Groups 0 or 0 + < 10 kg and
< 13 kg
E
XIL (1) IL (1)
Shell seat/rear-facing
seat
Groups 0+ and 1 < 13 kg and 9 to
18 kg
C, D
XIL (1) IL (1)
Forward-facing seat
Group 1 9 to 18 kg
A, B, B1XIUF - IL (1) (2) IUF - IL (1) (2)
Booster seat
Groups 2 and 3 15 to 25 kg and
22 to 36 kg
X
IUF - IL (1) (2) IUF - IL (1) (2)
Seat i-Size Xi-U i-U
The table below summarises the information already shown on the diagram \
on the previous page, to ensure the regula-
tions in force are respected.
Page 62 of 316
1.56
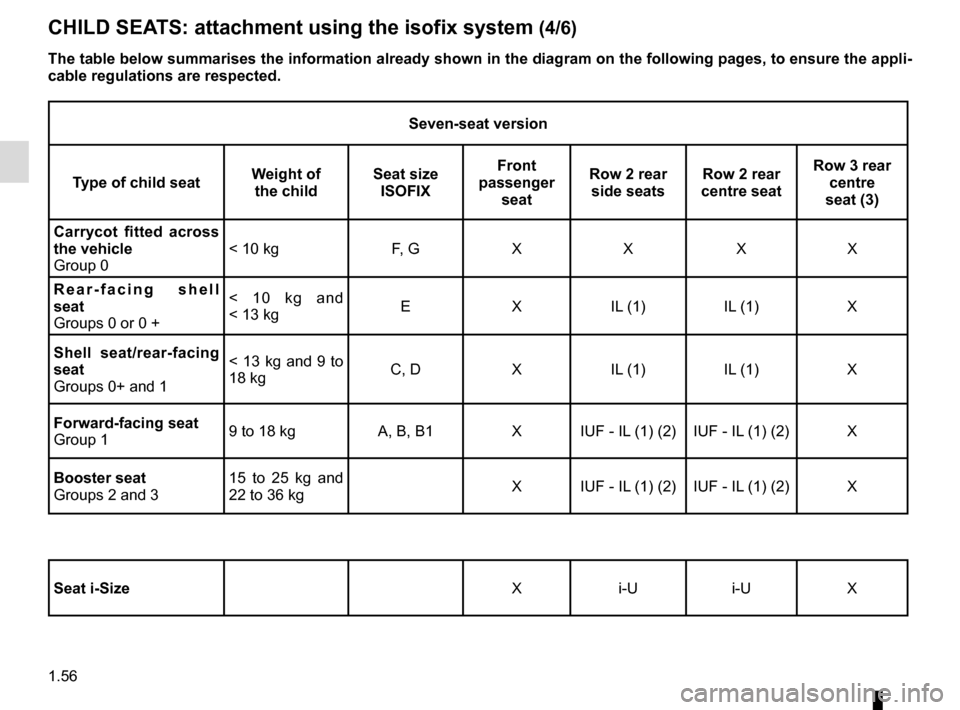
Seven-seat version
Type of child seat Weight of
the child Seat size
ISOFIX Front
passenger seat Row 2 rear
side seats Row 2 rear
centre seat Row 3 rear
centre
seat (3)
Carrycot fitted across
the vehicle
Group 0 < 10 kg F, G X X X X
Rear-facing shell
seat
Groups 0 or 0 + < 10 kg and
< 13 kg
E X IL (1) IL (1) X
Shell seat/rear-facing
seat
Groups 0+ and 1 < 13 kg and 9 to
18 kg
C, D X IL (1) IL (1) X
Forward-facing seat
Group 1 9 to 18 kg A, B, B1 X IUF - IL (1) (2) IUF - IL (1) (2) X
Booster seat
Groups 2 and 3 15 to 25 kg and
22 to 36 kg
X IUF - IL (1) (2) IUF - IL (1) (2) X
Seat i-Size X i-U i-U X
CHILD SEATS: attachment using the isofix system (4/6)
The table below summarises the information already shown in the diagram \
on the following pages, to ensure the appli-
cable regulations are respected.
Page 94 of 316
1.88
Position memory
– Adjust the door mirrors (see previous paragraphs);
– from the multifunction screen, select menu “Vehicle”, “Seats”, “Settings”
then “Position” and select “Save”.
The positions of the door mirrors in a
forward gear, reverse and of the front
seats are simultaneously saved.
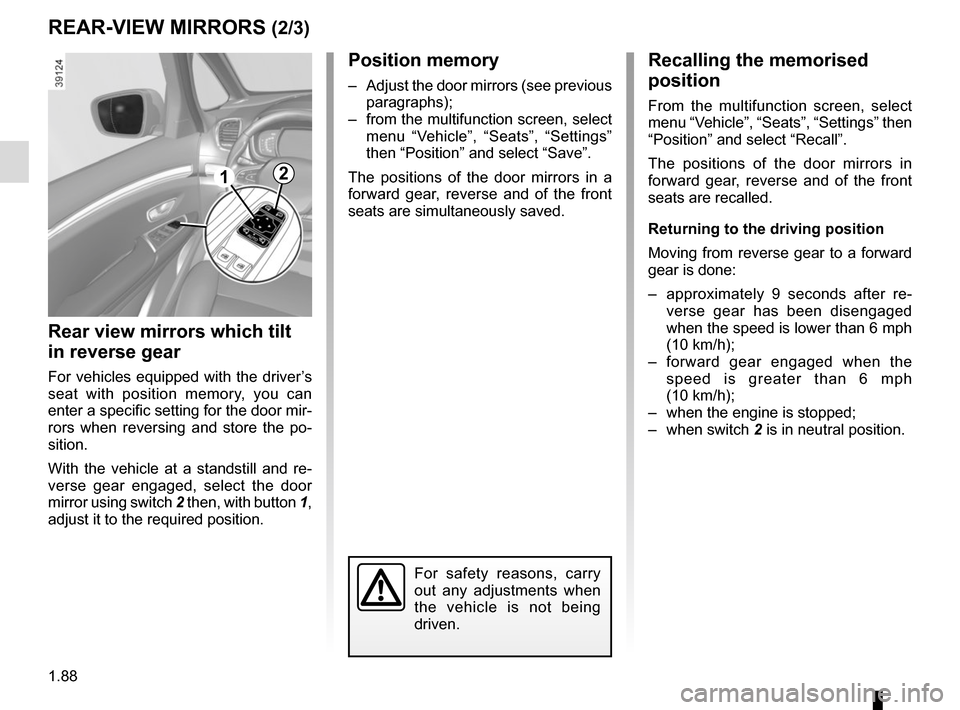
Rear view mirrors which tilt
in reverse gear
For vehicles equipped with the driver’s
seat with position memory, you can
enter a specific setting for the door mir-
rors when reversing and store the po-
sition.
With the vehicle at a standstill and re-
verse gear engaged, select the door
mirror using switch 2 then, with button 1,
adjust it to the required position.
REAR-VIEW MIRRORS (2/3)
1
Recalling the memorised
position
From the multifunction screen, select
menu “Vehicle”, “Seats”, “Settings” then
“Position” and select “Recall”.
The positions of the door mirrors in
forward gear, reverse and of the front
seats are recalled.
Returning to the driving position
Moving from reverse gear to a forward
gear is done:
– approximately 9 seconds after re- verse gear has been disengaged
when the speed is lower than 6 mph
(10 km/h);
– forward gear engaged when the speed is greater than 6 mph
(10 km/h);
– when the engine is stopped;
– when switch 2 is in neutral position.
For safety reasons, carry
out any adjustments when
the vehicle is not being
driven.
2
Page 286 of 316
5.32
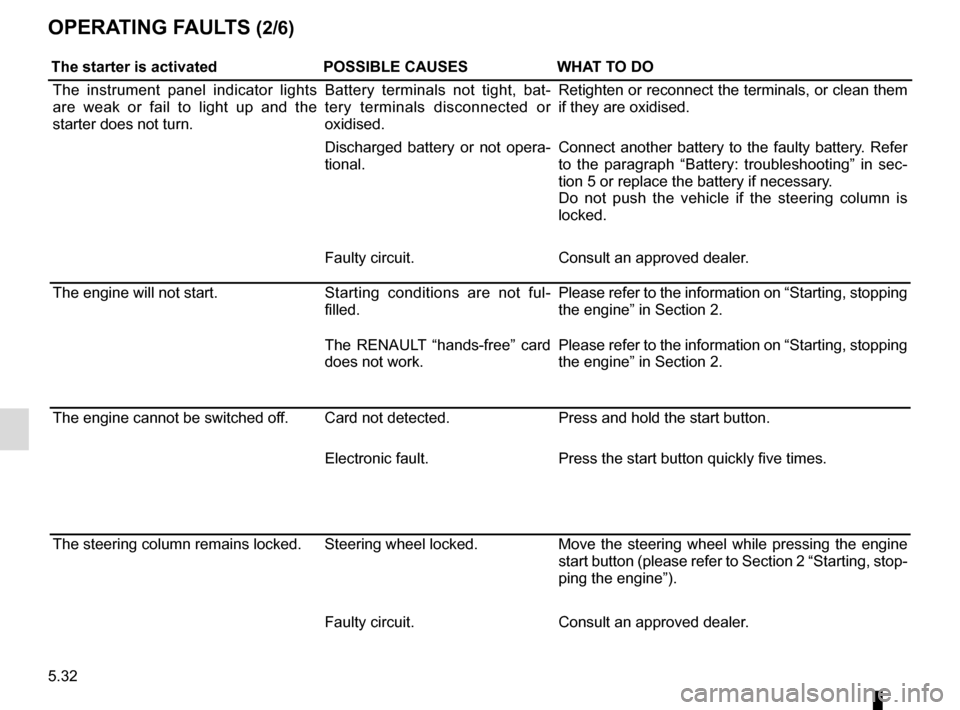
OPERATING FAULTS (2/6)
The starter is activatedPOSSIBLE CAUSESWHAT TO DO
The instrument panel indicator lights
are weak or fail to light up and the
starter does not turn. Battery terminals not tight, bat-
tery terminals disconnected or
oxidised.Retighten or reconnect the terminals, or clean them
if they are oxidised.
Discharged battery or not opera-
tional. Connect another battery to the faulty battery. Refer
to the paragraph “Battery: troubleshooting” in sec-
tion 5 or replace the battery if necessary.
Do not push the vehicle if the steering column is
locked.
Faulty circuit. Consult an approved dealer.
The engine will not start. Starting conditions are not ful-
filled.Please refer to the information on “Starting, stopping
the engine” in Section 2.
The RENAULT “hands-free” card
does not work. Please refer to the information on “Starting, stopping
the engine” in Section 2.
The engine cannot be switched off. Card not detected. Press and hold the start button.
Electronic fault. Press the start button quickly five times.
The steering column remains locked. Steering wheel locked. Move the steering wheel while pressing the engine
start button (please refer to Section 2 “Starting, stop-
ping the engine”).
Faulty circuit. Consult an approved dealer.