RENAULT ESPACE 2016 5.G Owners Manual
ESPACE 2016 5.G
RENAULT
RENAULT
https://www.carmanualsonline.info/img/7/1612/w960_1612-0.png
RENAULT ESPACE 2016 5.G Owners Manual
Trending: air conditioning, interior lights, child restraint, ground clearance, spare wheel storage, oil change, lights
Page 211 of 318
3.23
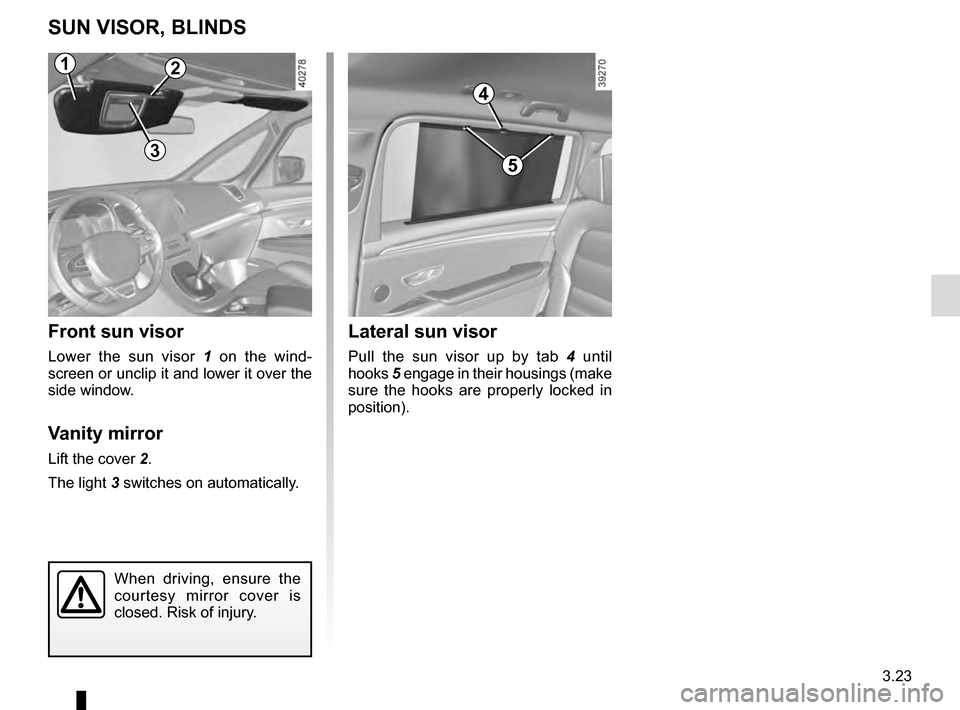
SUN VISOR, BLINDS
Front sun visor
Lower the sun visor 1 on the wind-
screen or unclip it and lower it over the
side window.
Vanity mirror
Lift the cover 2.
The light 3 switches on automatically.
Lateral sun visor
Pull the sun visor up by tab 4 until
hooks 5 engage in their housings (make
sure the hooks are properly locked in
position).
4
5
2
3
When driving, ensure the
courtesy mirror cover is
closed. Risk of injury.
1
Page 212 of 318
3.24
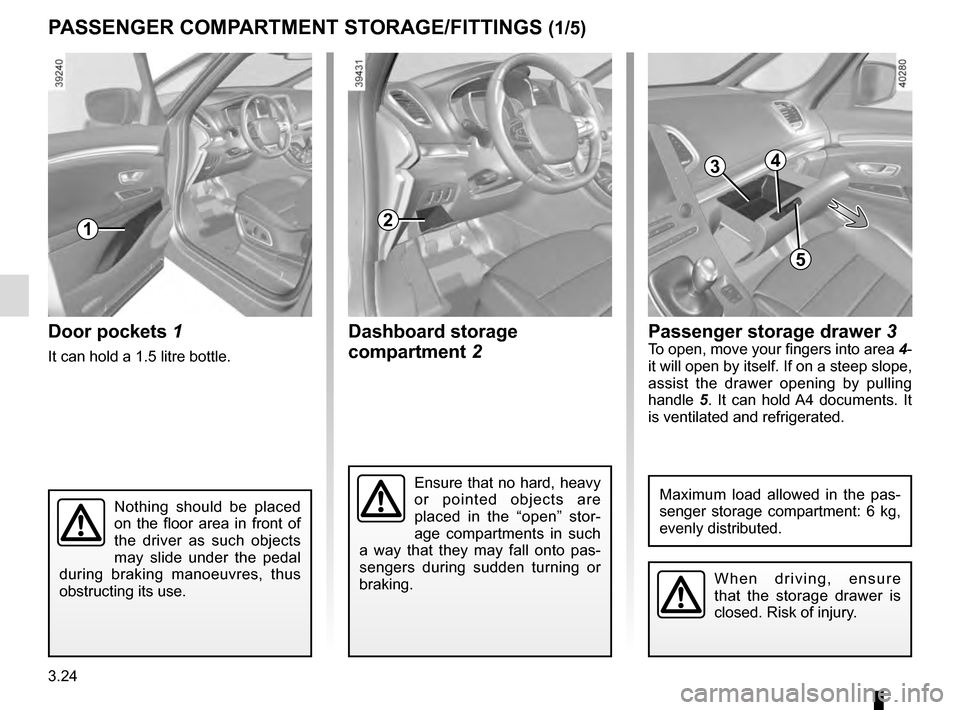
Dashboard storage
compartment 2Door pockets 1
It can hold a 1.5 litre bottle.
PASSENGER COMPARTMENT STORAGE/FITTINGS (1/5)
1
Nothing should be placed
on the floor area in front of
the driver as such objects
may slide under the pedal
during braking manoeuvres, thus
obstructing its use.
Ensure that no hard, heavy
or pointed objects are
placed in the “open” stor-
age compartments in such
a way that they may fall onto pas-
sengers during sudden turning or
braking.
2
Passenger storage drawer 3To open, move your fingers into area 4-
it will open by itself. If on a steep slope,
assist the drawer opening by pulling
handle 5. It can hold A4 documents. It
is ventilated and refrigerated.
Maximum load allowed in the pas-
senger storage compartment: 6 kg,
evenly distributed.
When driving, ensure
that the storage drawer is
closed. Risk of injury.
34
5
Page 213 of 318
3.25
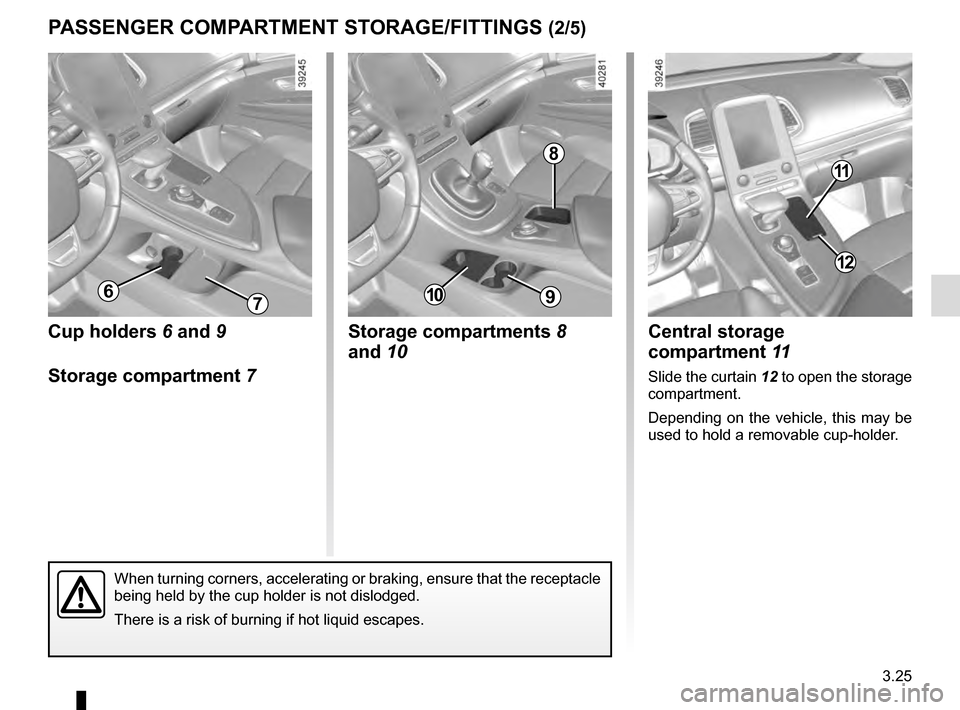
PASSENGER COMPARTMENT STORAGE/FITTINGS (2/5)
Central storage
compartment 11
Slide the curtain 12 to open the storage
compartment.
Depending on the vehicle, this may be
used to hold a removable cup-holder.
Cup holders 6 and 9
Storage compartment 7 Storage compartments 8
and 10
67
8
910
11
12
When turning corners, accelerating or braking, ensure that the receptacl\
e
being held by the cup holder is not dislodged.
There is a risk of burning if hot liquid escapes.
Page 214 of 318
3.26
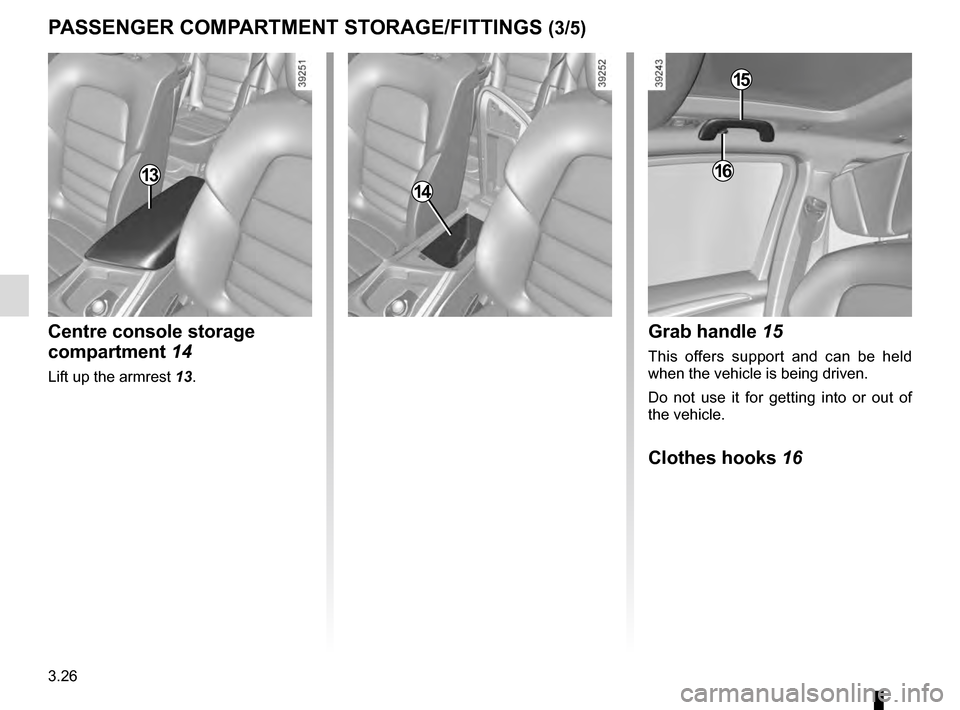
PASSENGER COMPARTMENT STORAGE/FITTINGS (3/5)
Centre console storage
compartment 14
Lift up the armrest 13.
1314
Grab handle 15
This offers support and can be held
when the vehicle is being driven.
Do not use it for getting into or out of
the vehicle.
Clothes hooks 16
15
16
Page 215 of 318
3.27
PASSENGER COMPARTMENT STORAGE/FITTINGS (4/5
Ensure that no hard, heavy
or pointed objects are
placed in the “open” stor-
age compartments in such
a way that they may fall onto pas-
sengers during sudden turning or
braking.
Storage drawer 18 under the
centre console
18
Rear door storage
compartment 17
17
Nothing should be placed
on the floor area in front of
the driver as such objects
may slide under the pedal
during braking manoeuvres, thus
obstructing its use.
Front seat storage pockets 19
19
Page 216 of 318
3.28
PASSENGER COMPARTMENT STORAGE/FITTINGS (5/5)
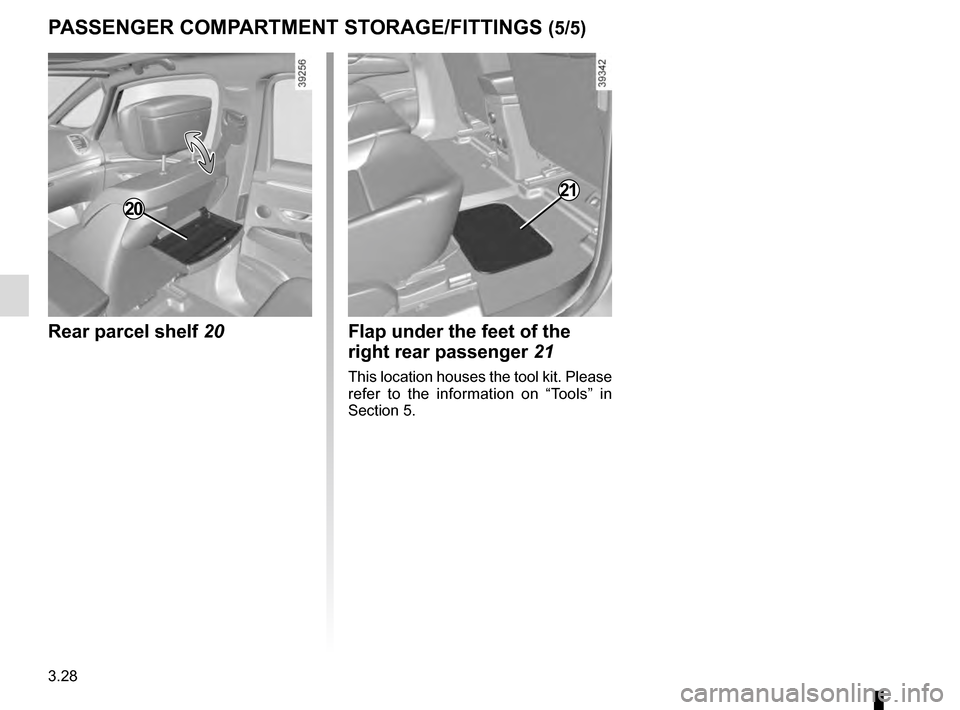
Rear parcel shelf 20
20
Flap under the feet of the
right rear passenger 21
This location houses the tool kit. Please
refer to the information on “Tools” in
Section 5.
21
Page 217 of 318
3.29
ASHTRAY/CIGAR LIGHTER/ACCESSORIES SOCKET
2
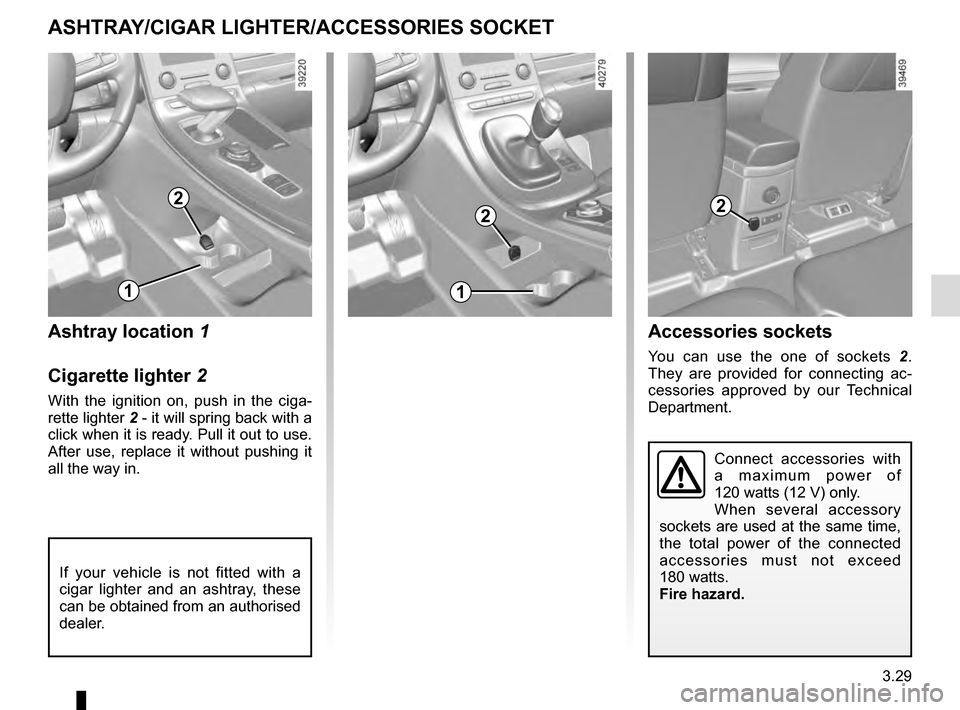
Ashtray location 1
Cigarette lighter 2
With the ignition on, push in the ciga-
rette lighter 2 - it will spring back with a
click when it is ready. Pull it out to use.
After use, replace it without pushing it
all the way in.
2
Accessories sockets
You can use the one of sockets 2.
They are provided for connecting ac-
cessories approved by our Technical
Department.
11
2
If your vehicle is not fitted with a
cigar lighter and an ashtray, these
can be obtained from an authorised
dealer.
Connect accessories with
a maximum power of
120 watts (12 V) only.
When several accessory
sockets are used at the same time,
the total power of the connected
accessories must not exceed
180 watts.
Fire hazard.
Page 218 of 318
3.30
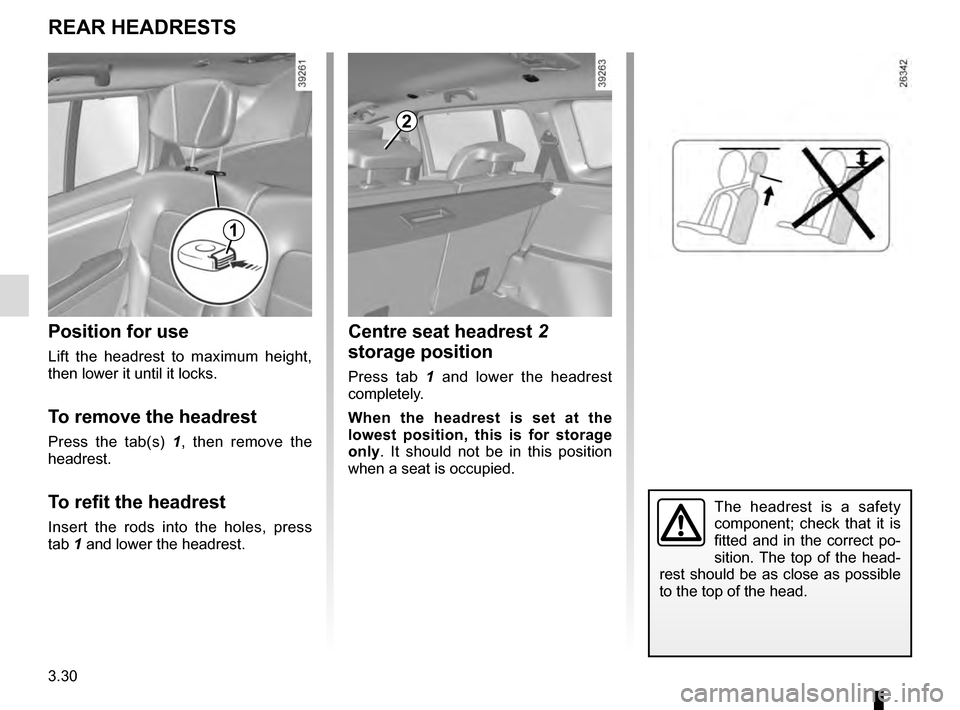
Centre seat headrest 2
storage position
Press tab 1 and lower the headrest
completely.
When the headrest is set at the
lowest position, this is for storage
only. It should not be in this position
when a seat is occupied.
REAR HEADRESTS
Position for use
Lift the headrest to maximum height,
then lower it until it locks.
To remove the headrest
Press the tab(s) 1 , then remove the
headrest.
To refit the headrest
Insert the rods into the holes, press
tab 1 and lower the headrest.
2
The headrest is a safety
component; check that it is
fitted and in the correct po-
sition. The top of the head-
rest should be as close as possible
to the top of the head.
1
Page 219 of 318
3.31
Heated seats
(depending on vehicle)
Side seats only
With the ignition on:
– Pressing the switch 3 on the requi-
red seat for the first time activates
the heating system on high. Both in-
tegrated switch warning lights come
on;
– pressing the switch for the second time changes the heating to low. One
integrated warning light comes on;
– pressing for the third time turns the heating off.
Operating faults
When an operating fault is detected,
the integrated warning lights on the
switch 3 for the seat concerned flash.
Consult an approved dealer.
For safety reasons, carry
out any adjustments when
the vehicle is stationary.
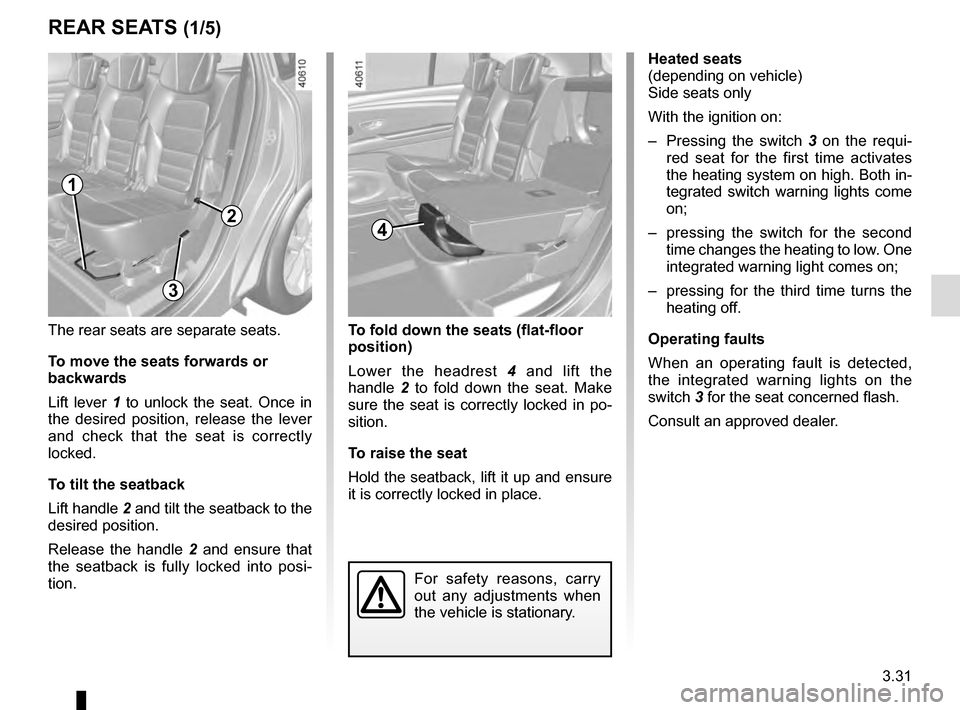
The rear seats are separate seats.
To move the seats forwards or
backwards
Lift lever 1 to unlock the seat. Once in
the desired position, release the lever
and check that the seat is correctly
locked.
To tilt the seatback
Lift handle 2 and tilt the seatback to the
desired position.
Release the handle 2 and ensure that
the seatback is fully locked into posi-
tion.
REAR SEATS (1/5)
1
24
To fold down the seats (flat-floor
position)
Lower the headrest 4 and lift the
handle 2 to fold down the seat. Make
sure the seat is correctly locked in po-
sition.
To raise the seat
Hold the seatback, lift it up and ensure
it is correctly locked in place.
3
Page 220 of 318
3.32
REAR SEATS (2/5)
When moving the rear
seats:
– check that no one is near
to any of the moving parts;
– check that there is sufficient space around the seat;
– check that nothing is obstructing the section of the boot reserved
for storing the seat;
For safety reasons, carry out any
adjustments when the vehicle is sta-
tionary.
When moving the rear
seats, ensure that nothing
obstructs the anchorage
points (passenger’s arm or
leg, a pet, gravel, cloth, toys, etc.).
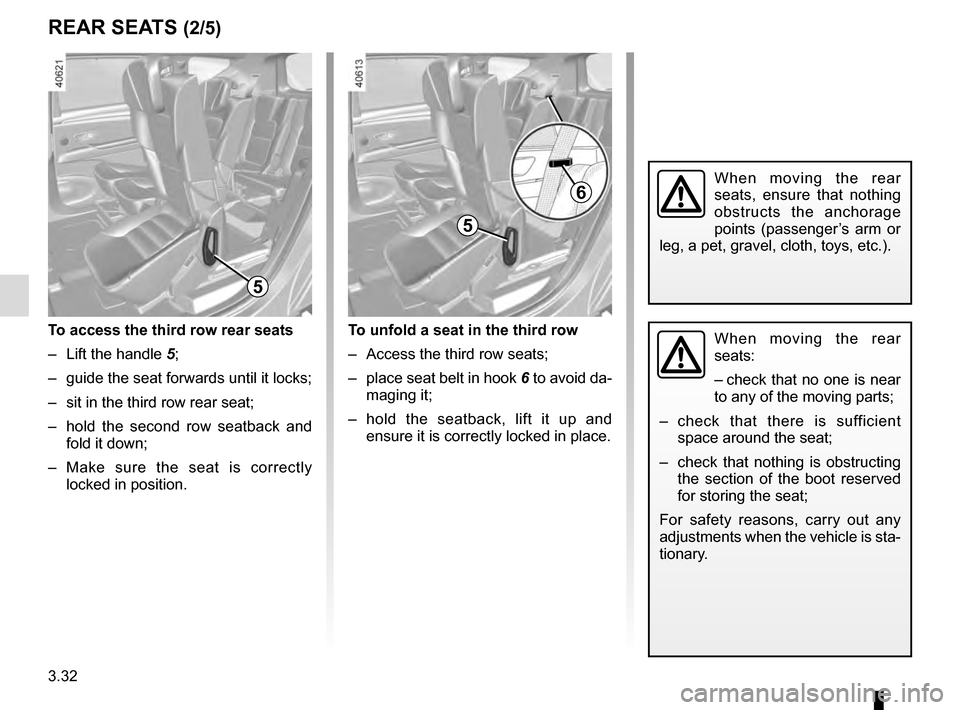
To unfold a seat in the third row
– Access the third row seats;
– place seat belt in hook 6 to avoid da-
maging it;
– hold the seatback, lift it up and ensure it is correctly locked in place.
5
To access the third row rear seats
– Lift the handle 5;
– guide the seat forwards until it locks;
– sit in the third row rear seat;
– hold the second row seatback and fold it down;
– Make sure the seat is correctly locked in position.
5
6
Trending: remote start, seats, Gearbox fluid, ad blue, oil pressure, receiver, wiper blades
