door lock RENAULT FLUENCE 2012 1.G Owner's Manual
[x] Cancel search | Manufacturer: RENAULT, Model Year: 2012, Model line: FLUENCE, Model: RENAULT FLUENCE 2012 1.GPages: 241, PDF Size: 6.5 MB
Page 76 of 241

rear view mirrors ................................... (up to the end of the DU)
1.72
ENG_UD21622_2
Rétroviseurs (L38 - X38 - Renault)
ENG_NU_891_892-7_L38-B32_Renault_1
Jaune NoirNoir texte
Door mirrors
Folding door mirrors
(depending on the vehicle)
The door mirrors automatically fold in
when the vehicle is locked (switch 2 in
position B ). In this case, they will fold
out when the ignition is next switched
on.
In any case, you can make the door
mirrors fold in (switch 2 in position C) or
fold out (switch 2 in position A).
Automatic mode is then deactivated. To
reactivate it, position switch 2 to B.
REAR VIEW MIRRORs (1/2)
Door mirrors
Adjustment
Select the door mirror using switch 3 ,
then use button 1 to adjust it to the de-
sired position.
heated door mirrors
(depending on the vehicle)
Mirror de-icing is carried out at the
same time as rear screen de-icing.
The driver ’s door mirror
may have two clearly de -
fined zones. Zone E shows
what can normally be seen
in an ordinary rear view mirror.
Zone D increases rear side visibility.
The objects in zone D look much
further away than they really are.
1
2
A
C
B
DE
3
Page 80 of 241
lights:main beam headlights ...................................... (current page)
warning buzzer ...................................................... (current page)
see-me-home lighting ............................................ (current page)
lights mobile directional ............................................. (current page)
1.76
ENG_UD27178_2
Éclairages et signalisations extérieurs (L38 - X38 - Renault)
ENG_NU_891_892-7_L38-B32_Renault_1
Jaune NoirNoir texte
EXTERIOR LIghTINg AND sIgNALs (2/3)
special note:
– If the dipped beam headlights are
manually switched on and if the light
is sufficient, the directional head -
lights will remain fixed;
– If the lights come on automatically
when cornering, the directional
headlights will start working from the
next time the vehicle corners;
– When the dipped beam headlights
are switched on with the engine
running and the vehicle stationary,
the lights move to reinitialise them -
selves. If not, there is a system fault.
switching off the lights
There are two possibilities:
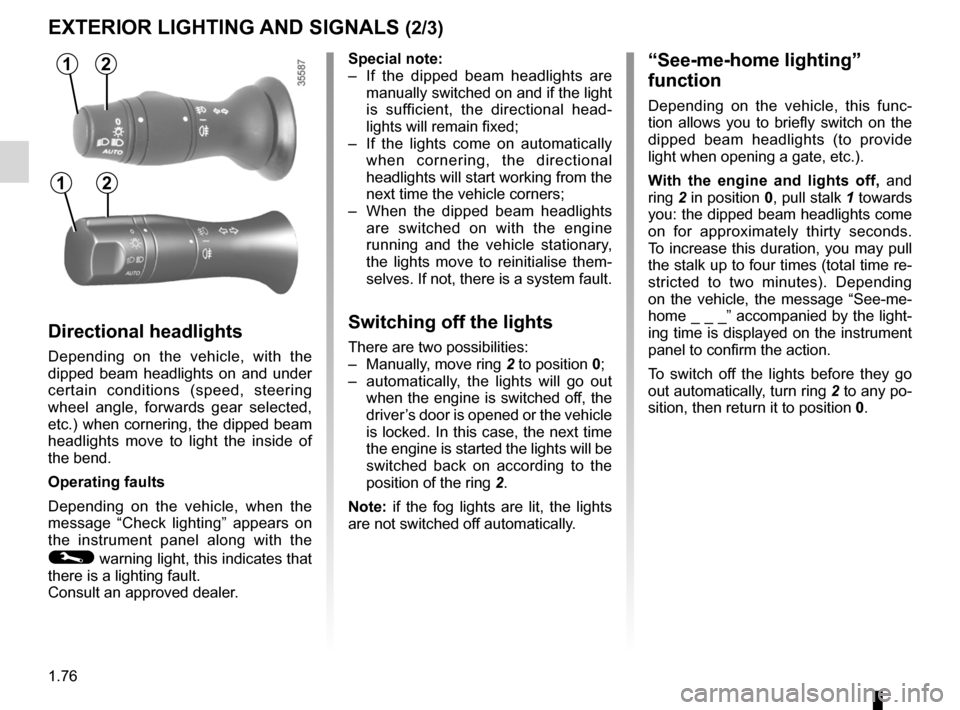
– Manually, move ring 2 to position 0;
– automatically, the lights will go out
when the engine is switched off, the
driver’s door is opened or the vehicle
is locked. In this case, the next time
the engine is started the lights will be
switched back on according to the
position of the ring 2.
Note: if the fog lights are lit, the lights
are not switched off automatically.
“see-me-home lighting”
function
Depending on the vehicle, this func -
tion allows you to briefly switch on the
dipped beam headlights (to provide
light when opening a gate, etc.).
With the engine and lights off, and
ring 2 in position 0, pull stalk 1 towards
you: the dipped beam headlights come
on for approximately thirty seconds.
To increase this duration, you may pull
the stalk up to four times (total time re-
stricted to two minutes). Depending
on the vehicle, the message “See-me-
home _ _ _” accompanied by the light-
ing time is displayed on the instrument
panel to confirm the action.
To switch off the lights before they go
out automatically, turn ring 2 to any po-
sition, then return it to position 0.
Directional headlights
Depending on the vehicle, with the
dipped beam headlights on and under
certain conditions (speed, steering
wheel angle, forwards gear selected,
etc.) when cornering, the dipped beam
headlights move to light the inside of
the bend.
Operating faults
Depending on the vehicle, when the
message “Check lighting ” appears on
the instrument panel along with the
© warning light, this indicates that
there is a lighting fault.
Consult an approved dealer.
12
12
Page 86 of 241
fuel tank capacity .................................. (up to the end of the DU)
fuel filling ................................................ (up to the end of the DU)
fuel grade ............................................... (up to the end of the DU)
fuel tank capacity ........................................... (up to the end of the DU)
fuel capacity ............................................................ (current page)
fuel filler cap ......................................... (up to the end of the DU)
1.82
ENG_UD23758_4
Réservoir à carburant (L38 - X38 - Renault)
ENG_NU_891_892-7_L38-B32_Renault_1
Jaune NoirNoir texte
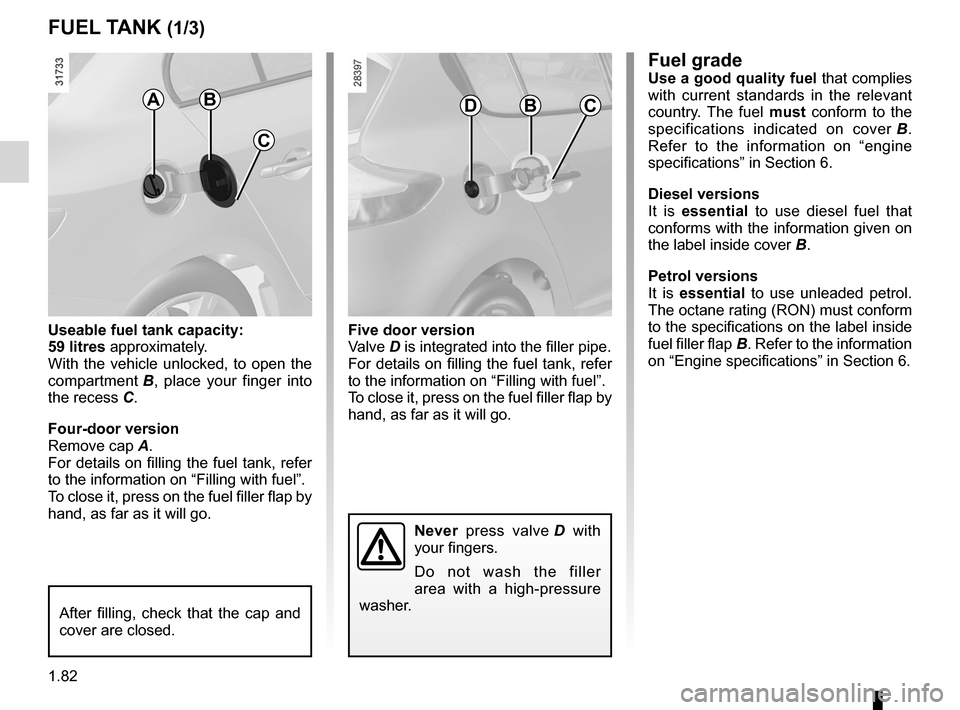
Five door version
Valve D is integrated into the filler pipe.
For details on filling the fuel tank, refer
to the information on “Filling with fuel”.
To close it, press on the fuel filler flap by
hand, as far as it will go.
Fuel gradeUse a good quality fuel that complies
with current standards in the relevant
country. The fuel must conform to the
specifications indicated on cover B .
Refer to the information on “engine
specifications” in Section 6.
Diesel versions
It is essential to use diesel fuel that
conforms with the information given on
the label inside cover B.
petrol versions
It is essential to use unleaded petrol.
The octane rating (RON) must conform
to the specifications on the label inside
fuel filler flap B. Refer to the information
on “Engine specifications” in Section 6.
Fuel tank (filling with fuel)
Never press valve D with
your fingers.
Do not wash the filler
area with a high-pressure
washer.
FUEL TANK (1/3)
BC
Useable fuel tank capacity:
59 litres approximately.
With the vehicle unlocked, to open the
compartment B , place your finger into
the recess C.
Four-door version
Remove cap A.
For details on filling the fuel tank, refer
to the information on “Filling with fuel”.
To close it, press on the fuel filler flap by
hand, as far as it will go.
BAD
After filling, check that the cap and
cover are closed.
C
Page 95 of 241

JauneNoirNoir texte
2.7
ENG_UD13650_1
Démarrage / Arrêt moteur avec carte RENAULT mains libres (L38 - X38 - Renault)
ENG_NU_891_892-7_L38-B32_Renault_2
St ARtING/St OPPING the eNGINe: vehicle with ReNAULt CARD (3/3)
When you leave your vehi -
cle, especially if you have
your RENAULT card with
you, check that the engine
is completely switched off.
If the card is no longer in the passenger
compartment when you try to switch the
engine off, the message “ No keycard
Press and hold ” appears on the instru-
ment panel: press button 1 for longer
than two seconds.
With the engine switched off, any ac -
cessories being used (radio, etc.) will
continue to function for approximately
10 minutes.
When the driver’s door is opened, the
accessories stop working.
With the card in reader 2 , press
button 1 : the engine stops. Removing
the card from the reader locks the
steering column.
Special note
If the card is no longer in the reader
when you try to switch the engine off,
the message “ No keycard Press and
hold ” appears on the instrument panel:
press button 1 for longer than two sec-
onds.
Conditions for stopping the
engine
The vehicle must stationary, with the
lever positioned in N or P for vehicles
with an automatic transmission.
hands-free ReNAUL t card
With the card in the vehicle , press
button 1 : the engine stops. The steer -
ing column is locked when the driver’s
door is opened or the vehicle is locked.
12
Page 140 of 241
electric windows ................................... (up to the end of the DU)
child safety ............................................................. (current page)
children (safety) ..................................................... (current page)
sunroof .................................................. (up to the end of the DU)
3.12
ENG_UD21430_2
Lève-vitres électriques (L38 - X38 - Renault)
ENG_NU_891_892-7_L38-B32_Renault_3
Jaune NoirNoir texte
These systems operate with the igni -
tion on or off, until one of the front doors
is opened (limited to about 3 minutes).
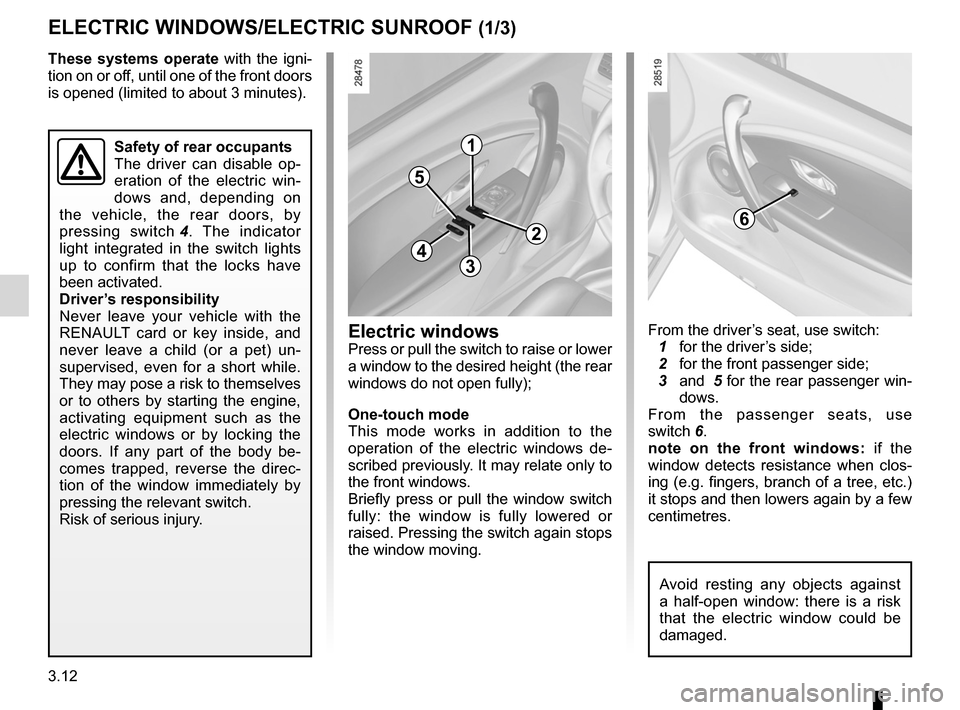
From the driver’s seat, use switch:
1 for the driver’s side;
2 for the front passenger side;
3 and 5 for the rear passenger win-
dows.
From the passenger seats, use
switch 6.
note on the front windows: if the
window detects resistance when clos -
ing (e.g. fingers, branch of a tree, etc.)
it stops and then lowers again by a few
centimetres.
Electric windows/Electric sunroof
ElEcTRIc wINDowS/ElEcTRIc SuNRooF (1/3)
Electric windows
Press or pull the switch to raise or lower
a window to the desired height (the rear
windows do not open fully);
one-touch mode
This mode works in addition to the
operation of the electric windows de -
scribed previously. It may relate only to
the front windows.
Briefly press or pull the window switch
fully: the window is fully lowered or
raised. Pressing the switch again stops
the window moving.
1
2
34
5
6
Safety of rear occupants
The driver can disable op -
eration of the electric win -
dows and, depending on
the vehicle, the rear doors, by
pressing switch 4 . The indicator
light integrated in the switch lights
up to confirm that the locks have
been activated.
Driver’s responsibility
Never leave your vehicle with the
RENAULT card or key inside, and
never leave a child (or a pet) un -
supervised, even for a short while.
They may pose a risk to themselves
or to others by starting the engine,
activating equipment such as the
electric windows or by locking the
doors. If any part of the body be -
comes trapped, reverse the direc -
tion of the window immediately by
pressing the relevant switch.
Risk of serious injury.
Avoid resting any objects against
a half-open window: there is a risk
that the electric window could be
damaged.
Page 141 of 241
JauneNoirNoir texte
3.13
ENG_UD21430_2
Lève-vitres électriques (L38 - X38 - Renault)
ENG_NU_891_892-7_L38-B32_Renault_3
ElEcTRIc wINDowS/ElEcTRIc SuNRooF (2/3)
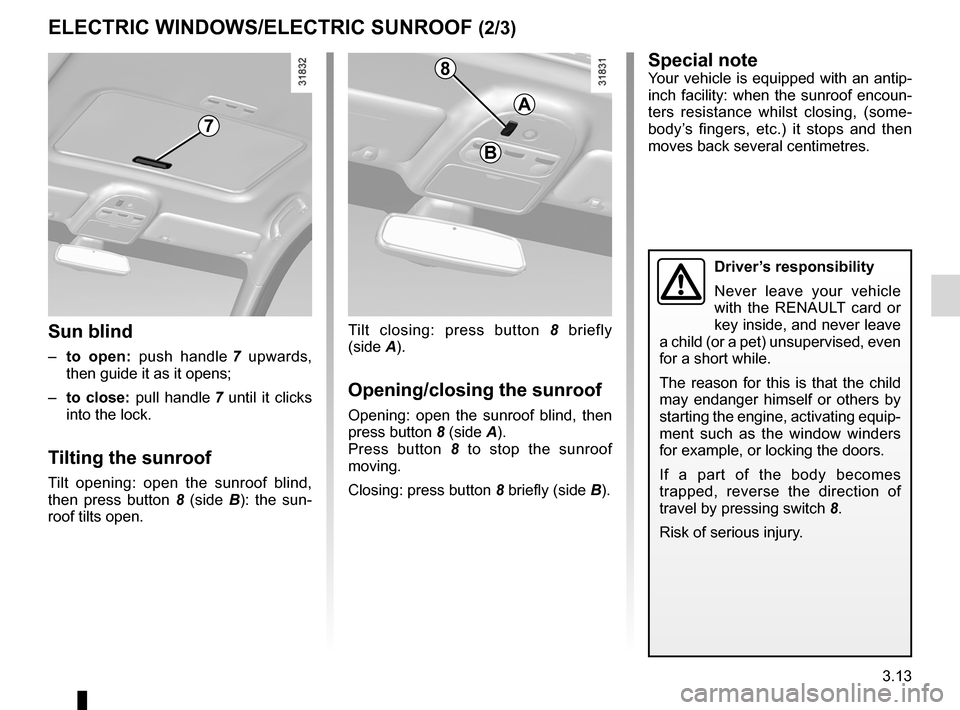
Tilt closing: press button 8 briefly
(side A).
opening/closing the sunroof
Opening: open the sunroof blind, then
press button 8 (side A).
Press button 8 to stop the sunroof
moving.
Closing: press button 8 briefly (side B).
Sun blind
– to open: push handle 7 upwards,
then guide it as it opens;
– to close: pull handle 7 until it clicks
into the lock.
Tilting the sunroof
Tilt opening: open the sunroof blind,
then press button 8 (side B ): the sun -
roof tilts open.
Special noteYour vehicle is equipped with an antip-
inch facility: when the sunroof encoun -
ters resistance whilst closing, (some -
body’s fingers, etc.) it stops and then
moves back several centimetres.
Driver’s responsibility
Never leave your vehicle
with the RENAULT card or
key inside, and never leave
a child (or a pet) unsupervised, even
for a short while.
The reason for this is that the child
may endanger himself or others by
starting the engine, activating equip-
ment such as the window winders
for example, or locking the doors.
If a part of the body becomes
trapped, reverse the direction of
travel by pressing switch 8.
Risk of serious injury.
7
8
B
A
Page 143 of 241

lighting:interior ............................................. (up to the end of the DU)
courtesy light ........................................ (up to the end of the DU)
map reading lights ................................ (up to the end of the DU)
3.15
ENG_UD21626_2
Eclairage intérieur (L38 - X38 - Renault)
ENG_NU_891_892-7_L38-B32_Renault_3
Manual window winders
Interior lighting
MANuAl wINDow wINDERS/INTERIoR lIghTINg (1/2)
When the doors or luggage com -
partment are unlocked and opened
the courtesy and footwell lights
come on temporarily.
234
courtesy light
Tilt switch 3 to move it to the position
for:
– permanent lighting;
– intermittent lighting, which comes
on when a door is opened. This
switches off after a time delay, once
the doors concerned have been
closed correctly;
– immediate switching off.
Map reading lights(depending on vehicle)
Tilt switches 2 or 4.
Front door lights
Light 5 comes on when the door is
opened.
5
Manual window winders
Turn handle 1.
1
Page 158 of 241

bonnet................................................... (up to the end of the DU)
maintenance: mechanical ...................................... (up to the end of the DU)
4.2
ENG_UD23759_3
Capot moteur (L38 - X38 - Renault)
ENG_NU_891_892-7_L38-B32_Renault_4
Jaune NoirNoir texte
Bonnet
Opening the bonnet
Lift the bonnet and release stay 4 from
its holder 5 . For your own safety, it is
very important to fix the stay into re -
tainer 3 in the bonnet.
To open, pull handle
1 , located on the
left-hand side of the dashboard.
Unlocking the bonnet catch
To release it, lift tab 2.
BOnnet: four-door version
1
2Closing the bonnet
Check that nothing has been left in the
engine compartment.
To close the bonnet, replace stay 4
back into its holder 5, hold the bonnet in
the middle and lower it to 30 cm above
the closed position, then release it. It
will latch automatically under its own
weight.
Ensure that the bonnet is
properly locked.
Ensure that nothing is pre -
venting locking (grit, cloths,
etc.).The engine may be hot
when carrying out opera -
tions in close proximity. In
addition, the engine cooling
fan can come on at any moment.
Risk of injury.In the event of even a slight
impact involving the radia -
tor grille or bonnet, have
the bonnet lock checked by
an approved dealer as soon as pos-
sible.
3
4
5
After carrying out any work
in the engine compart -
ment, check that nothing
has been left behind (cloth,
tools, etc.).
These may damage the engine or
cause a fire.
Page 159 of 241

JauneNoirNoir texte
4.3
ENG_UD23759_3
Capot moteur (L38 - X38 - Renault)
ENG_NU_891_892-7_L38-B32_Renault_4
Opening the bonnet
Lift the bonnet; you will need to guide it
as it is held by a strut.
To open, pull handle
1 , located on the
left-hand side of the dashboard.
Unlocking the bonnet catch
To release it, lift tab 2.
BOnnet: five-door version
2Closing the bonnet
Check that nothing has been left in the
engine compartment.
To close the bonnet again, hold the
bonnet in the middle and lower it to
30 cm above the closed position, then
release it. It will latch automatically
under its own weight.
Ensure that the bonnet is
properly locked.
Ensure that nothing is pre -
venting locking (grit, cloths,
etc.).
The engine may be hot
when carrying out opera -
tions in close proximity. In
addition, the engine cooling
fan can come on at any moment.
Risk of injury.In the event of even a slight
impact involving the radia -
tor grille or bonnet, have
the bonnet lock checked by
an approved dealer as soon as pos-
sible.
Do not press down on the
bonnet: there is a risk that
the bonnet may accidentally
close.
1
After carrying out any work
in the engine compart -
ment, check that nothing
has been left behind (cloth,
tools, etc.).
These may damage the engine or
cause a fire.
Page 171 of 241

maintenance:interior trim ...................................... (up to the end of the DU)
interior trim maintenance ................................... (up to the end of the DU)
cleaning: inside the vehicle ............................ (up to the end of the DU)
4.15
ENG_UD22866_8
Entretien des garnitures intérieures (X35 - X45 - X65 - J77 - X81 - \
J81 - X85 - X91 - B91 - K91 - D91 - X83 - X61 - X77 ph2 - X95 - B95 - D9\
5 - E95 - K95 - J95 - R95 -
ENG_NU_891_892-7_L38-B32_Renault_4
Interior trim maintenance
glass instrument panel(e.g. instrument panel, clock, exterior
temperature display, radio display, etc.)
Use a soft cloth (or cotton wool).
If this does not clean it properly, use a
soft cloth (or cotton wool) slightly mois-
tened with soapy water and then wipe
clean with a soft damp cloth or cotton
wool.
Finally, carefully dry off with a soft dry
cloth.
Cleaning products containing alco -
hol must not be used under any cir-
cumstances.
Seat belts
These must be kept clean.
Use products selected by our Technical
Department (Approved outlets) or
warm, soapy water and a sponge and
wipe with a dry cloth.
Detergents or dyes must not be used
under any circumstances.
inteRiOR tRiM MAintenAnCe (1/2)
textiles (seats, door trim, etc)
Vacuum-clean the textiles regularly.
liquid stain
Use soapy water.
Dab lightly (never rub) with a soft cloth,
rinse and remove the excess.
Solid or pasty stain
Carefully remove the excess solid or
pasty material immediately with a
spatula (working from the edges to the
centre to avoid spreading the stain).
Clean as for a liquid stain.
Special instructions for sweets or
chewing gum
Put an ice cube on the stain to solidify
it, then proceed as for a solid stain.
A well-maintained vehicle will last
longer. It is therefore recommended to
maintain the interior of the vehicle regu-
larly.
A stain should always be dealt with
swiftly.
Whatever type of stain is on the trim,
use
cold (or warm) soapy water with
natural soap.
Detergents (washing-up liquid, pow -
dered products, alcohol-based prod-
ucts) should not be used.
Use a soft cloth.
Rinse and soak up the excess.
For further recommendations for
maintaining the interior, and/or for
any unsatisfactory results, please
see an authorised dealer.