key RENAULT FLUENCE 2012 1.G Owner's Manual
[x] Cancel search | Manufacturer: RENAULT, Model Year: 2012, Model line: FLUENCE, Model: RENAULT FLUENCE 2012 1.GPages: 241, PDF Size: 6.5 MB
Page 125 of 241
JauneNoirNoir texte
2.37
ENG_UD21625_2
Aide au parking (L38 - X38 - Renault)
ENG_NU_891_892-7_L38-B32_Renault_2
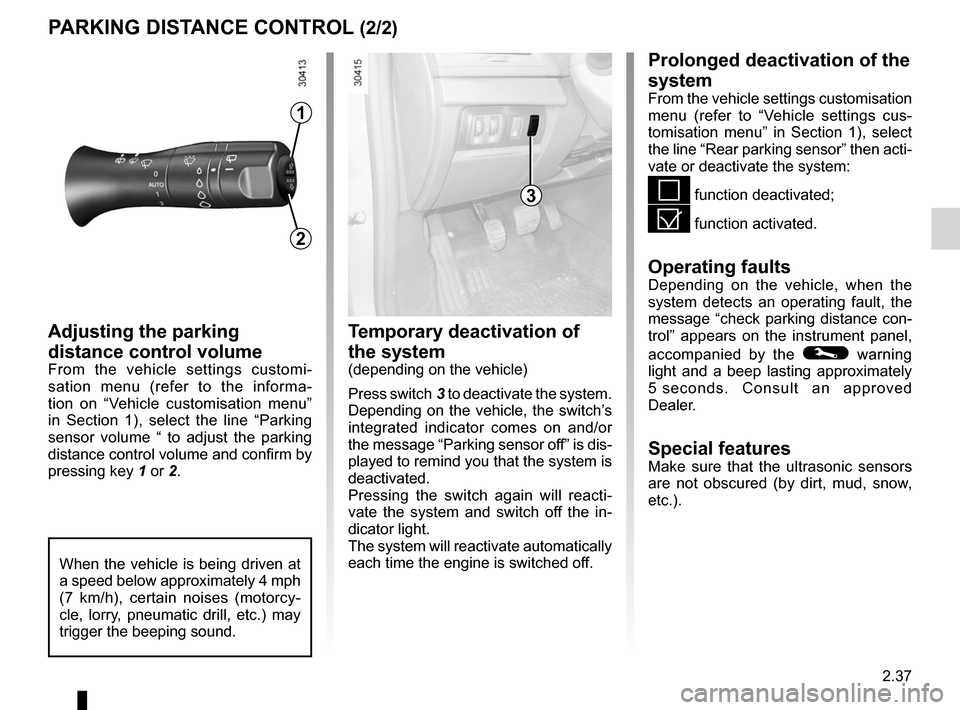
Adjusting the parking
distance control volume
From the vehicle settings customi -
sation menu (refer to the informa -
tion on “Vehicle customisation menu”
in Section 1), select the line “ Parking
sensor volume “ to adjust the parking
distance control volume and confirm by
pressing key 1 or 2.
temporary deactivation of
the system
(depending on the vehicle)
Press switch 3 to deactivate the system.
Depending on the vehicle, the switch’s
integrated indicator comes on and/or
the message “Parking sensor off” is dis-
played to remind you that the system is
deactivated.
Pressing the switch again will reacti -
vate the system and switch off the in -
dicator light.
The system will reactivate automatically
each time the engine is switched off.
PARkING DISt ANCe CONtROL (2/2)
Prolonged deactivation of the
system
From the vehicle settings customisation
menu (refer to “Vehicle settings cus -
tomisation menu” in Section 1), select
the line “Rear parking sensor” then acti-
vate or deactivate the system:
< function deactivated;
= function activated.
Operating faultsDepending on the vehicle, when the
system detects an operating fault, the
message “check parking distance con-
trol” appears on the instrument panel,
accompanied by the
© warning
light and a beep lasting approximately
5 seconds. Consult an approved
Dealer.
Special featuresMake sure that the ultrasonic sensors
are not obscured (by dirt, mud, snow,
etc.).
3
1
2
When the vehicle is being driven at
a speed below approximately 4 mph
(7 km/h), certain noises (motorcy -
cle, lorry, pneumatic drill, etc.) may
trigger the beeping sound.
Page 140 of 241
electric windows ................................... (up to the end of the DU)
child safety ............................................................. (current page)
children (safety) ..................................................... (current page)
sunroof .................................................. (up to the end of the DU)
3.12
ENG_UD21430_2
Lève-vitres électriques (L38 - X38 - Renault)
ENG_NU_891_892-7_L38-B32_Renault_3
Jaune NoirNoir texte
These systems operate with the igni -
tion on or off, until one of the front doors
is opened (limited to about 3 minutes).
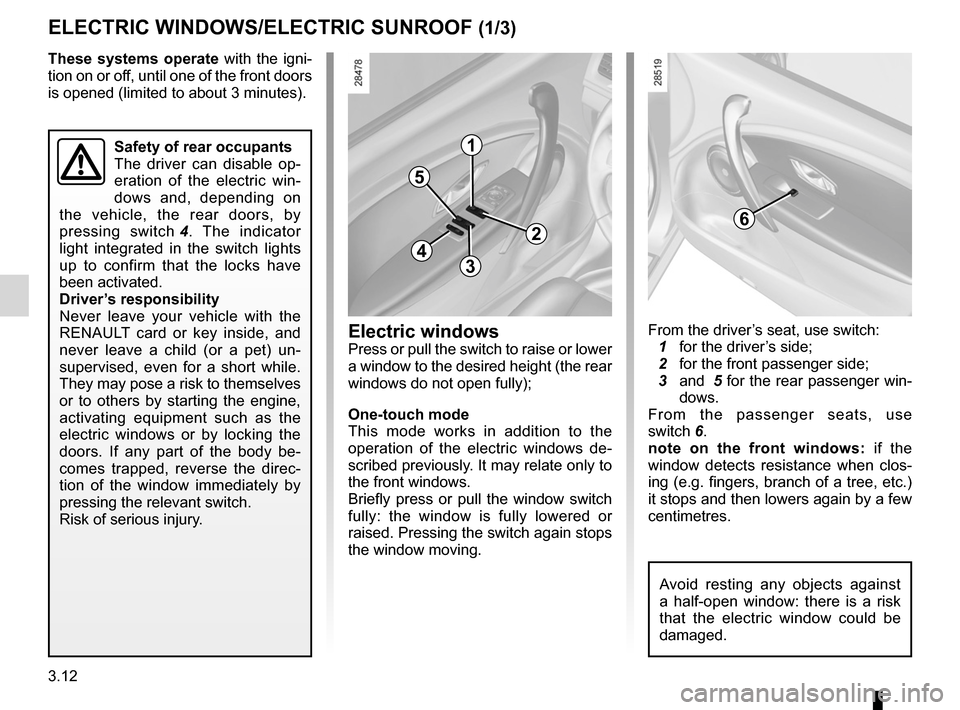
From the driver’s seat, use switch:
1 for the driver’s side;
2 for the front passenger side;
3 and 5 for the rear passenger win-
dows.
From the passenger seats, use
switch 6.
note on the front windows: if the
window detects resistance when clos -
ing (e.g. fingers, branch of a tree, etc.)
it stops and then lowers again by a few
centimetres.
Electric windows/Electric sunroof
ElEcTRIc wINDowS/ElEcTRIc SuNRooF (1/3)
Electric windows
Press or pull the switch to raise or lower
a window to the desired height (the rear
windows do not open fully);
one-touch mode
This mode works in addition to the
operation of the electric windows de -
scribed previously. It may relate only to
the front windows.
Briefly press or pull the window switch
fully: the window is fully lowered or
raised. Pressing the switch again stops
the window moving.
1
2
34
5
6
Safety of rear occupants
The driver can disable op -
eration of the electric win -
dows and, depending on
the vehicle, the rear doors, by
pressing switch 4 . The indicator
light integrated in the switch lights
up to confirm that the locks have
been activated.
Driver’s responsibility
Never leave your vehicle with the
RENAULT card or key inside, and
never leave a child (or a pet) un -
supervised, even for a short while.
They may pose a risk to themselves
or to others by starting the engine,
activating equipment such as the
electric windows or by locking the
doors. If any part of the body be -
comes trapped, reverse the direc -
tion of the window immediately by
pressing the relevant switch.
Risk of serious injury.
Avoid resting any objects against
a half-open window: there is a risk
that the electric window could be
damaged.
Page 141 of 241
JauneNoirNoir texte
3.13
ENG_UD21430_2
Lève-vitres électriques (L38 - X38 - Renault)
ENG_NU_891_892-7_L38-B32_Renault_3
ElEcTRIc wINDowS/ElEcTRIc SuNRooF (2/3)
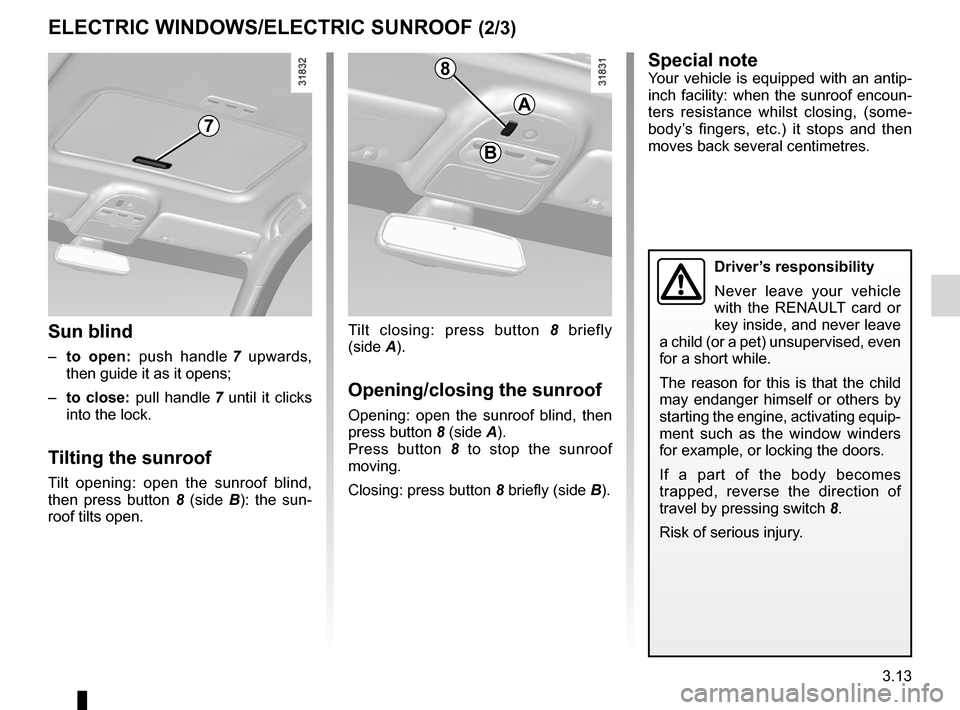
Tilt closing: press button 8 briefly
(side A).
opening/closing the sunroof
Opening: open the sunroof blind, then
press button 8 (side A).
Press button 8 to stop the sunroof
moving.
Closing: press button 8 briefly (side B).
Sun blind
– to open: push handle 7 upwards,
then guide it as it opens;
– to close: pull handle 7 until it clicks
into the lock.
Tilting the sunroof
Tilt opening: open the sunroof blind,
then press button 8 (side B ): the sun -
roof tilts open.
Special noteYour vehicle is equipped with an antip-
inch facility: when the sunroof encoun -
ters resistance whilst closing, (some -
body’s fingers, etc.) it stops and then
moves back several centimetres.
Driver’s responsibility
Never leave your vehicle
with the RENAULT card or
key inside, and never leave
a child (or a pet) unsupervised, even
for a short while.
The reason for this is that the child
may endanger himself or others by
starting the engine, activating equip-
ment such as the window winders
for example, or locking the doors.
If a part of the body becomes
trapped, reverse the direction of
travel by pressing switch 8.
Risk of serious injury.
7
8
B
A
Page 188 of 241
5.16
ENG_UD27193_5
Projecteurs avant : remplacement des lampes (L38 - X38 - Renault)
ENG_NU_891_892-7_L38-B32_Renault_5
Jaune NoirNoir texte
FrOnt heaDlIghts: changing bulbs (3/5)
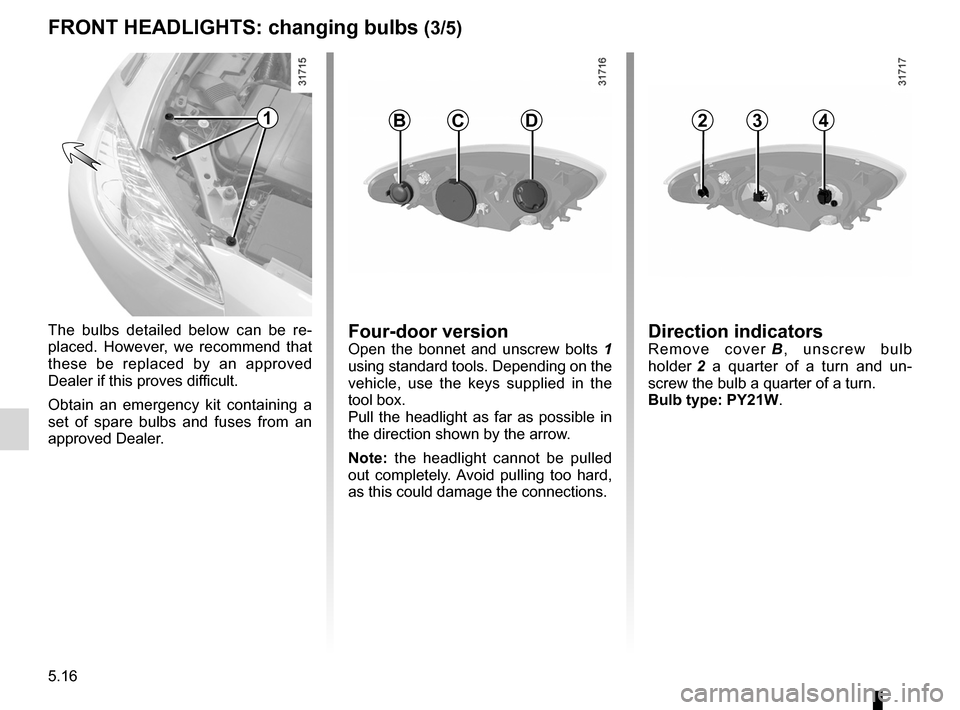
Direction indicators
R e m o v e c o v e r B , u n s c r e w b u l b
holder 2 a quarter of a turn and un -
screw the bulb a quarter of a turn.
Bulb type: Py21w.Four-door versionOpen the bonnet and unscrew bolts 1
using standard tools. Depending on the
vehicle, use the keys supplied in the
tool box.
Pull the headlight as far as possible in
the direction shown by the arrow.
n ote: the headlight cannot be pulled
out completely. Avoid pulling too hard,
as this could damage the connections.
BcD2431
The bulbs detailed below can be re -
placed. However, we recommend that
these be replaced by an approved
Dealer if this proves difficult.
Obtain an emergency kit containing a
set of spare bulbs and fuses from an
approved Dealer.
Page 202 of 241
battery (remote control) ........................ (up to the end of the DU)
5.30
ENG_UD21632_2
Télécommande à radiofréquence : piles (L38 - X38 - X32 - B3\
2 - Renault)
ENG_NU_891_892-7_L38-B32_Renault_5
Radio frequency remote control: battery
raDIO Frequency remOte cOntrOl: battery
remote controls
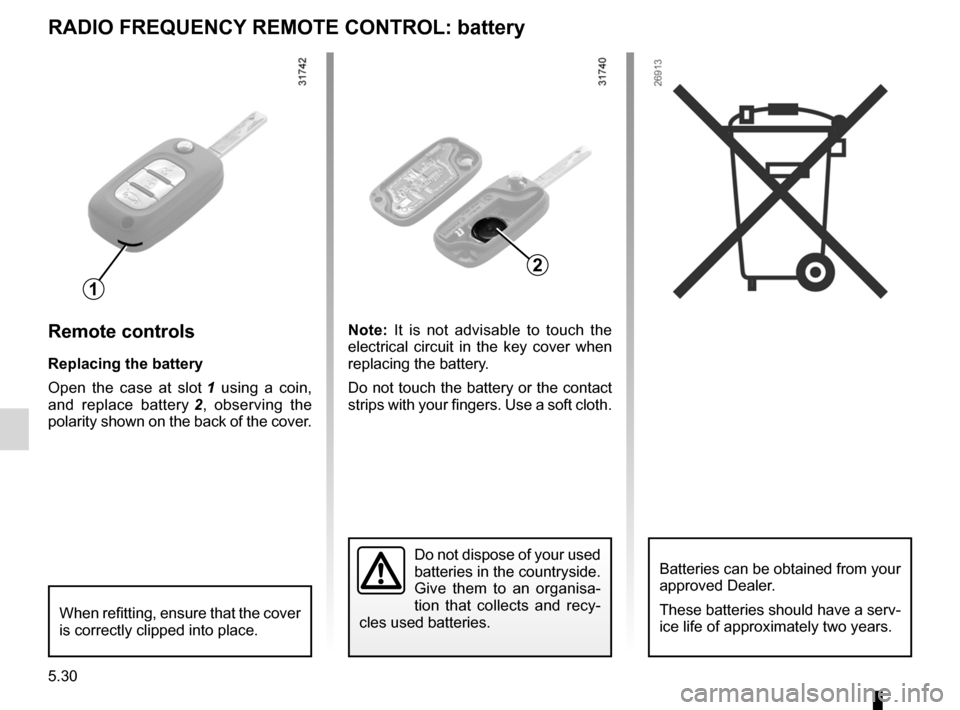
replacing the battery
Open the case at slot 1 using a coin,
and replace battery 2 , observing the
polarity shown on the back of the cover. n
ote: It is not advisable to touch the
electrical circuit in the key cover when
replacing the battery.
Do not touch the battery or the contact
strips with your fingers. Use a soft cloth.
Do not dispose of your used
batteries in the countryside.
Give them to an organisa -
tion that collects and recy -
cles used batteries.Batteries can be obtained from your
approved Dealer.
These batteries should have a serv-
ice life of approximately two years.
When refitting, ensure that the cover
is correctly clipped into place.
1
2
Page 203 of 241
RENAULT cardbattery ............................................. (up to the end of the DU)
RENAULT card battery .........................(up to the end of the DU)
5.31
ENG_UD21014_4
Carte RENAULT : pile (X45 - H45 - X91 - B91 - K91 - X95 - B95 - D95 - E95 - K95 - J9\
5 - R95 - L38 - X38 - X32 - B32 - Renault)
ENG_NU_891_892-7_L38-B32_Renault_5
Operating faultsIf the battery is too weak to ensure cor-
rect operation, you may start (insert the
RENAULT card in the card reader) and
lock/unlock the vehicle (refer to the in-
formation on “Locking/unlocking the
doors” in Section 1).
RENAULT card: battery
renault carD: battery
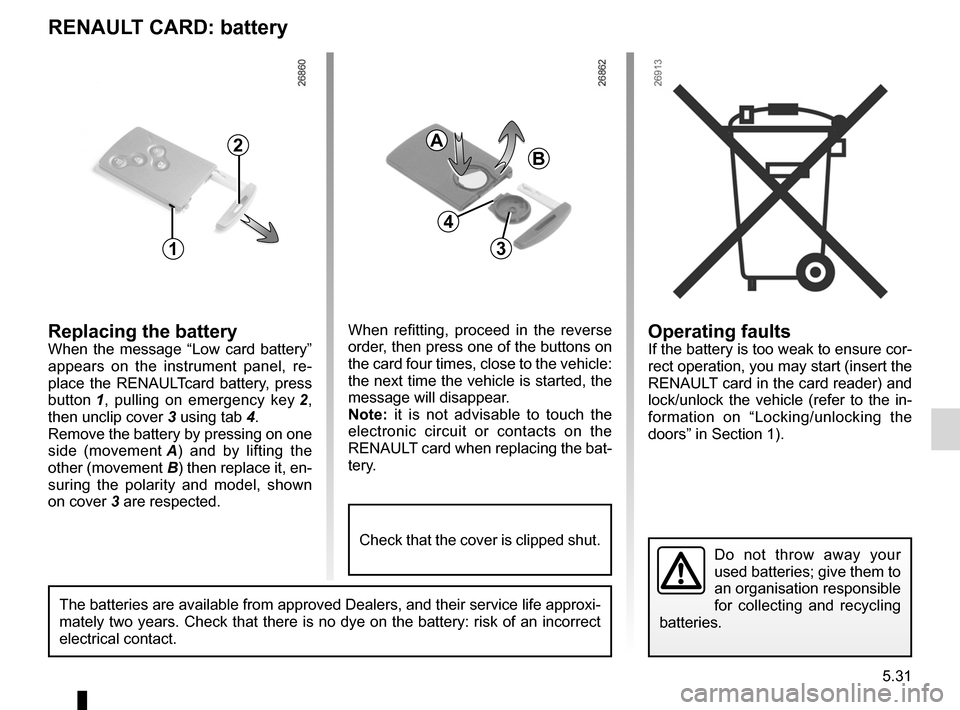
replacing the batteryWhen the message “Low card battery”
appears on the instrument panel, re -
place the RENAULTcard battery, press
button 1 , pulling on emergency key 2 ,
then unclip cover 3 using tab 4.
Remove the battery by pressing on one
side (movement A ) and by lifting the
other (movement B) then replace it, en-
suring the polarity and model, shown
on cover 3 are respected.
Do not throw away your
used batteries; give them to
an organisation responsible
for collecting and recycling
batteries.
1
2
When refitting, proceed in the reverse
order, then press one of the buttons on
the card four times, close to the vehicle:
the next time the vehicle is started, the
message will disappear.
n ote: it is not advisable to touch the
electronic circuit or contacts on the
RENAULT card when replacing the bat-
tery.
a
B
3
The batteries are available from approved Dealers, and their service life approxi -
mately two years. Check that there is no dye on the battery: risk of an incorrect
electrical contact.
4
Check that the cover is clipped shut.
Page 207 of 241
towingbreakdown ...................................... (up to the end of the DU)
towing hitch ........................................... (up to the end of the DU)
5.35
ENG_UD27187_3
Remorquage : dépannage (L38 - X38 - Renault)
ENG_NU_891_892-7_L38-B32_Renault_5
Towing
tOwIng : breakdown (1/2)
Before towing, insert the key in the
switch or the RENAULT card in the
reader to unlock the steering column:
depress the clutch pedal, select first
gear (lever in position n or r for vehi-
cles with an automatic gearbox).
Reposition the lever to neutral (posi -
tion N for vehicles fitted with an auto -
matic transmission)
The steering column is unlocked, power
is supplied to the accessory functions:
the vehicle lights can be used (hazard
warning lights, brake lights etc.). At
night the vehicle must have its lights on.
Once you have finished towing, press
the engine start button twice (risk of
running down the battery). The speed specified by current legis
-
lation for towing must always be ob -
served. If your vehicle is the towing
vehicle, do not exceed the maximum
towing weight for your vehicle (refer
to the information on “Weights” in
Section 6).
t owing a vehicle with an
automatic gearbox
With the engine switched off, the trans-
mission is no longer lubricated. It is
preferable to tow this type of vehicle on
a trailer or tow it with the front wheels
off the ground.
u nder exceptional circumstances,
you may tow the vehicle with all four
wheels on the ground, only going for -
ward, with the gear lever in the n posi-
tion, and for a distance not exceeding
50 miles (80 km).
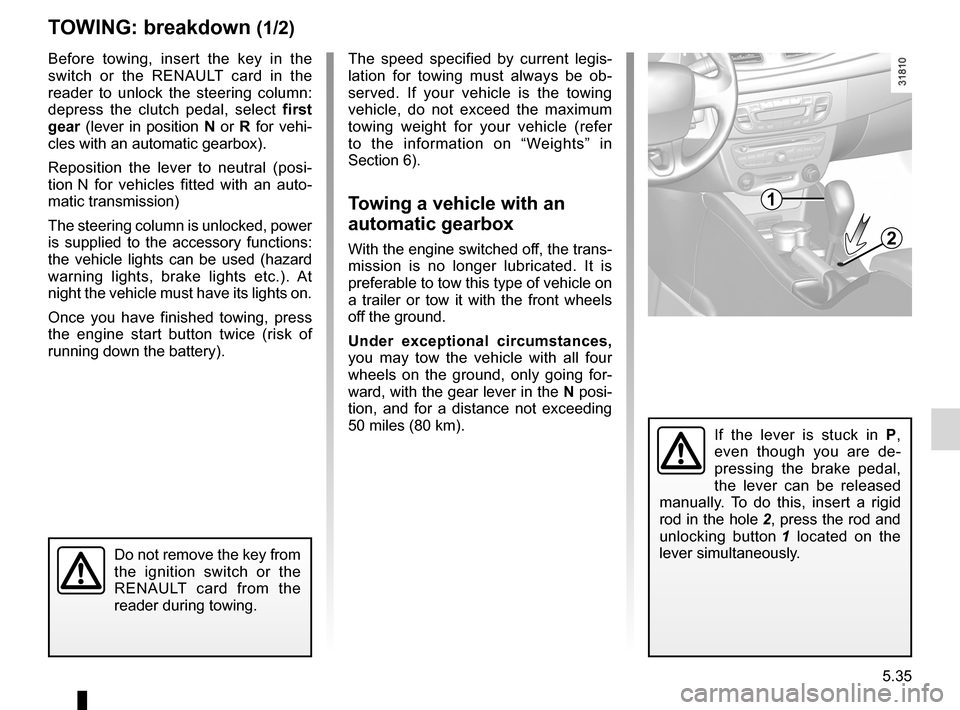
If the lever is stuck in P,
even though you are de -
pressing the brake pedal,
the lever can be released
manually. To do this, insert a rigid
rod in the hole 2, press the rod and
unlocking button 1 located on the
lever simultaneously.
1
2
Do not remove the key from
the ignition switch or the
RENAULT card from the
reader during towing.
Page 208 of 241
5.36
ENG_UD27187_3
Remorquage : dépannage (L38 - X38 - Renault)
ENG_NU_891_892-7_L38-B32_Renault_5
tOwIng : breakdown (2/2)
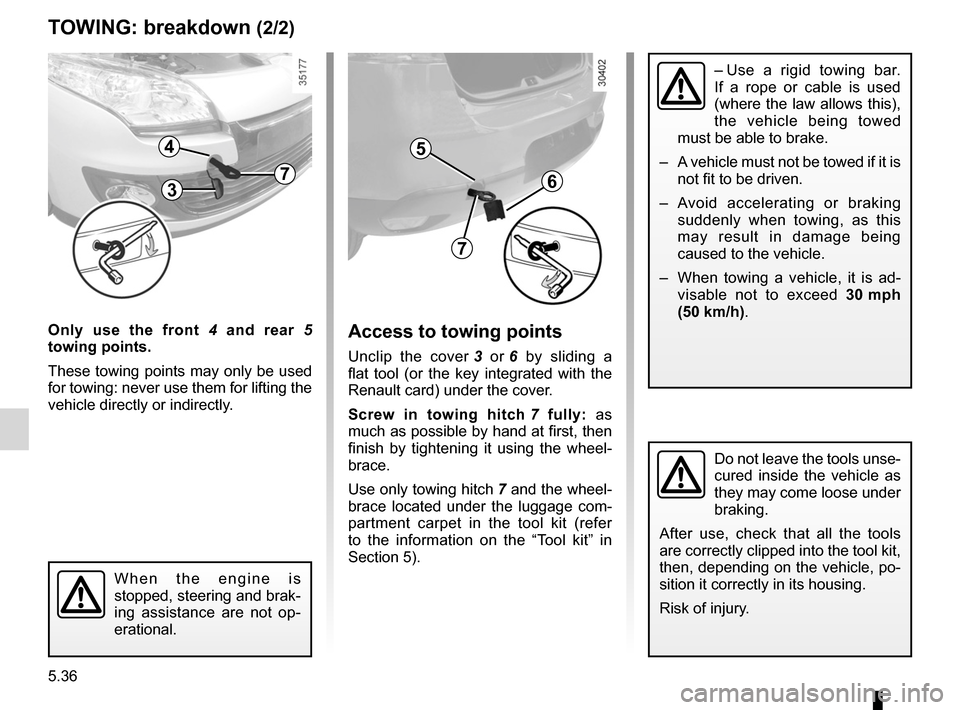
Only use the front 4 and rear 5
towing points.
These towing points may only be used
for towing: never use them for lifting the
vehicle directly or indirectly.access to towing points
Unclip the cover 3 or 6 by sliding a
flat tool (or the key integrated with the
Renault card) under the cover.
s crew in towing hitch 7 fully: as
much as possible by hand at first, then
finish by tightening it using the wheel -
brace.
Use only towing hitch 7 and the wheel -
brace located under the luggage com -
partment carpet in the tool kit (refer
to the information on the “Tool kit” in
Section 5).
W h e n t h e e n g i n e i s
stopped, steering and brak-
ing assistance are not op -
erational.
Do not leave the tools unse-
cured inside the vehicle as
they may come loose under
braking.
After use, check that all the tools
are correctly clipped into the tool kit,
then, depending on the vehicle, po-
sition it correctly in its housing.
Risk of injury.
5
6
7
– Use a rigid towing bar.
If a rope or cable is used
(where the law allows this),
the vehicle being towed
must be able to brake.
– A vehicle must not be towed if it is
not fit to be driven.
– Avoid accelerating or braking
suddenly when towing, as this
may result in damage being
caused to the vehicle.
– When towing a vehicle, it is ad -
visable not to exceed 30 mph
(50 km/h).
37
4
Page 209 of 241
operating faults ..................................... (up to the end of the DU)
faults operating faults ............................... (up to the end of the DU)
5.37
ENG_UD17941_2
Anomalies de fonctionnement (X85 - L38 - X38 - Renault)
ENG_NU_891_892-7_L38-B32_Renault_5
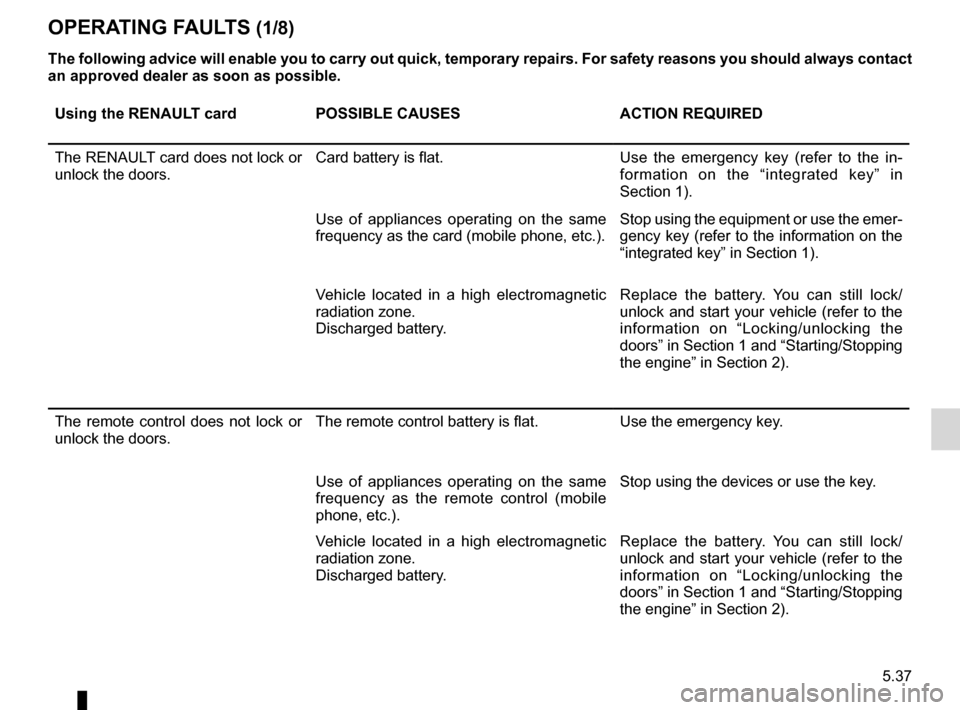
Operating faults
OPeratIng F aults (1/8)
the following advice will enable you to carry out quick, temporary repairs. For safety reasons you should always contact
an approved dealer as soon as possible.
using the renault card POssIBle causes actIOn requIreD
The RENAULT card does not lock or
unlock the doors. Card battery is flat.
Use the emergency key (refer to the in-
formation on the “integrated key” in
Section 1).
Use of appliances operating on the same
frequency as the card (mobile phone, etc.). Stop using the equipment or use the emer-
gency key (refer to the information on the
“integrated key” in Section 1).
Vehicle located in a high electromagnetic
radiation zone.
Discharged battery. Replace the battery. You can still lock/
unlock and start your vehicle (refer to the
information on “Locking/unlocking the
doors” in Section 1 and “Starting/Stopping
the engine” in Section 2).
The remote control does not lock or
unlock the doors. The remote control battery is flat.
Use the emergency key.
Use of appliances operating on the same
frequency as the remote control (mobile
phone, etc.). Stop using the devices or use the key.
Vehicle located in a high electromagnetic
radiation zone.
Discharged battery. Replace the battery. You can still lock/
unlock and start your vehicle (refer to the
information on “Locking/unlocking the
doors” in Section 1 and “Starting/Stopping
the engine” in Section 2).
Page 238 of 241
7.2
FRA_UD27191_7
Index (L38 - X38 - Renault)
ENG_NU_891_892-7_L38-B32_Renault_7
Jaune NoirNoir texte
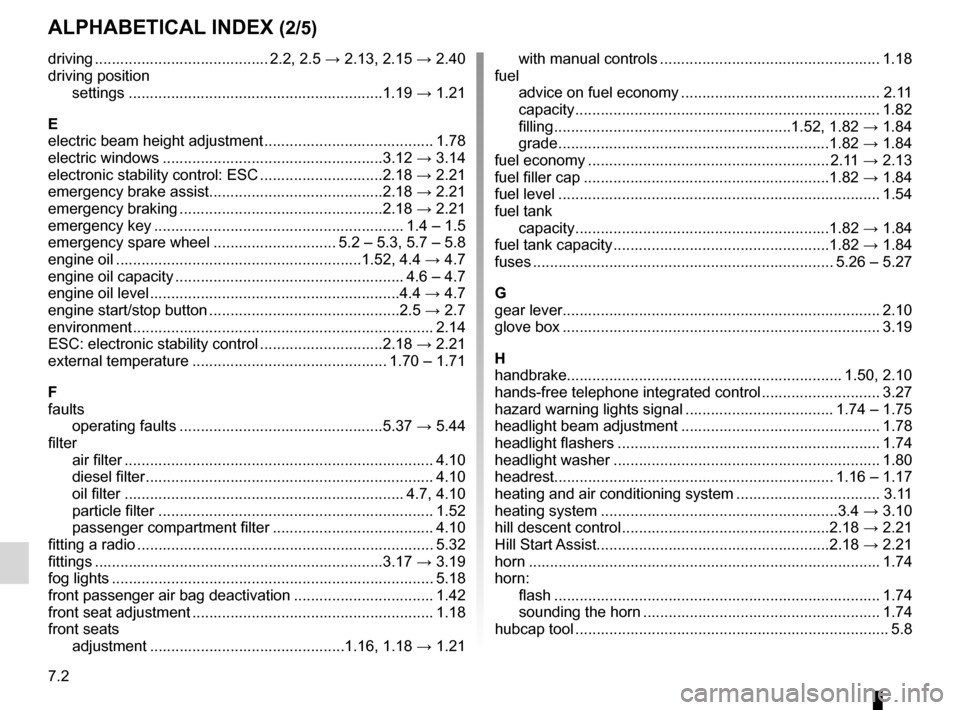
AlphAbeticAl index (2/5)
driving ......................................... 2.2, 2.5 → 2.13, 2.15 → 2.40
driving position settings ............................................................ 1.19 → 1.21
e
electric beam height adjustment ........................................ 1.78
electric windows .................................................... 3.12 → 3.14
electronic stability control: ESC .............................2.18 → 2.21
emergency brake assist ......................................... 2.18 → 2.21
emergency braking ................................................ 2.18 → 2.21
emergency key ........................................................... 1.4 – 1.5
emergency spare wheel ............................. 5.2 – 5.3, 5.7 – 5.8
engine oil .......................................................... 1.52, 4.4 → 4.7
engine oil capacity ...................................................... 4.6 – 4.7
engine oil level ........................................................... 4.4 → 4.7
engine start/stop button ............................................. 2.5 → 2.7
environment ....................................................................... 2.14
ESC: electronic stability control .............................2.18 → 2.21
external temperature .............................................. 1.70 – 1.71
F
faults operating faults ................................................ 5.37 → 5.44
filter air filter ......................................................................... 4.10
diesel filter .................................................................... 4.10
oil filter .................................................................. 4.7, 4.10
particle filter ................................................................. 1.52
passenger compartment filter ...................................... 4.10
fitting a radio ...................................................................... 5.32
fittings .................................................................... 3.17 → 3.19
fog lights ........................................................................\
.... 5.18
front passenger air bag deactivation ................................. 1.42
front seat adjustment ......................................................... 1.18
front seats adjustment ..............................................1.16, 1.18 → 1.21 with manual controls
.................................................... 1.18
fuel advice on fuel economy ............................................... 2.11
capacity ........................................................................ 1.82
filling ........................................................ 1.52, 1.82 → 1.84
grade ................................................................ 1.82 → 1.84
fuel economy ......................................................... 2.11 → 2.13
fuel filler cap .......................................................... 1.82 → 1.84
fuel level ........................................................................\
.... 1.54
fuel tank capacity ............................................................ 1.82 → 1.84
fuel tank capacity ................................................... 1.82 → 1.84
fuses ....................................................................... 5.26 – 5.27
G
gear lever ........................................................................\
... 2.10
glove box ........................................................................\
... 3.19
h
handbrake ................................................................. 1.50, 2.10
hands-free telephone integrated control ............................ 3.27
hazard warning lights signal ................................... 1.74 – 1.75
headlight beam adjustment ............................................... 1.78
headlight flashers .............................................................. 1.74
headlight washer ............................................................... 1.80
headrest .................................................................. 1.16 – 1.17
heating and air conditioning system .................................. 3.11
heating system ........................................................ 3.4 → 3.10
hill descent control ................................................. 2.18 → 2.21
Hill Start Assist....................................................... 2.18 → 2.21
horn ........................................................................\
........... 1.74
horn: flash ............................................................................. 1.74
sounding the horn ........................................................ 1.74
hubcap tool ........................................................................\
.. 5.8