height RENAULT FLUENCE 2012 1.G Owners Manual
[x] Cancel search | Manufacturer: RENAULT, Model Year: 2012, Model line: FLUENCE, Model: RENAULT FLUENCE 2012 1.GPages: 241, PDF Size: 6.5 MB
Page 20 of 241
headrest................................................ (up to the end of the DU)
front seats adjustment ...................................... (up to the end of the DU)
adjusting your driving position .............. (up to the end of the DU)
1.16
ENG_UD18801_8
Appuis-tête avant (B74 - K74 - X81 - J81 - X91 - B91 - K91 - D91 - X\
95 - B95 - D95 - J95 - R95 - Renault)
ENG_NU_891_892-7_L38-B32_Renault_1
Headrests - Seats
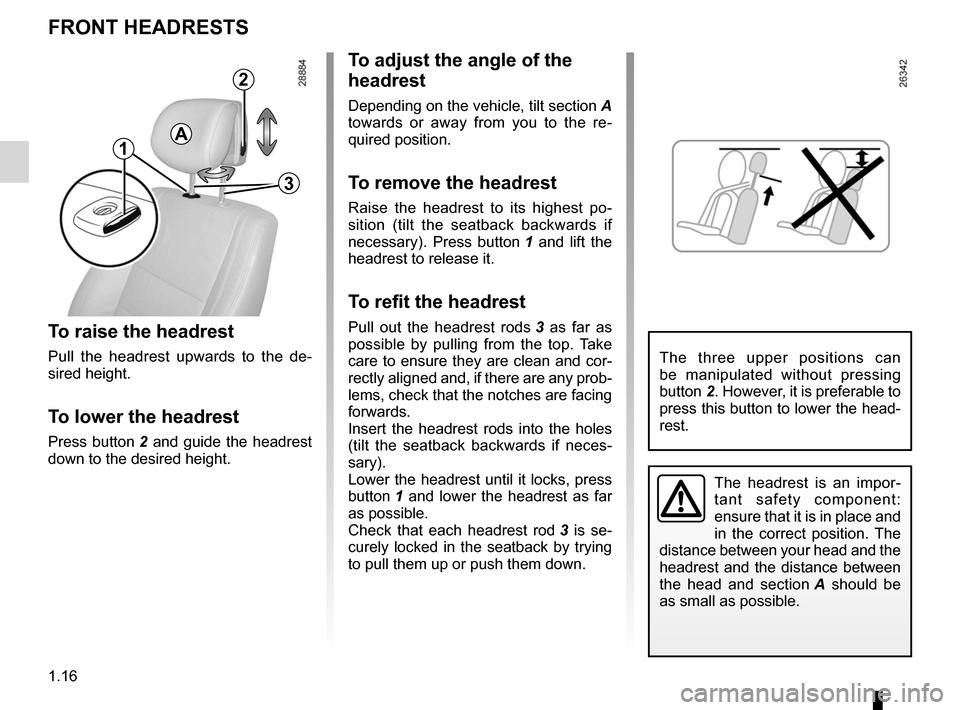
FRONT hEADREsTs
To raise the headrest
Pull the headrest upwards to the de -
sired height.
To lower the headrest
Press button 2 and guide the headrest
down to the desired height.
To adjust the angle of the
headrest
Depending on the vehicle, tilt section A
towards or away from you to the re -
quired position.
To remove the headrest
Raise the headrest to its highest po -
sition (tilt the seatback backwards if
necessary). Press button 1 and lift the
headrest to release it.
To refit the headrest
Pull out the headrest rods 3 as far as
possible by pulling from the top. Take
care to ensure they are clean and cor-
rectly aligned and, if there are any prob-
lems, check that the notches are facing
forwards.
Insert the headrest rods into the holes
(tilt the seatback backwards if neces -
sary).
Lower the headrest until it locks, press
button 1 and lower the headrest as far
as possible.
Check that each headrest rod 3 is se -
curely locked in the seatback by trying
to pull them up or push them down.
The headrest is an impor -
tant safety component:
ensure that it is in place and
in the correct position. The
distance between your head and the
headrest and the distance between
the head and section A should be
as small as possible.
2
3
A1
The three upper positions can
be manipulated without pressing
button 2. However, it is preferable to
press this button to lower the head-
rest.
Page 23 of 241
seat belts .............................................. (up to the end of the DU)
driving position settings ........................................... (up to the end of the DU)
adjusting your driving position ............................... (current page)
front seats adjustment ...................................... (up to the end of the DU)
1.19
ENG_UD25555_3
Ceintures de sécurité (L38 - X38 - Renault)
ENG_NU_891_892-7_L38-B32_Renault_1
Always wear your seat belt when trav-
elling in your vehicle. You must also
comply with the legislation of the par -
ticular country you are in.
Seat belts
I n c o r r e c t l y a d j u s t e d o r
twisted seat belts may
cause injuries in the event
of an accident.
Use one seat belt per person,
whether child or adult.
Even pregnant women should wear
a seat belt. In this case, ensure that
the lap belt is not exerting too much
pressure on the abdomen, but do
not allow any slack.
Before starting, first adjust your driv-
ing position, then ask all occupants
to adjust their seat belts to ensure
optimum protection.
Adjusting your driving
position
– s it well back in your seat (having
first removed your coat or jacket).
This is essential to ensure your back
is positioned correctly;
– adjust the distance between the
seat and the pedals. Your seat
should be as far back as possible
while still allowing you to depress
the clutch pedal fully. The seatback
should be adjusted so that your arms
are slightly bent when you hold the
steering wheel;
– adjust the position of your head -
rest. For the maximum safety, your
head must be as close as possible to
the headrest;
– adjust the height of the seat. This
adjustment allows you to select the
seat position which offers you the
best possible view;
– adjust the position of the steering
wheel.
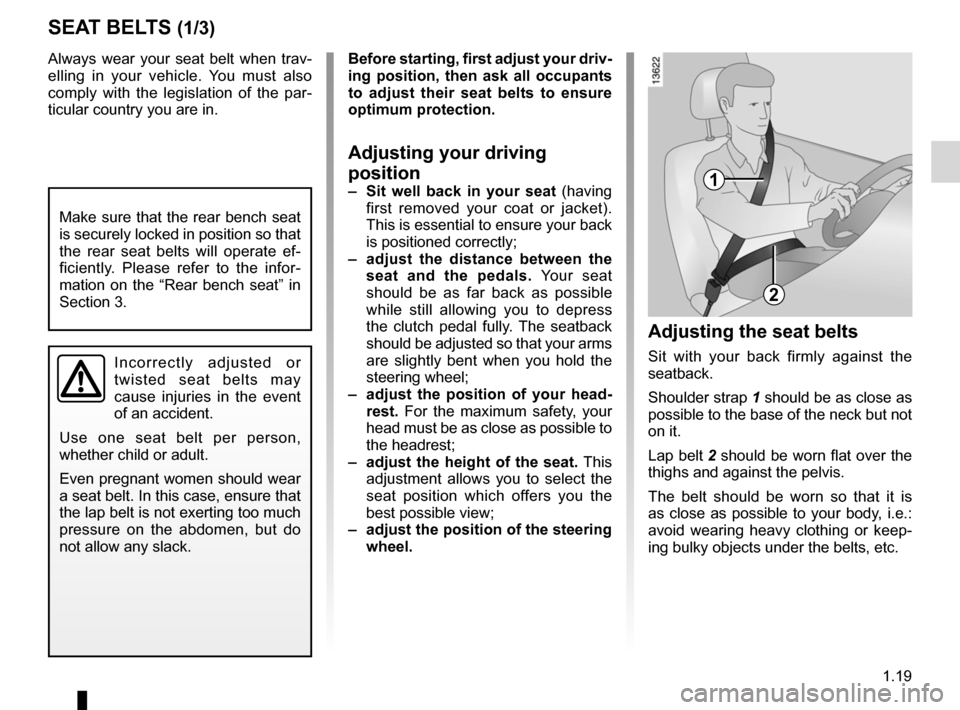
Adjusting the seat belts
Sit with your back firmly against the
seatback.
Shoulder strap 1 should be as close as
possible to the base of the neck but not
on it.
Lap belt 2 should be worn flat over the
thighs and against the pelvis.
The belt should be worn so that it is
as close as possible to your body, i.e.:
avoid wearing heavy clothing or keep -
ing bulky objects under the belts, etc.
sEAT BELTs (1/3)
1
2
Make sure that the rear bench seat
is securely locked in position so that
the rear seat belts will operate ef -
ficiently. Please refer to the infor -
mation on the “Rear bench seat” in
Section 3.
Page 24 of 241
1.20
ENG_UD25555_3
Ceintures de sécurité (L38 - X38 - Renault)
ENG_NU_891_892-7_L38-B32_Renault_1
Jaune NoirNoir texte
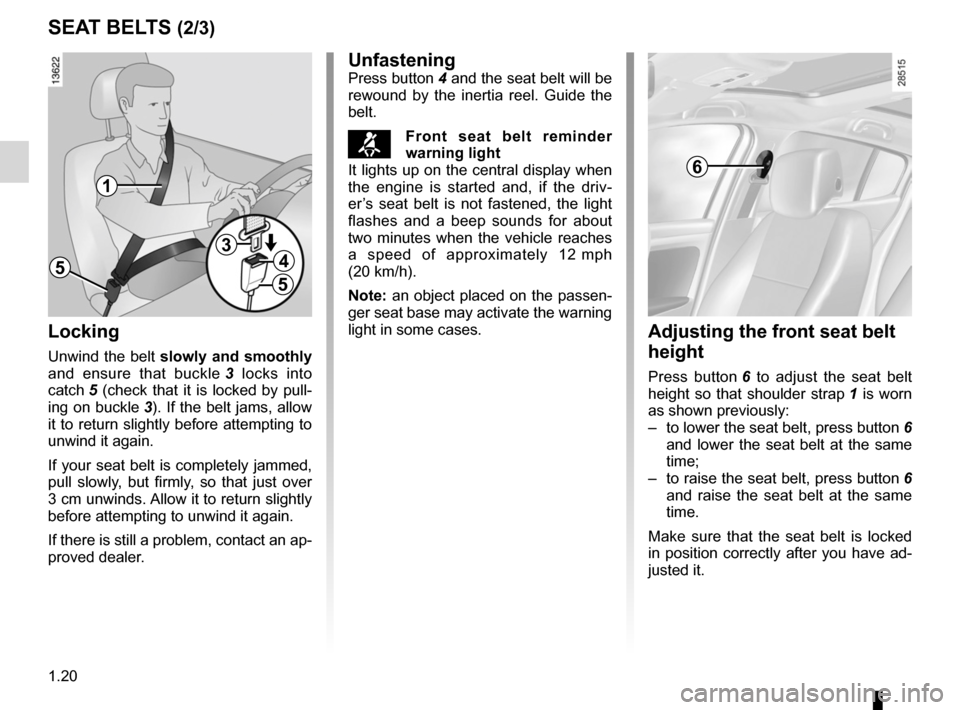
UnfasteningPress button 4 and the seat belt will be
rewound by the inertia reel. Guide the
belt.
™Front seat belt reminder
warning light
It lights up on the central display when
the engine is started and, if the driv -
er’s seat belt is not fastened, the light
flashes and a beep sounds for about
two minutes when the vehicle reaches
a speed of approximately 12 mph
(20 km/h).
Note: an object placed on the passen-
ger seat base may activate the warning
light in some cases.
sEAT BELTs (2/3)
Locking
Unwind the belt slowly and smoothly
and ensure that buckle 3 locks into
catch 5 (check that it is locked by pull -
ing on buckle 3). If the belt jams, allow
it to return slightly before attempting to
unwind it again.
If your seat belt is completely jammed,
pull slowly, but firmly, so that just over
3 cm unwinds. Allow it to return slightly
before attempting to unwind it again.
If there is still a problem, contact an ap-
proved dealer.
1
5
Adjusting the front seat belt
height
Press button 6 to adjust the seat belt
height so that shoulder strap 1 is worn
as shown previously:
– to lower the seat belt, press button 6
and lower the seat belt at the same
time;
– to raise the seat belt, press button 6
and raise the seat belt at the same
time.
Make sure that the seat belt is locked
in position correctly after you have ad-
justed it.
6
34
5
Page 34 of 241
1.30
ENG_UD20772_3
S curit enfants : choix du si ge enfant (X35 - L35 - X45 - H45 - X6\
5 - X77 - X81 - X85 - X91 - X83 - X61 - X77 ph2 - X95 - L38 - E33 - X33 \
- X38 - X62 - Renault)
ENG_NU_891_892-7_L38-B32_Renault_1
ChILD sAFETY : choosing a child seat
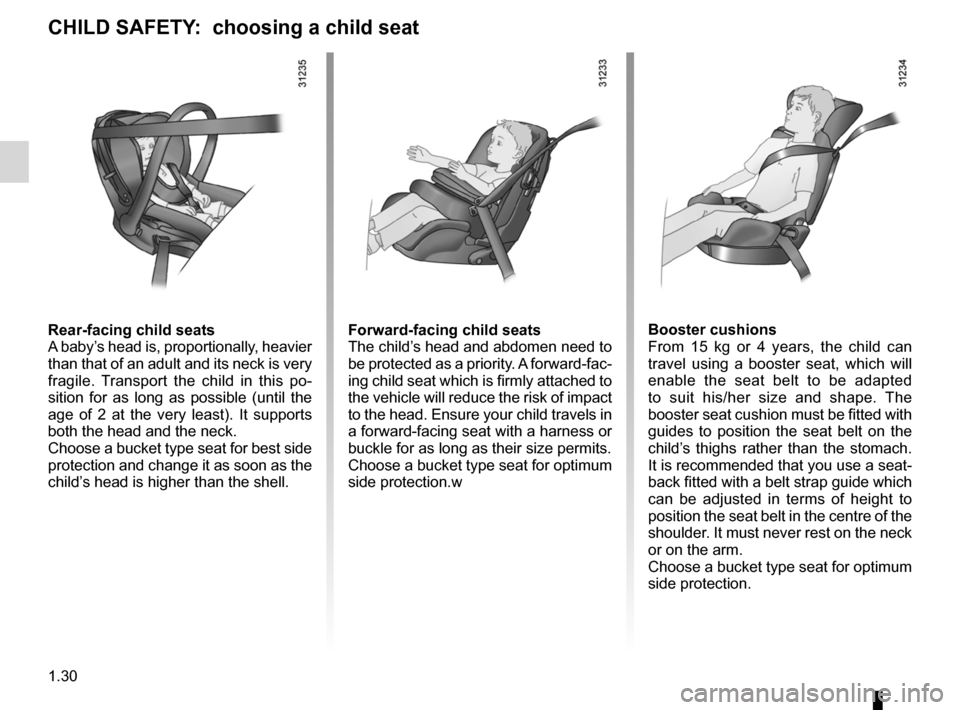
Rear-facing child seats
A baby’s head is, proportionally, heavier
than that of an adult and its neck is very
fragile. Transport the child in this po -
sition for as long as possible (until the
age of 2 at the very least). It supports
both the head and the neck.
Choose a bucket type seat for best side
protection and change it as soon as the
child’s head is higher than the shell.Forward-facing child seats
The child’s head and abdomen need to
be protected as a priority. A forward-fac-
ing child seat which is firmly attached to
the vehicle will reduce the risk of impact
to the head. Ensure your child travels in
a forward-facing seat with a harness or
buckle for as long as their size permits.
Choose a bucket type seat for optimum
side protection.w Booster cushions
From 15 kg or 4 years, the child can
travel using a booster seat, which will
enable the seat belt to be adapted
to suit his/her size and shape. The
booster seat cushion must be fitted with
guides to position the seat belt on the
child’s thighs rather than the stomach.
It is recommended that you use a seat-
back fitted with a belt strap guide which
can be adjusted in terms of height to
position the seat belt in the centre of the
shoulder. It must never rest on the neck
or on the arm.
Choose a bucket type seat for optimum
side protection.
Page 49 of 241

steering wheeladjustment ...................................... (up to the end of the DU)
power-assisted steering ........................(up to the end of the DU)
power-assisted steering ........................(up to the end of the DU)
1.45
ENG_UD18854_2
Volant de direction (L38 - X38 - Renault)
ENG_NU_891_892-7_L38-B32_Renault_1
power-assisted steering
The variable power-assisted steering
system is equipped with an electronic
control system which alters the level of
assistance to suit the vehicle speed.
Steering is made easier during parking
manoeuvres (for added comfort) whilst
the force needed to steer increases
progressively as the speed rises (for
enhanced safety at high speeds).
Steering wheel
Power-assisted steering
sTEERINg WhEEL/pOWER-AssIsTED sTEERINg
steering wheel
Height and, depending on the vehicle,
depth adjustment.
Pull lever 1 and move the steering
wheel to the required position.
Then, push the lever back fully, beyond
the point of resistance to lock the steer-
ing wheel.
Make sure that the steering wheel is
correctly locked.
For safety reasons, only
adjust the steering wheel
when the vehicle is station-
ary.
1
Never switch off the igni -
tion when travelling down -
hill, and avoid doing so in
normal driving (assistance
is not provided).
Never leave the steering wheel on
full lock when the vehicle is station-
ary.
Do not drive with a low battery
charge. The steering wheel may not
operate correctly.
With the engine switched off, or if
there is a system fault, it is still pos-
sible to turn the steering wheel. The
force required will be greater.
A noise may be heard when the
steering wheel is moved quickly.
This is normal.
Page 51 of 241

JauneNoirNoir texte
1.47
ENG_UD13633_1
Poste de conduite direction à gauche (L38 - X38 - Renault)
ENG_NU_891_892-7_L38-B32_Renault_1
DRIVINg pOsITION: LEFT -hAND DRIVE (2/2)
The equipment fitted, described below, DEpENDs ON ThE VERsION AND COUNTRY.
1 Side air vent.
2 Side window demister outlet.
3 Stalk for:
– direction indicator lights,
– exterior lights,
– front fog lights,
– rear fog light.
4 Instrument panel.
5 Driver’s air bag and horn location.
6 – Stalk for windscreen and rear
screen wash/wipe,
–
Trip computer information readout
control and vehicle settings customi-
sation menu.
7 – Display (depending on the vehi -
cle) for time, temperature, radio
information, navigation system in-
formation, etc.
– Driver and front passenger seat
belt unfastened and passenger
air bag deactivated warning lights 8
Centre air vents.
9 Location for passenger air bag.
10 Side window demister outlet.
11 Side air vent.
12 Glove box.
13 Heating and ventilation controls.
14 L o c a t i o n f o r r a d i o , n a v i g a t i o n
system, etc.
15 Cigar lighter.
16 Accessories socket.
17 Cup holder
18 Cruise control/speed limiter control.
19 Manual parking brake control.
20 Gear lever. 21
E n g i n e s t a r t / s t o p c o n t r o l a n d
RENAULT card reader.
22 Central door locking/unlocking con -
trols and hazard warning lights
switch.
23 Key ignition switch
24 Cruise control/speed limiter controls
25 Control for adjusting steering wheel
height and reach.
26 Bonnet release.
27 Controls for:
– headlight beam height remote ad-
justment;
– lighting rheostat for control instru-
ments;
– activation/deactivation of the trac-
tion control.
– activation/deactivation of the
parking distance control system.
Page 53 of 241
JauneNoirNoir texte
1.49
ENG_UD13634_1
Poste de conduite direction à droite (L38 - X38 - Renault)
ENG_NU_891_892-7_L38-B32_Renault_1
DRIVINg pOsITION: RIghT -hAND DRIVE (2/2)
The equipment fitted, described below, DEpENDs ON ThE VERsION AND COUNTRY.
1 Side air vent.
2 Side window demister outlet.
3 Location for passenger air bag.
4 – Display (depending on the vehi -
cle) for time, temperature, radio
information, navigation system in-
formation, etc.
– Driver and front passenger seat
belt unfastened and passenger
air bag deactivated warning lights
5 Centre air vents.
6 Stalk for:
– direction indicator lights,
– exterior lights,
– front fog lights,
– rear fog light.
7 Location for driver ’s air bag and
horn.
8 Instrument panel.
9 – Steering column stalk for wind -
screen and rear screen wash/
wipe,
–
Trip computer information readout
control and vehicle settings customi-
sation menu.
10 Side window demister outlet.
11 Side air vent.
12 Controls for:
– headlight beam height remote ad-
justment;
– lighting rheostat for control instru-
ments;
– activation/deactivation of the trac-
tion control.
– activation/deactivation of the
parking distance control system.
13 Key ignition switch.
14 Cruise control/speed limiter con -
trols. 15
Control for adjusting steering wheel
height and reach.
16 Central door locking/unlocking con -
trols and hazard warning lights
switch.
17 Cigar lighter.
18 Cup holder
19 Cruise control/speed limiter main
control.
20 Electronic parking brake control.
21 Gear lever.
22 Accessories socket.
23 E n g i n e s t a r t / s t o p c o n t r o l a n d
RENAULT card reader.
24 L o c a t i o n f o r r a d i o , n a v i g a t i o n
system, etc.
25 Heating and ventilation controls.
26 Glove box.
27 Bonnet release.
Page 82 of 241

electric beam height adjustment ........... (up to the end of the DU)
see-me-home lighting ........................... (up to the end of the DU)
lights: adjusting ......................................... (up to the end of the DU)
lights adjustment ...................................... (up to the end of the DU)
signals and lights .................................. (up to the end of the DU)
headlight beam adjustment .................. (up to the end of the DU)
1.78
ENG_UD13644_1
Réglage électrique de la hauteur des faisceaux (L38 - X38 - Renau\
lt)ENG_NU_891_892-7_L38-B32_Renault_1
Headlight beam adjustment
On vehicles fitted with this function,
control A allows you to adjust the height
of the beams according to the load.
Turn control A downwards to lower the
headlights and upwards to raise them.
For vehicles not fitted with control A ,
adjustment is automatic.
ELECTRICAL ADJUsTMENT OF ThE DIppED BEAM hEADLIghTs
A
For manual setting
Examples of positions for adjusting control A according to the load
Driver alone or with front
passenger 0
Driver with one front passenger
and one rear passenger 0
Driver with one front passenger
and two or three rear
passengers 1
Driver with one front passenger,
three rear passengers and
luggage 3
Page 140 of 241
electric windows ................................... (up to the end of the DU)
child safety ............................................................. (current page)
children (safety) ..................................................... (current page)
sunroof .................................................. (up to the end of the DU)
3.12
ENG_UD21430_2
Lève-vitres électriques (L38 - X38 - Renault)
ENG_NU_891_892-7_L38-B32_Renault_3
Jaune NoirNoir texte
These systems operate with the igni -
tion on or off, until one of the front doors
is opened (limited to about 3 minutes).
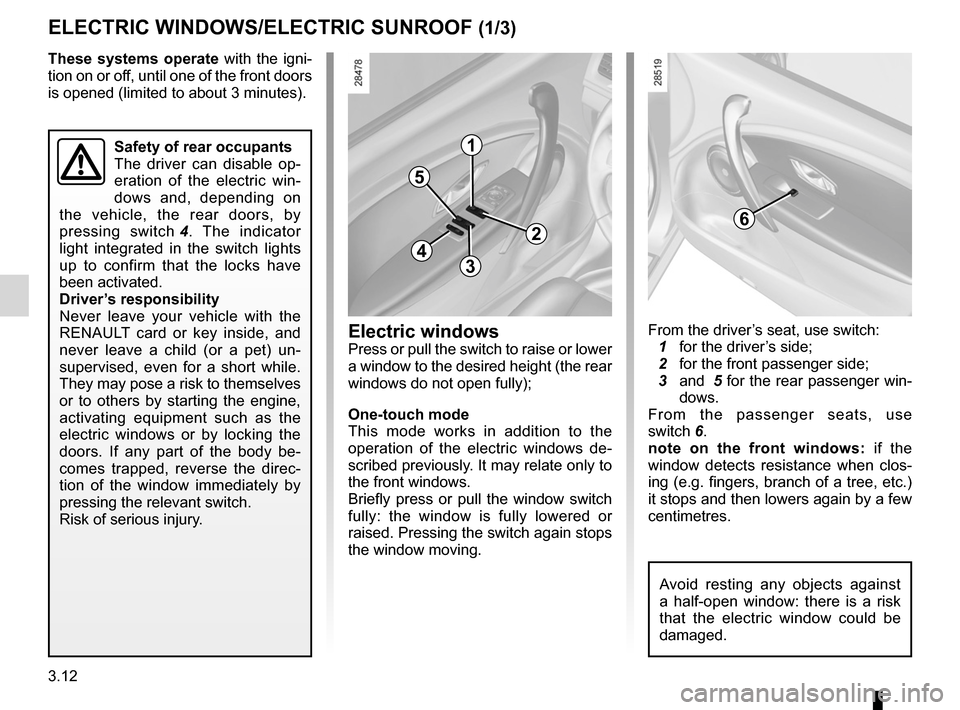
From the driver’s seat, use switch:
1 for the driver’s side;
2 for the front passenger side;
3 and 5 for the rear passenger win-
dows.
From the passenger seats, use
switch 6.
note on the front windows: if the
window detects resistance when clos -
ing (e.g. fingers, branch of a tree, etc.)
it stops and then lowers again by a few
centimetres.
Electric windows/Electric sunroof
ElEcTRIc wINDowS/ElEcTRIc SuNRooF (1/3)
Electric windows
Press or pull the switch to raise or lower
a window to the desired height (the rear
windows do not open fully);
one-touch mode
This mode works in addition to the
operation of the electric windows de -
scribed previously. It may relate only to
the front windows.
Briefly press or pull the window switch
fully: the window is fully lowered or
raised. Pressing the switch again stops
the window moving.
1
2
34
5
6
Safety of rear occupants
The driver can disable op -
eration of the electric win -
dows and, depending on
the vehicle, the rear doors, by
pressing switch 4 . The indicator
light integrated in the switch lights
up to confirm that the locks have
been activated.
Driver’s responsibility
Never leave your vehicle with the
RENAULT card or key inside, and
never leave a child (or a pet) un -
supervised, even for a short while.
They may pose a risk to themselves
or to others by starting the engine,
activating equipment such as the
electric windows or by locking the
doors. If any part of the body be -
comes trapped, reverse the direc -
tion of the window immediately by
pressing the relevant switch.
Risk of serious injury.
Avoid resting any objects against
a half-open window: there is a risk
that the electric window could be
damaged.
Page 166 of 241
4.10
ENG_UD18857_2
Niveaux / filtres (L38 - X38 - Renault)
ENG_NU_891_892-7_L38-B32_Renault_4
windscreen/headlight washer reservoir
Filters
levelS (3/3)FilteRS
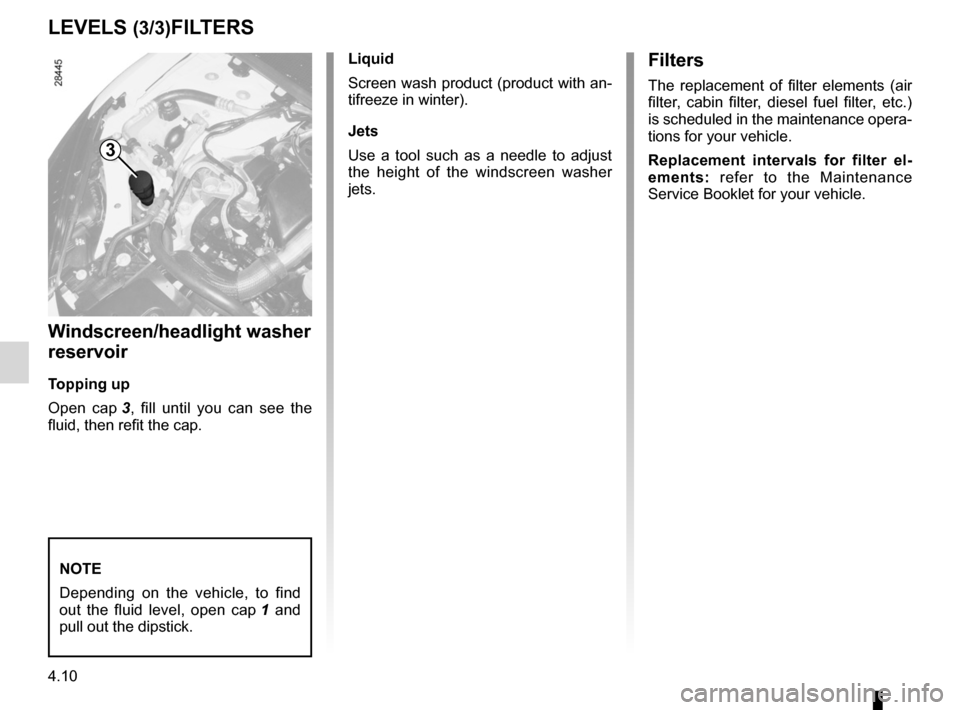
Windscreen/headlight washer
reservoir
t opping up
Open cap 3 , fill until you can see the
fluid, then refit the cap. liquid
Screen wash product (product with an-
tifreeze in winter).
Jets
Use a tool such as a needle to adjust
the height of the windscreen washer
jets.
nOte
Depending on the vehicle, to find
out the fluid level, open cap
1 and
pull out the dipstick.
Filters
The replacement of filter elements (air
filter, cabin filter, diesel fuel filter, etc.)
is scheduled in the maintenance opera -
tions for your vehicle.
Replacement intervals for filter el -
ements: refer to the Maintenance
Service Booklet for your vehicle.
3