tow RENAULT FLUENCE 2012 1.G Owners Manual
[x] Cancel search | Manufacturer: RENAULT, Model Year: 2012, Model line: FLUENCE, Model: RENAULT FLUENCE 2012 1.GPages: 241, PDF Size: 6.5 MB
Page 15 of 241
warning buzzer ...................................................... (current page)
doors ..................................................... (up to the end of the DU)
locking the doors .................................. (up to the end of the DU)
opening the doors ................................. (up to the end of the DU)
closing the doors .................................. (up to the end of the DU)
children ................................................. (up to the end of the DU)
doors/tailgate ........................................ (up to the end of the DU)
1.11
ENG_UD21348_3
Ouverture et fermeture des portes (L38 - X38 - Renault)
ENG_NU_891_892-7_L38-B32_Renault_1
Doors
OpENINg AND CLOsINg ThE DOORs (1/2)
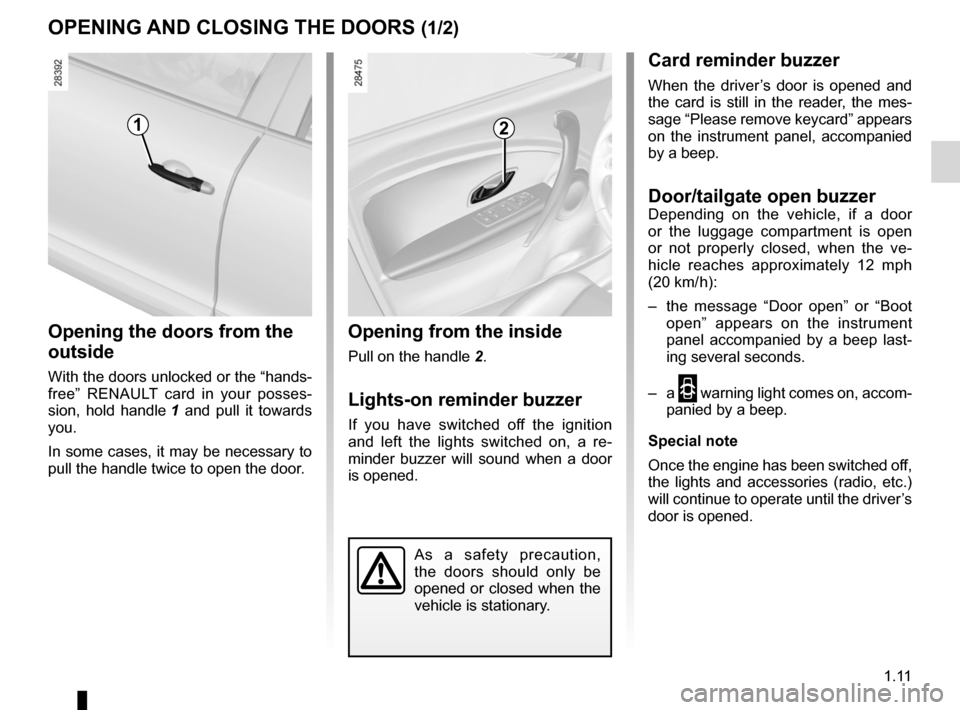
Opening the doors from the
outside
With the doors unlocked or the “hands -
free” RENAULT card in your posses -
sion, hold handle 1 and pull it towards
you.
In some cases, it may be necessary to
pull the handle twice to open the door.
Opening from the inside
Pull on the handle 2.
Lights-on reminder buzzer
If you have switched off the ignition
and left the lights switched on, a re -
minder buzzer will sound when a door
is opened.
Card reminder buzzer
When the driver’s door is opened and
the card is still in the reader, the mes-
sage “Please remove keycard” appears
on the instrument panel, accompanied
by a beep.
Door/tailgate open buzzerDepending on the vehicle, if a door
or the luggage compartment is open
or not properly closed, when the ve -
hicle reaches approximately 12 mph
(20 km/ h):
– the message “ Door open” or “Boot
open ” appears on the instrument
panel accompanied by a beep last -
ing several seconds.
– a
2 warning light comes on, accom-
panied by a beep.
special note
Once the engine has been switched off,
the lights and accessories (radio, etc.)
will continue to operate until the driver’s
door is opened.
12
As a safety precaution,
the doors should only be
opened or closed when the
vehicle is stationary.
Page 20 of 241
headrest................................................ (up to the end of the DU)
front seats adjustment ...................................... (up to the end of the DU)
adjusting your driving position .............. (up to the end of the DU)
1.16
ENG_UD18801_8
Appuis-tête avant (B74 - K74 - X81 - J81 - X91 - B91 - K91 - D91 - X\
95 - B95 - D95 - J95 - R95 - Renault)
ENG_NU_891_892-7_L38-B32_Renault_1
Headrests - Seats
FRONT hEADREsTs
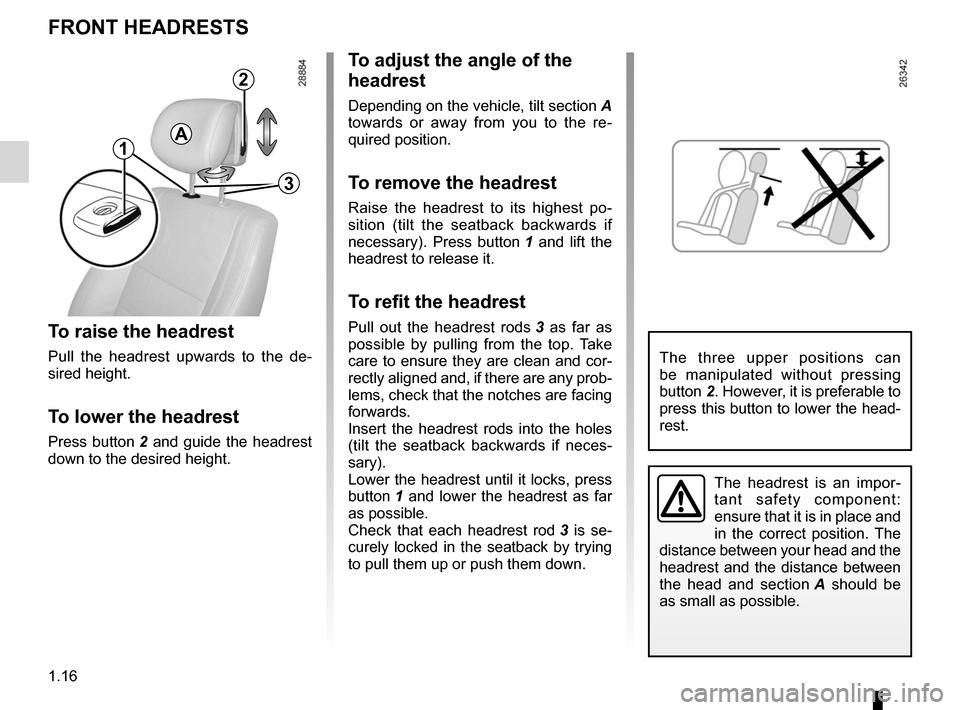
To raise the headrest
Pull the headrest upwards to the de -
sired height.
To lower the headrest
Press button 2 and guide the headrest
down to the desired height.
To adjust the angle of the
headrest
Depending on the vehicle, tilt section A
towards or away from you to the re -
quired position.
To remove the headrest
Raise the headrest to its highest po -
sition (tilt the seatback backwards if
necessary). Press button 1 and lift the
headrest to release it.
To refit the headrest
Pull out the headrest rods 3 as far as
possible by pulling from the top. Take
care to ensure they are clean and cor-
rectly aligned and, if there are any prob-
lems, check that the notches are facing
forwards.
Insert the headrest rods into the holes
(tilt the seatback backwards if neces -
sary).
Lower the headrest until it locks, press
button 1 and lower the headrest as far
as possible.
Check that each headrest rod 3 is se -
curely locked in the seatback by trying
to pull them up or push them down.
The headrest is an impor -
tant safety component:
ensure that it is in place and
in the correct position. The
distance between your head and the
headrest and the distance between
the head and section A should be
as small as possible.
2
3
A1
The three upper positions can
be manipulated without pressing
button 2. However, it is preferable to
press this button to lower the head-
rest.
Page 21 of 241
headrest................................................ (up to the end of the DU)
adjusting your driving position .............. (up to the end of the DU)
1.17
ENG_UD21350_2
Appuis-tête arrière (L38 - X38 - Renault)
ENG_NU_891_892-7_L38-B32_Renault_1
REAR hEADREsTs
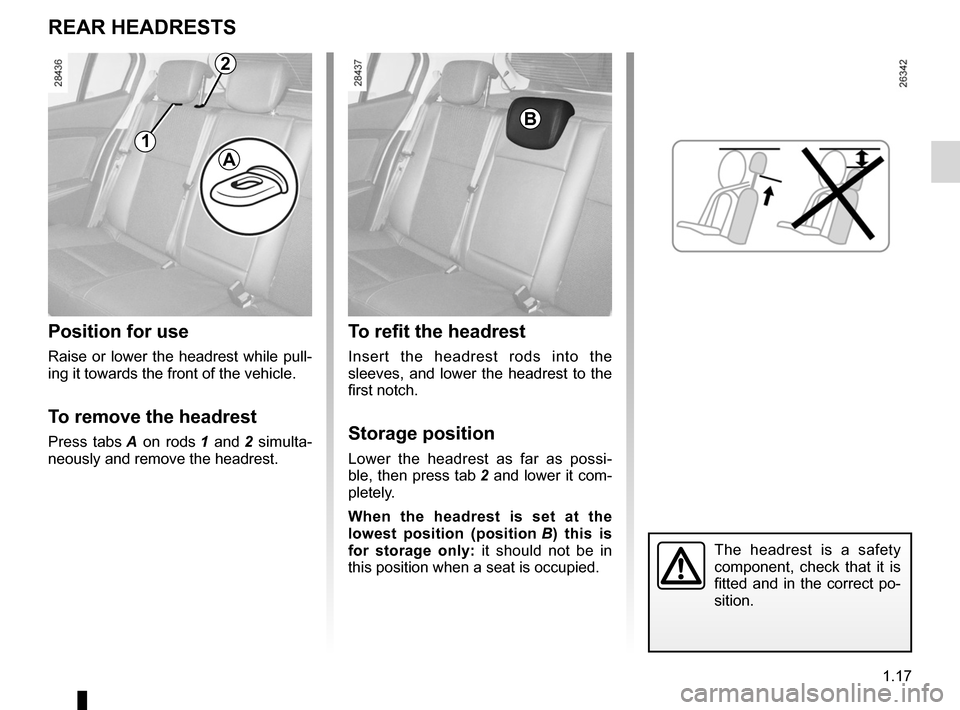
position for use
Raise or lower the headrest while pull -
ing it towards the front of the vehicle.
To remove the headrest
Press tabs A on rods 1 and 2 simulta -
neously and remove the headrest.
To refit the headrest
Insert the headrest rods into the
sleeves, and lower the headrest to the
first notch.
storage position
Lower the headrest as far as possi -
ble, then press tab 2 and lower it com-
pletely.
When the headrest is set at the
lowest position (position B ) this is
for storage only: it should not be in
this position when a seat is occupied.
The headrest is a safety
component, check that it is
fitted and in the correct po-
sition.
B
1
2
A
Page 35 of 241
child restraint/seat ................................ (up to the end of the DU)
child restraint/seat ................................ (up to the end of the DU)
child restraint/seat ................................ (up to the end of the DU)
child safety ............................................ (up to the end of the DU)
child seats ............................................. (up to the end of the DU)
transporting children ............................. (up to the end of the DU)
towing rings .......................................... (up to the end of the DU)
1.31
ENG_UD22117_2
Sécurité enfants : choix de la fixation du siège enfant (L38 -\
X38 - Renault)
ENG_NU_891_892-7_L38-B32_Renault_1
choosing a child seat mounting
ChILD sAFETY : choosing a child/baby seat mounting (1/2)
There are two ways of attaching child
seats: via the seat belt or using the
ISOFIX system.
Attachment via the seat belt
The seat belt must be adjusted to
ensure that it is effective in the event of
harsh braking or an impact.
Ensure that the strap paths indicated
by the child seat manufacturer are re-
spected.
Always check that the seat belt is cor-
rectly fastened by pulling it up, then
pulling it out fully whilst pressing on the
child seat.
Check that the seat is correctly held by
moving it from side to side and back
to front: the seat should remain firmly
fixed.
Check that the child seat has not been
installed at an angle and that it is not
resting against a window. Attachment using the IsOFIX
system
Authorised ISOFIX child seats are ap
-
proved in accordance with regulation
ECE-R44 in one of the three following
scenarios:
– ISOFIX universal 3-point forwardfac-
ing seat
– ISOFIX semi-universal 2-point seat
– specific
For the latter two, check that your child
seat can be installed by consulting the
list of compatible vehicles.
Attach the child seat with the ISOFIX
locks, if these are provided. The ISOFIX
system allows quick, easy, safe fitting.
The ISOFIX system consists of 2 rings
and, in some cases, a third ring.
Before using an ISOFIX
child seat that you pur -
chased for another vehicle,
check that its installation is
authorised. Consult the list of ve -
hicles which can be fitted with the
seat from the equipment manufac -
turer.
No modifications may be
made to the component
parts of the restraint system
(ISOFIX seat belts, seats
and their mountings) originally fitted.
The seat belt must never
be twisted or the tension
relieved. Never pass the
shoulder strap under the
arm or behind the back.
Check that the seat belt has not
been damaged by sharp edges.
If the seat belt does not operate nor-
mally, it will not protect the child.
Consult an approved dealer. Do not
use this seat until the seat belt has
been repaired.
Do not use the child seat
if it may unfasten the seat
belt restraining it: the base
of the seat must not rest on
the buckle and/or catch of the seat
belt.
Page 67 of 241
JauneNoirNoir texte
1.63
ENG_UD25557_2
Ordinateur de bord : paramètres de voyage (L38 - X38 - X32 - B32 - R\
enault)
ENG_NU_891_892-7_L38-B32_Renault_1
TRIp COMpUTER: trip settings (3/5)
The display of information shown below DEpENDs ON ThE VEhICLE EQUIpMENT AND COUNTRY.
Examples of selections Interpreting the display selected
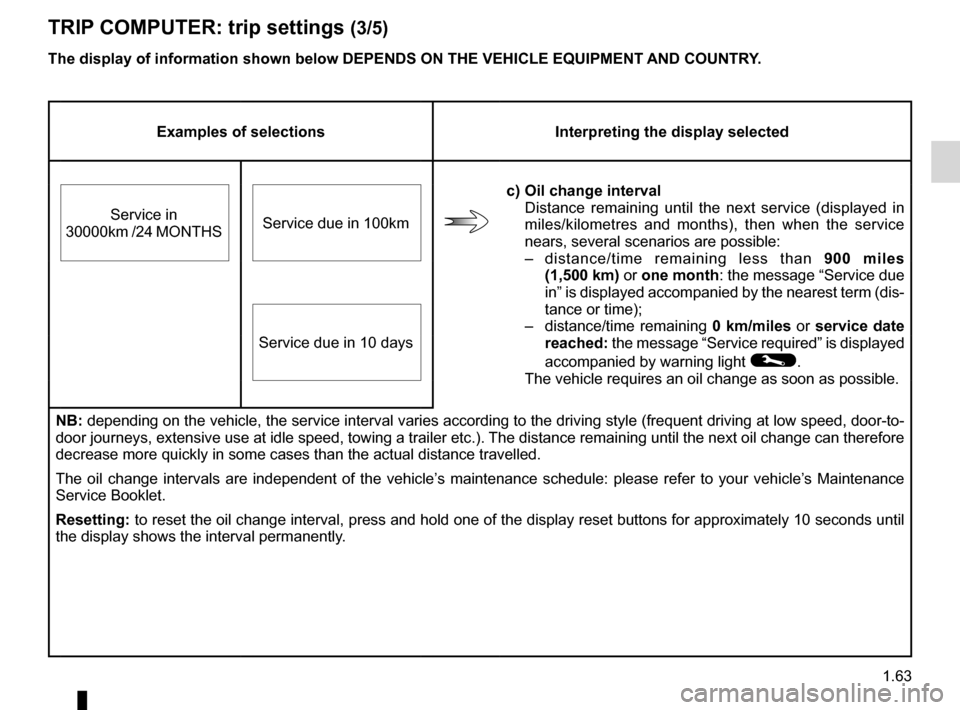
c) Oil change interval
Distance remaining until the next service (displayed in
miles/kilometres and months), then when the service
nears, several scenarios are possible:
– distance/time remaining less than 900 miles
(1,500 km) or one month: the message “Service due
in” is displayed accompanied by the nearest term (dis-
tance or time);
– distance/time remaining 0 km/miles or service date
reached: the message “Service required ” is displayed
accompanied by warning light
©.
The vehicle requires an oil change as soon as possible.
Service in
30000km /24 MONTHS Service due in
100km
Service due in 10 days
NB: depending on the vehicle, the service interval varies according to the driving style (frequent driving at low speed, door-to-
door journeys, extensive use at idle speed, towing a trailer etc.). The distance remaining until the next oil change can therefore
decrease more quickly in some cases than the actual distance travelled.
The oil change intervals are independent of the vehicle’s maintenance schedule: please refer to your vehicle’s Maintenance
Service Booklet.
Resetting: to reset the oil change interval, press and hold one of the display reset buttons for approximately 10 seconds until
the display shows the interval permanently.
Page 78 of 241

warning buzzer ..................................... (up to the end of the DU)
headlight flashers ................................. (up to the end of the DU)
indicators .............................................. (up to the end of the DU)
lights: hazard warning ............................... (up to the end of the DU)
lights: direction indicators .......................... (up to the end of the DU)
indicators: direction indicators .......................... (up to the end of the DU)
hazard warning lights signal ................. (up to the end of the DU)
hazard warning lights signal ................. (up to the end of the DU)
horn ...................................................... (up to the end of the DU)
horn: flash ................................................................. (current page)
horn: sounding the horn ............................................ (current page)
horn ....................................................................... (current page)
audible and visual signals .....................(up to the end of the DU)
1.74
ENG_UD21429_2
Avertisseurs sonore et lumineux (L38 - X38 - Renault)
ENG_NU_891_892-7_L38-B32_Renault_1
Audible and visual signals
AUDIBLE AND VIsUAL sIgNALs
horn
Press on the sides of the steering wheel
boss A.
headlight flasher
Pull stalk 1 towards you to flash the
headlights.
éhazard warning lights
Press switch 2. This switch ac-
tivates all four direction indicators and
the side indicator lights simultaneously.
It must only be used in an emergency to
warn drivers of other vehicles that you
have had to stop in an area where stop-
ping is prohibited or unexpected or that
you are obliged to drive under special
conditions.
Depending on the vehicle, the hazard
warning lights may come on automati -
cally under heavy deceleration. You can
switch them off by pressing switch 2.
Direction indicators
Move stalk 1 parallel to the steering
wheel and in the direction you are going
to turn it.
When driving on the motorway, the
steering wheel is not often turned
enough to return the stalk automatically
to 0 . There is an intermediate position
in which the stalk may be held when
changing lanes.
When the stalk is released, it automati-
cally returns to 0.
A
2
1
0
Page 79 of 241
lighting:exterior ............................................ (up to the end of the DU)
instrument panel .................................................... (current page)
lights: side lights ......................................................... (current page)
lights: dipped beam headlights ................................... (current page)
hazard warning lights signal .................................. (current page)
signals and lights .................................. (up to the end of the DU)
lighting: instrument panel .............................................. (current page)
daytime running lights ............................................ (current page)
1.75
ENG_UD27178_2
Éclairages et signalisations extérieurs (L38 - X38 - Renault)
ENG_NU_891_892-7_L38-B32_Renault_1
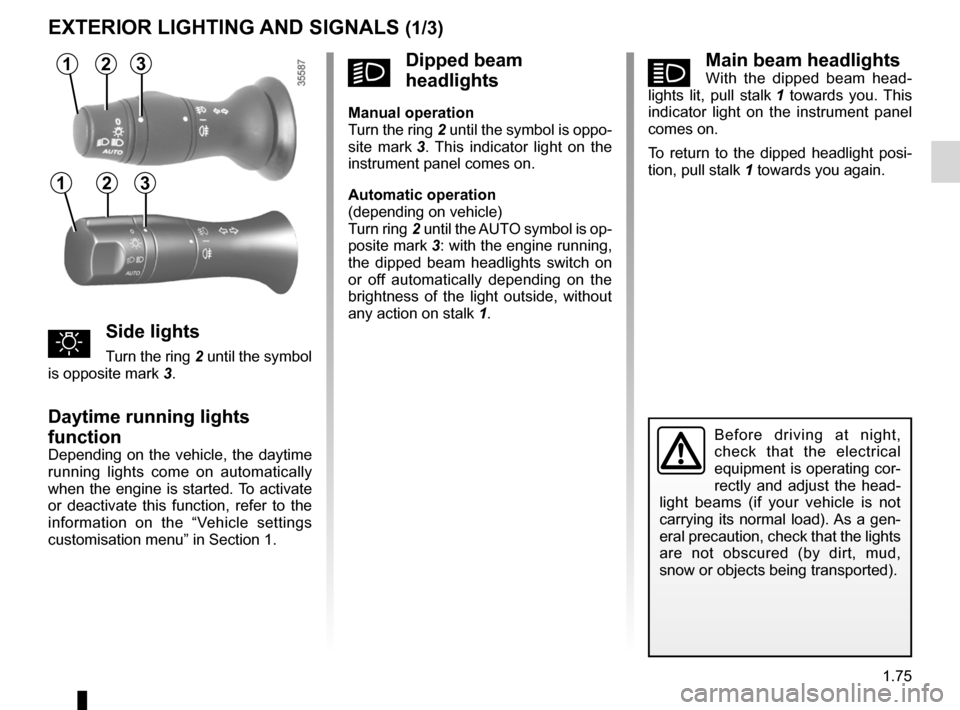
áMain beam headlightsWith the dipped beam head -
lights lit, pull stalk 1 towards you. This
indicator light on the instrument panel
comes on.
To return to the dipped headlight posi-
tion, pull stalk 1 towards you again.
Exterior lighting and signals
Before driving at night,
check that the electrical
equipment is operating cor-
rectly and adjust the head -
light beams (if your vehicle is not
carrying its normal load). As a gen-
eral precaution, check that the lights
are not obscured (by dirt, mud,
snow or objects being transported).
EXTERIOR LIghTINg AND sIgNALs (1/3)
31
uside lights
Turn the ring 2 until the symbol
is opposite mark 3.
Daytime running lights
function
Depending on the vehicle, the daytime
running lights come on automatically
when the engine is started. To activate
or deactivate this function, refer to the
information on the “Vehicle settings
customisation menu” in Section 1.
kDipped beam
headlights
Manual operation
Turn the ring 2 until the symbol is oppo -
site mark 3 . This indicator light on the
instrument panel comes on.
Automatic operation
(depending on vehicle)
Turn ring 2 until the AUTO symbol is op-
posite mark 3: with the engine running,
the dipped beam headlights switch on
or off automatically depending on the
brightness of the light outside, without
any action on stalk 1.
2
312
Page 80 of 241
lights:main beam headlights ...................................... (current page)
warning buzzer ...................................................... (current page)
see-me-home lighting ............................................ (current page)
lights mobile directional ............................................. (current page)
1.76
ENG_UD27178_2
Éclairages et signalisations extérieurs (L38 - X38 - Renault)
ENG_NU_891_892-7_L38-B32_Renault_1
Jaune NoirNoir texte
EXTERIOR LIghTINg AND sIgNALs (2/3)
special note:
– If the dipped beam headlights are
manually switched on and if the light
is sufficient, the directional head -
lights will remain fixed;
– If the lights come on automatically
when cornering, the directional
headlights will start working from the
next time the vehicle corners;
– When the dipped beam headlights
are switched on with the engine
running and the vehicle stationary,
the lights move to reinitialise them -
selves. If not, there is a system fault.
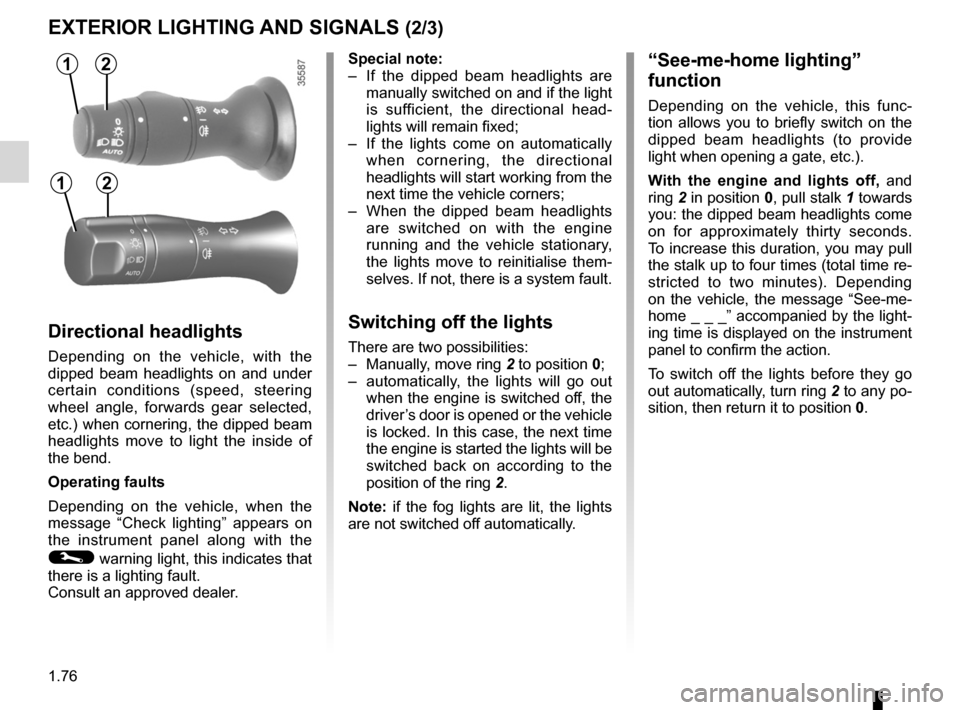
switching off the lights
There are two possibilities:
– Manually, move ring 2 to position 0;
– automatically, the lights will go out
when the engine is switched off, the
driver’s door is opened or the vehicle
is locked. In this case, the next time
the engine is started the lights will be
switched back on according to the
position of the ring 2.
Note: if the fog lights are lit, the lights
are not switched off automatically.
“see-me-home lighting”
function
Depending on the vehicle, this func -
tion allows you to briefly switch on the
dipped beam headlights (to provide
light when opening a gate, etc.).
With the engine and lights off, and
ring 2 in position 0, pull stalk 1 towards
you: the dipped beam headlights come
on for approximately thirty seconds.
To increase this duration, you may pull
the stalk up to four times (total time re-
stricted to two minutes). Depending
on the vehicle, the message “See-me-
home _ _ _” accompanied by the light-
ing time is displayed on the instrument
panel to confirm the action.
To switch off the lights before they go
out automatically, turn ring 2 to any po-
sition, then return it to position 0.
Directional headlights
Depending on the vehicle, with the
dipped beam headlights on and under
certain conditions (speed, steering
wheel angle, forwards gear selected,
etc.) when cornering, the dipped beam
headlights move to light the inside of
the bend.
Operating faults
Depending on the vehicle, when the
message “Check lighting ” appears on
the instrument panel along with the
© warning light, this indicates that
there is a lighting fault.
Consult an approved dealer.
12
12
Page 84 of 241

headlight washer ................................................... (current page)
1.80
ENG_UD27179_3
Essuie-vitre / lave-vitre avant (L38 - X38 - Renault)
ENG_NU_891_892-7_L38-B32_Renault_1
headlight washers
headlights on
On equipped vehicles, hold stalk 1
pulled towards you for about 1 second,
and the headlight washers and wind -
screen washers will be activated at the
same time.
Note: when the minimum windscreen
washer fluid level is reached, the head -
light washer system may be deprimed.
Fill the windscreen washer fluid and
then activate the windscreen washer,
with the engine running , to reprime
the system.
Windscreen washer
With the ignition on, pull stalk 1 then
release.
A brief pull will trigger a single sweep
of the wipers, in addition to the wind -
screen washer.
A longer pull will trigger three sweeps
of the wipers followed, a few seconds
later, by a fourth, in addition to the wind -
screen washer.
WINDsCREEN WAsh/WIpE (2/2)
In freezing or snowy weather, ensure
they are not stuck to the windscreen
(including the central area located
behind the interior rear-view mirror)
and the rear screen before starting
the wipers (risk of motor overheat -
ing).
1
A
When working in the engine
compartment, ensure that
the windscreen wiper stalk
is in position A (park).
Risk of injury.
Before any action on the
windscreen (washing the
vehicle, de-icing, cleaning
the windscreen, etc.) return
stalk 1 to position A (park).
Risk of injury and/or damage.
1
1
Page 96 of 241
special features of petrol vehicles ........ (up to the end of the DU)
catalytic converter ................................. (up to the end of the DU)
driving ................................................... (up to the end of the DU)
catalytic converter ................................. (up to the end of the DU)
2.8
ENG_UD10553_1
Particularités des versions essence (X85 - B85 - C85 - S85 - K85 - R\
enault)
ENG_NU_891_892-7_L38-B32_Renault_2
Special features of petrol versions
SPeCIAL FeA tUReS OF PetROL VeRSIONS
The following operating conditions:
– driving for long periods when the low
fuel level warning light is lit;
– using leaded petrol;
– using fuel or lubrication additives
which are not approved.
Or operating faults such as:
– faulty ignition system, running out of
fuel or disconnected spark plugs re-
sulting in the engine misfiring or cut-
ting out when driving;
– loss of power,
as they may cause the catalytic con -
verter to overheat and thus reduce its
efficiency, or damage it irreparably
and cause heat damage to the vehi-
cle. If you notice any of the above operating
faults, have the necessary repairs car-
ried out as soon as possible by an ap-
proved Dealer.
These faults may be avoided by regu
-
larly taking your vehicle to an approved
Dealer at the intervals specified in the
Maintenance Service Booklet.
Starting problems
To avoid damaging the catalytic con -
verter, do not keep trying to start the
engine (using the start button, or by
pushing or towing the vehicle) without
having identified and corrected the
starting fault.
If the fault cannot be identified, do not
keep trying to start the engine, but con-
tact an approved Dealer.
Do not park the vehicle or
run the engine in locations
where combustible sub -
stances or materials such
as grass or leaves can come into
contact with the hot exhaust system.