boot RENAULT FLUENCE Z.E. 2012 Owners Manual
[x] Cancel search | Manufacturer: RENAULT, Model Year: 2012, Model line: FLUENCE Z.E., Model: RENAULT FLUENCE Z.E. 2012Pages: 195, PDF Size: 5.23 MB
Page 15 of 195
1.10
ENG_UD28731_4
Charge de la batterie de traction (X38 - L38 électrique - Renault)
ENG_NU_914-4_L38e_Renault_1
Jaune NoirNoir texte
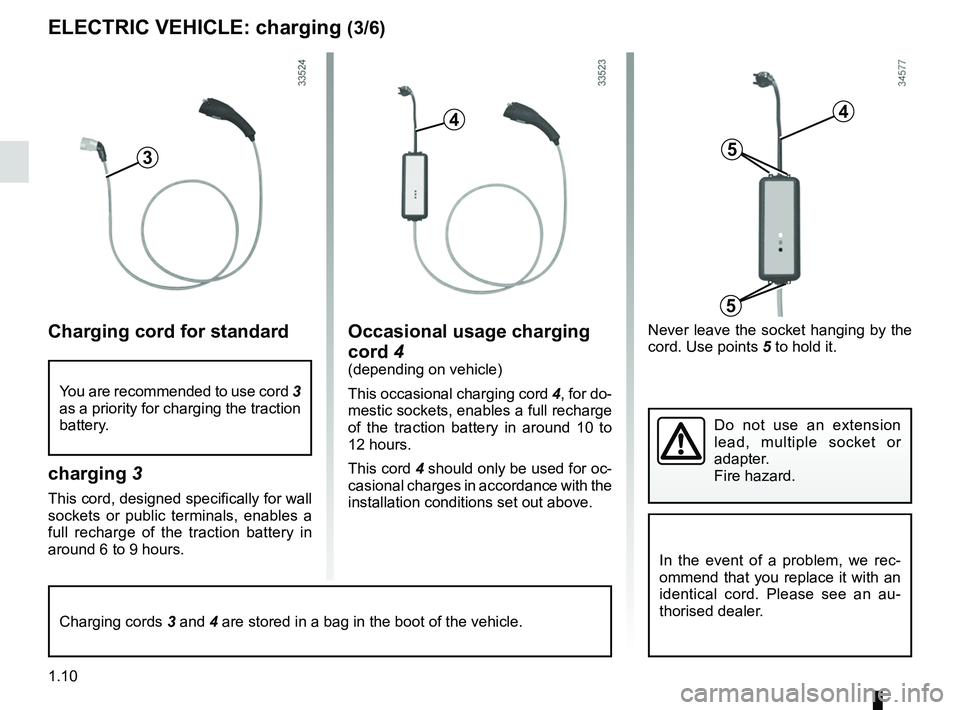
Never leave the socket hanging by the
cord. Use points 5 to hold it.
electric vehicle: charging (3/6)
charging cord for standard
charging 3
This cord, designed specifically for wall
sockets or public terminals, enables a
full recharge of the traction battery in
around 6 to 9 hours.
Occasional usage charging
cord 4
(depending on vehicle)
This occasional charging cord 4, for do-
mestic sockets, enables a full recharge
of the traction battery in around 10 to
12 hours.
This cord 4 should only be used for oc-
casional charges in accordance with the
installation conditions set out above.
In the event of a problem, we rec -
ommend that you replace it with an
identical cord. Please see an au -
thorised dealer.
5
5
4
Do not use an extension
lead, multiple socket or
adapter.
Fire hazard.
You are recommended to use cord 3
as a priority for charging the traction
battery.
3
4
Charging cords 3 and 4 are stored in a bag in the boot of the vehicle.
Page 17 of 195
1.12
ENG_UD28731_4
Charge de la batterie de traction (X38 - L38 électrique - Renault)
ENG_NU_914-4_L38e_Renault_1
Jaune NoirNoir texte
electric vehicle: charging (5/6)
86
7
9
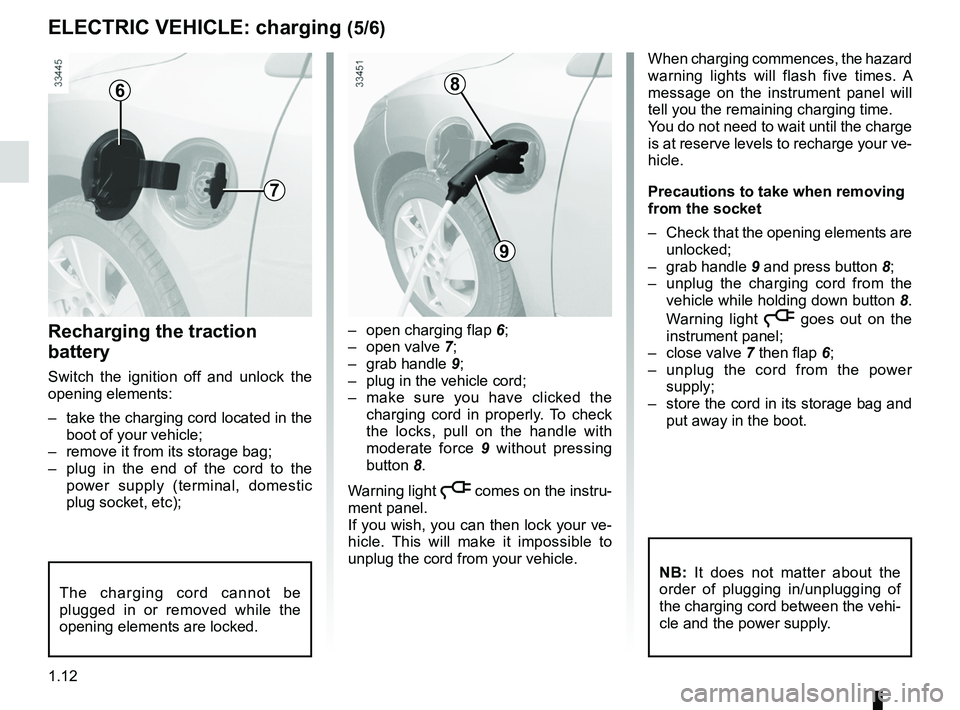
– open charging flap 6;
– open valve 7;
– grab handle 9;
– plug in the vehicle cord;
– make sure you have clicked the
charging cord in properly. To check
the locks, pull on the handle with
moderate force 9 without pressing
button 8.
Warning light
ṋ comes on the instru-
ment panel.
If you wish, you can then lock your ve-
hicle. This will make it impossible to
unplug the cord from your vehicle.
recharging the traction
battery
Switch the ignition off and unlock the
opening elements:
– take the charging cord located in the
boot of your vehicle;
– remove it from its storage bag;
– plug in the end of the cord to the
power supply (terminal, domestic
plug socket, etc); When charging commences, the hazard
warning lights will flash five times. A
message on the instrument panel will
tell you the remaining charging time.
You do not need to wait until the charge
is at reserve levels to recharge your ve-
hicle.
Precautions to take when removing
from the socket
–
Check that the opening elements are
unlocked;
– grab handle 9 and press button 8;
– unplug the charging cord from the
vehicle while holding down button 8.
Warning light
ṋ goes out on the
instrument panel;
– close valve 7 then flap 6;
– unplug the cord from the power
supply;
– store the cord in its storage bag and
put away in the boot.
The charging cord cannot be
plugged in or removed while the
opening elements are locked.
NB: It does not matter about the
order of plugging in/unplugging of
the charging cord between the vehi-
cle and the power supply.
Page 20 of 195
keys ...................................................... (up to the end of the DU)
children ................................................. (up to the end of the DU)
child safety ............................................ (up to the end of the DU)
locking the doors .................................. (up to the end of the DU)
1.15
ENG_UD21527_3
Télécommande à radiofréquence : généralités (L38 -\
X38 - Renault)
ENG_NU_914-4_L38e_Renault_1
Key, radio frequency remote control: general information, use, deadlocking
KeY/rADiO FreqUeNcY remOte cONtrOl: general information
41
2
3
5
radio frequency remote
control operating range
This varies according to the surround-
ings: please take care not to lock or
unlock the doors by inadvertently press-
ing the buttons on the remote control.
interference
The presence of certain objects (metal
objects, mobile telephones, or an area
with strong electromagnetic radiation,
etc.) close to the key may create inter-
ference and affect the operation of the
system.
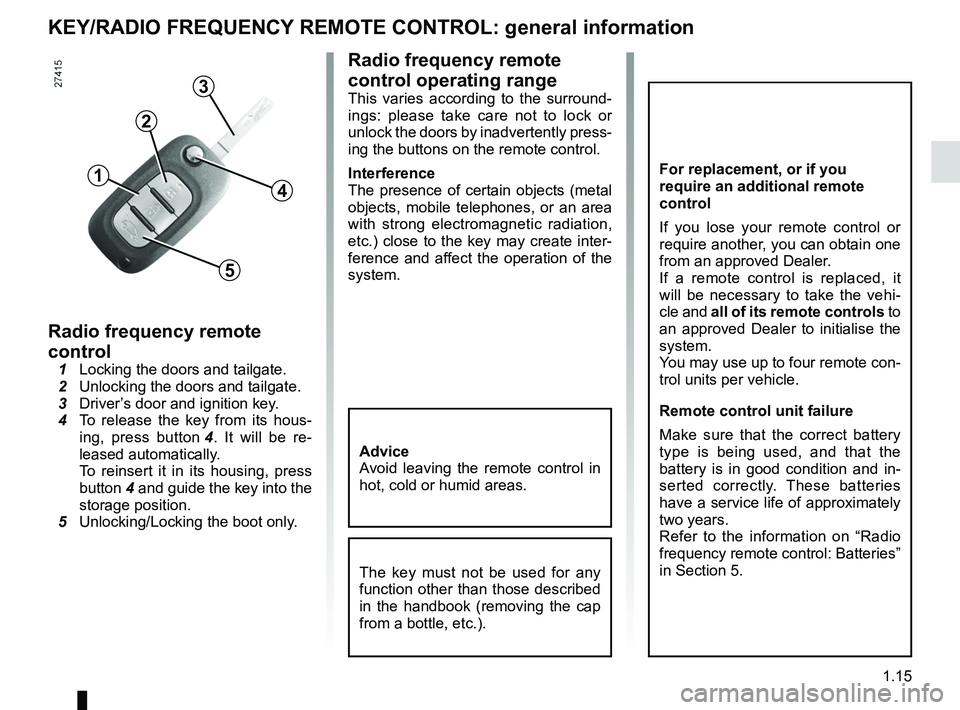
radio frequency remote
control
1 Locking the doors and tailgate.
2 Unlocking the doors and tailgate.
3 Driver’s door and ignition key.
4 To release the key from its hous -
ing, press button 4 . It will be re -
leased automatically.
To reinsert it in its housing, press
button 4 and guide the key into the
storage position.
5 Unlocking/Locking the boot only.
The key must not be used for any
function other than those described
in the handbook (removing the cap
from a bottle, etc.).
For replacement, or if you
require an additional remote
control
If you lose your remote control or
require another, you can obtain one
from an approved Dealer.
If a remote control is replaced, it
will be necessary to take the vehi -
cle and all of its remote controls to
an approved Dealer to initialise the
system.
You may use up to four remote con-
trol units per vehicle.
remote control unit failure
Make sure that the correct battery
type is being used, and that the
battery is in good condition and in -
serted correctly. These batteries
have a service life of approximately
two years.
Refer to the information on “Radio
frequency remote control: Batteries”
in Section 5.
Advice
Avoid leaving the remote control in
hot, cold or humid areas.
Page 21 of 195
keys ...................................................... (up to the end of the DU)
locking the doors .................................. (up to the end of the DU)
1.16
ENG_UD21528_3
Télécommande à radiofréquence : utilisation (L38 - X38 - Re\
nault)
ENG_NU_914-4_L38e_Renault_1
Unlocking the doors
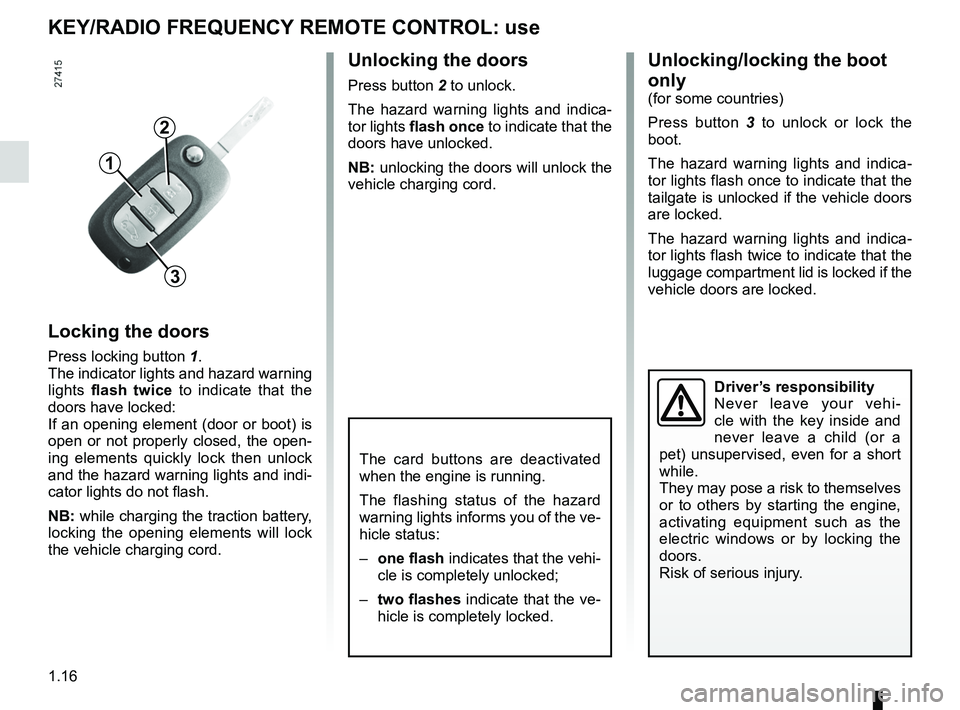
Press button 2 to unlock.
The hazard warning lights and indica -
tor lights flash once to indicate that the
doors have unlocked.
NB: unlocking the doors will unlock the
vehicle charging cord.
KeY/rADiO FreqUeNcY remOte cONtrOl: use
locking the doors
Press locking button 1.
The indicator lights and hazard warning
lights flash twice to indicate that the
doors have locked:
If an opening element (door or boot) is
open or not properly closed, the open -
ing elements quickly lock then unlock
and the hazard warning lights and indi -
cator lights do not flash.
NB: while charging the traction battery,
locking the opening elements will lock
the vehicle charging cord.
3
1
2
Unlocking/locking the boot
only
(for some countries)
Press button 3 to unlock or lock the
boot.
The hazard warning lights and indica -
tor lights flash once to indicate that the
tailgate is unlocked if the vehicle doors
are locked.
The hazard warning lights and indica -
tor lights flash twice to indicate that the
luggage compartment lid is locked if the
vehicle doors are locked.
Driver’s responsibility
Never leave your vehi -
cle with the key inside and
never leave a child (or a
pet) unsupervised, even for a short
while.
They may pose a risk to themselves
or to others by starting the engine,
activating equipment such as the
electric windows or by locking the
doors.
Risk of serious injury.
The card buttons are deactivated
when the engine is running.
The flashing status of the hazard
warning lights informs you of the ve-
hicle status:
– one flash indicates that the vehi-
cle is completely unlocked;
– two flashes indicate that the ve-
hicle is completely locked.
Page 22 of 195
warning buzzer ...................................................... (current page)
doors ..................................................... (up to the end of the DU)
locking the doors .................................. (up to the end of the DU)
opening the doors ................................. (up to the end of the DU)
closing the doors .................................. (up to the end of the DU)
children ................................................. (up to the end of the DU)
doors/tailgate ........................................ (up to the end of the DU)
1.17
ENG_UD20061_2
Ouverture et fermeture des portes (L38 - X38 - Renault)
ENG_NU_914-4_L38e_Renault_1
Doors
OPeNiNg AND clOSiNg the DOOrS (1/2)
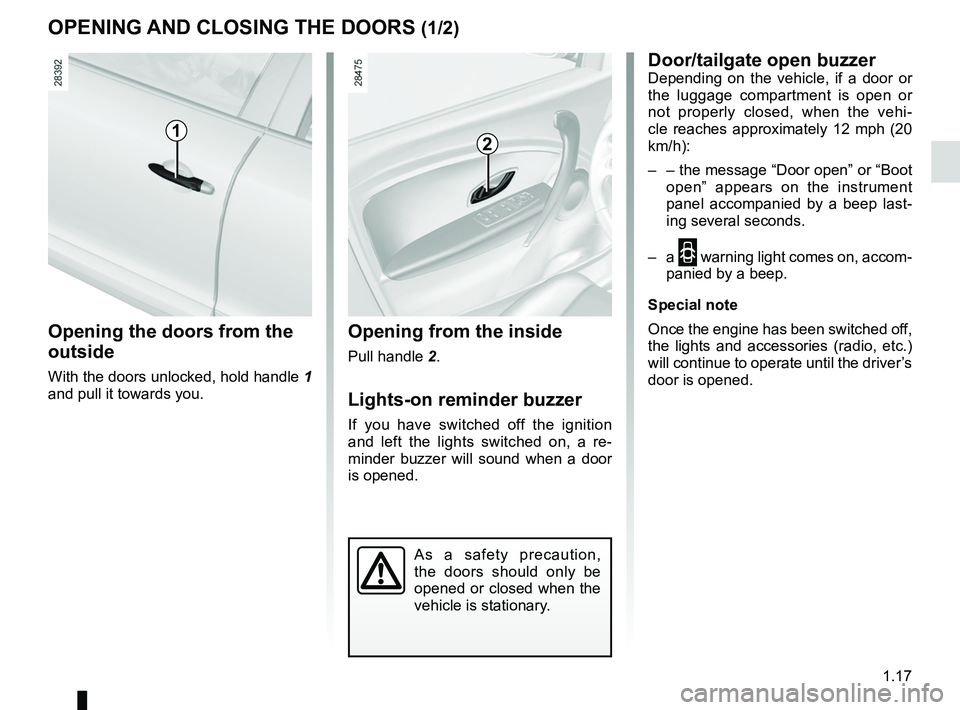
Opening the doors from the
outside
With the doors unlocked, hold handle 1
and pull it towards you.
Opening from the inside
Pull handle 2.
lights-on reminder buzzer
If you have switched off the ignition
and left the lights switched on, a re -
minder buzzer will sound when a door
is opened.
Door/tailgate open buzzerDepending on the vehicle, if a door or
the luggage compartment is open or
not properly closed, when the vehi -
cle reaches approximately 12 mph (20
km/h):
– – the message “Door open ” or “Boot
open ” appears on the instrument
panel accompanied by a beep last -
ing several seconds.
– a
2 warning light comes on, accom-
panied by a beep.
Special note
Once the engine has been switched off,
the lights and accessories (radio, etc.)
will continue to operate until the driver’s
door is opened.
12
As a safety precaution,
the doors should only be
opened or closed when the
vehicle is stationary.
Page 25 of 195
1.20
ENG_UD20063_2
Verrouillage / Déverrouillage des portes (L38 - X38 - Renault)
ENG_NU_914-4_L38e_Renault_1
lOcKiNg/UNlOcKiNg the DOOrS (2/2)
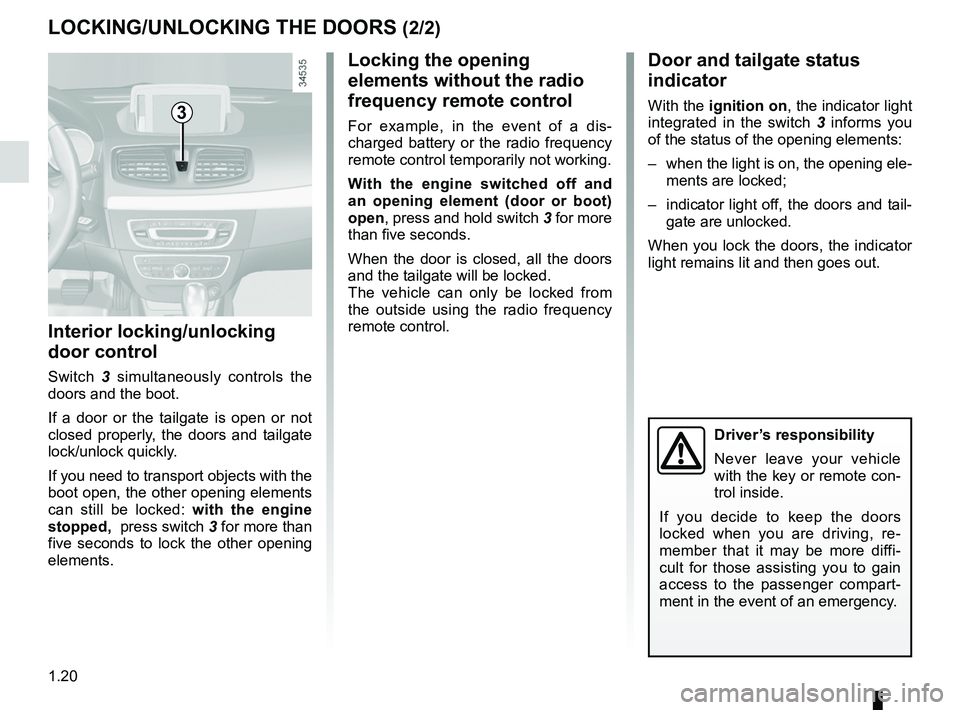
interior locking/unlocking
door control
Switch 3 simultaneously controls the
doors and the boot.
If a door or the tailgate is open or not
closed properly, the doors and tailgate
lock/unlock quickly.
If you need to transport objects with the
boot open, the other opening elements
can still be locked: with the engine
stopped, press switch 3 for more than
five seconds to lock the other opening
elements.
locking the opening
elements without the radio
frequency remote control
For example, in the event of a dis -
charged battery or the radio frequency
remote control temporarily not working.
With the engine switched off and
an opening element (door or boot)
open, press and hold switch 3 for more
than five seconds.
When the door is closed, all the doors
and the tailgate will be locked.
The vehicle can only be locked from
the outside using the radio frequency
remote control.
Door and tailgate status
indicator
With the ignition on, the indicator light
integrated in the switch 3 informs you
of the status of the opening elements:
– when the light is on, the opening ele-
ments are locked;
– indicator light off, the doors and tail-
gate are unlocked.
When you lock the doors, the indicator
light remains lit and then goes out.3
Driver’s responsibility
Never leave your vehicle
with the key or remote con-
trol inside.
If you decide to keep the doors
locked when you are driving, re -
member that it may be more diffi -
cult for those assisting you to gain
access to the passenger compart -
ment in the event of an emergency.
Page 118 of 195

sun visor ................................................................ (current page)
courtesy mirrors ..................................................... (current page)
JauneNoirNoir texte
3.15
ENG_UD20075_2
Eclairage intérieur (L38 - X38 - Renault)
ENG_NU_914-4_L38e_Renault_3
luggage compartment light
Light 6 comes on when the boot is
opened.
Sun visor
INTERIoR lIghTINg (2/2)/SuN VISoR
6
Sun visor
Lower the sun visor 7 over the wind -
screen or unclip it and turn it over the
side window.
courtesy mirrors
Slide cover 8 , depending on the vehi -
cle, and the mirror is lit.
78
Page 123 of 195

tailgate .................................................. (up to the end of the DU)
tailgate .................................................. (up to the end of the DU)
transporting objects in the luggage compartment ............................ (current page)
3.20
ENG_UD19267_1
Coffre à bagages (L38 - X38 - Renault)
ENG_NU_914-4_L38e_Renault_3
Boot
T AIlgATE
opening
Press button 1 and lift the boot lid
closing
Lower the boot lid using handle 3 inside
the boot (depending on the vehicle) to
assist you.
1
Transporting objects
lashing hook
Hook 2 enables loads to be secured. Storage tray
Situated under the luggage compart
-
ment carpet - “lift the carpet using
strap 3”
2
3
Always position the heavi -
est items directly on the
floor. The luggage should
be loaded in such a way
that no items will be thrown forward
and strike the occupants if the driver
has to brake suddenly.
Page 139 of 195

tyre inflation kit....................................................... (current page)
tool kit ................................................... (up to the end of the DU)
5.2
ENG_UD23031_2
Bloc outils, kit de gonflage : accès (L38 électrique - Renault)
ENG_NU_914-4_L38e_Renault_5
Jaune NoirNoir texte
Tool kit
TOOL KIT (1/2)
the tool kit contains tools and the tyre
inflation kit. It is located in the boot.
To get to it:
– remove strap 1 and attach it 2.
– position your hands at A and B;
– pull the kit 3 towards you.
To use the tyre inflation kit, please refer
to “Tyre inflation kit” in Section 5.
Do not leave the tools un -
secured inside the vehicle
as they may come loose
under braking. After use,
check that all the tools are correctly
clipped into the tool kit, then position
it correctly in its housing: there is a
risk of injury.
1
2
B
A3
Inflation kit
To use the tyre inflation kit, please refer
to “Tyre inflation kit” in Section 5.
Page 142 of 195
JauneNoirNoir texte
5.5
ENG_UD28764_1
Kit de gonflage des pneumatiques (L38 électrique - Renault)
ENG_NU_914-4_L38e_Renault_5
TYrE INFLATION KIT (2/5)
143
5
6
78
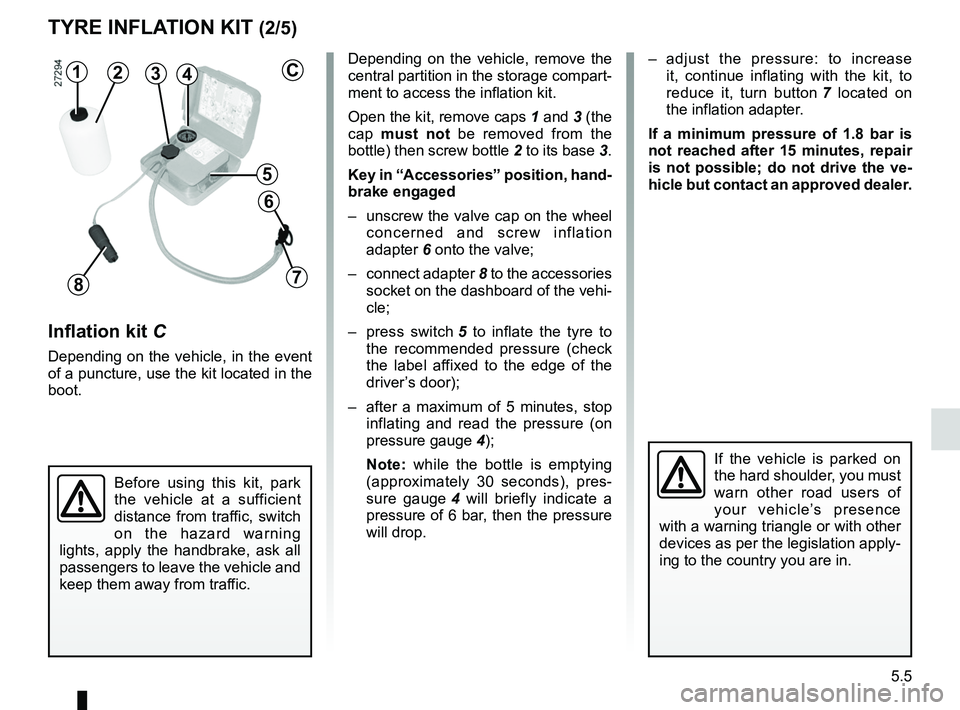
2Depending on the vehicle, remove the
central partition in the storage compart-
ment to access the inflation kit.
Open the kit, remove caps 1 and 3 (the
cap must not be removed from the
bottle) then screw bottle 2 to its base 3.
Key in “Accessories” position, hand-
brake engaged
– unscrew the valve cap on the wheel
concerned and screw inflation
adapter 6 onto the valve;
– connect adapter 8 to the accessories
socket on the dashboard of the vehi-
cle;
– press switch 5 to inflate the tyre to
the recommended pressure (check
the label affixed to the edge of the
driver’s door);
– after a maximum of 5 minutes, stop
inflating and read the pressure (on
pressure gauge 4);
Note: while the bottle is emptying
(approximately 30 seconds), pres -
sure gauge 4 will briefly indicate a
pressure of 6 bar, then the pressure
will drop. –
adjust the pressure: to increase
it, continue inflating with the kit, to
reduce it, turn button 7 located on
the inflation adapter.
If a minimum pressure of 1.8 bar is
not reached after 15 minutes, repair
is not possible; do not drive the ve-
hicle but contact an approved dealer.
Inflation kit C
Depending on the vehicle, in the event
of a puncture, use the kit located in the
boot.
Before using this kit, park
the vehicle at a sufficient
distance from traffic, switch
on the hazard warning
lights, apply the handbrake, ask all
passengers to leave the vehicle and
keep them away from traffic.
If the vehicle is parked on
the hard shoulder, you must
warn other road users of
your vehicle’s presence
with a warning triangle or with other
devices as per the legislation apply-
ing to the country you are in.
C