boot RENAULT FLUENCE Z.E. 2012 User Guide
[x] Cancel search | Manufacturer: RENAULT, Model Year: 2012, Model line: FLUENCE Z.E., Model: RENAULT FLUENCE Z.E. 2012Pages: 195, PDF Size: 5.23 MB
Page 144 of 195

JauneNoirNoir texte
5.7
ENG_UD28764_1
Kit de gonflage des pneumatiques (L38 électrique - Renault)
ENG_NU_914-4_L38e_Renault_5
TYrE INFLATION KIT (4/5)
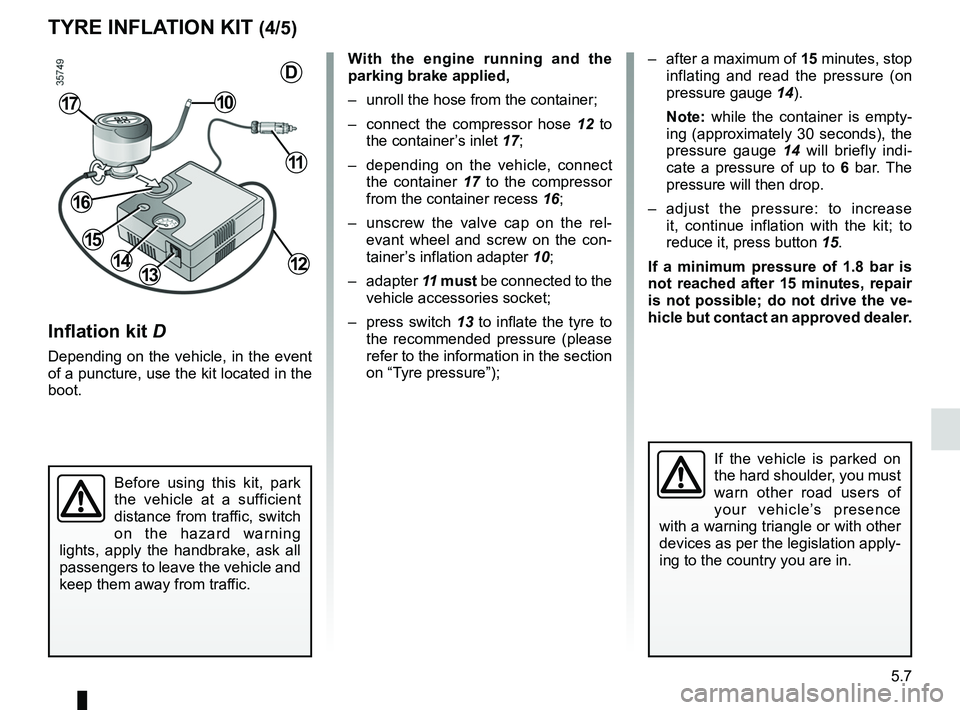
Inflation kit D
Depending on the vehicle, in the event
of a puncture, use the kit located in the
boot.
Before using this kit, park
the vehicle at a sufficient
distance from traffic, switch
on the hazard warning
lights, apply the handbrake, ask all
passengers to leave the vehicle and
keep them away from traffic.
1314
1017
11
12
16
15
DWith the engine running and the
parking brake applied,
– unroll the hose from the container;
– connect the compressor hose 12 to
the container’s inlet 17;
– depending on the vehicle, connect
the container 17 to the compressor
from the container recess 16;
– unscrew the valve cap on the rel -
evant wheel and screw on the con -
tainer’s inflation adapter 10;
– adapter 11 must be connected to the
vehicle accessories socket;
– press switch 13 to inflate the tyre to
the recommended pressure (please
refer to the information in the section
on “Tyre pressure”); –
after a maximum of 15 minutes, stop
inflating and read the pressure (on
pressure gauge 14).
Note: while the container is empty -
ing (approximately 30 seconds), the
pressure gauge 14 will briefly indi -
cate a pressure of up to 6 bar. The
pressure will then drop.
– adjust the pressure: to increase
it, continue inflation with the kit; to
reduce it, press button 15.
If a minimum pressure of 1.8 bar is
not reached after 15 minutes, repair
is not possible; do not drive the ve-
hicle but contact an approved dealer.
If the vehicle is parked on
the hard shoulder, you must
warn other road users of
your vehicle’s presence
with a warning triangle or with other
devices as per the legislation apply-
ing to the country you are in.
Page 154 of 195

bulbschanging ......................................... (up to the end of the DU)
lights: direction indicators ........................................... (current page)
lights: brake lights ...................................................... (current page)
lights: side lights ......................................................... (current page)
changing a bulb .................................... (up to the end of the DU)
bulbs changing ......................................... (up to the end of the DU)
5.17
ENG_UD23018_2
Projecteurs arrière et latéraux (L38 électrique - Renault)
ENG_NU_914-4_L38e_Renault_5
Rear lights (changing bulbs)
Direction indicator lights 4
Bulb type: PY21W.
side light and brake light 5
Bulb type: P21/5W.
Direction indicator lights/
brake and side lights
– Open the boot and unscrew bolts 1
using the rear lights key (refer to
the information on the “Tool kit” in
Section 5), then take out the light unit
by pulling it back.
– Release clips 3 to remove bulb
holder 2.
– Unscrew bulb holder 4 or 5 and re -
place the bulb.
Note: ensure that the cable is in place
before inserting the light unit.
rEAr LIgHTs AND sIDE LIgHTs: changing bulbs (1/2)
4
5
refitting
To refit, proceed in the reverse order,
taking care not to damage the wiring.
1
3
2
The bulbs are under pres -
sure and can break when
replaced.
Risk of injury.
Page 167 of 195

towing hitch............................................................ (current page)
5.30
ENG_UD28878_1
Remorquage, dépannage (L38 électrique - Renault)
ENG_NU_914-4_L38e_Renault_5
T OWINg, BrEAKDOWN (3/3)
Access to towing points
Only use the front 6 and rear 7 towing
points.
These towing points may only be used
for towing: never use them for lifting the
vehicle directly or indirectly. Unclip cover
5 or 8 by inserting a flat -
blade screwdriver or similar under the
cover.
Tighten towing hitch 4 fully: as much
as possible by hand at first, then finish
tightening it using the wheelbrace.
Only use the tow hitch 4 and the wheel-
brace located under the boot carpet in
the tool kit (please refer to the para -
graph entitled “Tool kit”).
Do not leave the tools unse-
cured inside the vehicle as
they may come loose under
braking.
After use, check that all the tools
are correctly clipped into the tool kit,
then, depending on the vehicle, po-
sition it correctly in its housing.
Risk of injury.
6
7
4
45
8
Do not remove the key from
the ignition when the vehi -
cle is being towed.