RENAULT KADJAR 2018 Owners Manual
Manufacturer: RENAULT, Model Year: 2018, Model line: KADJAR, Model: RENAULT KADJAR 2018Pages: 310, PDF Size: 8.35 MB
Page 181 of 310
2.73
AUTOMATIC TRANSMISSION (2/3)
Special cases
In certain driving conditions (for exam-
ple, engine protection, operation of the
Electronic Stability Programme: the au-
tomatic system may change gear auto-
matically.
Likewise, to prevent incorrect manoeu-
vres, a gear change may be refused by
the automatic system: in this case the
gear display flashes for a few seconds
as a warning.
Special circumstances
– If the bends and road surface do
not allow you to stay in automatic
mode (e.g. in the mountains), we
recommend that you change to
manual mode. This will prevent the
automatic gearbox from changing
gear repeatedly when climbing, and
permit engine braking on long de-
scents.
– In cold weather , start the engine
and wait a few seconds before
moving the selector lever from posi-
tion P or N and engaging it in D or R
to prevent the engine stalling.
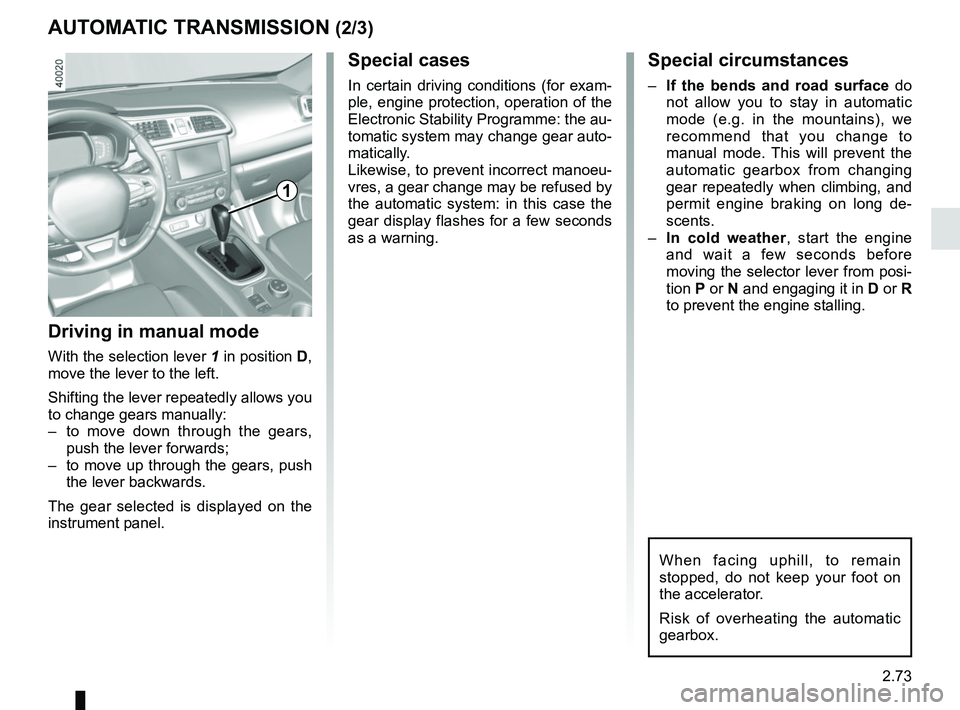
Driving in manual mode
With the selection lever 1 in position D,
move the lever to the left.
Shifting the lever repeatedly allows you
to change gears manually:
– to move down through the gears, push the lever forwards;
– to move up through the gears, push the lever backwards.
The gear selected is displayed on the
instrument panel.
1
When facing uphill, to remain
stopped, do not keep your foot on
the accelerator.
Risk of overheating the automatic
gearbox.
Page 182 of 310
2.74
AUTOMATIC TRANSMISSION (3/3)
Parking the vehicle
When the vehicle is stopped, move the
lever to position P while keeping your
foot on the brake pedal: the gearbox is
in neutral and the drive wheels are me-
chanically locked by the driveshaft.
Apply the handbrake or, depending
on the vehicle, ensure that the elec-
tronic parking brake is applied.
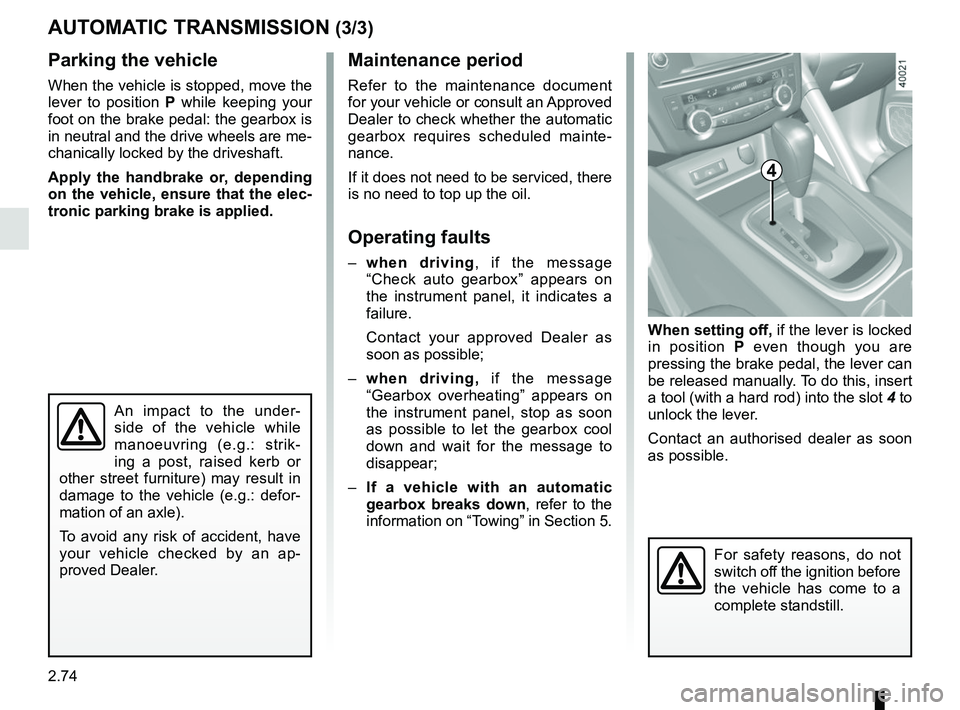
When setting off, if the lever is locked
in position P even though you are
pressing the brake pedal, the lever can
be released manually. To do this, insert
a tool (with a hard rod) into the slot 4 to
unlock the lever.
Contact an authorised dealer as soon
as possible.
Maintenance period
Refer to the maintenance document
for your vehicle or consult an Approved
Dealer to check whether the automatic
gearbox requires scheduled mainte-
nance.
If it does not need to be serviced, there
is no need to top up the oil.
Operating faults
– when driving , if the message
“Check auto gearbox” appears on
the instrument panel, it indicates a
failure.
Contact your approved Dealer as
soon as possible;
– when driving, if the message
“Gearbox overheating” appears on
the instrument panel, stop as soon
as possible to let the gearbox cool
down and wait for the message to
disappear;
– If a vehicle with an automatic
gearbox breaks down, refer to the
information on “Towing” in Section 5.
4
For safety reasons, do not
switch off the ignition before
the vehicle has come to a
complete standstill.
An impact to the under-
side of the vehicle while
manoeuvring (e.g.: strik-
ing a post, raised kerb or
other street furniture) may result in
damage to the vehicle (e.g.: defor-
mation of an axle).
To avoid any risk of accident, have
your vehicle checked by an ap-
proved Dealer.
Page 183 of 310
3.1
Section 3: Your comfort
Air vents. . . . . . . . . . . . . . . . . . . . . . . . . . . . . . . .\
. . . . . . . . . . . . . . . . . . . . . . . . . . . . . . . . . . . . . . . 3.2
Manual air conditioning/heating system . . . . . . . . . . . . . . . . . . . . . . . . . . . . . . . . . . . .\
. . . . . . . . . . 3.4
Automatic climate control . . . . . . . . . . . . . . . . . . . . . . . . . . . . . . . . . . . .\
. . . . . . . . . . . . . . . . . . . . . 3.7
Air conditioning: information and advice on use . . . . . . . . . . . . . . . . . . . . . . . . . . . . . . . . . . . .\
. . . . 3.13
Outside air quality and deodorisation functions . . . . . . . . . . . . . . . . . . . . . . . . . . . . . . . . . . . . \
. . . . . 3.15
Electric windows . . . . . . . . . . . . . . . . . . . . . . . . . . . . . . . . . . . .\
. . . . . . . . . . . . . . . . . . . . . . . . . . . . 3.16
Fixed glass roof . . . . . . . . . . . . . . . . . . . . . . . . . . . . . . . . . . . . \
. . . . . . . . . . . . . . . . . . . . . . . . . . . . . 3.17
Interior lighting . . . . . . . . . . . . . . . . . . . . . . . . . . . . . . . . . . . . \
. . . . . . . . . . . . . . . . . . . . . . . . . . . . . . 3.18
Passenger compartment storage/fittings . . . . . . . . . . . . . . . . . . . . . . . . . . . . . . . . . . . . \
. . . . . . . . . . 3.20
Ashtray/cigarette lighter . . . . . . . . . . . . . . . . . . . . . . . . . . . . . . . . . . . . \
. . . . . . . . . . . . . . . . . . . . . . . 3.25
Sliding rear bench seat . . . . . . . . . . . . . . . . . . . . . . . . . . . . . . . . . . . .\
. . . . . . . . . . . . . . . . . . . . . . . 3.27
Luggage compartment. . . . . . . . . . . . . . . . . . . . . . . . . . . . . . . . . . . . \
. . . . . . . . . . . . . . . . . . . . . . . . 3.29
Luggage cover . . . . . . . . . . . . . . . . . . . . . . . . . . . . . . . . . . . . \
. . . . . . . . . . . . . . . . . . . . . . . . . . . . . . 3.30
Luggage compartment storage . . . . . . . . . . . . . . . . . . . . . . . . . . . . . . . . . . . .\
. . . . . . . . . . . . . . . . . 3.31
Transporting objects in the luggage compartment . . . . . . . . . . . . . . . . . . . . . . . . . . . . . . . . . . . .\
. . 3.33
Transporting objects: . . . . . . . . . . . . . . . . . . . . . . . . . . . . . . . . . . . . \
. . . . . . . . . . . . . . . . . . . . . . . . . 3.34 equipment . . . . . . . . . . . . . . . . . . . . . . . . . . . . . . . . . . . .\
. . . . . . . . . . . . . . . . . . . . . . . . . . . 3.34
Luggage net. . . . . . . . . . . . . . . . . . . . . . . . . . . . . . . . . . . . \
. . . . . . . . . . . . . . . . . . . . . . . . . . . . . . . . 3.35
Roof bars . . . . . . . . . . . . . . . . . . . . . . . . . . . . . . . . . . . . \
. . . . . . . . . . . . . . . . . . . . . . . . . . . . . . . . . . 3.37
Spoiler . . . . . . . . . . . . . . . . . . . . . . . . . . . . . . . . . . . . \
. . . . . . . . . . . . . . . . . . . . . . . . . . . . . . . . . . . . 3.38
Multimedia equipment . . . . . . . . . . . . . . . . . . . . . . . . . . . . . . . . . . . . \
. . . . . . . . . . . . . . . . . . . . . . . . 3.39
Page 184 of 310
3.2
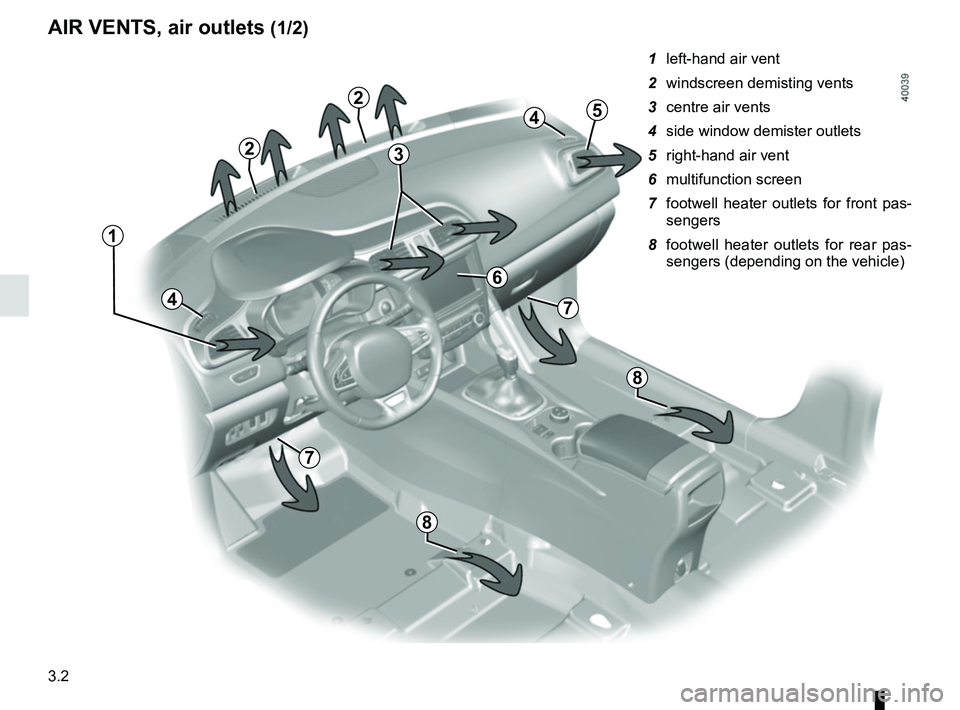
AIR VENTS, air outlets (1/2)
1 left-hand air vent
2 windscreen demisting vents
3 centre air vents
4 side window demister outlets
5 right-hand air vent
6 multifunction screen
7 footwell heater outlets for front pas-sengers
8 footwell heater outlets for rear pas- sengers (depending on the vehicle)
2
1
5
7
7
8
4
3
6
2
4
8
Page 185 of 310
3.3
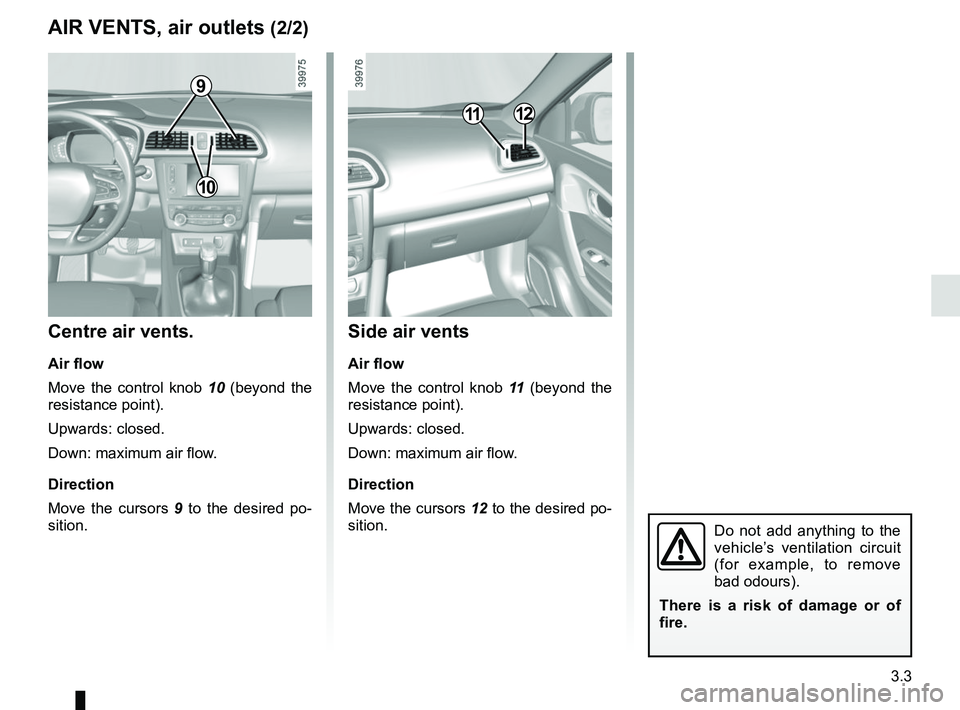
Side air vents
Air flow
Move the control knob 11 (beyond the
resistance point).
Upwards: closed.
Down: maximum air flow.
Direction
Move the cursors 12 to the desired po-
sition.
Centre air vents.
Air flow
Move the control knob 10 (beyond the
resistance point).
Upwards: closed.
Down: maximum air flow.
Direction
Move the cursors 9 to the desired po-
sition.
AIR VENTS, air outlets (2/2)
1112
Do not add anything to the
vehicle’s ventilation circuit
(for example, to remove
bad odours).
There is a risk of damage or of
fire.
10
9
Page 186 of 310
3.4
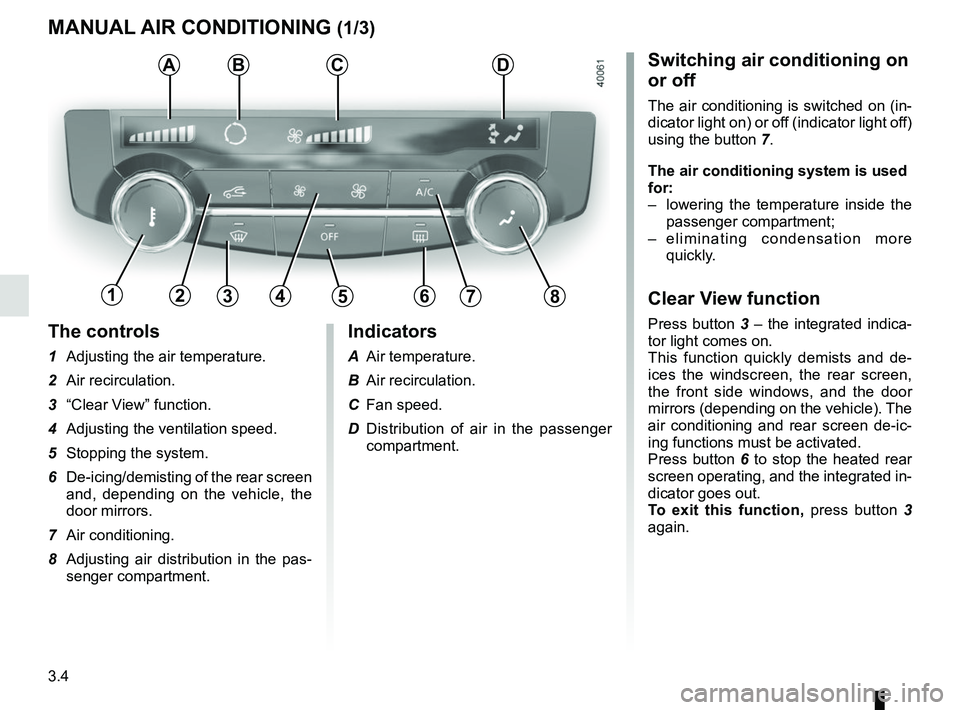
The controls
1 Adjusting the air temperature.
2 Air recirculation.
3 “Clear View” function.
4 Adjusting the ventilation speed.
5 Stopping the system.
6 De-icing/demisting of the rear screen and, depending on the vehicle, the
door mirrors.
7 Air conditioning.
8 Adjusting air distribution in the pas- senger compartment.
MANUAL AIR CONDITIONING (1/3)
ABSwitching air conditioning on
or off
The air conditioning is switched on (in-
dicator light on) or off (indicator light off)
using the button 7.
The air conditioning system is used
for:
– lowering the temperature inside the
passenger compartment;
– eliminating condensation more quickly.
Clear View function
Press button 3 – the integrated indica-
tor light comes on.
This function quickly demists and de-
ices the windscreen, the rear screen,
the front side windows, and the door
mirrors (depending on the vehicle). The
air conditioning and rear screen de-ic-
ing functions must be activated.
Press button 6 to stop the heated rear
screen operating, and the integrated in-
dicator goes out.
To exit this function, press button 3
again.
C
13456782
Indicators
A Air temperature.
B Air recirculation.
C Fan speed.
D Distribution of air in the passenger compartment.
D
Page 187 of 310
3.5
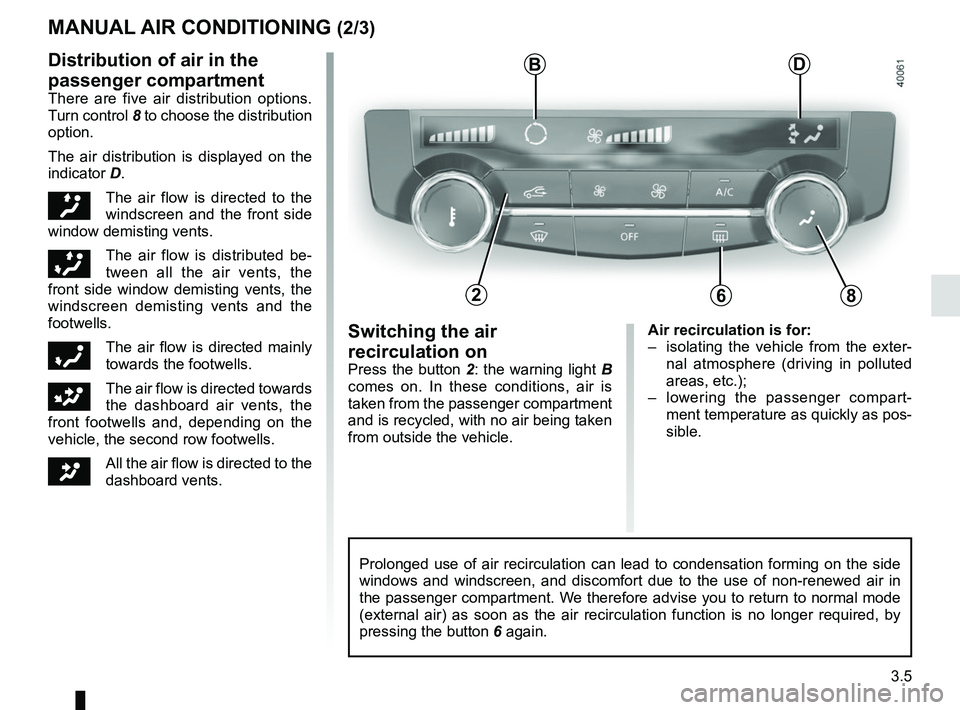
Air recirculation is for:
– isolating the vehicle from the exter-nal atmosphere (driving in polluted
areas, etc.);
– lowering the passenger compart- ment temperature as quickly as pos-
sible.Switching the air
recirculation on
Press the button 2: the warning light B
comes on. In these conditions, air is
taken from the passenger compartment
and is recycled, with no air being taken
from outside the vehicle.
MANUAL AIR CONDITIONING (2/3)
Prolonged use of air recirculation can lead to condensation forming on t\
he side
windows and windscreen, and discomfort due to the use of non-renewed air\
in
the passenger compartment. We therefore advise you to return to normal mode
(external air) as soon as the air recirculation function is no longer \
required, by
pressing the button 6 again.
Distribution of air in the
passenger compartment
There are five air distribution options.
Turn control 8 to choose the distribution
option.
The air distribution is displayed on the
indicator D.
õThe air flow is directed to the
windscreen and the front side
window demisting vents.
÷The air flow is distributed be-
tween all the air vents, the
front side window demisting vents, the
windscreen demisting vents and the
footwells.
óThe air flow is directed mainly
towards the footwells.
GThe air flow is directed towards
the dashboard air vents, the
front footwells and, depending on the
vehicle, the second row footwells.
JAll the air flow is directed to the
dashboard vents.
B
682
D
Page 188 of 310
3.6
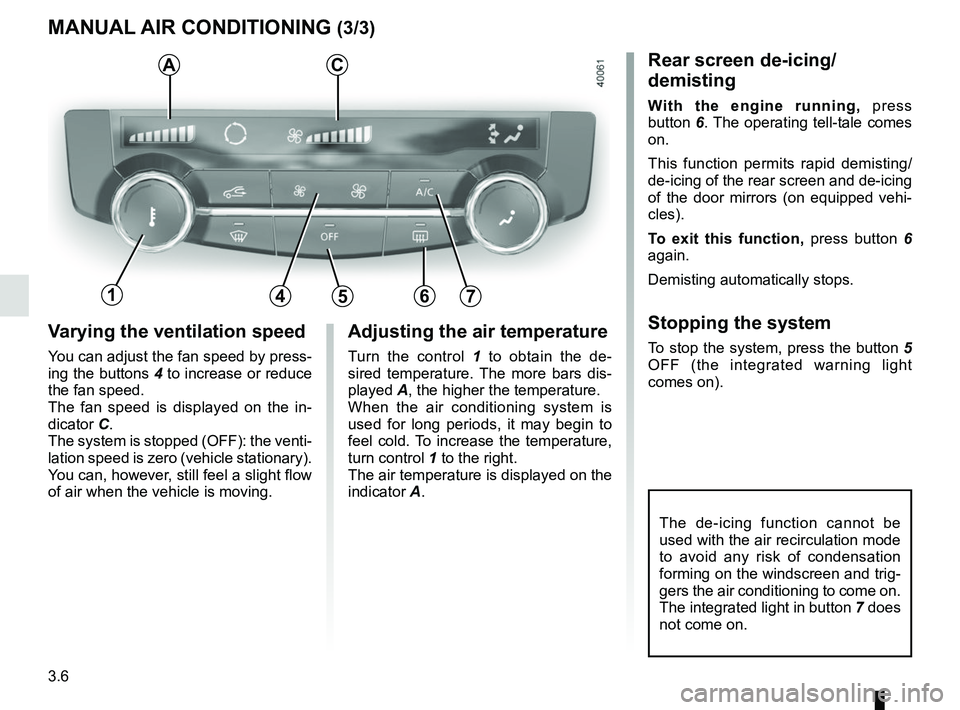
Varying the ventilation speed
You can adjust the fan speed by press-
ing the buttons 4 to increase or reduce
the fan speed.
The fan speed is displayed on the in-
dicator C.
The system is stopped (OFF): the venti-
lation speed is zero (vehicle stationary).
You can, however, still feel a slight flow
of air when the vehicle is moving.
MANUAL AIR CONDITIONING (3/3)
Adjusting the air temperature
Turn the control 1 to obtain the de-
sired temperature. The more bars dis-
played A, the higher the temperature.
When the air conditioning system is
used for long periods, it may begin to
feel cold. To increase the temperature,
turn control 1 to the right.
The air temperature is displayed on the
indicator A.
The de-icing function cannot be
used with the air recirculation mode
to avoid any risk of condensation
forming on the windscreen and trig-
gers the air conditioning to come on.
The integrated light in button 7 does
not come on.
Rear screen de-icing/
demisting
With the engine running, press
button 6. The operating tell-tale comes
on.
This function permits rapid demisting/
de-icing of the rear screen and de-icing
of the door mirrors (on equipped vehi-
cles).
To exit this function, press button 6
again.
Demisting automatically stops.
Stopping the system
To stop the system, press the button 5
OFF (the integrated warning light
comes on).
AC
14567
Page 189 of 310
3.7
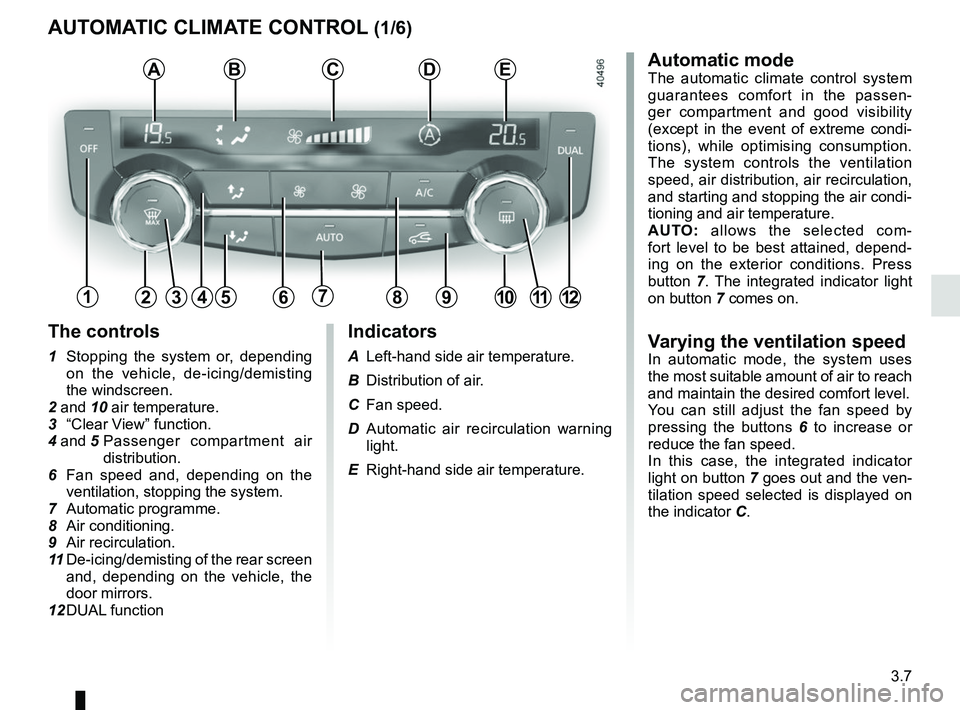
AUTOMATIC CLIMATE CONTROL (1/6)Automatic mode
The automatic climate control system
guarantees comfort in the passen-
ger compartment and good visibility
(except in the event of extreme condi-
tions), while optimising consumption.
The system controls the ventilation
speed, air distribution, air recirculation,
and starting and stopping the air condi-
tioning and air temperature.
AUTO: allows the selected com-
fort level to be best attained, depend-
ing on the exterior conditions. Press
button 7. The integrated indicator light
on button 7 comes on.
Varying the ventilation speedIn automatic mode, the system uses
the most suitable amount of air to reach
and maintain the desired comfort level.
You can still adjust the fan speed by
pressing the buttons 6 to increase or
reduce the fan speed.
In this case, the integrated indicator
light on button 7 goes out and the ven-
tilation speed selected is displayed on
the indicator C.
Indicators
A Left-hand side air temperature.
B Distribution of air.
C Fan speed.
D Automatic air recirculation warning
light.
E Right-hand side air temperature.
The controls
1 Stopping the system or, depending on the vehicle, de-icing/demisting
the windscreen.
2 and 10 air temperature.
3 “Clear View” function.
4 and 5 Passenger compartment air
distribution.
6 Fan speed and, depending on the ventilation, stopping the system.
7 Automatic programme.
8 Air conditioning.
9 Air recirculation.
11 De-icing/demisting of the rear screen
and, depending on the vehicle, the
door mirrors.
12 DUAL function
124567891012
ABCDE
311
Page 190 of 310
3.8
AUTOMATIC CLIMATE CONTROL (2/6)
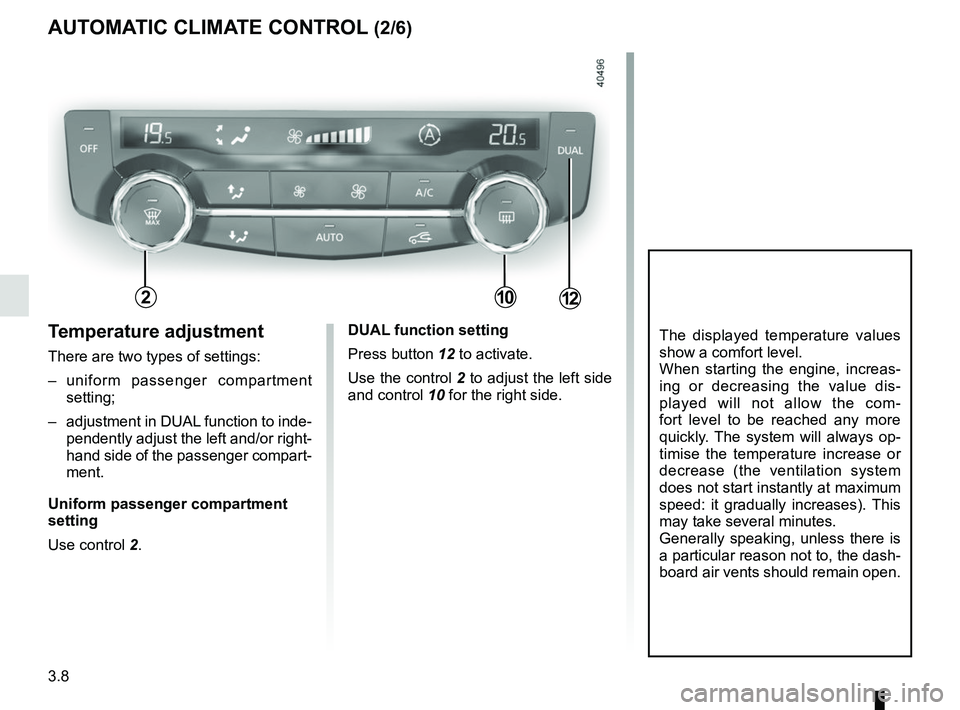
Temperature adjustment
There are two types of settings:
– uniform passenger compartment setting;
– adjustment in DUAL function to inde- pendently adjust the left and/or right-
hand side of the passenger compart-
ment.
Uniform passenger compartment
setting
Use control 2.
The displayed temperature values
show a comfort level.
When starting the engine, increas-
ing or decreasing the value dis-
played will not allow the com-
fort level to be reached any more
quickly. The system will always op-
timise the temperature increase or
decrease (the ventilation system
does not start instantly at maximum
speed: it gradually increases). This
may take several minutes.
Generally speaking, unless there is
a particular reason not to, the dash-
board air vents should remain open.DUAL function setting
Press button 12 to activate.
Use the control 2 to adjust the left side
and control 10 for the right side.
21012