ignition RENAULT KANGOO 2012 X61 / 2.G User Guide
[x] Cancel search | Manufacturer: RENAULT, Model Year: 2012, Model line: KANGOO, Model: RENAULT KANGOO 2012 X61 / 2.GPages: 237, PDF Size: 8.62 MB
Page 58 of 237
instrument panel ................................... (up to the end of the DU)
warning lights ........................................ (up to the end of the DU)
operating faults ..................................... (up to the end of the DU)
lights: dipped beam headlights ................................... (current page)
lights: main beam headlights ...................................... (current page)
lights: fog lights .......................................................... (current page)
lights: direction indicators ........................................... (current page)
indicators ............................................................... (current page)
coolant ................................................................... (current page)
air bag .................................................................... (current page)
fuel filling ................................................................. (current page)
control instruments ............................... (up to the end of the DU)
1.52
ENG_UD24365_6
Tableau de bord : témoins lumineux (X61 - F61 - K61 - Renault)
ENG_NU_813-11_FK61_Renault_1
Jaune NoirNoir texte
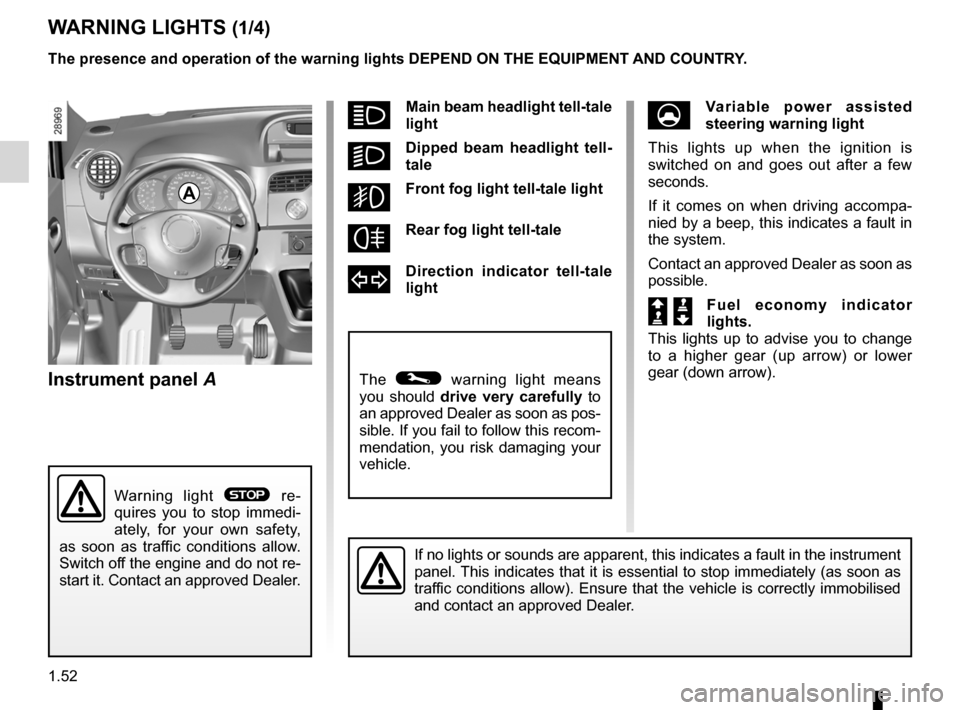
Instrument panel A
Warning lights
WARNING LIGHTS (1/4)
If no lights or sounds are apparent, this indicates a fault in the instrument
panel. This indicates that it is essential to stop immediately (as soon as
traffic conditions allow). Ensure that the vehicle is correctly immobilised
and contact an approved Dealer.
A
Warning light ® re-
quires you to stop immedi -
ately, for your own safety,
as soon as traffic conditions allow.
Switch off the engine and do not re-
start it. Contact an approved Dealer.
The presence and operation of the warning lights DepeND ON THe eQUIpMeNT AND COUNTR y.
The © warning light means
you should drive very carefully to
an approved Dealer as soon as pos-
sible. If you fail to follow this recom-
mendation, you risk damaging your
vehicle.
áMain beam headlight tell-tale
light
kDipped beam headlight tell -
tale
gFront fog light tell-tale light
fRear fog light tell-tale
dDirection indicator tell-tale
light
Uv ariable power assisted
steering warning light
This lights up when the ignition is
switched on and goes out after a few
seconds.
If it comes on when driving accompa -
nied by a beep, this indicates a fault in
the system.
Contact an approved Dealer as soon as
possible.
Š ‰F u e l e c o n o m y i n d i c a t o r
lights.
This lights up to advise you to change
to a higher gear (up arrow) or lower
gear (down arrow).
Page 59 of 237
seat belts ............................................................... (current page)
handbrake .............................................................. (current page)
variable power-assisted steering ........................... (current page)
ABS ....................................................................... (current page)
JauneNoirNoir texte
1.53
ENG_UD24365_6
Tableau de bord : témoins lumineux (X61 - F61 - K61 - Renault)
ENG_NU_813-11_FK61_Renault_1
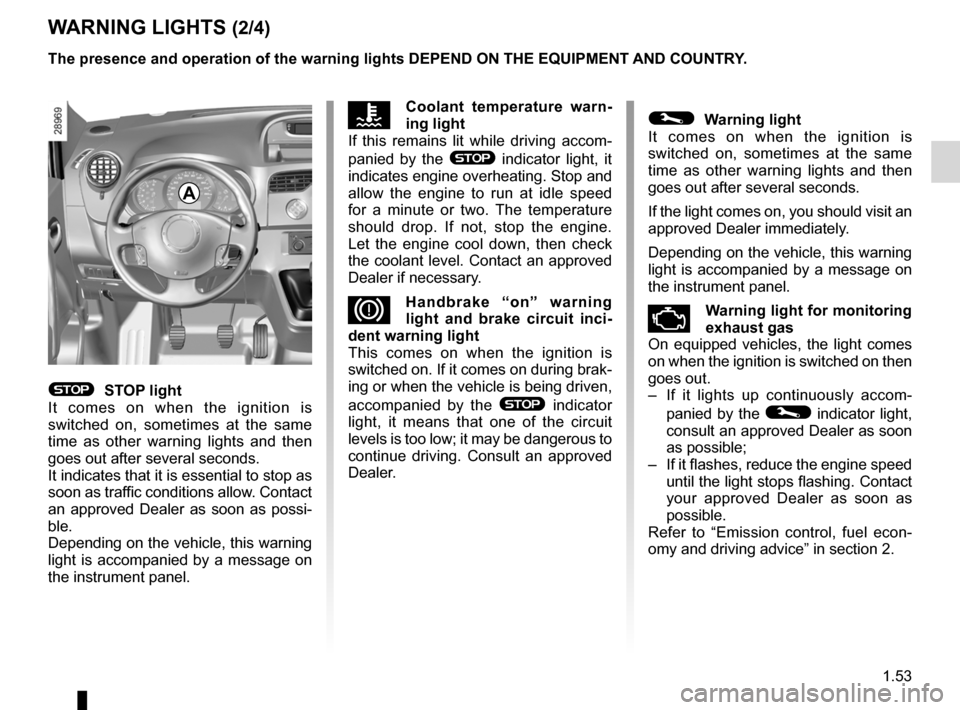
WARNING LIGHTS (2/4)
A
The presence and operation of the warning lights DepeND ON THe eQUIpMeNT AND COUNTR y.
© Warning light
It comes on when the ignition is
switched on, sometimes at the same
time as other warning lights and then
goes out after several seconds.
If the light comes on, you should visit an
approved Dealer immediately.
Depending on the vehicle, this warning
light is accompanied by a message on
the instrument panel.
\fWarning light for monitoring
exhaust gas
On equipped vehicles, the light comes
on when the ignition is switched on then
goes out.
– If it lights up continuously accom -
panied by the
© indicator light,
consult an approved Dealer as soon
as possible;
– If it flashes, reduce the engine speed
until the light stops flashing. Contact
your approved Dealer as soon as
possible.
Refer to “Emission control, fuel econ -
omy and driving advice” in section 2.
ÔCoolant temperature warn -
ing light
If this remains lit while driving accom -
panied by the
® indicator light, it
indicates engine overheating. Stop and
allow the engine to run at idle speed
for a minute or two. The temperature
should drop. If not, stop the engine.
Let the engine cool down, then check
the coolant level. Contact an approved
Dealer if necessary.
DHandbrake “on” warning
light and brake circuit inci -
dent warning light
This comes on when the ignition is
switched on. If it comes on during brak-
ing or when the vehicle is being driven,
accompanied by the
® indicator
light, it means that one of the circuit
levels is too low; it may be dangerous to
continue driving. Consult an approved
Dealer.® STOp light
It comes on when the ignition is
switched on, sometimes at the same
time as other warning lights and then
goes out after several seconds.
It indicates that it is essential to stop as
soon as traffic conditions allow. Contact
an approved Dealer as soon as possi-
ble.
Depending on the vehicle, this warning
light is accompanied by a message on
the instrument panel.
Page 60 of 237
engine oil ............................................................... (current page)
battery .................................................................... (current page)
speed limiter .......................................................... (current page)
cruise control ......................................................... (current page)
ASR (traction control) ............................................ (current page)
filter particle filter ..................................................... (current page)
ESP: Electronic Stability Program ........ (up to the end of the DU)
1.54
ENG_UD24365_6
Tableau de bord : témoins lumineux (X61 - F61 - K61 - Renault)
ENG_NU_813-11_FK61_Renault_1
Jaune NoirNoir texte
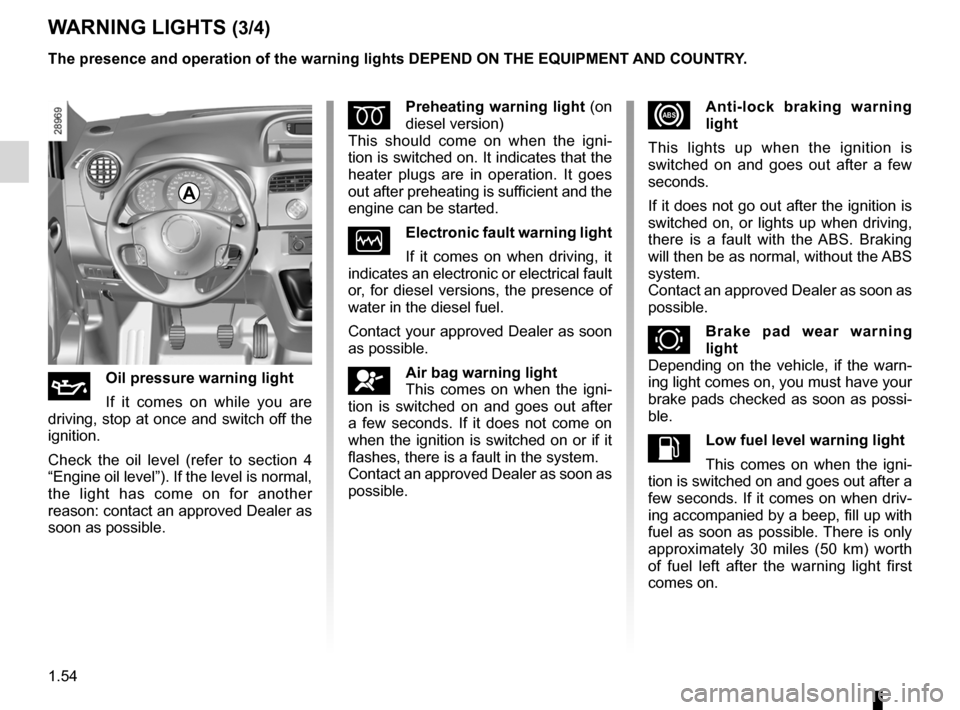
WARNING LIGHTS (3/4)
A
The presence and operation of the warning lights DepeND ON THe eQUIpMeNT AND COUNTR y.
xAnti-lock braking warning
light
This lights up when the ignition is
switched on and goes out after a few
seconds.
If it does not go out after the ignition is
switched on, or lights up when driving,
there is a fault with the ABS. Braking
will then be as normal, without the ABS
system.
Contact an approved Dealer as soon as
possible.
\b Brake pad wear warning
light
Depending on the vehicle, if the warn-
ing light comes on, you must have your
brake pads checked as soon as possi-
ble.
LLow fuel level warning light
This comes on when the igni -
tion is switched on and goes out after a
few seconds. If it comes on when driv-
ing accompanied by a beep, fill up with
fuel as soon as possible. There is only
approximately 30 miles (50 km) worth
of fuel left after the warning light first
comes on.
Épreheating warning light (on
diesel version)
This should come on when the igni -
tion is switched on. It indicates that the
heater plugs are in operation. It goes
out after preheating is sufficient and the
engine can be started.
Òelectronic fault warning light
If it comes on when driving, it
indicates an electronic or electrical fault
or, for diesel versions, the presence of
water in the diesel fuel.
Contact your approved Dealer as soon
as possible.
åAir bag warning light
This comes on when the igni -
tion is switched on and goes out after
a few seconds. If it does not come on
when the ignition is switched on or if it
flashes, there is a fault in the system.
Contact an approved Dealer as soon as
possible.
ÀOil pressure warning light
If it comes on while you are
driving, stop at once and switch off the
ignition.
Check the oil level (refer to section 4
“Engine oil level”). If the level is normal,
the light has come on for another
reason: contact an approved Dealer as
soon as possible.
Page 61 of 237
JauneNoirNoir texte
1.55
ENG_UD24365_6
Tableau de bord : témoins lumineux (X61 - F61 - K61 - Renault)
ENG_NU_813-11_FK61_Renault_1
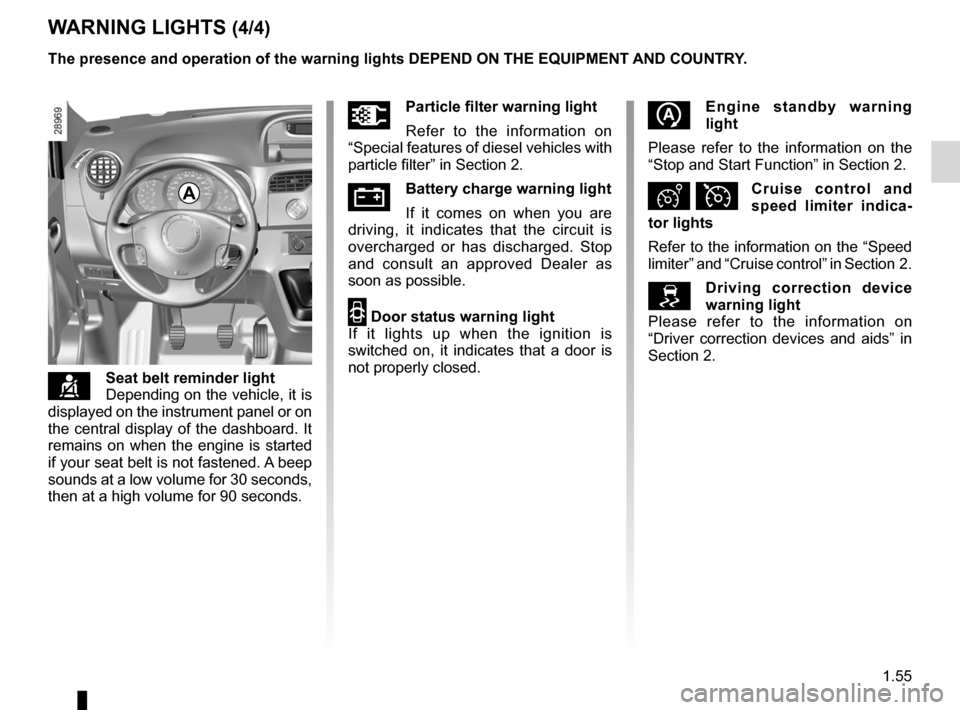
WARNING LIGHTS (4/4)
çSeat belt reminder light
Depending on the vehicle, it is
displayed on the instrument panel or on
the central display of the dashboard. It
remains on when the engine is started
if your seat belt is not fastened. A beep
sounds at a low volume for 30 seconds,
then at a high volume for 90 seconds.
A
The presence and operation of the warning lights DepeND ON THe eQUIpMeNT AND COUNTR y.
Üparticle filter warning light
Refer to the information on
“Special features of diesel vehicles with
particle filter” in Section 2.
ÚBattery charge warning light
If it comes on when you are
driving, it indicates that the circuit is
overcharged or has discharged. Stop
and consult an approved Dealer as
soon as possible.
2 Door status warning light
If it lights up when the ignition is
switched on, it indicates that a door is
not properly closed.
e ngine standby warning
light
Please refer to the information on the
“Stop and Start Function” in Section 2.
Ð ÏCruise control and
speed limiter indica -
tor lights
Refer to the information on the “Speed
limiter” and “Cruise control” in Section 2.
Driving correction device
warning light
Please refer to the information on
“Driver correction devices and aids” in
Section 2.
Page 71 of 237
trip computer and warning system........(up to the end of the DU)
warning lights ........................................ (up to the end of the DU)
instrument panel messages ..................(up to the end of the DU)
instrument panel ................................... (up to the end of the DU)
1.65
ENG_UD23313_2
Ordinateur de bord : messages d’information (X61 - F61 - K61 - Renault)
ENG_NU_813-11_FK61_Renault_1
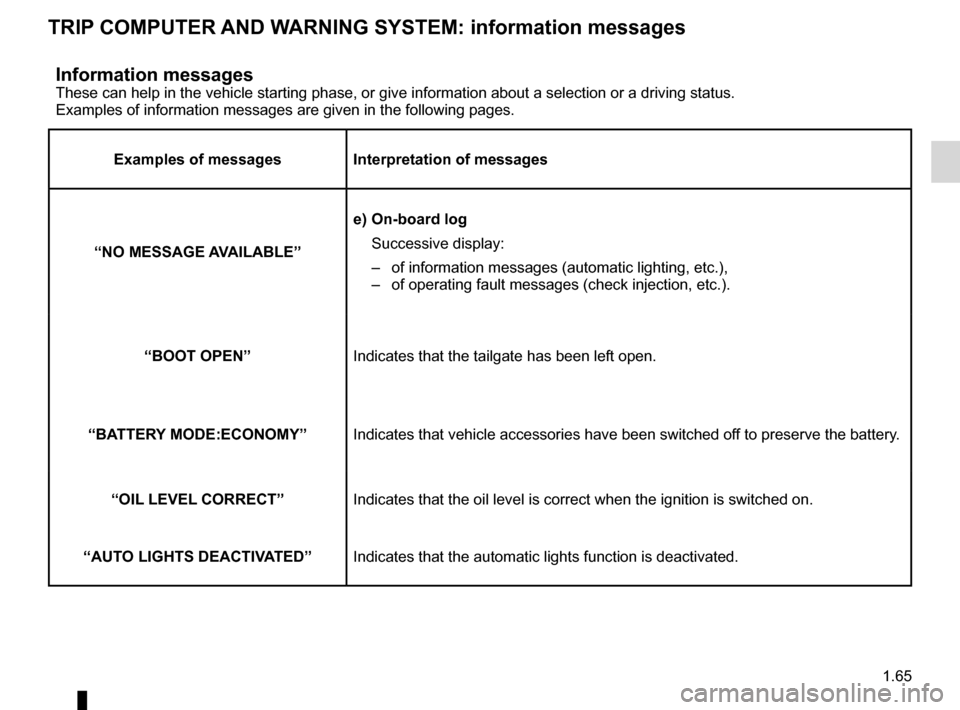
Information messagesThese can help in the vehicle starting phase, or give information about a selection or a driving status.
Examples of information messages are given in the following pages.
examples of messages Interpretation of messages
“NO MeSSAGe A vAILABLe” e)
On-board log
Successive display:
– of information messages (automatic lighting, etc.),
– of operating fault messages (check injection, etc.).
“BOOT OpeN ” Indicates that the tailgate has been left open.
“BATTeR y MODe:eCONOMy” Indicates that vehicle accessories have been switched off to preserve the battery.
“OIL LeveL CORReCT” Indicates that the oil level is correct when the ignition is switched on.
“AUTO LIGHTS DeACTIv ATeD”Indicates that the automatic lights function is deactivated.
TRIp COMpUTeR AND WARNING SySTeM: information messages
Page 74 of 237
clock ..................................................... (up to the end of the DU)
clock ..................................................... (up to the end of the DU)
external temperature ............................ (up to the end of the DU)
1.68
ENG_UD21413_3
Heure et température extérieure (X61 - F61 - K61 - Renault)
ENG_NU_813-11_FK61_Renault_1
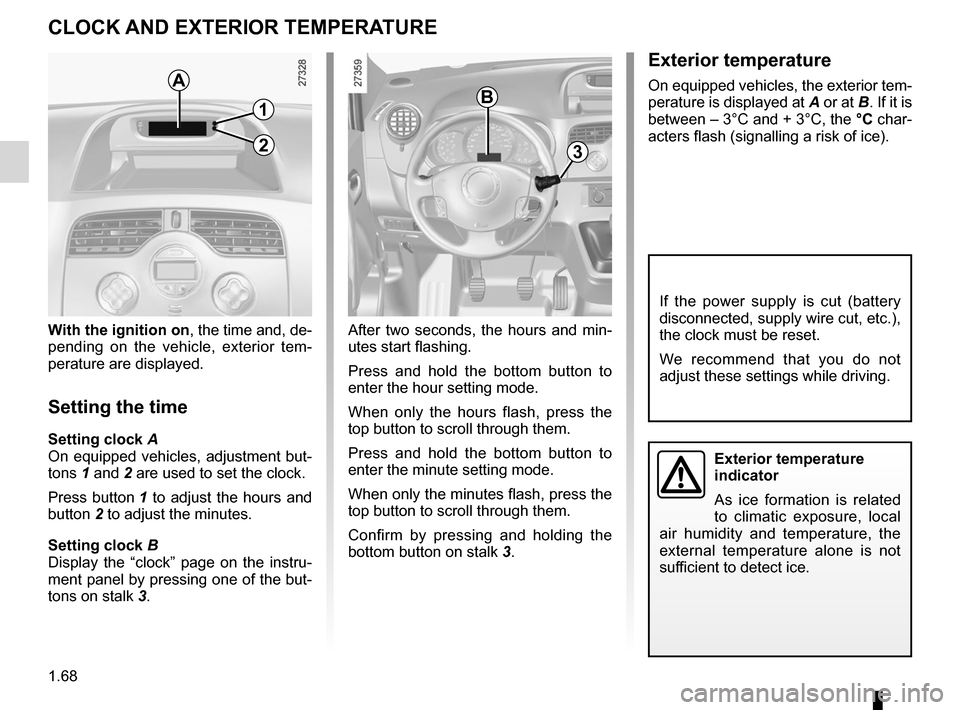
exterior temperature
On equipped vehicles, the exterior tem-
perature is displayed at A or at B. If it is
between – 3°C and + 3°C, the °C char-
acters flash (signalling a risk of ice).
Clock and exterior temperature
CLOCK AND eXTeRIOR TeMpeRATURe
exterior temperature
indicator
As ice formation is related
to climatic exposure, local
air humidity and temperature, the
external temperature alone is not
sufficient to detect ice.
A
1
2
B
3
After two seconds, the hours and min-
utes start flashing.
Press and hold the bottom button to
enter the hour setting mode.
When only the hours flash, press the
top button to scroll through them.
Press and hold the bottom button to
enter the minute setting mode.
When only the minutes flash, press the
top button to scroll through them.
Confirm by pressing and holding the
bottom button on stalk 3.
With the ignition on, the time and, de-
pending on the vehicle, exterior tem
-
perature are displayed.
Setting the time
Setting clock A
On equipped vehicles, adjustment but-
tons 1 and 2 are used to set the clock.
Press button 1 to adjust the hours and
button 2 to adjust the minutes.
Setting clock B
Display the “clock” page on the instru-
ment panel by pressing one of the but-
tons on stalk 3.
If the power supply is cut (battery
disconnected, supply wire cut, etc.),
the clock must be reset.
We recommend that you do not
adjust these settings while driving.
Page 76 of 237
signals and lights .................................. (up to the end of the DU)
lights: side lights ......................................................... (current page)
lights: dipped beam headlights ................................... (current page)
lights: main beam headlights ...................................... (current page)
1.70
ENG_UD3885_1
Eclairage et signalisation extérieure (X61 - F61 - K61 - Renault)
ENG_NU_813-11_FK61_Renault_1
Jaune NoirNoir texte
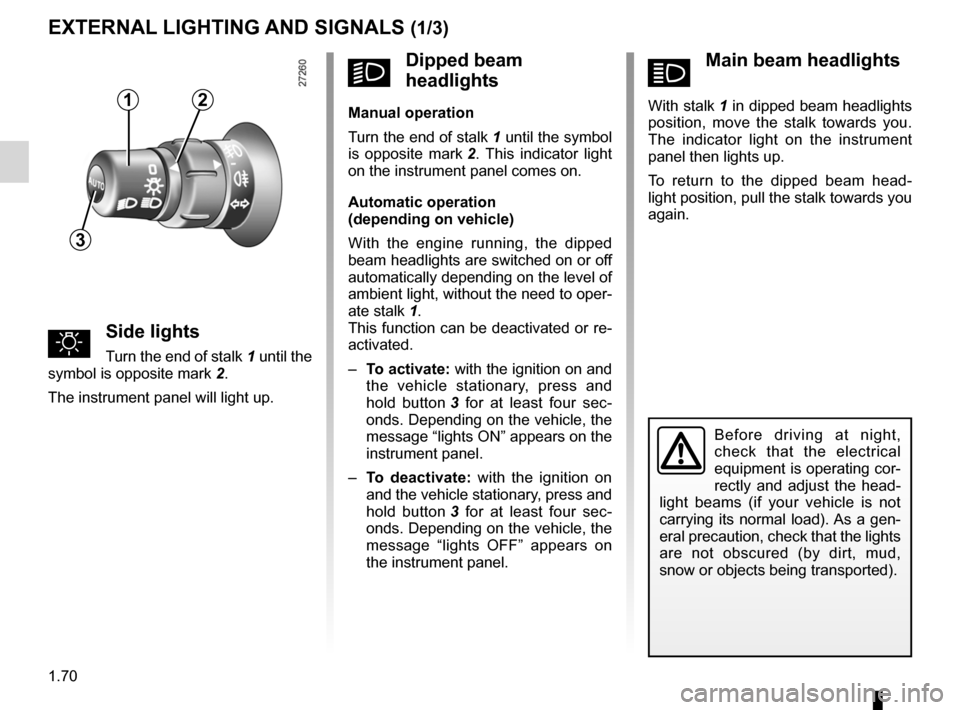
áMain beam headlights
With stalk 1 in dipped beam headlights
position, move the stalk towards you.
The indicator light on the instrument
panel then lights up.
To return to the dipped beam head -
light position, pull the stalk towards you
again.
Éclairage et signalisation extérieure
uSide lights
Turn the end of stalk 1 until the
symbol is opposite mark 2.
The instrument panel will light up.
eXTeRNAL LIGHTING AND SIGNALS (1/3)
Before driving at night,
check that the electrical
equipment is operating cor-
rectly and adjust the head -
light beams (if your vehicle is not
carrying its normal load). As a gen-
eral precaution, check that the lights
are not obscured (by dirt, mud,
snow or objects being transported).
kDipped beam
headlights
Manual operation
Turn the end of stalk 1 until the symbol
is opposite mark 2 . This indicator light
on the instrument panel comes on.
Automatic operation
(depending on vehicle)
With the engine running, the dipped
beam headlights are switched on or off
automatically depending on the level of
ambient light, without the need to oper-
ate stalk 1.
This function can be deactivated or re-
activated.
– To activate: with the ignition on and
the vehicle stationary, press and
hold button 3 for at least four sec -
onds. Depending on the vehicle, the
message “lights ON” appears on the
instrument panel.
– To deactivate: with the ignition on
and the vehicle stationary, press and
hold button 3 for at least four sec -
onds. Depending on the vehicle, the
message “lights OFF” appears on
the instrument panel.12
3
Page 77 of 237
see-me-home lighting ............................................ (current page)
lights: main beam headlights ...................................... (current page)
lights-on warning buzzer ........................................ (current page)
JauneNoirNoir texte
1.71
ENG_UD3885_1
Eclairage et signalisation extérieure (X61 - F61 - K61 - Renault)
ENG_NU_813-11_FK61_Renault_1
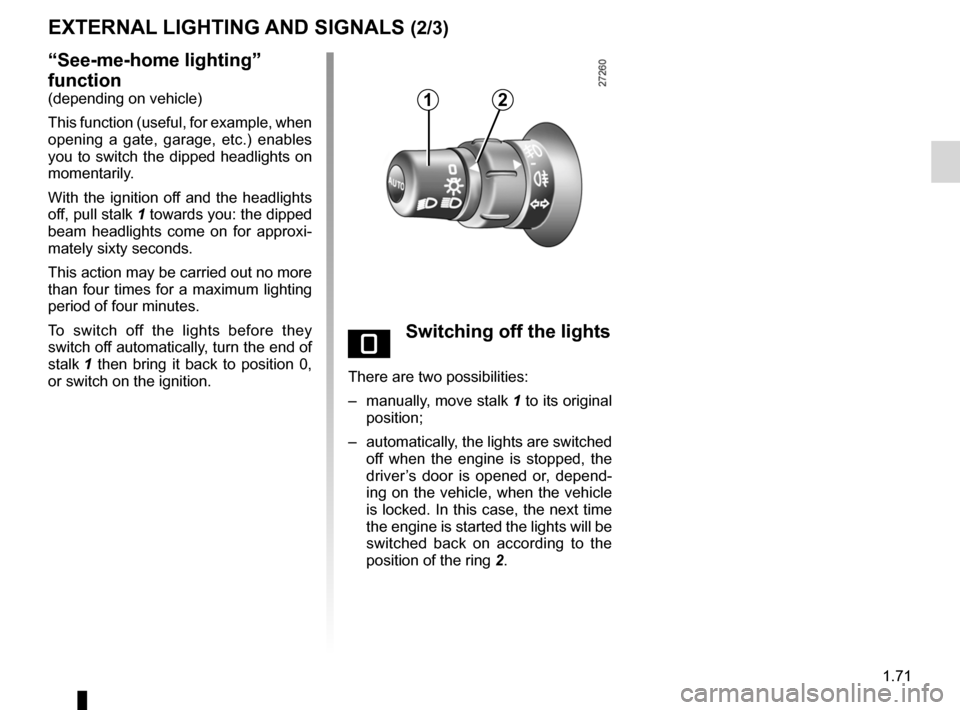
“See-me-home lighting”
function
(depending on vehicle)
This function (useful, for example, when
opening a gate, garage, etc.) enables
you to switch the dipped headlights on
momentarily.
With the ignition off and the headlights
off, pull stalk 1 towards you: the dipped
beam headlights come on for approxi -
mately sixty seconds.
This action may be carried out no more
than four times for a maximum lighting
period of four minutes.
To switch off the lights before they
switch off automatically, turn the end of
stalk 1 then bring it back to position 0,
or switch on the ignition.
eXTeRNAL LIGHTING AND SIGNALS (2/3)
eSwitching off the lights
There are two possibilities:
– manually, move stalk 1 to its original
position;
– automatically, the lights are switched
off when the engine is stopped, the
driver’s door is opened or, depend -
ing on the vehicle, when the vehicle
is locked. In this case, the next time
the engine is started the lights will be
switched back on according to the
position of the ring 2.
12
Page 78 of 237
lights:fog lights .......................................................... (current page)
fog lights ................................................................ (current page)
1.72
ENG_UD3885_1
Eclairage et signalisation extérieure (X61 - F61 - K61 - Renault)
ENG_NU_813-11_FK61_Renault_1
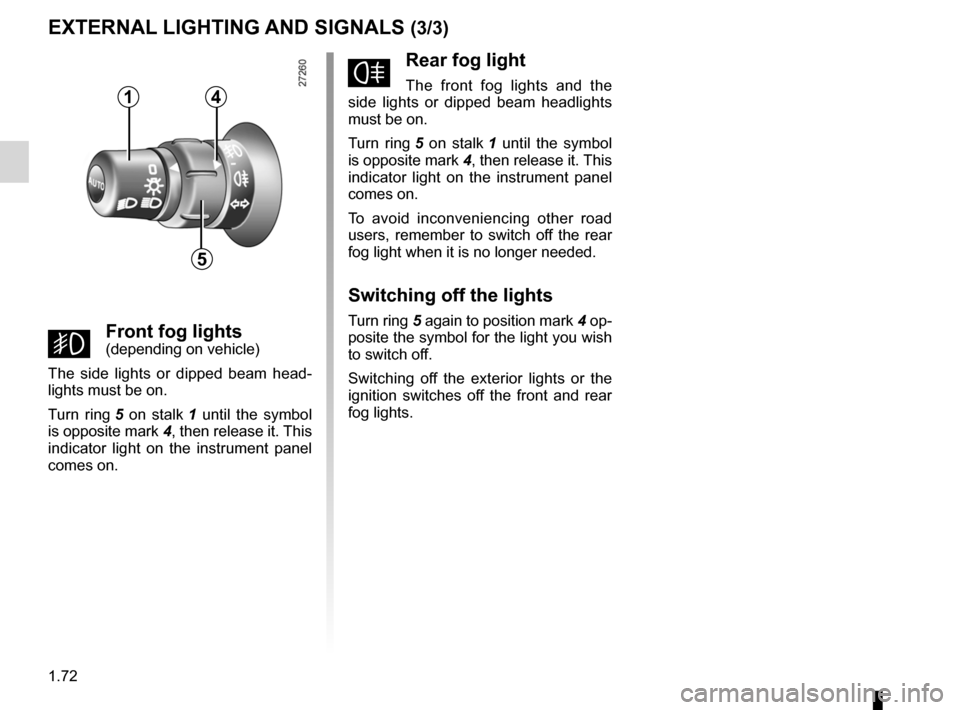
fRear fog light
The front fog lights and the
side lights or dipped beam headlights
must be on.
Turn ring 5 on stalk 1 until the symbol
is opposite mark 4, then release it. This
indicator light on the instrument panel
comes on.
To avoid inconveniencing other road
users, remember to switch off the rear
fog light when it is no longer needed.
Switching off the lights
Turn ring 5 again to position mark 4 op-
posite the symbol for the light you wish
to switch off.
Switching off the exterior lights or the
ignition switches off the front and rear
fog lights.
gFront fog lights(depending on vehicle)
The side lights or dipped beam head -
lights must be on.
Turn ring 5 on stalk 1 until the symbol
is opposite mark 4, then release it. This
indicator light on the instrument panel
comes on.
eXTeRNAL LIGHTING AND SIGNALS (3/3)
1
5
4
Page 80 of 237
windscreen washer ............................... (up to the end of the DU)
wipers ................................................... (up to the end of the DU)
1.74
ENG_UD21466_2
Essuie-vitre/lave-vitre avant (X61 - F61 - K61 - Renault)
ENG_NU_813-11_FK61_Renault_1
Jaune NoirNoir texte
Windscreen wipers/washers
Windscreen wiper
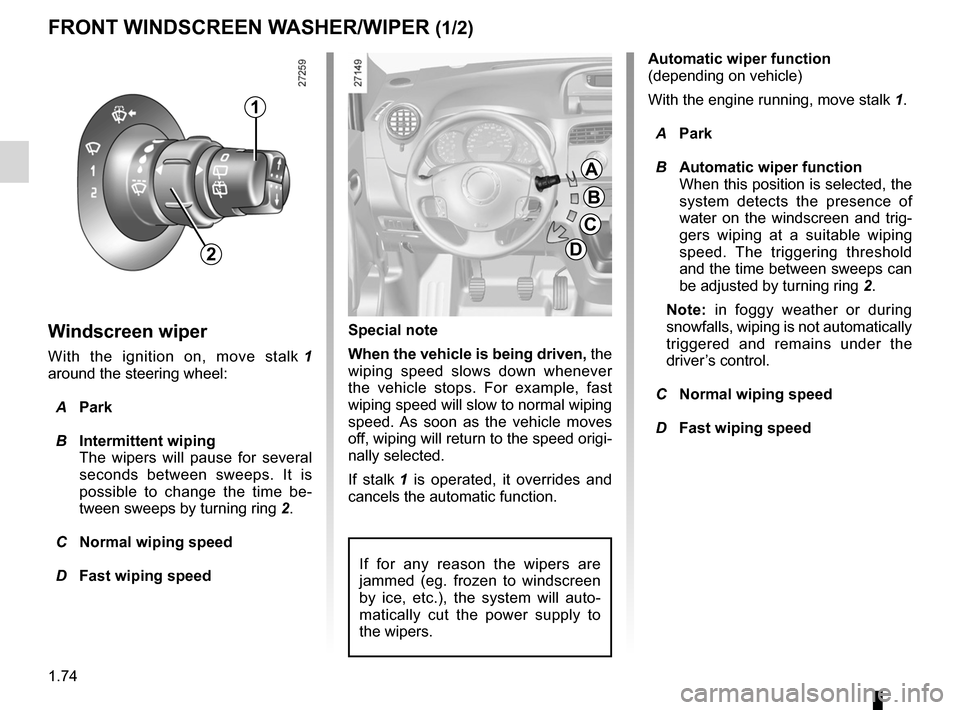
With the ignition on, move stalk 1
around the steering wheel:
A park
B Intermittent wiping
The wipers will pause for several
seconds between sweeps. It is
possible to change the time be -
tween sweeps by turning ring 2.
C Normal wiping speed
D Fast wiping speed
FRONT WINDSCReeN WASHeR/WIpeR (1/2)
Special note
When the vehicle is being driven, the
wiping speed slows down whenever
the vehicle stops. For example, fast
wiping speed will slow to normal wiping
speed. As soon as the vehicle moves
off, wiping will return to the speed origi -
nally selected.
If stalk 1 is operated, it overrides and
cancels the automatic function.
If for any reason the wipers are
jammed (eg. frozen to windscreen
by ice, etc.), the system will auto -
matically cut the power supply to
the wipers.
A
B
C
D
1
2
Automatic wiper function
(depending on vehicle)
With the engine running, move stalk 1.
A park
B Automatic wiper function
When this position is selected, the
system detects the presence of
water on the windscreen and trig -
gers wiping at a suitable wiping
speed. The triggering threshold
and the time between sweeps can
be adjusted by turning ring 2.
Note: in foggy weather or during
snowfalls, wiping is not automatically
triggered and remains under the
driver’s control.
C Normal wiping speed
D Fast wiping speed