boot RENAULT KANGOO 2012 X61 / 2.G Owners Manual
[x] Cancel search | Manufacturer: RENAULT, Model Year: 2012, Model line: KANGOO, Model: RENAULT KANGOO 2012 X61 / 2.GPages: 237, PDF Size: 8.62 MB
Page 71 of 237
trip computer and warning system........(up to the end of the DU)
warning lights ........................................ (up to the end of the DU)
instrument panel messages ..................(up to the end of the DU)
instrument panel ................................... (up to the end of the DU)
1.65
ENG_UD23313_2
Ordinateur de bord : messages d’information (X61 - F61 - K61 - Renault)
ENG_NU_813-11_FK61_Renault_1
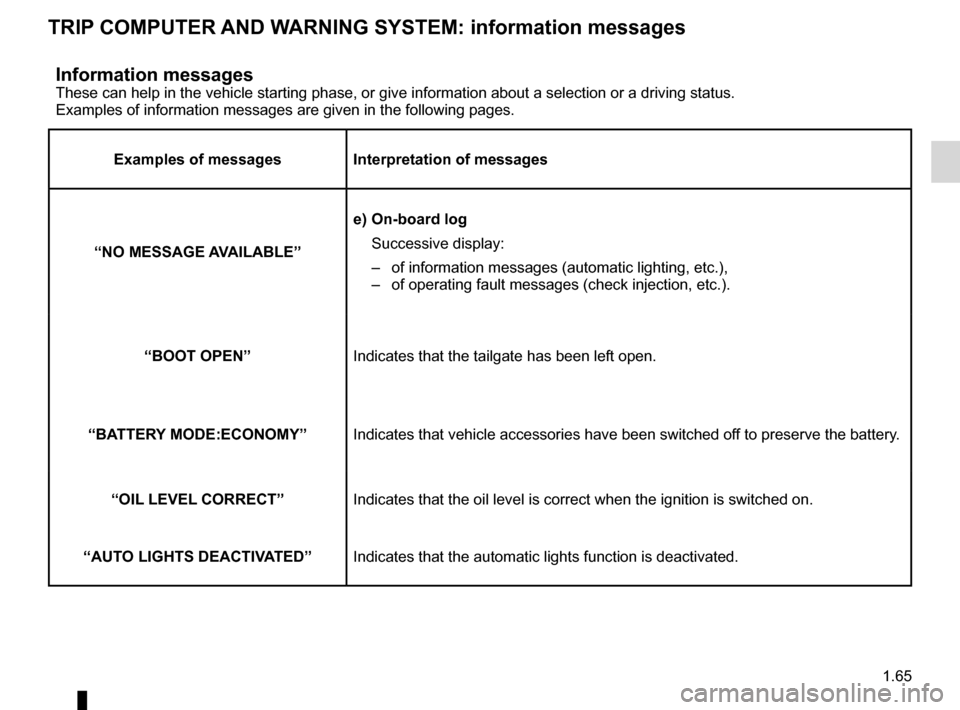
Information messagesThese can help in the vehicle starting phase, or give information about a selection or a driving status.
Examples of information messages are given in the following pages.
examples of messages Interpretation of messages
“NO MeSSAGe A vAILABLe” e)
On-board log
Successive display:
– of information messages (automatic lighting, etc.),
– of operating fault messages (check injection, etc.).
“BOOT OpeN ” Indicates that the tailgate has been left open.
“BATTeR y MODe:eCONOMy” Indicates that vehicle accessories have been switched off to preserve the battery.
“OIL LeveL CORReCT” Indicates that the oil level is correct when the ignition is switched on.
“AUTO LIGHTS DeACTIv ATeD”Indicates that the automatic lights function is deactivated.
TRIp COMpUTeR AND WARNING SySTeM: information messages
Page 117 of 237
3.1
ENG_UD29763_11
Sommaire 3 (X61 - F61 - K61 - Renault)
ENG_NU_813-11_FK61_Renault_3
Section 3: Your comfort
Air vents: air outlets . . . . . . . . . . . . . . . . . . . . . . . . . . . . . . . . . . . . . . . . . . . . . . . . . . . . . . . . . . . . . . 3.2
Heating, air conditioning . . . . . . . . . . . . . . . . . . . . . . . . . . . . . . . . . . . . . . . . . . . . . . . . . . . . . . . . . . 3.4
Automatic climate control . . . . . . . . . . . . . . . . . . . . . . . . . . . . . . . . . . . . . . . . . . . . . . . . . . . . . . . . . 3.7
Air conditioning: information and advice on use . . . . . . . . . . . . . . . . . . . . . . . . . . . . . . . . . . . . . . . . 3.15
Interior lighting . . . . . . . . . . . . . . . . . . . . . . . . . . . . . . . . . . . . . . . . . . . . . . . . . . . . . . . . . . . . . . . . . . 3.16
Sun visor/Mirrors . . . . . . . . . . . . . . . . . . . . . . . . . . . . . . . . . . . . . . . . . . . . . . . . . . . . . . . . . . . . . . . . 3.18
Electric windows . . . . . . . . . . . . . . . . . . . . . . . . . . . . . . . . . . . . . . . . . . . . . . . . . . . . . . . . . . . . . . . . 3.19
Half-opening window . . . . . . . . . . . . . . . . . . . . . . . . . . . . . . . . . . . . . . . . . . . . . . . . . . . . . . . . . . . . . 3.20
Manual sunroof . . . . . . . . . . . . . . . . . . . . . . . . . . . . . . . . . . . . . . . . . . . . . . . . . . . . . . . . . . . . . . . . . 3.21
Ashtray/Cigarette lighter/Accessories sockets . . . . . . . . . . . . . . . . . . . . . . . . . . . . . . . . . . . . . . . . . 3.22
Passenger compartment storage space and fittings . . . . . . . . . . . . . . . . . . . . . . . . . . . . . . . . . . . . . 3.23
Rear bench seat . . . . . . . . . . . . . . . . . . . . . . . . . . . . . . . . . . . . . . . . . . . . . . . . . . . . . . . . . . . . . . . . 3.28
Transporting objects . . . . . . . . . . . . . . . . . . . . . . . . . . . . . . . . . . . . . . . . . . . . . . . . . . . . . . . . . . . . . 3.30
in the boot . . . . . . . . . . . . . . . . . . . . . . . . . . . . . . . . . . . . . . . . . . . . . . . . . . . . . . . . . . . . . . . 3.30
Towbar . . . . . . . . . . . . . . . . . . . . . . . . . . . . . . . . . . . . . . . . . . . . . . . . . . . . . . . . . . . . . . . . . . 3.31
Luggage cover . . . . . . . . . . . . . . . . . . . . . . . . . . . . . . . . . . . . . . . . . . . . . . . . . . . . . . . . . . . . . . . . . . 3.32
Luggage net . . . . . . . . . . . . . . . . . . . . . . . . . . . . . . . . . . . . . . . . . . . . . . . . . . . . . . . . . . . . . . . . . . . . 3.33
Roof bars . . . . . . . . . . . . . . . . . . . . . . . . . . . . . . . . . . . . . . . . . . . . . . . . . . . . . . . . . . . . . . . . . . . . . . 3.34
Page 146 of 237
transporting objectsin the luggage compartment ........... (up to the end of the DU)
tailgate .................................................. (up to the end of the DU)
3.30
ENG_UD29642_4
Transports d’objets dans le coffre (X61 - F61 - K61 - Renault)
ENG_NU_813-11_FK61_Renault_3
Jaune NoirNoir texte
Transporting objects
in the boot
Always position the heavi -
est items directly on the
floor.
Use the lashing points on
the floor of the luggage compart -
ment, if these are fitted to the vehi-
cle.
The luggage should be loaded in
such a way that no items will be
thrown forward and strike the occu-
pants if the driver has to brake sud-
denly.
Fasten the rear seat belts, even if
the seats are not occupied.
trAnsPOrtinG OBjeCts in tHe BOOt (1/2)
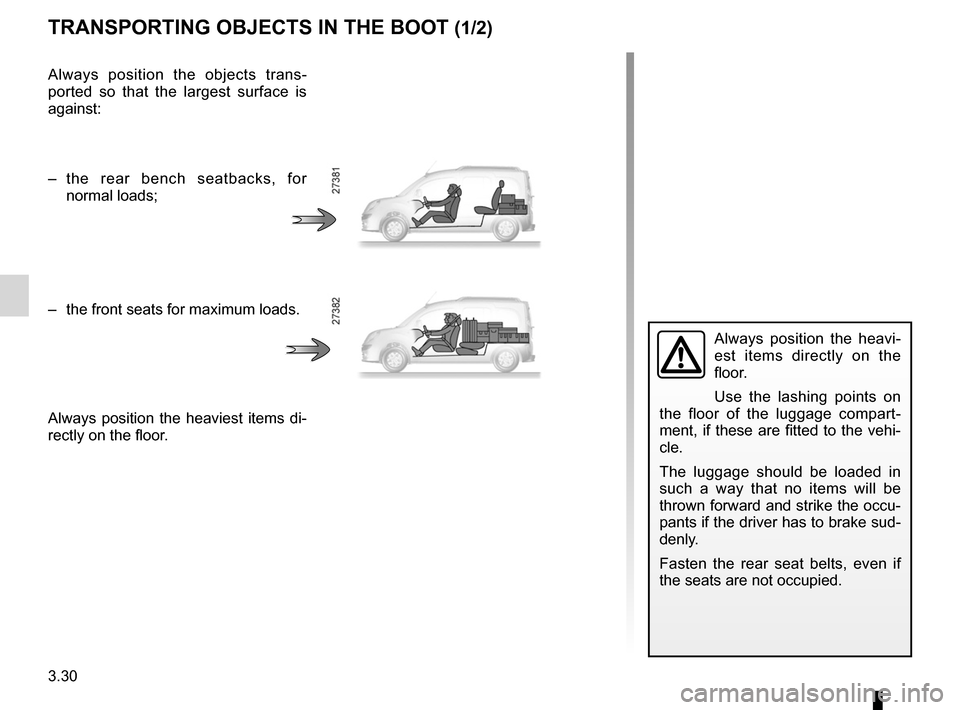
Always position the objects trans -
ported so that the largest surface is
against:
– the rear bench seatbacks, for
normal loads;
– the front seats for maximum loads.
Always position the heaviest items di-
rectly on the floor.
Page 147 of 237

towing equipmentfitting ................................................................ (current page)
JauneNoirNoir texte
3.31
ENG_UD29642_4
Transports d’objets dans le coffre (X61 - F61 - K61 - Renault)
ENG_NU_813-11_FK61_Renault_3
Towbar
trAnsPOrtinG OBjeCts in tHe BOOt (2/2)/t OWinG
Permissible nose weight, maxi -
mum permissible towing weight,
braked and unbraked: refer to
the information on “Weights” in
Section 6.
For fitting and conditions of use,
refer to the equipment’s fitting in -
structions.
Please keep these instructions with
the rest of the vehicle documenta -
tion.
If the towbar ball obscures the regis-
tration plate or the rear fog lights, it
should be removed when not in use.
In all cases, comply with local leg -
islation.
A = 776.5 mm.
A
Page 174 of 237
5.4
ENG_UD29751_1
Kit de gonflage des pneumatiques (2 kits) (X61 - F61 - K61 - Renault)\
ENG_NU_813-11_FK61_Renault_5
Jaune NoirNoir texte
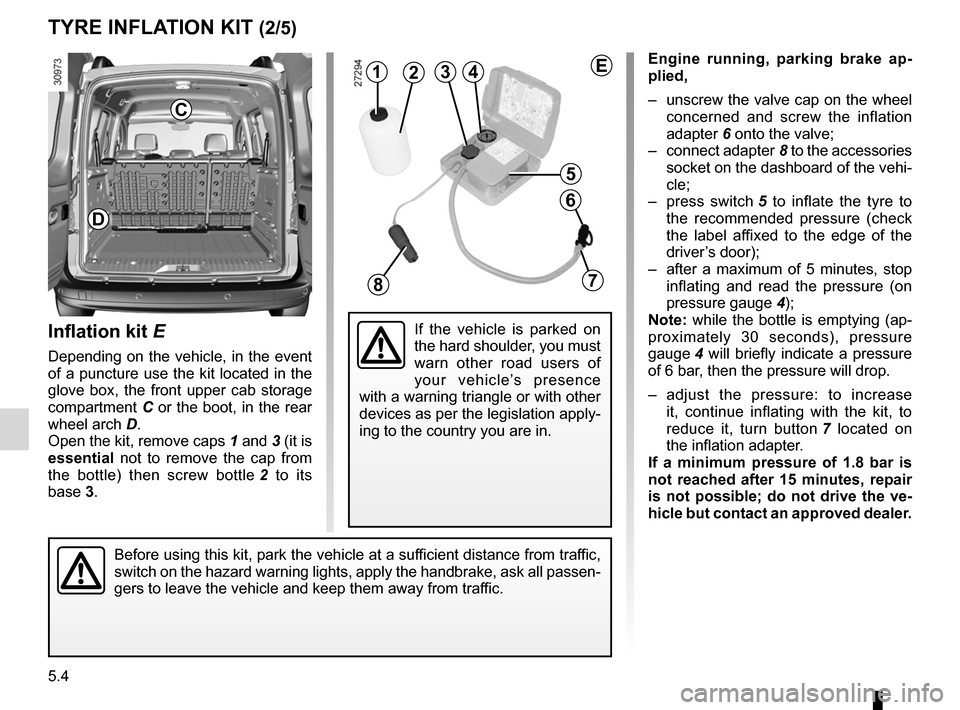
engine running, parking brake ap -
plied,
– unscrew the valve cap on the wheel
concerned and screw the inflation
adapter 6 onto the valve;
– connect adapter 8 to the accessories
socket on the dashboard of the vehi-
cle;
– press switch 5 to inflate the tyre to
the recommended pressure (check
the label affixed to the edge of the
driver’s door);
– after a maximum of 5 minutes, stop
inflating and read the pressure (on
pressure gauge 4);
note: while the bottle is emptying (ap-
proximately 30 seconds), pressure
gauge 4 will briefly indicate a pressure
of 6 bar, then the pressure will drop.
– adjust the pressure: to increase
it, continue inflating with the kit, to
reduce it, turn button 7 located on
the inflation adapter.
If a minimum pressure of 1.8 bar is
not reached after 15 minutes, repair
is not possible; do not drive the ve-
hicle but contact an approved dealer.
Inflation kit E
Depending on the vehicle, in the event
of a puncture use the kit located in the
glove box, the front upper cab storage
compartment C or the boot, in the rear
wheel arch D.
Open the kit, remove caps 1 and 3 (it is
essential not to remove the cap from
the bottle) then screw bottle 2 to its
base 3.
tyre InFlatIOn KIt (2/5)
143
5
6
78
2
Before using this kit, park the vehicle at a sufficient distance from traffic,
switch on the hazard warning lights, apply the handbrake, ask all passen-
gers to leave the vehicle and keep them away from traffic.
D
If the vehicle is parked on
the hard shoulder, you must
warn other road users of
your vehicle’s presence
with a warning triangle or with other
devices as per the legislation apply-
ing to the country you are in.
c
e
Page 176 of 237
5.6
ENG_UD29751_1
Kit de gonflage des pneumatiques (2 kits) (X61 - F61 - K61 - Renault)\
ENG_NU_813-11_FK61_Renault_5
Jaune NoirNoir texte
tyre InFlatIOn KIt (4/5)
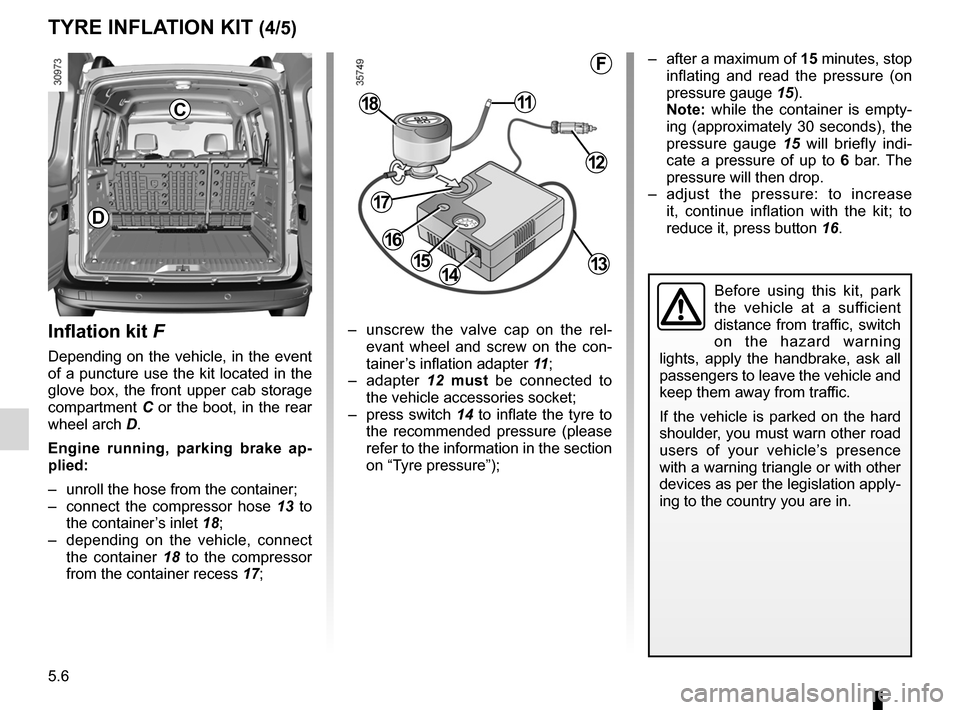
Inflation kit F
Depending on the vehicle, in the event
of a puncture use the kit located in the
glove box, the front upper cab storage
compartment C or the boot, in the rear
wheel arch D.
e ngine running, parking brake ap -
plied:
– unroll the hose from the container;
– connect the compressor hose 13 to
the container’s inlet 18;
– depending on the vehicle, connect
the container 18 to the compressor
from the container recess 17; –
unscrew the valve cap on the rel -
evant wheel and screw on the con -
tainer’s inflation adapter 11;
– adapter 12 must be connected to
the vehicle accessories socket;
– press switch 14 to inflate the tyre to
the recommended pressure (please
refer to the information in the section
on “Tyre pressure”);
1415
1118
12
13
17
16
F
Before using this kit, park
the vehicle at a sufficient
distance from traffic, switch
on the hazard warning
lights, apply the handbrake, ask all
passengers to leave the vehicle and
keep them away from traffic.
If the vehicle is parked on the hard
shoulder, you must warn other road
users of your vehicle’s presence
with a warning triangle or with other
devices as per the legislation apply-
ing to the country you are in.
– after a maximum of 15 minutes, stop
inflating and read the pressure (on
pressure gauge 15).
n ote: while the container is empty -
ing (approximately 30 seconds), the
pressure gauge 15 will briefly indi -
cate a pressure of up to 6 bar. The
pressure will then drop.
– adjust the pressure: to increase
it, continue inflation with the kit; to
reduce it, press button 16.
D
c