tow RENAULT KANGOO 2018 User Guide
[x] Cancel search | Manufacturer: RENAULT, Model Year: 2018, Model line: KANGOO, Model: RENAULT KANGOO 2018Pages: 264, PDF Size: 7.09 MB
Page 108 of 264
2.16
ENVIRONMENT
Emissions
Your vehicle has been designed to
emit fewer greenhouse gases (CO2)
while in use, and therefore to consume
less fuel (eg. 140 g/km, equivalent to
5.3 l/100 km for a diesel vehicle).
Our vehicles are also equipped with a
particle filter system including a cata-
lytic converter, an oxygen sensor and
an active carbon filter (the latter pre-
vents vapour from the fuel tank being
released into the open air).
For certain diesel vehicles, this system
also has a particle filter to reduce the
volume of soot particles emitted.
Please make your own
contribution towards
protecting the environment
too
– Worn parts replaced in the course of routine vehicle maintenance (vehi-
cle battery, oil filter, air filter, batter-
ies, etc.) and oil containers (empty or
filled with used oil) must be disposed
of through specialist organisations. – At the end of the vehicle’s service
life, it should be sent to approved
centres to ensure that it is recycled.
– In all cases, comply with local legis- lation.
Recycling
Your vehicle is 85% recyclable and
95% recoverable.
To achieve these objectives, many of
the vehicle components have been de-
signed to enable them to be recycled.
The materials and structures have
been carefully designed to allow these
components to be easily removed and
reprocessed by specialist companies.
In order to preserve raw material re-
sources, this vehicle incorporates nu-
merous parts made from recycled plas-
tics or renewable materials (vegetable
or animal-derived materials such as
cotton or wool).
Your vehicle has been designed with
respect for the environment in mind for
its entire service life: during production,
use and at the end of its life.
This commitment is illustrated by the
Renault eco² signature.Manufacture
Your vehicle has been manufactured at
a factory which complies with a policy
to reduce the environmental impact
on the surrounding areas (reduction of
water and energy consumption, visual
and noise pollution, atmospheric emis-
sions and waste water; sorting and re-
using waste).
Page 136 of 264
2.44
Operating faults
– When driving, if the “CHECK
GEARBOX” message and the
© warning light appear on the
instrument panel, this indicates a
fault.
Contact your approved Dealer as
soon as possible.
– When driving, if the message
“GEARBOX OVERHEATING” ap-
pears on the instrument panel, drive
at a moderate speed and avoid lea-
ving the gearstick in the D (or R) po-
sition, where traffic conditions allow:
always return to N while the vehicle
is stationary.
Contact your approved Dealer as
soon as possible.
– If a vehicle with an automatic gearbox breaks down, refer to the
information on “Towing” in Section 5.
AUTOMATIC GEARBOX (3/3)
Parking the vehicleWhen the vehicle is stopped, move the
lever to position P while keeping your
foot on the brake pedal: the gearbox is
in neutral and the drive wheels are me-
chanically locked by the driveshaft.
Apply the handbrake.Special circumstances
– If the bends and road surface do
not allow you to stay in automatic
mode (eg. in the mountains), we rec-
ommend that you change to manual
mode.
This will prevent the automatic gear-
box from changing gear repeatedly
when climbing, and permit engine
braking on long descents.
– In cold weather, start the engine
and wait a few seconds before
moving the selector lever from posi-
tion P or N and engaging it in D or R
to prevent the engine stalling..
Page 137 of 264
3.1
Section 3: Your comfort
Air vents: air outlets . . . . . . . . . . . . . . . . . . . . . . . . . . . . . . . . . . . . \
. . . . . . . . . . . . . . . . . . . . . . . . . . 3.2
Heating/air conditioning . . . . . . . . . . . . . . . . . . . . . . . . . . . . . . . . . . . . \
. . . . . . . . . . . . . . . . . . . . . . . 3.4
Automatic climate control . . . . . . . . . . . . . . . . . . . . . . . . . . . . . . . . . . . .\
. . . . . . . . . . . . . . . . . . . . . 3.7
Air conditioning: information and advice on use . . . . . . . . . . . . . . . . . . . . . . . . . . . . . . . . . . . .\
. . . . 3.15
Interior lighting . . . . . . . . . . . . . . . . . . . . . . . . . . . . . . . . . . . . \
. . . . . . . . . . . . . . . . . . . . . . . . . . . . . . 3.17
Sun visor/Mirrors . . . . . . . . . . . . . . . . . . . . . . . . . . . . . . . . . . . . \
. . . . . . . . . . . . . . . . . . . . . . . . . . . . 3.19
Electric windows . . . . . . . . . . . . . . . . . . . . . . . . . . . . . . . . . . . .\
. . . . . . . . . . . . . . . . . . . . . . . . . . . . 3.20
Half-opening window . . . . . . . . . . . . . . . . . . . . . . . . . . . . . . . . . . . . \
. . . . . . . . . . . . . . . . . . . . . . . . . 3.21
Manual sunroof . . . . . . . . . . . . . . . . . . . . . . . . . . . . . . . . . . . .\
. . . . . . . . . . . . . . . . . . . . . . . . . . . . . 3.22
Ashtray/cigar lighter/accessories sockets . . . . . . . . . . . . . . . . . . . . . . . . . . . . . . . . . . . .\
. . . . . . . . . 3.23
Passenger compartment storage/fittings . . . . . . . . . . . . . . . . . . . . . . . . . . . . . . . . . . . . \
. . . . . . . . . . 3.24
Rear bench seat . . . . . . . . . . . . . . . . . . . . . . . . . . . . . . . . . . . .\
. . . . . . . . . . . . . . . . . . . . . . . . . . . . 3.29
Transporting objects . . . . . . . . . . . . . . . . . . . . . . . . . . . . . . . . . . . .\
. . . . . . . . . . . . . . . . . . . . . . . . . 3.31 in the boot . . . . . . . . . . . . . . . . . . . . . . . . . . . . . . . . . . . .\
. . . . . . . . . . . . . . . . . . . . . . . . . . . 3.31
towbar . . . . . . . . . . . . . . . . . . . . . . . . . . . . . . . . . . . .\
. . . . . . . . . . . . . . . . . . . . . . . . . . . . . . 3.32
Luggage cover . . . . . . . . . . . . . . . . . . . . . . . . . . . . . . . . . . . . \
. . . . . . . . . . . . . . . . . . . . . . . . . . . . . . 3.33
Luggage net. . . . . . . . . . . . . . . . . . . . . . . . . . . . . . . . . . . . \
. . . . . . . . . . . . . . . . . . . . . . . . . . . . . . . . 3.34
Roof bars . . . . . . . . . . . . . . . . . . . . . . . . . . . . . . . . . . . . \
. . . . . . . . . . . . . . . . . . . . . . . . . . . . . . . . . . 3.35
Multimedia equipment . . . . . . . . . . . . . . . . . . . . . . . . . . . . . . . . . . . . \
. . . . . . . . . . . . . . . . . . . . . . . . 3.37
Page 140 of 264
3.4
Switching air conditioning on
or off
The air conditioning is switched on (in-
dicator light illuminated) or off (indicator
light extinguished) using button 6.
The air conditioning system is used
for:
– lowering the temperature inside the passenger compartment;
– eliminating condensation more quickly.
The air conditioning does not operate
when the exterior temperature is low.
Adjusting the air temperature
Turn control 2 to obtain the desired
temperature. The further towards the
red the slide is, the higher the tempera-
ture will be.
When the air conditioning system is
used for long periods, it may begin to
feel cold. To increase the temperature,
turn control 2 to the right.
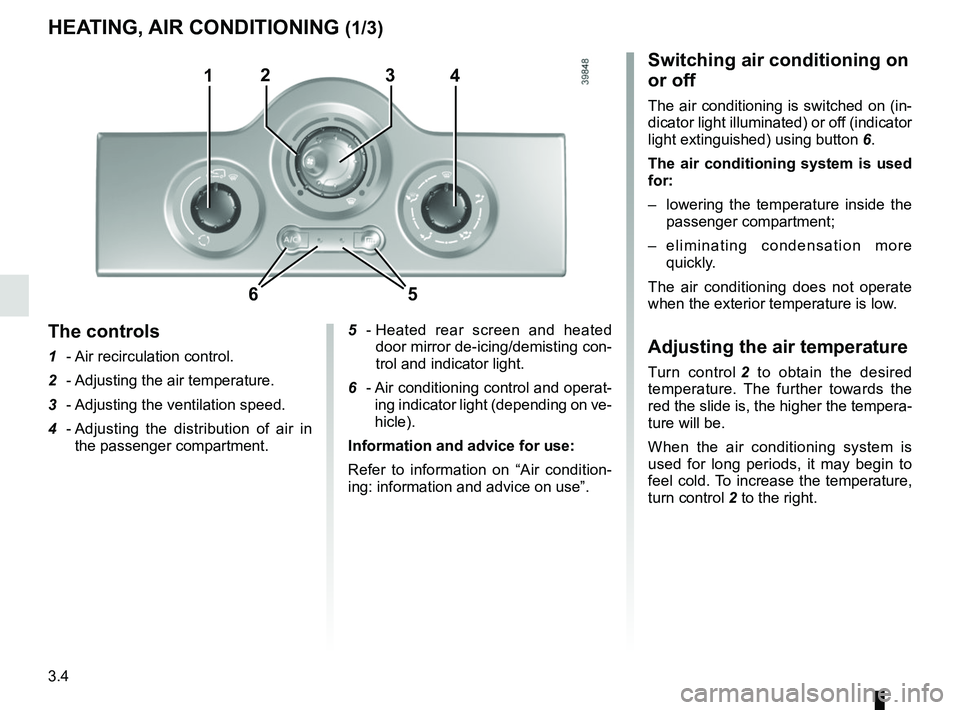
5 -
Heated rear screen and heated
door mirror de-icing/demisting con-
trol and indicator light.
6 - Air conditioning control and operat-
ing indicator light (depending on ve-
hicle).
Information and advice for use:
Refer to information on “Air condition-
ing: information and advice on use”.
The controls
1 - Air recirculation control.
2 - Adjusting the air temperature.
3 - Adjusting the ventilation speed.
4 - Adjusting the distribution of air in
the passenger compartment.
HEATING, AIR CONDITIONING (1/3)
1423
65
Page 141 of 264

3.5
óThe air flow is directed mainly
towards the footwells.
GThe air flow is directed to all air
vents and the footwells.
This is the recommended position for
the best temperature in hot weather.
JThe air flow is directed mainly
to the dashboard vents. This
position allows the passenger compart-
ment to be heated or cooled more
quickly.
Rapid demisting
Turn the controls to the positions
marked as
W:
– air from the outside;
– maximum temperature;
– demisting.
Using the climate control increases the
speed of demisting.iThe air flow is directed to the
windscreen demisting vents,
the side windows and the passenger
footwells.
This is the recommended position for
the best temperature in cold weather.
HEATING, AIR CONDITIONING (2/3)
Distribution of air in the
passenger compartment
Turn control 4 so that the pointer is po-
sitioned opposite the marked positions.
WThe air flow is directed to the
windscreen demisting vents
and the side windows. This position
prevents the formation of condensa-
tion.
4
Page 142 of 264

3.6
Adjusting the ventilation
speed
Normal use
Turn control 3 to one of the four posi-
tions to start the ventilation system and
adjust the power.
Select position 1 for minimum ventila-
tion and position 4 for maximum ven-
tilation.
Position 0
In this position:
– the air conditioning stops automati- cally even if button 6 is activated (the
indicator light remains lit);
– the ventilation speed of air in the passenger compartment is zero;
– there is, however, a slight flow of air when the vehicle is moving.
This position should not normally be
used.
HEATING, AIR CONDITIONING (3/3)
Air recirculation (isolation of
the passenger compartment)
Turn control 1 towards air recirculation
symbol
â.
In these conditions air is taken from the
passenger compartment and is recircu-
lated, with no air being taken from out-
side the vehicle.
Air recirculation is for:
– isolating the passenger compart- ment from the outside air (driving in
polluted areas, unpleasant odours,
etc.);
– bringing the passenger compartment to the desired temperature as quickly
as possible.
Prolonged use of this position can
lead to condensation forming on the
side windows and windscreen and
problems due to the use of non-re-
newed air in the passenger com-
partment.
We therefore advise you to return to
normal mode (outside air) as soon
as the air recirculation function is no
longer required, by turning control 1
again.
13
6
Page 146 of 264

3.10
ôThe air flow is directed mainly
to the dashboard air vents.
This position allows the passenger
compartment to be heated or cooled
more quickly.
öThe air flow is directed to all
the windscreen demisting
vents and the passenger footwells.
FThe air flow is directed mainly
towards the passenger
footwells.
The manual air distribution option
causes the operating tell-tale light
on display 4 to go out (automatic
mode), but only air distribution is no
longer controlled automatically by
the system.
Press button 5 to return to automa-
tic mode.
Distribution of air in the
passenger compartment
There are five possible combinations
for air distribution, which may be selec-
ted by pressing buttons 7 and 9 repea-
tedly. The arrows on display 4 indicate
the setting selected:
AUTOMATIC CLIMATE CONTROL (4/8)
õThe air flow is directed to the
windscreen demisting vents
and the side windows.
÷The air flow is directed to the
windscreen demisting vents,
the side windows and the passenger
footwells.
47
9
5
Page 151 of 264
3.15
Operating faults
As a general rule, contact your ap-
proved dealer in the event of an oper-
ating fault.
– Reduction in de-icing, demisting or air conditioning performance.
This may be caused by the passen-
ger compartment filter cartridge be-
coming clogged.
– No cold air is being produced .
Check that the controls are set cor-
rectly and that the fuses are sound.
Otherwise, switch off the system.
Presence of water under the
vehicle
After prolonged use of the air condi-
tioning system, it is normal for water
to be present under the vehicle. This is
caused by condensation.
AIR CONDITIONING: information and operating instructions (1/2)
Do not open the refriger-
ant fluid circuit. The fluid
may damage eyes or skin.
Fuel consumption
You will normally notice an increase in
fuel consumption (especially in town)
when the air conditioning is operating.
For vehicles fitted with air conditioning
with no automatic mode, switch off the
system when it is not required.
Advice for reducing consumption
and helping to preserve the environ-
ment
Drive with the air vents open and the
windows closed.
If the vehicle has been parked in the
sun, open the doors for a few moments
to let the hot air escape before starting
the engine.
Maintenance
Refer to the Maintenance Document
for your vehicle for the inspection fre-
quency.
Advice on use
In some situations (air conditioning off,
air recirculation activated, ventilation
speed at zero or low etc.), you may
notice that condensation starts to form
on the windows and windscreen.
If there is condensation, use the “Clear
View” function to remove it, then use
the air conditioning in automatic mode
to stop it forming again.
Do not add anything to the
vehicle’s ventilation circuit
(for example, to remove
bad odours).
There is a risk of damage or of
fire.
Use the air conditioning system reg-
ularly, even in cold weather, running
it at least once a month for approxi-
mately 5 minutes.
Vehicles equipped with
modeECO
Once activated, ECO mode may
reduce air conditioning perform-
ance. Please refer to the informa-
tion on “Driving advice, Eco-driving”
in Section 2.
Page 158 of 264
3.22
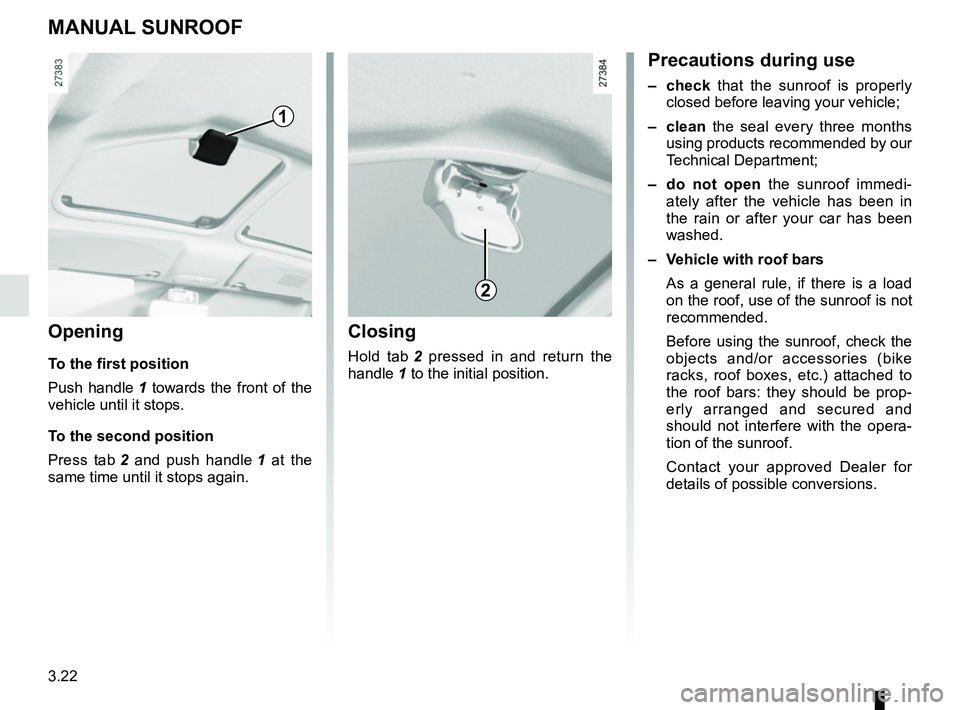
MANUAL SUNROOF
Opening
To the first position
Push handle 1 towards the front of the
vehicle until it stops.
To the second position
Press tab 2 and push handle 1 at the
same time until it stops again.
1
2
Precautions during use
– check that the sunroof is properly
closed before leaving your vehicle;
– clean the seal every three months using products recommended by our
Technical Department;
– do not open the sunroof immedi-
ately after the vehicle has been in
the rain or after your car has been
washed.
– Vehicle with roof bars As a general rule, if there is a load
on the roof, use of the sunroof is not
recommended.
Before using the sunroof, check the
objects and/or accessories (bike
racks, roof boxes, etc.) attached to
the roof bars: they should be prop-
erly arranged and secured and
should not interfere with the opera-
tion of the sunroof.
Contact your approved Dealer for
details of possible conversions.
Closing
Hold tab 2 pressed in and return the
handle 1 to the initial position.
Page 168 of 264
3.32
TRANSPORTING OBJECTS IN THE BOOT (2/2)/TOWING
If the towbar ball obscures the regis-
tration plate or the rear fog lights, it
should be removed when not in use.
In all cases, comply with local leg-
islation.
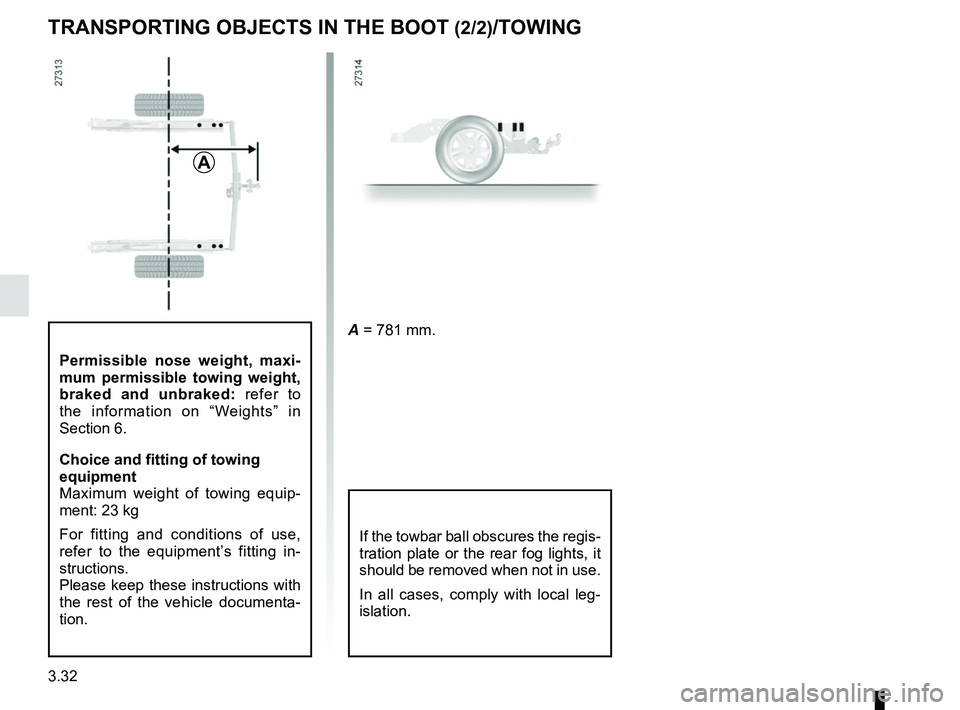
A = 781 mm.
A
Permissible nose weight, maxi-
mum permissible towing weight,
braked and unbraked: refer to
the information on “Weights” in
Section 6.
Choice and fitting of towing
equipment
Maximum weight of towing equip-
ment: 23 kg
For fitting and conditions of use,
refer to the equipment’s fitting in-
structions.
Please keep these instructions with
the rest of the vehicle documenta-
tion.