RENAULT KANGOO Z.E. 2018 Owners Manual
KANGOO Z.E. 2018
RENAULT
RENAULT
https://www.carmanualsonline.info/img/7/58401/w960_58401-0.png
RENAULT KANGOO Z.E. 2018 Owners Manual
Trending: check engine, service interval reset, gas type, remote start, fuel filter, headlights, inflation pressure
Page 181 of 230
5.13
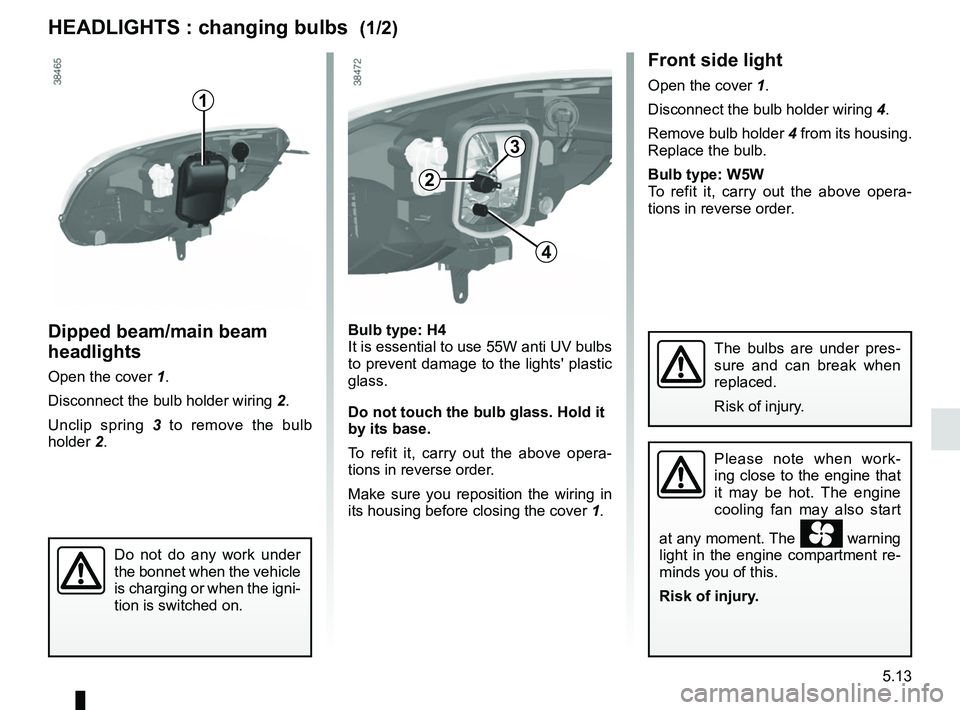
Front side light
Open the cover 1.
Disconnect the bulb holder wiring 4.
Remove bulb holder 4 from its housing.
Replace the bulb.
Bulb type: W5W
To refit it, carry out the above opera-
tions in reverse order.
Bulb type: H4 It is essential to use 55W anti UV bulbs
to prevent damage to the lights' plastic
glass.
Do not touch the bulb glass. Hold it
by its base.
To refit it, carry out the above opera-
tions in reverse order.
Make sure you reposition the wiring in
its housing before closing the cover 1.
The bulbs are under pres-
sure and can break when
replaced.
Risk of injury.
HEADLIGHTS : changing bulbs (1/2)
Please note when work-
ing close to the engine that
it may be hot. The engine
cooling fan may also start
at any moment. The
warning
light in the engine compartment re-
minds you of this.
Risk of injury.Do not do any work under
the bonnet when the vehicle
is charging or when the igni-
tion is switched on.
Dipped beam/main beam
headlights
Open the cover 1.
Disconnect the bulb holder wiring 2.
Unclip spring 3 to remove the bulb
holder 2.
2
1
4
3
Page 182 of 230
5.14
HEADLIGHTS : changing bulbs (2/2)
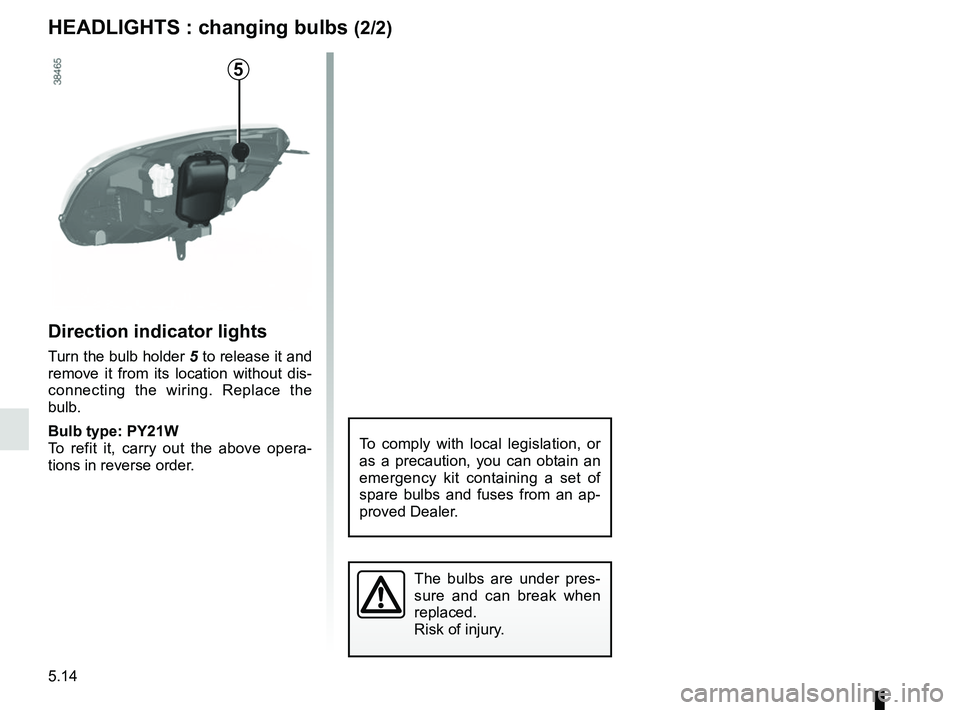
Direction indicator lights
Turn the bulb holder 5 to release it and
remove it from its location without dis-
connecting the wiring. Replace the
bulb.
Bulb type: PY21W
To refit it, carry out the above opera-
tions in reverse order.
The bulbs are under pres-
sure and can break when
replaced.
Risk of injury.
To comply with local legislation, or
as a precaution, you can obtain an
emergency kit containing a set of
spare bulbs and fuses from an ap-
proved Dealer.
5
Page 183 of 230
5.15
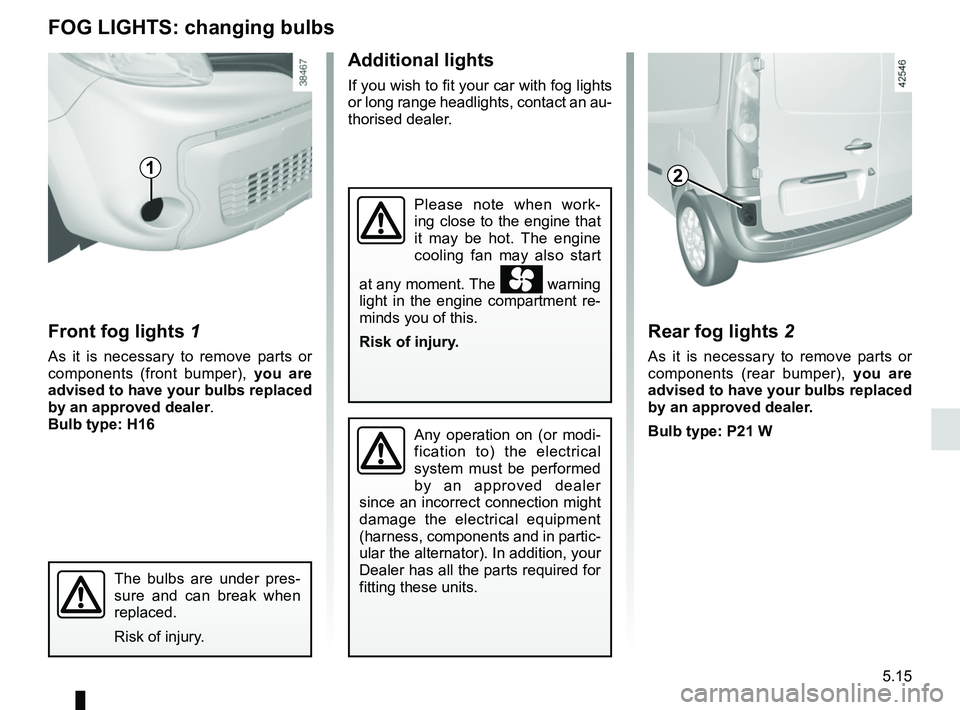
Front fog lights 1
As it is necessary to remove parts or
components (front bumper), you are
advised to have your bulbs replaced
by an approved dealer.
Bulb type: H16
Additional lights
If you wish to fit your car with fog lights
or long range headlights, contact an au-
thorised dealer.
FOG LIGHTS: changing bulbs
1
Please note when work-
ing close to the engine that
it may be hot. The engine
cooling fan may also start
at any moment. The
warning
light in the engine compartment re-
minds you of this.
Risk of injury.
Any operation on (or modi-
fication to) the electrical
system must be performed
by an approved dealer
since an incorrect connection might
damage the electrical equipment
(harness, components and in partic-
ular the alternator). In addition, your
Dealer has all the parts required for
fitting these units.
Rear fog lights 2
As it is necessary to remove parts or
components (rear bumper), you are
advised to have your bulbs replaced
by an approved dealer.
Bulb type: P21 W
2
The bulbs are under pres-
sure and can break when
replaced.
Risk of injury.
Page 184 of 230
5.16
The bulbs are under pres-
sure and can break when
replaced.
Risk of injury.
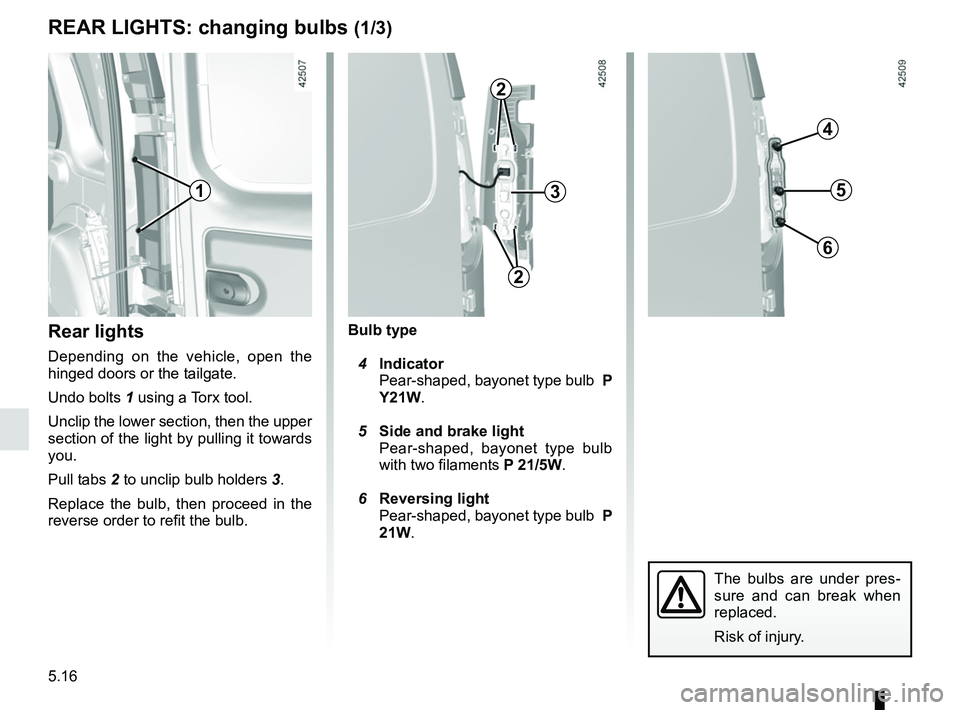
Bulb type
4 Indicator
Pear-shaped, bayonet type bulb P
Y21W.
5 Side and brake light
Pear-shaped, bayonet type bulb
with two filaments P 21/5W.
6 Reversing light
Pear-shaped, bayonet type bulb P
21W.Rear lights
Depending on the vehicle, open the
hinged doors or the tailgate.
Undo bolts 1 using a Torx tool.
Unclip the lower section, then the upper
section of the light by pulling it towards
you.
Pull tabs 2 to unclip bulb holders 3.
Replace the bulb, then proceed in the
reverse order to refit the bulb.
REAR LIGHTS: changing bulbs (1/3)
31
2
2
5
4
6
Page 185 of 230
5.17
REAR LIGHTS: changing bulbs (2/3)
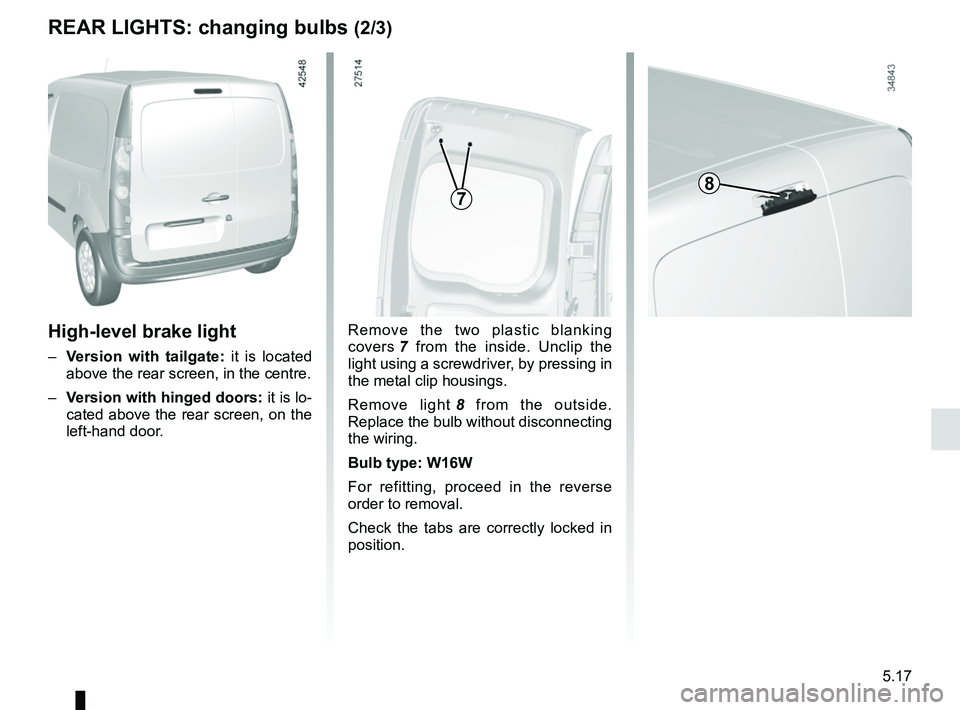
High-level brake light
– Version with tailgate: it is located
above the rear screen, in the centre.
– Version with hinged doors: it is lo-
cated above the rear screen, on the
left-hand door. Remove the two plastic blanking
covers 7
from the inside. Unclip the
light using a screwdriver, by pressing in
the metal clip housings.
Remove light 8 from the outside.
Replace the bulb without disconnecting
the wiring.
Bulb type: W16W
For refitting, proceed in the reverse
order to removal.
Check the tabs are correctly locked in
position.
78
Page 186 of 230
5.18
REAR LIGHTS: changing bulbs (3/3)
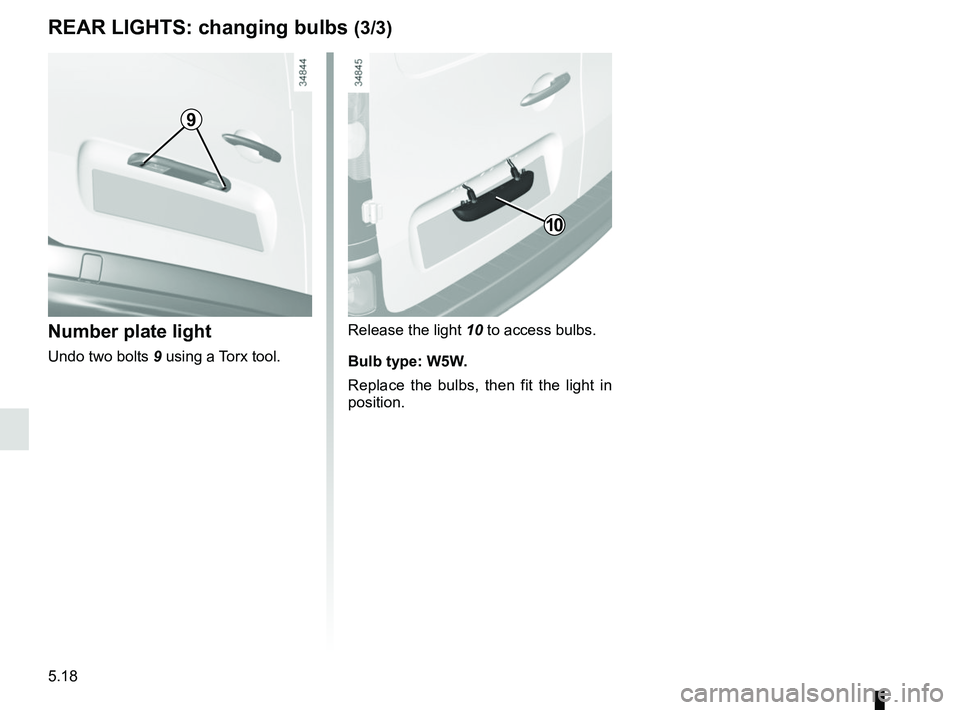
Release the light 10 to access bulbs.
Bulb type: W5W.
Replace the bulbs, then fit the light in
position.Number plate light
Undo two bolts 9 using a Torx tool.
9
10
Page 187 of 230
5.19
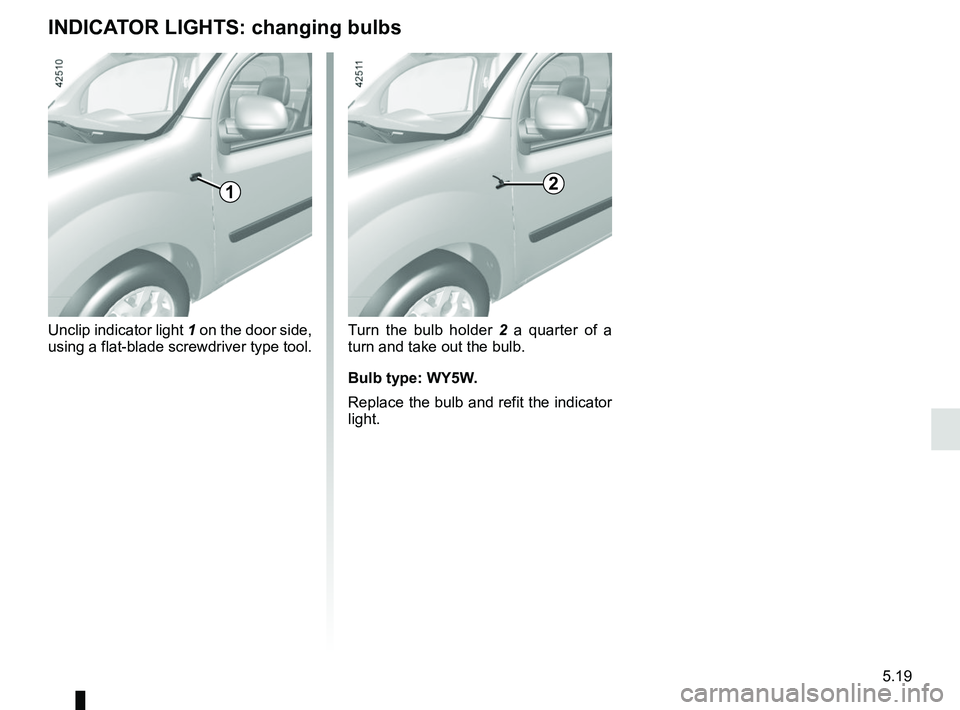
Turn the bulb holder 2 a quarter of a
turn and take out the bulb.
Bulb type: WY5W.
Replace the bulb and refit the indicator
light.
Unclip indicator light
1 on the door side,
using a flat-blade screwdriver type tool.
INDICATOR LIGHTS: changing bulbs
12
Page 188 of 230
5.20
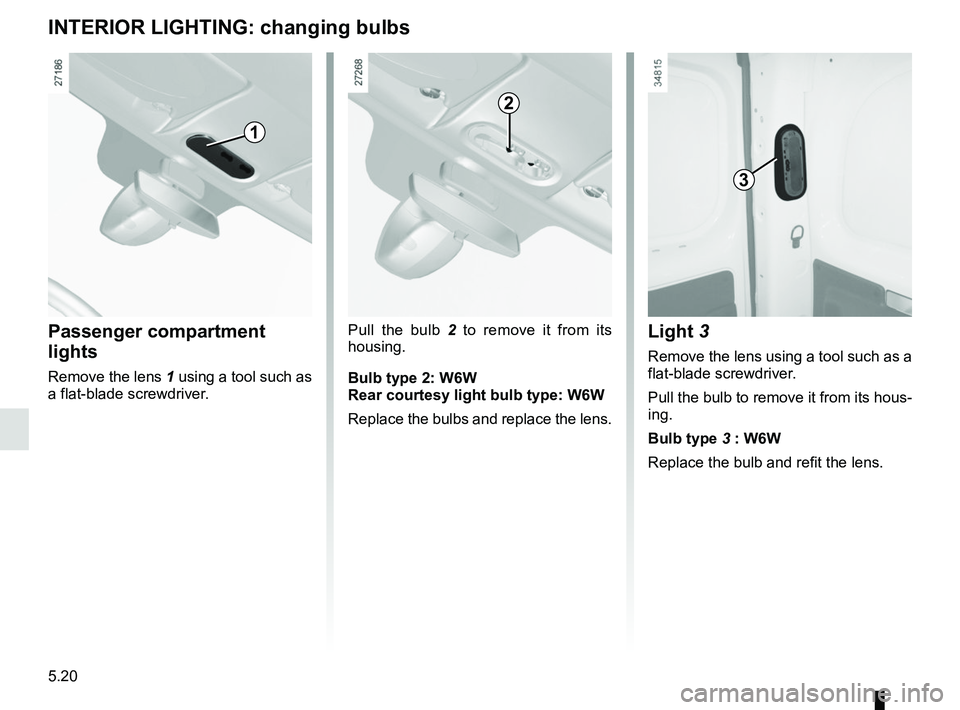
Passenger compartment
lights
Remove the lens 1 using a tool such as
a flat-blade screwdriver.
INTERIOR LIGHTING: changing bulbs
1
Pull the bulb 2 to remove it from its
housing.
Bulb type 2: W6W
Rear courtesy light bulb type: W6W
Replace the bulbs and replace the lens.
2
3
Light 3
Remove the lens using a tool such as a
flat-blade screwdriver.
Pull the bulb to remove it from its hous-
ing.
Bulb type 3 : W6W
Replace the bulb and refit the lens.
Page 189 of 230

5.21
To comply with local legislation, or
as a precaution, you can obtain an
emergency kit containing a set of
spare bulbs and fuses from an ap-
proved Dealer.
FUSES (1/2)
Fuse box
If any electrical component does not
work, check the condition of the fuses.
Unclip cover A. To locate the fuses, please see the fol-
lowing page.
It is not advisable to use the free fuse
locations.
Some functions are protected by fuses
located in the engine compartment.
However, because of their reduced ac-
cessibility,
it is recommended to have
these fuses replaced by an autho-
rised dealer.
Check the fuse in question and replace it, if necessary, with a fuse of
the same rating.
If a fuse is fitted where the rating is too high, it may cause the elect\
rical
circuit to overheat (risk of fire) in the event of an item of equipmen\
t using
an excessive amount of current.
A
1
Tweezers 1
Remove the fuse using tweezers 1, lo-
cated at the back of cover A.
To remove the fuse from the tweezers,
slide the fuse to the side.
Page 190 of 230

5.22
FUSES (2/2)
Number Allocation
1 Not used
2 Not used
3 Air conditioning, pedestrian
horn
4 heating, traction battery
5 Rear windscreen wiper
6 Horn, diagnostic socket
7 Heated seats, telematic box
8 Traction battery
9 Passenger compartment
ECU
10 Windscreen washer
11 Brake lights
12 Passenger compartment
ECU
13 Electric window, ECO mode
14 Heated rear screen
15 Starter
12
3456
78910
11121314
15161718
19202122
23242526
27
28
29
Allocation of fusesThe presence of certain fuses de-
pends on the vehicle equipment
level.
Number Allocation
16 Brake lights, additional
equipment, ABS, ESP,
luggage compartment light,
courtesy light, rain and light
sensor
17 Radio, navigation system,
display, alarm
18 Additional equipment
19 Heated door mirrors
20 Hazard lights, rear fog lights
21 Central locking of opening
elements
22 Instrument panel
23 Not used
24 Radio, heated seats, brake
lights
25 Front accessories socket
26 Towbar
27 Electric front windows
28 Rear-view mirror control
29 Passenger compartment
motor-driven fan assembly
Trending: steering wheel, remote start, height, steering, change key battery, fog light, battery location

