RENAULT KANGOO Z.E. 2018 Owner's Manual
Manufacturer: RENAULT, Model Year: 2018, Model line: KANGOO Z.E., Model: RENAULT KANGOO Z.E. 2018Pages: 230, PDF Size: 5.03 MB
Page 21 of 230
1.15
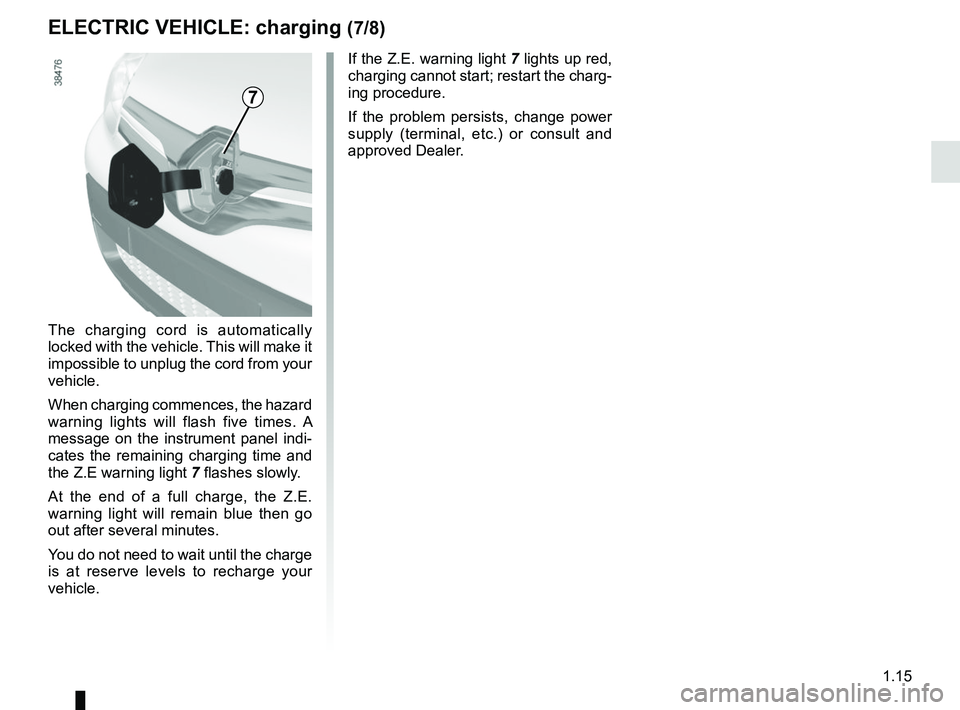
The charging cord is automatically
locked with the vehicle. This will make it
impossible to unplug the cord from your
vehicle.
When charging commences, the hazard
warning lights will flash five times. A
message on the instrument panel indi-
cates the remaining charging time and
the Z.E warning light 7 flashes slowly.
At the end of a full charge, the Z.E.
warning light will remain blue then go
out after several minutes.
You do not need to wait until the charge
is at reserve levels to recharge your
vehicle.
ELECTRIC VEHICLE: charging (7/8)
7
If the Z.E. warning light 7 lights up red,
charging cannot start; restart the charg-
ing procedure.
If the problem persists, change power
supply (terminal, etc.) or consult and
approved Dealer.
Page 22 of 230
1.16
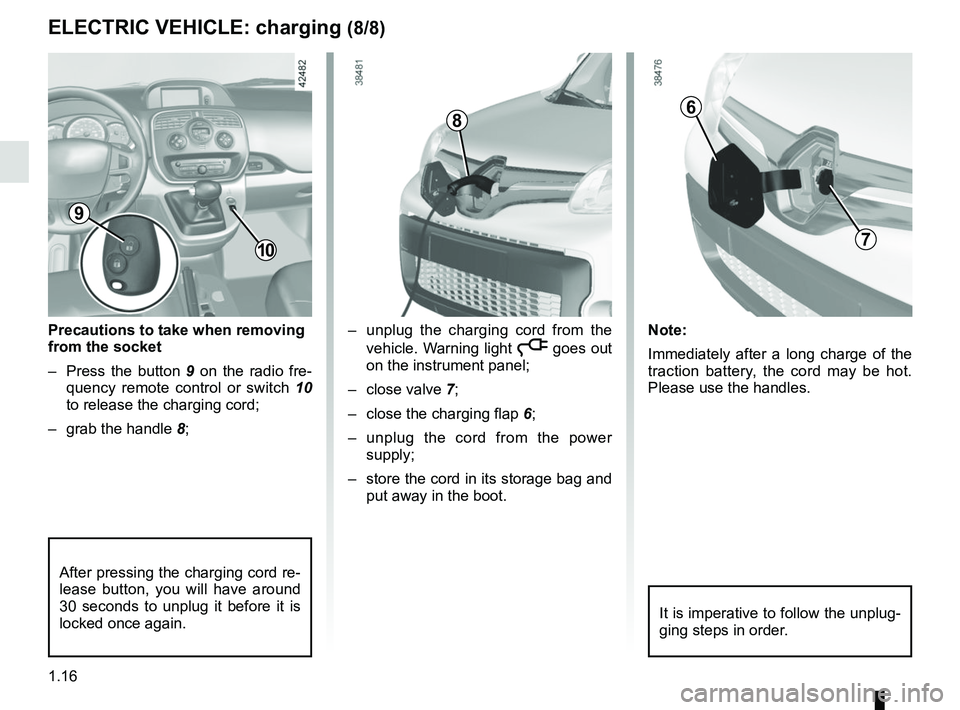
Precautions to take when removing
from the socket
– Press the button 9 on the radio fre-
quency remote control or switch 10
to release the charging cord;
– grab the handle 8;– unplug the charging cord from the
vehicle. Warning light
ṋ goes out
on the instrument panel;
– close valve 7;
– close the charging flap 6;
– unplug the cord from the power supply;
– store the cord in its storage bag and put away in the boot.
ELECTRIC VEHICLE: charging (8/8)
10
6
7
After pressing the charging cord re-
lease button, you will have around
30 seconds to unplug it before it is
locked once again.
Note:
Immediately after a long charge of the
traction battery, the cord may be hot.
Please use the handles.
8
It is imperative to follow the unplug-
ging steps in order.
9
Page 23 of 230

1.17
KEY, RADIO FREQUENCY REMOTE CONTROL: general information (1/2)
Radio frequency remote
control A
1 Locking all the opening elements.
2 Unlocking all opening elements and
the charging cord.
3 Coded key for ignition switch, dri- ver’s door and fuel filler cap.
1
2
3
The key must not be used for any
function other than those described
in the handbook (removing the cap
from a bottle, etc.).Advice
Avoid leaving the remote control in
hot, cold or humid areas.
Driver’s responsibility
when parking or stopping
the vehicle
Never leave an animal,
child or adult who is not self-suffi-
cient alone in your vehicle, even for
a short time.
They may pose a risk to themselves
or to others by starting the engine,
activating equipment such as the
electric windows or locking the
doors, for example.
Also, in hot and/or sunny weather,
please remember that the tempera-
ture inside the passenger compart-
ment increases very quickly.
RISK OF DEATH OR SERIOUS
INJURY.
Radio frequency remote
control B
1 Locking all the opening elements.
2 Unlocking all the opening elements.
3 Coded key for ignition switch, driv-
er’s door and fuel filler cap.
4 Locking/unlocking the luggage com- partment and, depending on the ve-
hicle, the sliding side doors.
1
2
3
4
BA
Page 24 of 230

1.18
Radio frequency remote
control operating range
This varies according to the surroun-
dings: take care not to lock or unlock
the doors by inadvertently pressing the
buttons on the remote control.
Interference
Interference by factors in the imme-
diate vicinity (external installations or
the use of equipment operating on the
same frequency as the remote control)
may affect the operation of the remote
control.
Note: if a door is not opened within
approximately 2 seconds of the door
being unlocked by remote control, the
doors will lock again automatically.
KEY, RADIO FREQUENCY REMOTE CONTROL: general information (2/2)
For replacement, or if you
require an additional remote
control.
You must only contact an approved
Dealer.
– To replace a remote control, the vehicle must be taken to an ap-
proved Dealer as both the vehi-
cle and the remote control are
needed to initialise the system.
– Depending on the vehicle, you have the option of using up to
four remote controls.
Remote control unit failure
Make sure that the correct battery
type is being used, and that the bat-
tery is in good condition and inser-
ted correctly. These batteries have
a service life of approximately two
years.
To learn how to change the battery,
please refer to the information on
the “Key, radio frequency remote
control: Batteries” in Section 5.
Page 25 of 230

1.19
KEY, RADIO FREQUENCY REMOTE CONTROL: Use (1/2)
The doors are locked and unlocked
using the remote control unit.
It is powered by a battery which must
be replaced (refer to the information on
the “Key, radio frequency remote con-
trol: batteries” in Section 5).Locking the doors
Remote control A or B
Press locking button 1.
The hazard warning lights and side in-
dicator lights flash twice to indicate
that the doors have locked.
If a door or the tailgate is open or not
properly shut, the doors and tailgate
lock then quickly unlock and the hazard
warning lights and side indicator lights
do not flash.
1
AB
1
Driver’s responsibility
when parking or stopping
the vehicle
Never leave an animal,
child or adult who is not self-suffi-
cient alone in your vehicle, even for
a short time.
They may pose a risk to themselves
or to others by starting the engine,
activating equipment such as the
electric windows or locking the
doors, for example.
Also, in hot and/or sunny weather,
please remember that the tempera-
ture inside the passenger compart-
ment increases very quickly.
RISK OF DEATH OR SERIOUS
INJURY.
Page 26 of 230
1.20
2
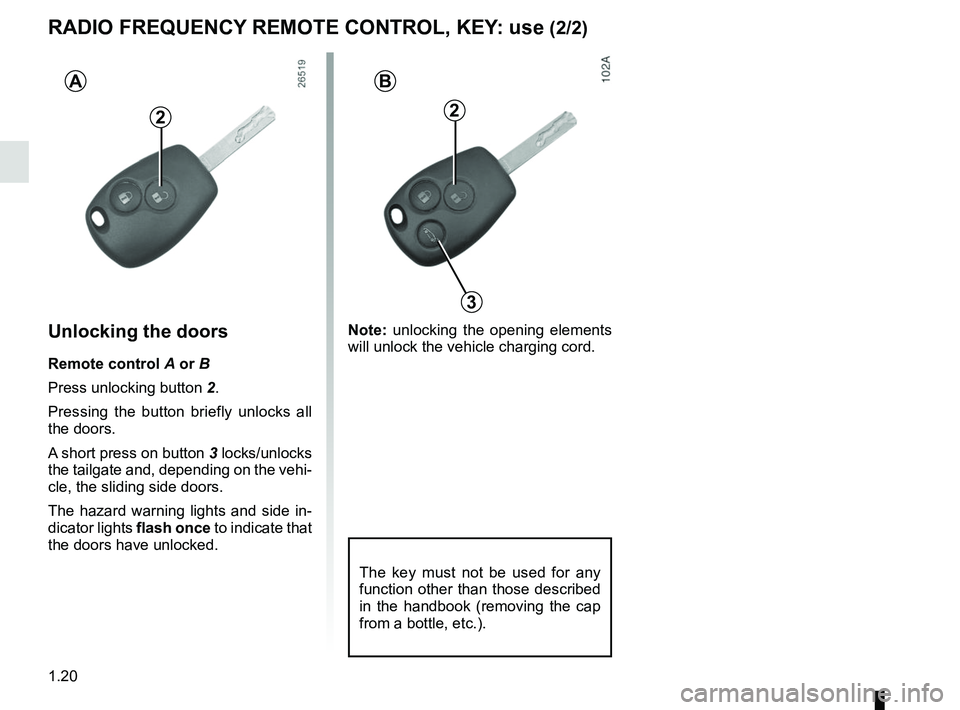
Unlocking the doors
Remote control A or B
Press unlocking button 2.
Pressing the button briefly unlocks all
the doors.
A short press on button 3 locks/unlocks
the tailgate and, depending on the vehi-
cle, the sliding side doors.
The hazard warning lights and side in-
dicator lights flash once to indicate that
the doors have unlocked.
AB
2
3
RADIO FREQUENCY REMOTE CONTROL, KEY: use (2/2)
The key must not be used for any
function other than those described
in the handbook (removing the cap
from a bottle, etc.).
Note: unlocking the opening elements
will unlock the vehicle charging cord.
Page 27 of 230
1.21
DEADLOCKING
Never use deadlocking if
someone is still inside the
vehicle.
1
If fitted to the vehicle, this allows the
doors to be locked and prevents them
from being opened with the interior
handles (for example, by breaking the
window and then trying to open the
doors from the inside).
2
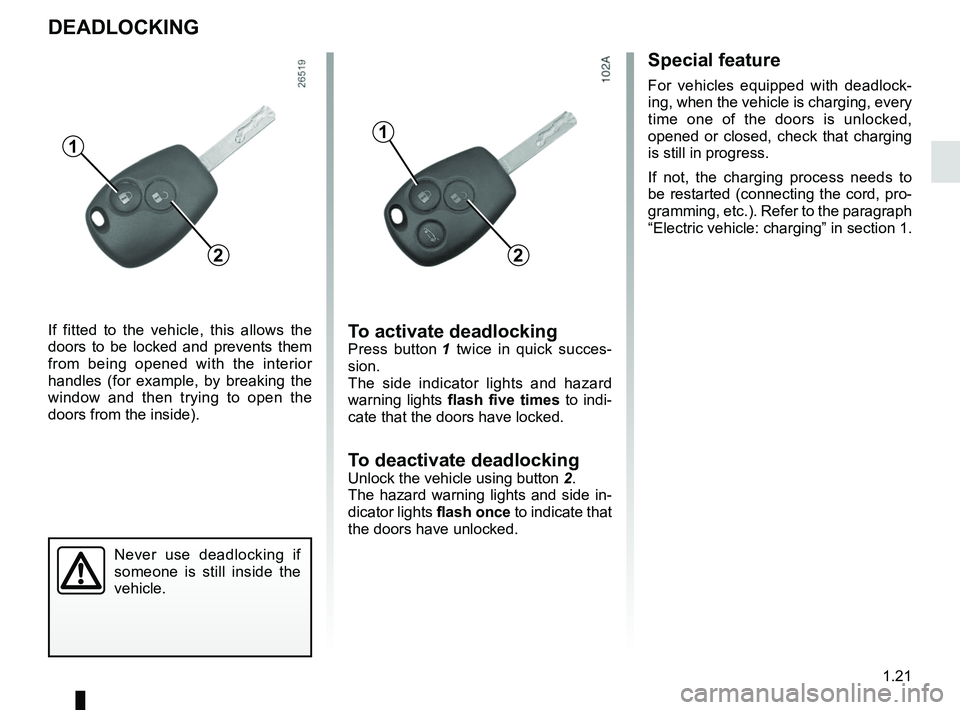
To activate deadlockingPress button 1 twice in quick succes-
sion.
The side indicator lights and hazard
warning lights flash five times to indi-
cate that the doors have locked.
To deactivate deadlocking
Unlock the vehicle using button 2.
The hazard warning lights and side in-
dicator lights flash once to indicate that
the doors have unlocked.
1
2
Special feature
For vehicles equipped with deadlock-
ing, when the vehicle is charging, every
time one of the doors is unlocked,
opened or closed, check that charging
is still in progress.
If not, the charging process needs to
be restarted (connecting the cord, pro-
gramming, etc.). Refer to the paragraph
“Electric vehicle: charging” in section 1.
Page 28 of 230
1.22
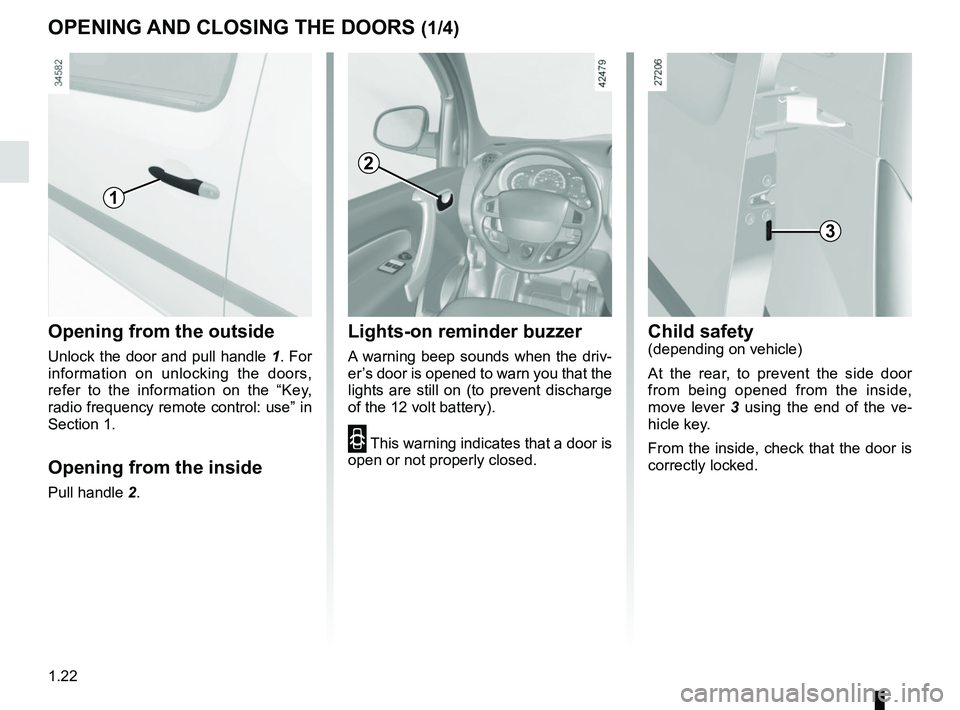
Opening from the outside
Unlock the door and pull handle 1. For
information on unlocking the doors,
refer to the information on the “Key,
radio frequency remote control: use” in
Section 1.
Opening from the inside
Pull handle 2.
OPENING AND CLOSING THE DOORS (1/4)
1
2
Child safety(depending on vehicle)
At the rear, to prevent the side door
from being opened from the inside,
move lever 3 using the end of the ve-
hicle key.
From the inside, check that the door is
correctly locked.
3
Lights-on reminder buzzer
A warning beep sounds when the driv-
er’s door is opened to warn you that the
lights are still on (to prevent discharge
of the 12 volt battery).
2 This warning indicates that a door is
open or not properly closed.
Page 29 of 230
1.23
OPENING AND CLOSING THE DOORS (2/4)
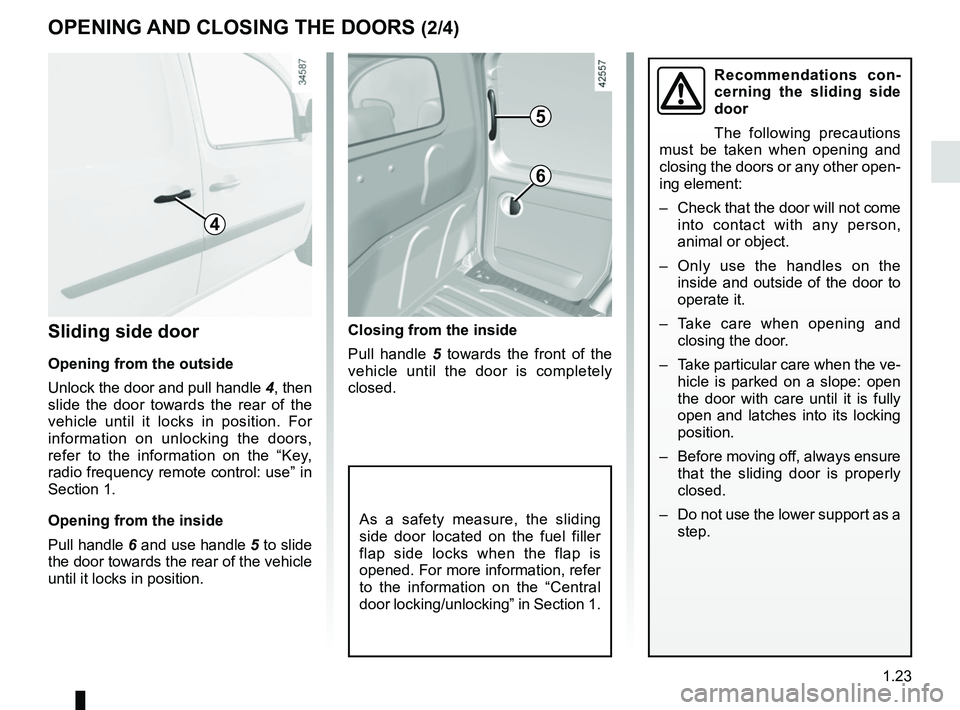
Closing from the inside
Pull handle 5 towards the front of the
vehicle until the door is completely
closed.Sliding side door
Opening from the outside
Unlock the door and pull handle 4, then
slide the door towards the rear of the
vehicle until it locks in position. For
information on unlocking the doors,
refer to the information on the “Key,
radio frequency remote control: use” in
Section 1.
Opening from the inside
Pull handle 6 and use handle 5 to slide
the door towards the rear of the vehicle
until it locks in position.
Recommendations con-
cerning the sliding side
door
The following precautions
must be taken when opening and
closing the doors or any other open-
ing element:
– Check that the door will not come into contact with any person,
animal or object.
– Only use the handles on the inside and outside of the door to
operate it.
– Take care when opening and closing the door.
– Take particular care when the ve- hicle is parked on a slope: open
the door with care until it is fully
open and latches into its locking
position.
– Before moving off, always ensure that the sliding door is properly
closed.
– Do not use the lower support as a step.
4
5
6
As a safety measure, the sliding
side door located on the fuel filler
flap side locks when the flap is
opened. For more information, refer
to the information on the “Central
door locking/unlocking” in Section 1.
Page 30 of 230
1.24
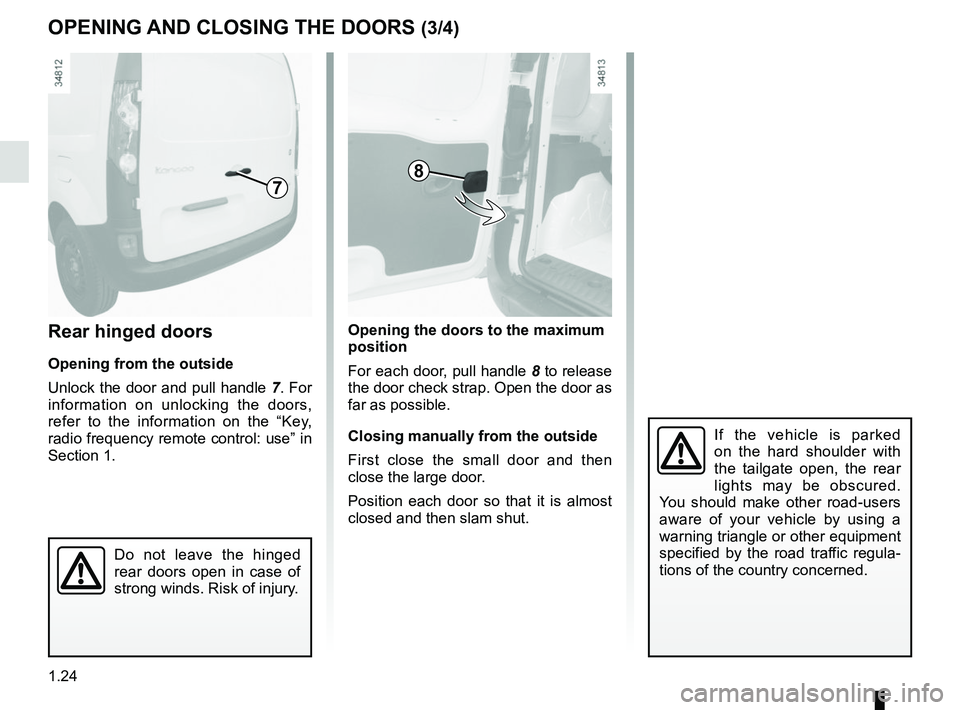
Opening the doors to the maximum
position
For each door, pull handle 8 to release
the door check strap. Open the door as
far as possible.
Closing manually from the outside
First close the small door and then
close the large door.
Position each door so that it is almost
closed and then slam shut.Rear hinged doors
Opening from the outside
Unlock the door and pull handle 7. For
information on unlocking the doors,
refer to the information on the “Key,
radio frequency remote control: use” in
Section 1.
OPENING AND CLOSING THE DOORS (3/4)
If the vehicle is parked
on the hard shoulder with
the tailgate open, the rear
lights may be obscured.
You should make other road-users
aware of your vehicle by using a
warning triangle or other equipment
specified by the road traffic regula-
tions of the country concerned.
Do not leave the hinged
rear doors open in case of
strong winds. Risk of injury.
7
8