brake RENAULT KANGOO ZERO EMISSION 2012 X61 / 2.G User Guide
[x] Cancel search | Manufacturer: RENAULT, Model Year: 2012, Model line: KANGOO ZERO EMISSION, Model: RENAULT KANGOO ZERO EMISSION 2012 X61 / 2.GPages: 213, PDF Size: 6.08 MB
Page 101 of 213
ABS ...................................................... (up to the end of the DU)
driving ................................................... (up to the end of the DU)
anti-lock braking system: ABS ..............(up to the end of the DU)
emergency brake assist ........................(up to the end of the DU)
emergency braking ............................... (up to the end of the DU)
2.10
ENG_UD23727_2
Dispositifs de correction de conduite (X61 - F61 - Renault)
ENG_NU_911-4_F61e_Renault_2
Jaune NoirNoir texte
Driving correction devices
abS (anti-lock braking
System)
Under heavy braking, the ABS prevents
the wheels from locking, allowing the
stopping distance to be managed and
keeping control of the vehicle.
Under these circumstances, the vehi -
cle can be steered to avoid an obstacle
whilst braking. In addition, this system
can increase stopping distances, par -
ticularly on roads with low surface grip
(wet ground, etc.).
You will feel a pulsation through the
brake pedal each time the system is
activated. The ABS does not in any way
improve the vehicle’s physical perform-
ance relating to the road surface and
roadholding. It is still essential to follow
the rules of good driving practice (such
as driving at a safe distance from the
vehicle in front). Operating faults:
–
If the x warning light on the in-
strument panel comes on while driv-
ing, braking is still operational .
– If the
x and D warning
lights on the instrument panel come
on while driving, this indicates a
fault in the braking system.
In such cases, the ABS and emergency
brake assist are also deactivated and,
depending on the vehicle, the mes -
sages “check ABS” and “check brak -
ing system” appear on the instrument
panel.
Consult an approved dealer.
DriVing cOrrEctiOn DEVicES (1/2)
Depending on the vehicle, this is com-
posed of:
– abS (anti-lock braking system);
– emergency brake assist with, de -
pending on the vehicle, braking
anticipation;
In an emergency, apply firm and
continuous pressure to the brake
pedal. There is no need to pump
it repeatedly. The ABS will modu -
late the force applied in the braking
system.
These functions are an ad-
ditional aid in the event of
critical driving conditions,
enabling the vehicle behav -
iour to be adapted to suit the driving
conditions.
However, the functions do not take
the place of the driver. they do
not increase the vehicle’s limits
and should not encourage you
to drive more quickly. Therefore,
they can under no circumstances
replace the vigilance or responsibil -
ity of the driver when manoeuvring
the vehicle (the driver must always
be ready for sudden incidents which
may occur when driving).
Yo u r b r a k i n g s y s t e m s
are partially operational.
However, it is dangerous
to brake suddenly and
it is essential to stop immediately,
as soon as traffic conditions allow.
Contact an approved dealer.
Page 102 of 213

JauneNoirNoir texte
2.11
ENG_UD23727_2
Dispositifs de correction de conduite (X61 - F61 - Renault)
ENG_NU_911-4_F61e_Renault_2
Emergency brake assist
This is an additional system to ABS
which helps reduce vehicle stopping
distances.
Operating principle
The system detects an emergency
braking situation. In this case, the brak-
ing assistance immediately develops
maximum power and may trigger ABS
regulation.
ABS braking is maintained as long as
the brake pedal is not released.
DriVing cOrrEctiOn DEVicES (2/2)
Hazard warning lights switching on
Depending on the vehicle, these may
light up in the event of sudden decel -
eration.
Operating faultsWhen the system detects an operating
fault the message “braking fault” ap -
pears on the instrument panel along
with the
© warning light.
Consult an approved dealer.
Page 106 of 213

driving ................................................... (up to the end of the DU)
cruise control ........................................ (up to the end of the DU)
2.15
ENG_UD29323_3
Régulateur-limiteur de vitesses : fonction régulateur (X61 - F61 - Renault)
ENG_NU_911-4_F61e_Renault_2
The cruise control function helps you to
maintain your driving speed at a speed
that you choose, called the cruising
speed.
This cruising speed may be set at any
speed above 18 mph (30 km/h).
Cruise control
cruiSE cOntrOl, SPEED liMitEr: cruise control function (1/4)
2453
The cruise control function
is in no way linked to the
braking system.
This function is an addi -
tional driving aid. However,
the function does not take
the place of the driver.
Therefore, it can under no circum -
stances replace the driver’s respon-
sibility to respect speed limits and to
be vigilant (the driver must always
be ready to brake).
Cruise control must not be used in
heavy traffic, on undulating or slip -
pery roads (black ice, aquaplan -
ing, gravel) and during bad weather
(fog, rain, side winds etc.).
There is a risk of accidents.
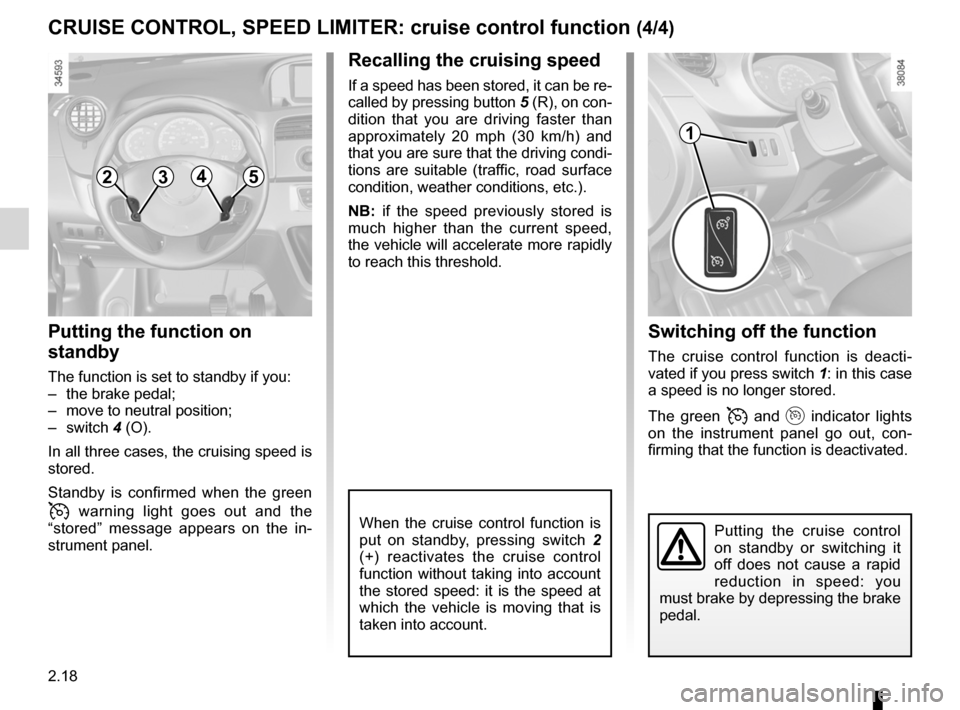
controls 1 Main “On/Off” switch.
2 Cruising speed activation, storage
and increase switch (+).
3 Decreasing cruising speed (-).
4 Switch the function to standby
(with cruising speed saved) (O).
5 Activation with recall of saved
cruising speed (R).
1
Page 109 of 213
2.18
ENG_UD29323_3
Régulateur-limiteur de vitesses : fonction régulateur (X61 - F61 - Renault)
ENG_NU_911-4_F61e_Renault_2
Switching off the function
The cruise control function is deacti -
vated if you press switch 1: in this case
a speed is no longer stored.
The green
and indicator lights
on the instrument panel go out, con -
firming that the function is deactivated.
recalling the cruising speed
If a speed has been stored, it can be re-
called by pressing button 5 (R), on con-
dition that you are driving faster than
approximately 20 mph (30 km/h) and
that you are sure that the driving condi -
tions are suitable (traffic, road surface
condition, weather conditions, etc.).
nb : if the speed previously stored is
much higher than the current speed,
the vehicle will accelerate more rapidly
to reach this threshold.
When the cruise control function is
put on standby, pressing switch 2
(+) reactivates the cruise control
function without taking into account
the stored speed: it is the speed at
which the vehicle is moving that is
taken into account.
Putting the function on
standby
The function is set to standby if you:
– the brake pedal;
– move to neutral position;
– switch 4 (O).
In all three cases, the cruising speed is
stored.
Standby is confirmed when the green
warning light goes out and the
“stored” message appears on the in -
strument panel.
cruiSE cOntrOl, SPEED liMitEr: cruise control function (4/4)
Putting the cruise control
on standby or switching it
off does not cause a rapid
reduction in speed: you
must brake by depressing the brake
pedal.
2453
1
Page 135 of 213

transporting objectsin the luggage compartment ........... (up to the end of the DU)
tailgate .................................................. (up to the end of the DU)
3.24
ENG_UD21474_3
Transports d’objets dans le coffre (X61 - F61 - K61 - Renault)
ENG_NU_911-4_F61e_Renault_3
Transporting objects in the boot
Always position the heavi -
est items directly on the
floor.
Use the lashing points on
the floor of the luggage compart -
ment, if these are fitted to the vehi-
cle.
The luggage should be loaded in
such a way that no items will be
thrown forward and strike the occu-
pants if the driver has to brake sud-
denly.
Fasten the rear seat belts, even if
the seats are not occupied.
trAnsPortinG oBjeCts in tHe luGGAGe CoMPArtMent
Always position the objects trans -
ported so that the largest surface is
against:
– the rear bench seatbacks, for
normal loads;
– the front seats for maximum loads.
Always position the heaviest items di-
rectly on the floor.
Page 136 of 213
towingtowing equipment ............................ (up to the end of the DU)
towing equipment fitting ............................................... (up to the end of the DU)
3.25
ENG_UD29274_3
Remorquage : attelage (X61 - F61 - K61 - Renault)
ENG_NU_911-4_F61e_Renault_3
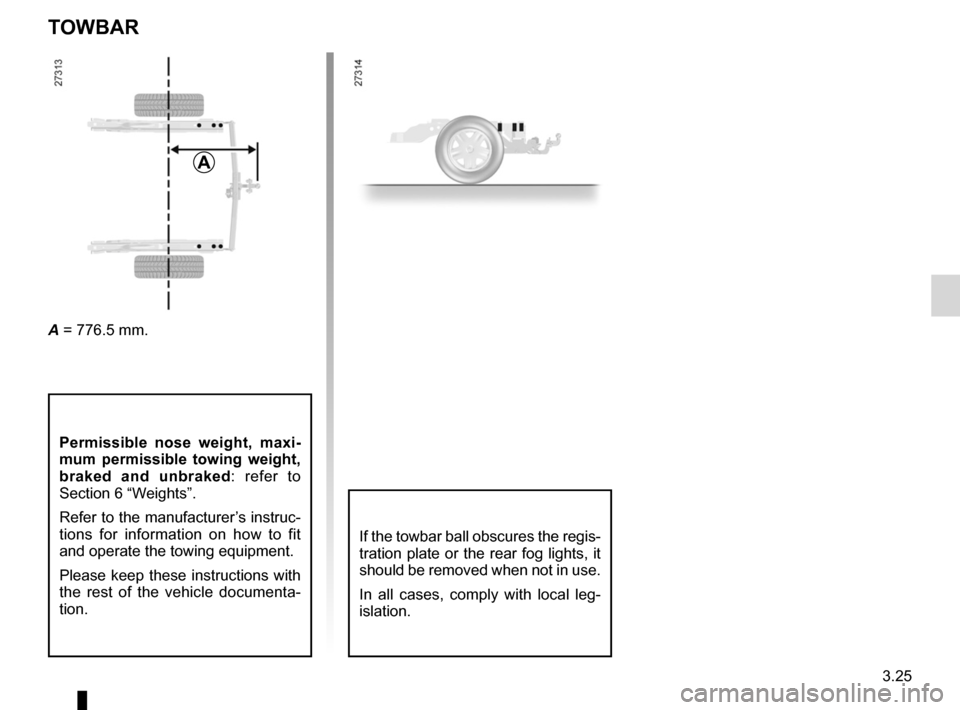
A = 776.5 mm.
Towbar
Permissible nose weight, maxi -
mum permissible towing weight,
braked and unbraked : refer to
Section 6 “Weights”.
Refer to the manufacturer’s instruc-
tions for information on how to fit
and operate the towing equipment.
Please keep these instructions with
the rest of the vehicle documenta -
tion.
t oWBAr
A
If the towbar ball obscures the regis-
tration plate or the rear fog lights, it
should be removed when not in use.
In all cases, comply with local leg -
islation.
Page 138 of 213
4.1
ENG_UD29095_4
Sommaire 4 (X61 - F61 - Renault)
ENG_NU_911-4_F61e_Renault_4
Section 4: Maintenance
Bonnet . . . . . . . . . . . . . . . . . . . . . . . . . . . . . . . . . . . . . . . . . . . . . . . . . . . . . . . . . . . . . . . . . . . . . . . . 4.2
Levels . . . . . . . . . . . . . . . . . . . . . . . . . . . . . . . . . . . . . . . . . . . . . . . . . . . . . . . . . . . . . . . . . . . . . . . . 4.4
coolant . . . . . . . . . . . . . . . . . . . . . . . . . . . . . . . . . . . . . . . . . . . . . . . . . . . . . . . . . . . . . . . . . . 4.4
brake fluid . . . . . . . . . . . . . . . . . . . . . . . . . . . . . . . . . . . . . . . . . . . . . . . . . . . . . . . . . . . . . . . . 4.5
windscreen washer reservoir . . . . . . . . . . . . . . . . . . . . . . . . . . . . . . . . . . . . . . . . . . . . . . . . . 4.5
12 volt battery . . . . . . . . . . . . . . . . . . . . . . . . . . . . . . . . . . . . . . . . . . . . . . . . . . . . . . . . . . . . . . . . . . 4.6
Tyre pressure. . . . . . . . . . . . . . . . . . . . . . . . . . . . . . . . . . . . . . . . . . . . . . . . . . . . . . . . . . . . . . . . . . . 4.8
Bodywork maintenance . . . . . . . . . . . . . . . . . . . . . . . . . . . . . . . . . . . . . . . . . . . . . . . . . . . . . . . . . . . 4.9
Interior trim maintenance . . . . . . . . . . . . . . . . . . . . . . . . . . . . . . . . . . . . . . . . . . . . . . . . . . . . . . . . . . 4.11
Page 142 of 213
brake fluid .............................................................. (current page)
levels: brake fluid ........................................................ (current page)
tanks and reservoirs brake fluid ........................................................ (current page)
tanks and reservoirs: windscreen washer .......................................... (current page)
windscreen washer ................................................ (current page)
levels: windscreen washer reservoir ........................... (current page)
JauneNoirNoir texte
4.5
ENG_UD26206_3
Niveaux (X61 électrique - Renault)
ENG_NU_911-4_F61e_Renault_4
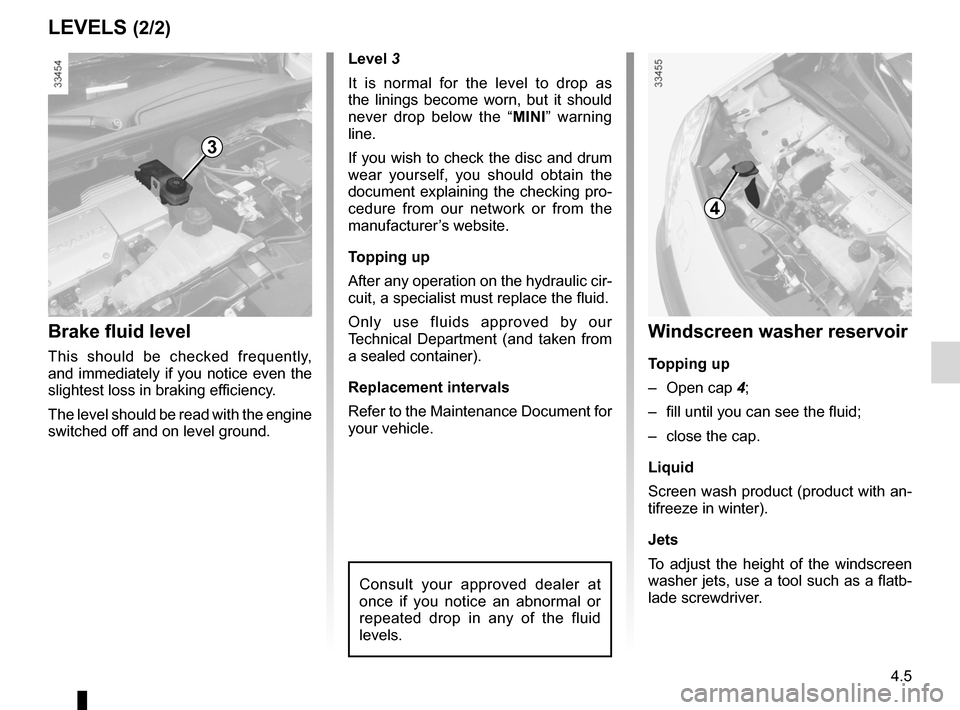
brake fluid
windscreen washer reservoir
Windscreen washer reservoir
t opping up
– Open cap 4;
– fill until you can see the fluid;
– close the cap.
Liquid
Screen wash product (product with an-
tifreeze in winter).
Jets
To adjust the height of the windscreen
washer jets, use a tool such as a flatb-
lade screwdriver.
4
Level 3
It is normal for the level to drop as
the linings become worn, but it should
never drop below the “ MInI” warning
line.
If you wish to check the disc and drum
wear yourself, you should obtain the
document explaining the checking pro-
cedure from our network or from the
manufacturer’s website.
t opping up
After any operation on the hydraulic cir-
cuit, a specialist must replace the fluid.
Only use fluids approved by our
Technical Department (and taken from
a sealed container).
Replacement intervals
Refer to the Maintenance Document for
your vehicle.
Consult your approved dealer at
once if you notice an abnormal or
repeated drop in any of the fluid
levels.
Brake fluid level
This should be checked frequently,
and immediately if you notice even the
slightest loss in braking efficiency.
The level should be read with the engine
switched off and on level ground.
3
LeveLs (2/2)
Page 153 of 213

5.4
ENG_UD28662_1
Kit de gonflage des pneumatiques (X61 électrique - Renault)
ENG_NU_911-4_F61e_Renault_5
Jaune NoirNoir texte
Inflation kit C
In the event of a puncture, use the kit
located in the glovebox.
Open the kit, remove caps 1 and 3 (it is
essential not to remove the cap from
the bottle) then screw bottle 2 to its sup-
port 3.
tyre InFlatIOn KIt (2/5)
143
5
6
78
2Key in “accessories” position, hand-
brake engaged
– unscrew the valve cap on the wheel
concerned and screw the inflation
adapter 6 onto the valve;
– connect adapter 8 to the accessories
socket on the dashboard of the vehi-
cle;
– press switch 5 to inflate the tyre to
the recommended pressure (check
the label affixed to the edge of the
driver’s door);
– after a maximum of 5 minutes, stop
inflating and read the pressure (on
pressure gauge 4);
note: while the bottle is emptying (ap-
proximately 30 seconds), pressure
gauge 4 will briefly indicate a pressure
of 6 bar, then the pressure will drop.
– adjust the pressure: to increase
it, continue inflating with the kit, to
reduce it, turn button 7 located on
the inflation adapter.
If a minimum pressure of 1.8 bar is
not reached after 15 minutes, repair
is not possible; do not drive the ve-
hicle but contact an approved dealer.
Before using this kit, park
the vehicle at a sufficient
distance from traffic, switch
on the hazard warning
lights, apply the handbrake, ask all
passengers to leave the vehicle and
keep them away from traffic.
If the vehicle is parked on
the hard shoulder, you must
warn other road users of
your vehicle’s presence
with a warning triangle or with other
devices as per the legislation apply-
ing to the country you are in.
c
Page 155 of 213

5.6
ENG_UD28662_1
Kit de gonflage des pneumatiques (X61 électrique - Renault)
ENG_NU_911-4_F61e_Renault_5
Jaune NoirNoir texte
tyre InFlatIOn KIt (4/5)
Inflation kit D
Depending on the vehicle, in the event
of a puncture, please use the kit located
in the glovebox.
Before using this kit, park
the vehicle at a sufficient
distance from traffic, switch
on the hazard warning
lights, apply the handbrake, ask all
passengers to leave the vehicle and
keep them away from traffic.
If the vehicle is parked on
the hard shoulder, you must
warn other road users of
your vehicle’s presence
with a warning triangle or with other
devices as per the legislation apply-
ing to the country you are in.
w ith the engine running and the
parking brake applied,
– unroll the hose from the container;
– connect the compressor hose 12 to
the container’s inlet 17;
– depending on the vehicle, connect
the container 17 to the compressor
from the container recess 16;
– unscrew the valve cap on the rel -
evant wheel and screw on the con -
tainer’s inflation adapter 10;
– adapter 11 must be connected to the
vehicle accessories socket;
– press switch 13 to inflate the tyre to
the recommended pressure (please
refer to the information in the section
on “Tyre pressure”);
1314
1017
– after a maximum of 15 minutes, stop
inflating and read the pressure (on
pressure gauge 14).
n ote: while the container is empty -
ing (approximately 30 seconds), the
pressure gauge 14 will briefly indi -
cate a pressure of up to 6 bar. The
pressure will then drop.
– adjust the pressure: to increase
it, continue inflation with the kit; to
reduce it, press button 15.
If a minimum pressure of 1.8 bar is
not reached after 15 minutes, repair
is not possible; do not drive the ve-
hicle but contact an approved dealer.
11
12
16
15
D