Engine lock RENAULT KOLEOS 2012 1.G User Guide
[x] Cancel search | Manufacturer: RENAULT, Model Year: 2012, Model line: KOLEOS, Model: RENAULT KOLEOS 2012 1.GPages: 233, PDF Size: 7.81 MB
Page 65 of 233
JauneNoirNoir texte
1.59
ENG_UD27277_8
Ordinateur de bord (X45 - H45 - Renault)
ENG_NU_977-2_H45_Ph2_Renault_1
TRIp cOMpUTER ANd WARNINg sYsTEM (10/10)
Warning messages
These appear with the ® warning light and require you to stop immediately, for your own safety, as soon as traffic
conditions allow. stop your engine and do not restart it. contact an approved dealer.
Examples of warning messages are given in the following pages. Note: the messages appear on the display either individually
or alternately (when there are several messages to be displayed), and may be accompanied by a warning light and/or a beep.
Examples of messages Interpretation of messages
“stop vehicle” Indicates an electronic parking brake fault. Apply the electronic parking brake
manually and ensure that the vehicle is immobilised using a chock.
“Engine overheating ” Indicates that the engine is overheating.
“puncture” Indicates a puncture affecting the tyre shown on the display.
“Underinflation critical ”Indicates major under-inflation of the tyre shown on the display .
“Risk of steering locking ”Indicates a fault in the steering.
Page 66 of 233
steering wheeladjustment ...................................... (up to the end of the DU)
power-assisted steering ........................(up to the end of the DU)
power-assisted steering ........................(up to the end of the DU)
1.60
ENG_UD27278_4
Volant de direction/Direction assist e (X45 - H45 - Renault)
ENG_NU_977-2_H45_Ph2_Renault_1
Operating faults
–
If the message “Check power steer-
ing ” is displayed on the instrument
panel accompanied by the
©
warning light, consult an authorised
dealer straight away.
–
If the message "Power steering fault"
is displayed on the instrument panel
and the warning light
® comes
on, stop the vehicle as soon as pos-
sible and contact an authorised
dealer.
Steering wheel
Power-assisted steering
sTEERINg WhEEL/pOWER-AssIsTEd sTEERINg
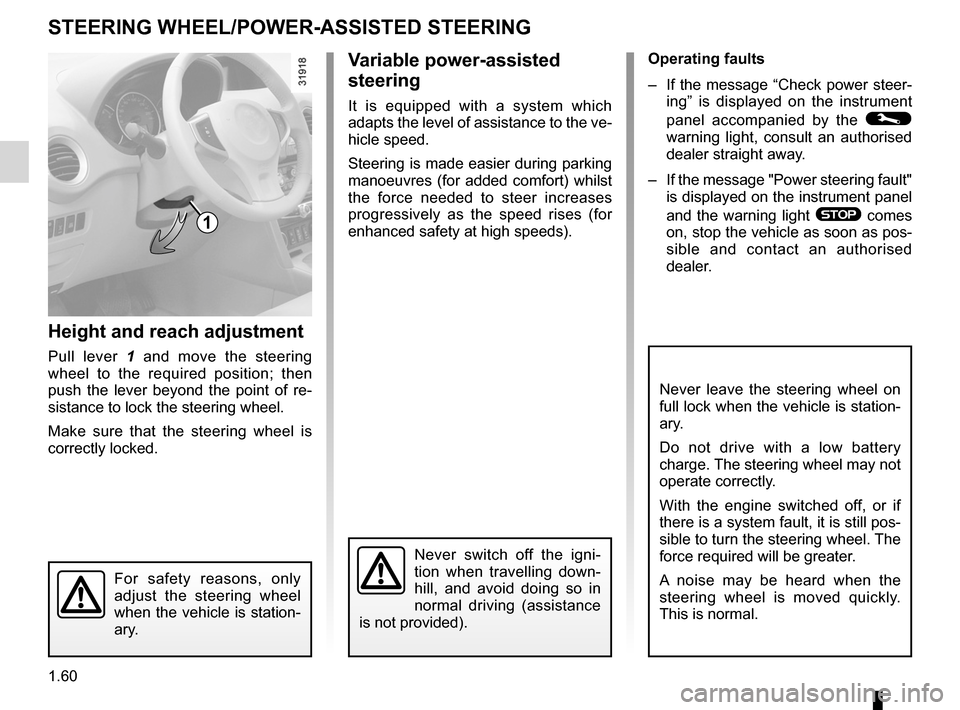
height and reach adjustment
Pull lever 1 and move the steering
wheel to the required position; then
push the lever beyond the point of re -
sistance to lock the steering wheel.
Make sure that the steering wheel is
correctly locked.
For safety reasons, only
adjust the steering wheel
when the vehicle is station-
ary.
Never switch off the igni -
tion when travelling down -
hill, and avoid doing so in
normal driving (assistance
is not provided).
1
v ariable power-assisted
steering
It is equipped with a system which
adapts the level of assistance to the ve-
hicle speed.
Steering is made easier during parking
manoeuvres (for added comfort) whilst
the force needed to steer increases
progressively as the speed rises (for
enhanced safety at high speeds).
Never leave the steering wheel on
full lock when the vehicle is station-
ary.
Do not drive with a low battery
charge. The steering wheel may not
operate correctly.
With the engine switched off, or if
there is a system fault, it is still pos-
sible to turn the steering wheel. The
force required will be greater.
A noise may be heard when the
steering wheel is moved quickly.
This is normal.
Page 81 of 233
starting the engine ................................ (up to the end of the DU)
driving ................................................... (up to the end of the DU)
engine start/stop button ........................ (up to the end of the DU)
starting the engine ................................ (up to the end of the DU)
2.3
ENG_UD27279_4
D marrage du moteur (X45 - H45 - obsol te - Renault)
ENG_NU_977-2_H45_Ph2_Renault_2
Starting the engine
STARTING THE ENGINE (1/2)
1
2
3
Starting the engine
Remote control RENAULT card
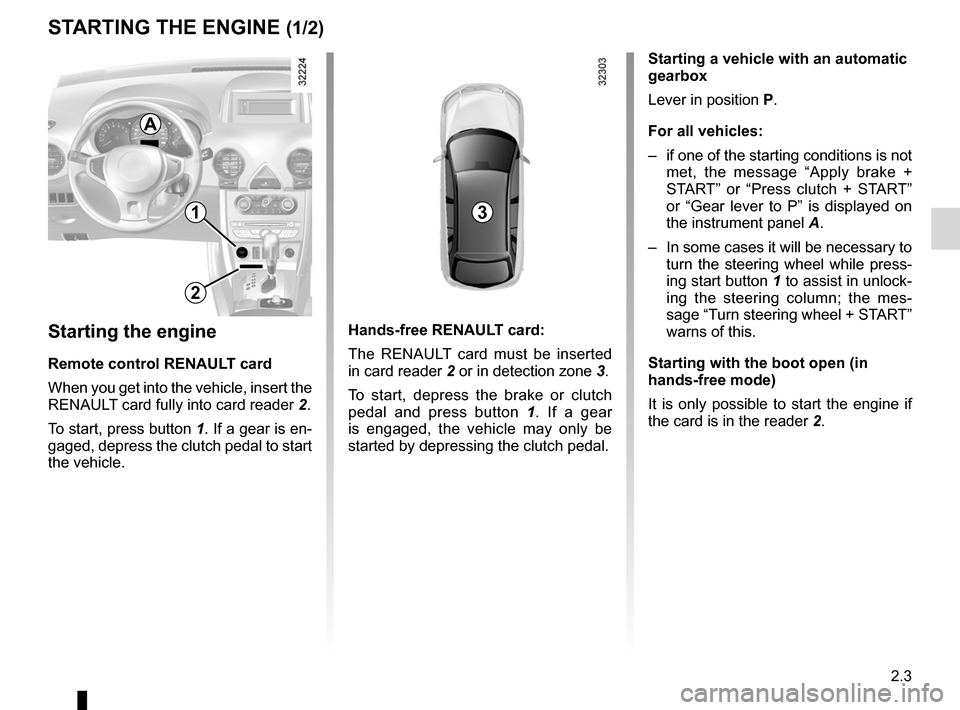
When you get into the vehicle, insert the
RENAULT card fully into card reader 2.
To start, press button 1. If a gear is en-
gaged, depress the clutch pedal to start
the vehicle. Hands-free RENAULT card:
The RENAULT card must be inserted
in card reader
2 or in detection zone 3.
To start, depress the brake or clutch
pedal and press button 1 . If a gear
is engaged, the vehicle may only be
started by depressing the clutch pedal. Starting a vehicle with an automatic
gearbox
Lever in position
P.
For all vehicles:
– if one of the starting conditions is not
met, the message “ Apply brake +
START ” or “Press clutch + START ”
or “ Gear lever to P ” is displayed on
the instrument panel A.
– In some cases it will be necessary to
turn the steering wheel while press-
ing start button 1 to assist in unlock-
ing the steering column; the mes -
sage “Turn steering wheel + START”
warns of this.
Starting with the boot open (in
hands-free mode)
It is only possible to start the engine if
the card is in the reader 2.
A
Page 83 of 233
stopping the engine .............................. (up to the end of the DU)
driving ................................................... (up to the end of the DU)
2.5
ENG_UD27287_4
Arr t du moteur (X45 - H45 - Renault)
ENG_NU_977-2_H45_Ph2_Renault_2
Stopping the engine
STOPPING THE ENGINE
Special note
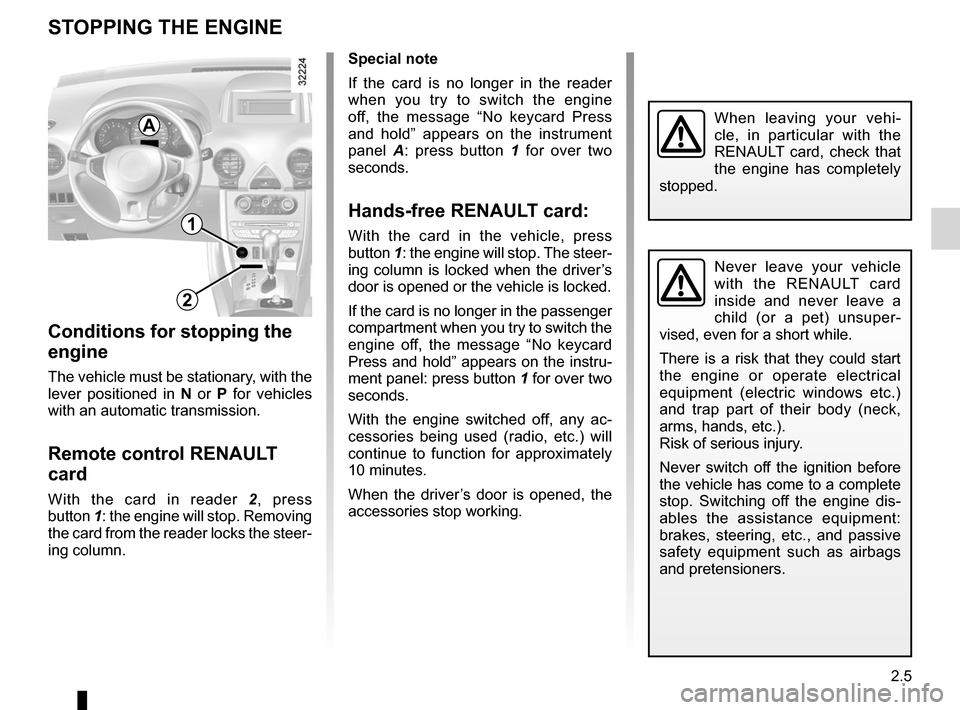
If the card is no longer in the reader
when you try to switch the engine
off, the message “ No keycard Press
and hold ” appears on the instrument
panel A : press button 1 for over two
seconds.
Hands-free RENAULT card:
With the card in the vehicle, press
button 1: the engine will stop. The steer-
ing column is locked when the driver’s
door is opened or the vehicle is locked.
If the card is no longer in the passenger
compartment when you try to switch the
engine off, the message “ No keycard
Press and hold ” appears on the instru-
ment panel: press button 1 for over two
seconds.
With the engine switched off, any ac -
cessories being used (radio, etc.) will
continue to function for approximately
10 minutes.
When the driver’s door is opened, the
accessories stop working.
Conditions for stopping the
engine
The vehicle must be stationary, with the
lever positioned in N or P for vehicles
with an automatic transmission.
Remote control RENAULT
card
With the card in reader 2, press
button 1: the engine will stop. Removing
the card from the reader locks the steer-
ing column.
Never leave your vehicle
with the RENAULT card
inside and never leave a
child (or a pet) unsuper -
vised, even for a short while.
There is a risk that they could start
the engine or operate electrical
equipment (electric windows etc.)
and trap part of their body (neck,
arms, hands, etc.).
Risk of serious injury.
Never switch off the ignition before
the vehicle has come to a complete
stop. Switching off the engine dis -
ables the assistance equipment:
brakes, steering, etc., and passive
safety equipment such as airbags
and pretensioners.
When leaving your vehi -
cle, in particular with the
RENAULT card, check that
the engine has completely
stopped.
1
2
A
Page 89 of 233
JauneNoirNoir texte
2.11
ENG_UD27280_8
Frein de parking assist (X45 - H45 - Renault)
ENG_NU_977-2_H45_Ph2_Renault_2
ELECTRONIC PARKING BRAKE (2/4)
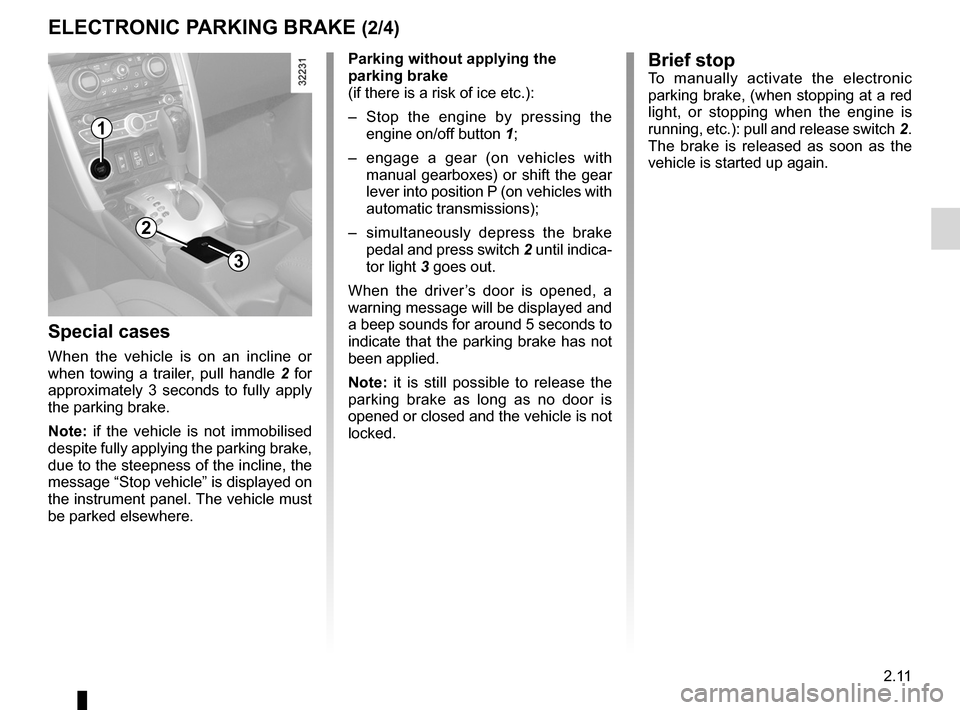
Special cases
When the vehicle is on an incline or
when towing a trailer, pull handle 2 for
approximately 3 seconds to fully apply
the parking brake.
Note: if the vehicle is not immobilised
despite fully applying the parking brake,
due to the steepness of the incline, the
message “Stop vehicle ” is displayed on
the instrument panel. The vehicle must
be parked elsewhere. Parking without applying the
parking brake
(if there is a risk of ice etc.):
–
Stop the engine by pressing the
engine on/off button 1;
– engage a gear (on vehicles with
manual gearboxes) or shift the gear
lever into position P (on vehicles with
automatic transmissions);
– simultaneously depress the brake
pedal and press switch 2 until indica-
tor light 3 goes out.
When the driver ’s door is opened, a
warning message will be displayed and
a beep sounds for around 5 seconds to
indicate that the parking brake has not
been applied.
Note: it is still possible to release the
parking brake as long as no door is
opened or closed and the vehicle is not
locked.
1
2
3
Brief stopTo manually activate the electronic
parking brake, (when stopping at a red
light, or stopping when the engine is
running, etc.): pull and release switch 2.
The brake is released as soon as the
vehicle is started up again.
Page 99 of 233
driving ................................................... (up to the end of the DU)
4 wheel drive (4WD) ............................. (up to the end of the DU)
all-wheel drive system .......................... (up to the end of the DU)
2.21
ENG_UD27290_7
Transmission int grale : 4 roues motrices : 4WD (X45 - H45 - Renault)
ENG_NU_977-2_H45_Ph2_Renault_2
All-wheel drive transmission: 4-wheel drive (4WD)
ALL-wHEEL DRIvE SYSTEM: 4 wheel drive (4wD) (1/3)
“AUTO” mode
This is the mode defined each time
the engine is started.
Operating principle
The “AUTO” mode automatically dis -
tributes the torque between the front
and rear axles according to the road
conditions and the vehicle speed. This
position optimises roadholding. Use
this mode where the roads are slippery
or in good condition.
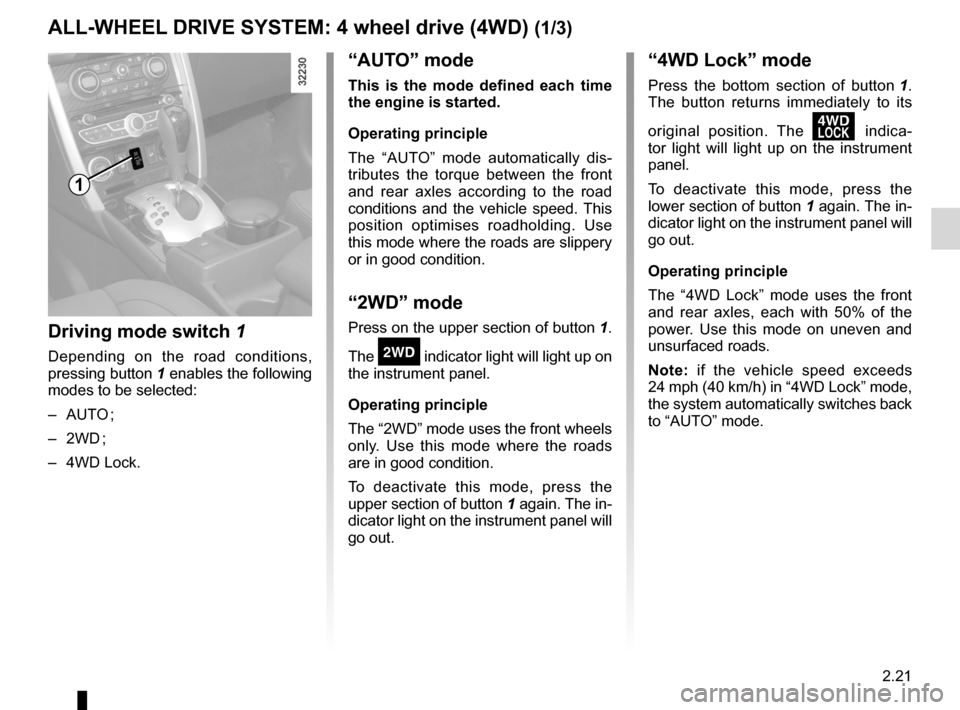
“2wD” mode
Press on the upper section of button 1.
The
‘ indicator light will light up on
the instrument panel.
Operating principle
The “2WD” mode uses the front wheels
only. Use this mode where the roads
are in good condition.
To deactivate this mode, press the
upper section of button 1 again. The in-
dicator light on the instrument panel will
go out.
“4wD Lock” mode
Press the bottom section of button 1 .
The button returns immediately to its
original position. The
’ indica -
tor light will light up on the instrument
panel.
To deactivate this mode, press the
lower section of button 1 again. The in-
dicator light on the instrument panel will
go out.
Operating principle
The “4WD Lock” mode uses the front
and rear axles, each with 50% of the
power. Use this mode on uneven and
unsurfaced roads.
Note: if the vehicle speed exceeds
24 mph (40 km/h) in “4WD Lock” mode,
the system automatically switches back
to “AUTO” mode.
Driving mode switch 1
Depending on the road conditions,
pressing button 1 enables the following
modes to be selected:
– AUTO ;
– 2WD ;
– 4WD Lock.
1
Page 101 of 233
JauneNoirNoir texte
2.23
ENG_UD27290_7
Transmission int grale : 4 roues motrices : 4WD (X45 - H45 - Renault)
ENG_NU_977-2_H45_Ph2_Renault_2
ALL-wHEEL DRIvE SYSTEM: 4 wheel drive (4wD) (3/3)
All-wheel drive system
– Depending on the driving conditions, the system may switch automatically from “2WD” to “4WD”. In this case, the
“4WD” indicator light does not come on.
– Whichever mode is selected, do not start the engine if the rear wheels are on the ground and the front wheels are in the air
(e.g. vehicle jacked up) or if they are resting on rollers.
– Do not press the mode selector switch while cornering, reversing or if the wheels are slipping. Only select the “2WD”,
“AUTO” or “4WD Lock” mode when the vehicle is being driven in a straight line.
– When the engine warms up, the idle speed may be higher. Be careful when driving or stopping on slippery roads with the
“AUTO” mode selected.
– Only use tyres which meet the required specifications.
– Snow chains must only be fitted to the front wheels.
– This function is an additional aid in the event of critical driving conditions, enabling the vehicle behaviour to be adapted to
suit the driving conditions.
However, the function does not take the place of the driver. It does not increase the vehicle’s limits and should not en-
courage you to drive more quickly. Therefore, it can under no circumstances replace the vigilance or responsibility of the
driver when manoeuvring the vehicle (the driver must always be ready for sudden incidents which may occur when driving).
– It is recommended not to use “4WD Lock” mode permanently when driving on roads in good condition.
– Always ensure tyres with identical specifications are fitted to all four wheels (brand, size, structure, wear etc.). Fitting tyres
of different sizes to the front and rear wheels and/or left and right wheels may have serious consequences for the tyres,
gearbox, transfer gearbox and the rear differential pinions.
Page 105 of 233
downhill speed control ........................................... (current page)
JauneNoirNoir texte
2.27
ENG_UD27148_7
Dispositifs de correction et d’assistance la conduite (X45 - H45 - Renault)
ENG_NU_977-2_H45_Ph2_Renault_2
DRIvER CORRECTION DEvICES (4/5)
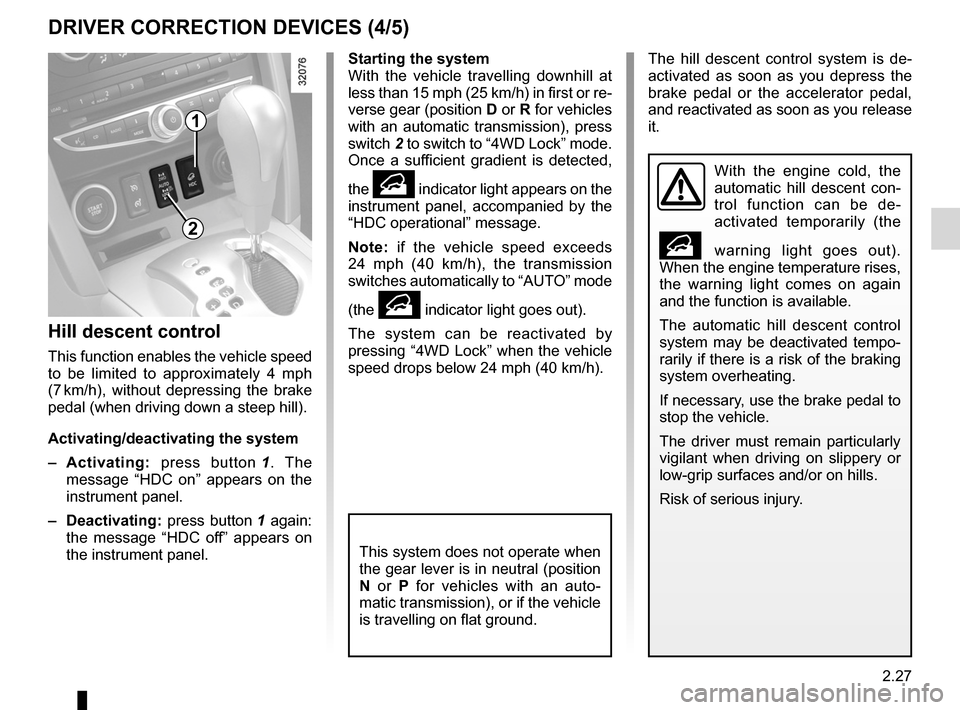
Hill descent control
This function enables the vehicle speed
to be limited to approximately 4 mph
(7 km/h), without depressing the brake
pedal (when driving down a steep hill).
Activating/deactivating the system
– Activating: press button 1 . The
message “ HDC on” appears on the
instrument panel.
– Deactivating: press button 1 again:
the message “ HDC off” appears on
the instrument panel.
Starting the system
With the vehicle travelling downhill at
less than 15 mph (25 km/h) in first or re-
verse gear (position D or R for vehicles
with an automatic transmission), press
switch 2 to switch to “4WD Lock” mode.
Once a sufficient gradient is detected,
the
• indicator light appears on the
instrument panel, accompanied by the
“HDC operational ” message.
Note: if the vehicle speed exceeds
24 mph (40 km/h), the transmission
switches automatically to “AUTO” mode
(the
• indicator light goes out).
The system can be reactivated by
pressing “4WD Lock” when the vehicle
speed drops below 24 mph (40 km/h).
1
With the engine cold, the
automatic hill descent con -
trol function can be de -
activated temporarily (the
• warning light goes out).
When the engine temperature rises,
the warning light comes on again
and the function is available.
The automatic hill descent control
system may be deactivated tempo-
rarily if there is a risk of the braking
system overheating.
If necessary, use the brake pedal to
stop the vehicle.
The driver must remain particularly
vigilant when driving on slippery or
low-grip surfaces and/or on hills.
Risk of serious injury.
This system does not operate when
the gear lever is in neutral (position
N or P for vehicles with an auto -
matic transmission), or if the vehicle
is travelling on flat ground.
2
The hill descent control system is de -
activated as soon as you depress the
brake pedal or the accelerator pedal,
and reactivated as soon as you release
it.
Page 117 of 233

automatic gearbox (use) ....................... (up to the end of the DU)
automatic gearbox selector lever ..........(up to the end of the DU)
driving ................................................... (up to the end of the DU)
reverse gear selecting .......................................... (up to the end of the DU)
changing gear ....................................... (up to the end of the DU)
continuous variation ..............................(up to the end of the DU)
continuously variable transmission ....... (up to the end of the DU)
2.39
ENG_UD27292_7
Bo tes de vitesses automatiques ou variation continue (X45 - H45 - Renault)
ENG_NU_977-2_H45_Ph2_Renault_2
Automatic or continuously variable transmission
AUTOMATIC OR CONTINUOUSLY vARIABLE TRANSMISSION (1/3)
Depending on the vehicle, the vehicle is
either fitted with an automatic transmis-
sion, or a continuously variable trans -
mission.
Selector lever 2
Display A on the instrument panel
shows the mode and gear selected.
3: P: park
4: R: reverse gear
5: N: neutral
6: D: automatic mode
7: manual mode
8: zone displaying gearbox mode or
gear engaged in manual mode
1
2
8
3
6
5
4
7
Operation
N With the gear lever 2 in position P,
switch on the ignition.
To move out of position P, you must de-
press the brake pedal before pressing
the unlocking button 1.
With the foot on the brake pedal (warn-
ing light
c on display A goes out),
move the lever out of position P.
Only engage D or R when the vehi -
cle is stopped, with your foot on the
brake and the accelerator pedal re -
leased.
A
Driving in automatic mode
Select position D. In most traffic con -
ditions, you will not have to touch the
gear selector lever again: the gears will
change automatically at the right time
and at the most suitable engine speed
because the automatic system takes
into account the vehicle load and road
contour and adjusts itself to the particu-
lar driving style you have chosen.
Economical driving
When driving, always leave the lever
in position D, keeping the accelerator
pedal lightly depressed to ensure auto-
matic gear changes at a lower engine
speed.
Accelerating and overtaking
Depress the accelerator pedal firmly
and fully (so that it goes beyond the
kickdown point).
This will enable you to change down
to the optimum gear within the
engine range.
Page 118 of 233
2.40
ENG_UD27292_7
Bo tes de vitesses automatiques ou variation continue (X45 - H45 - Renault)
ENG_NU_977-2_H45_Ph2_Renault_2
Jaune NoirNoir texte
AUTOMATIC OR CONTINUOUSLY vARIABLE TRANSMISSION (2/3)
Driving in manual mode
With the selector lever in position D,
move the lever to the left. Shifting the
lever repeatedly allows you to change
gears manually:
– backwards to shift down the gears;
– forwards to shift up the gears.
The gear selected is displayed on the
instrument panel.
Special cases
Under certain driving conditions (e.g.
engine protection, or electronic stability
control (ESC) operational etc.) the au -
tomatic system may change gear auto-
matically.
Likewise, to prevent incorrect manoeu -
vres, a gear change may be refused by
the automatic system: in this case the
gear display flashes for a few seconds
as a warning.
Special circumstances
– If the bends and road surface do
not allow you to stay in automatic
mode (e.g. in the mountains), we
recommend that you change to
manual mode.
This will prevent repeated gear
changes when climbing and will
enable engine braking on long de -
scents.
– In very cold weather, to avoid stall-
ing the engine, start the engine and
wait a few seconds before moving
the lever from position P or N to po-
sition D or R.
– v ehicles not fitted with traction
control: to avoid wheelspin when
starting on a slippery or low grip sur-
face, change to manual mode and
select second gear before moving
off.
Parking the vehicle
When the vehicle is stopped, move the
lever to position P while keeping your
foot on the brake pedal: the gearbox is
in neutral and the drive wheels are me-
chanically locked by the driveshaft.
Depending on the vehicle, apply the
handbrake or check that the elec -
tronic parking brake is on (refer to
the information on the Parking brake in
Section 2).
In very cold weather, the system may prevent the gears from being shifted in
manual mode until the gearbox reaches the right temperature.
An impact to the under -
side of the vehicle while
manoeuvring (e.g.: strik -
ing a post, raised kerb or
other street furniture) may result in
damage to the vehicle (e.g.: defor -
mation of an axle).
To avoid any risk of accident, have
your vehicle checked by an ap -
proved Dealer.