engine RENAULT KOLEOS 2012 1.G Workshop Manual
[x] Cancel search | Manufacturer: RENAULT, Model Year: 2012, Model line: KOLEOS, Model: RENAULT KOLEOS 2012 1.GPages: 233, PDF Size: 7.81 MB
Page 119 of 233
JauneNoirNoir texte
2.41
ENG_UD27292_7
Bo tes de vitesses automatiques ou variation continue (X45 - H45 - Renault)
ENG_NU_977-2_H45_Ph2_Renault_2
AUTOMATIC OR CONTINUOUSLY vARIABLE TRANSMISSION (3/3)
Operating faults
– when driving, if the “Check auto
gearbox ” message appears on the
instrument panel, it indicates a fault.
Contact your approved Dealer as
soon as possible.
– when driving , if the message “Auto
gearbox overheating ” appears on
the instrument panel, shift the gear
lever into position N, as soon as pos-
sible.
Contact your approved dealer as
soon as possible.
– If a vehicle with an automatic
gearbox breaks down , refer to the
information on “Towing” in Section 5.
Special note for vehicles equipped
with continuously variable
transmissions:
Under certain driving conditions at high
speeds, the gearbox may temporarily
limit the maximum engine speed. This
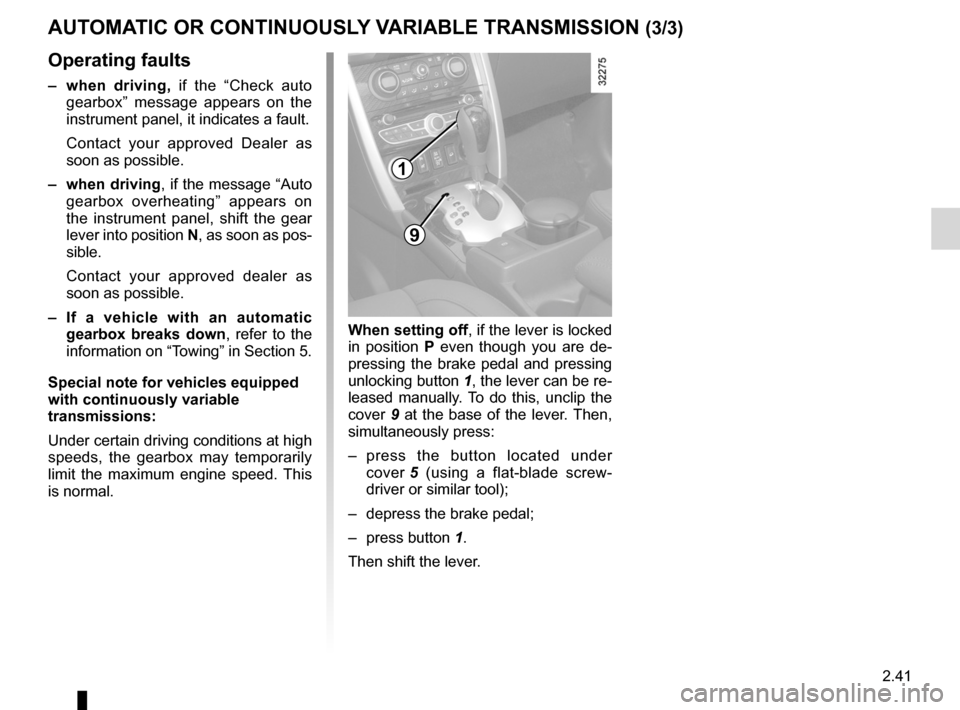
is normal. when setting off, if the lever is locked
in position
P even though you are de -
pressing the brake pedal and pressing
unlocking button 1, the lever can be re-
leased manually. To do this, unclip the
cover 9 at the base of the lever. Then,
simultaneously press:
– press the button located under
cover 5 (using a flat-blade screw -
driver or similar tool);
– depress the brake pedal;
– press button 1.
Then shift the lever.
9
1
Page 129 of 233

JauneNoirNoir texte
3.9
ENG_UD20983_3
Conditionnement d’air automatique bizone (X45 - H45 - Renault)
ENG_NU_977-2_H45_Ph2_Renault_3
AuT oMATIc clIMATE coNTRol (3/6)
Varying the ventilation speed
In automatic mode, the system uses
the most suitable amount of air to reach
and maintain the desired comfort level.
Use control 6 to increase or reduce the
ventilation speed.
In this case, automatic mode is
switched off.
Switching air conditioning on
or off
In automatic mode, the system switches
the air conditioning system on or off,
depending on the climate conditions.
Press button 4 to switch the air condi -
tioning on (indicator light on) or (indica -
tor light off).
Note: activating the “Clear View” func-
tion automatically activates the air con-
ditioning. Press button 3 to activate au-
tomatic mode again.
564
The displayed temperature values
show a comfort level.
When the vehicle is started in cold
or hot weather, increasing or de -
creasing the values displayed does
not mean that the temperature is
reached more quickly. Whatever the
indicated temperature may be, the
system optimises the increase or
decrease in temperature (the venti-
lation system does not start instantly
at maximum speed: it gradually in -
creases until the engine tempera -
ture is sufficient, which may take
from a few seconds to several min-
utes).
Generally speaking, unless there is
a particular fault, the dashboard air
vents should remain open.
3
Page 130 of 233
rear screen de-icing/demisting .............................. (current page)
windscreen de-icing/demisting .............................. (current page)
3.10
ENG_UD20983_3
Conditionnement d’air automatique bizone (X45 - H45 - Renault)
ENG_NU_977-2_H45_Ph2_Renault_3
Jaune NoirNoir texte
AuToMATIc clIMATE coNTRol (4/6)
In cold weather, the ventilation
system does not come on automati-
cally at maximum speed in auto -
matic mode: the speed is increased
gradually until the engine is warm
enough to heat the air in the pas -
senger compartment. This may take
from a few seconds to several min-
utes.
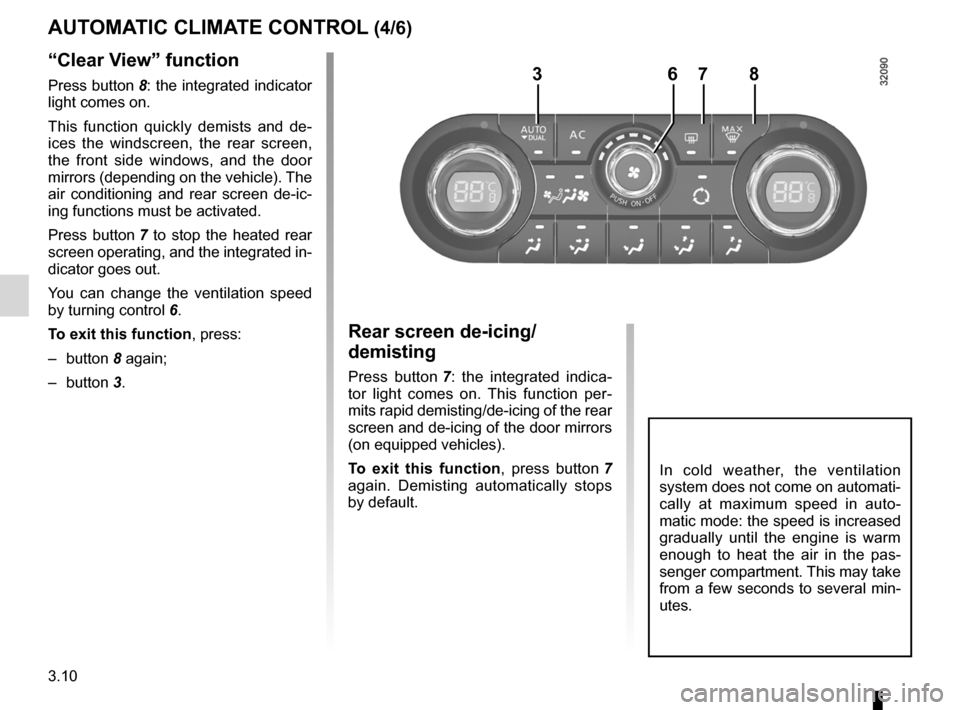
“clear View” function
Press button 8: the integrated indicator
light comes on.
This function quickly demists and de -
ices the windscreen, the rear screen,
the front side windows, and the door
mirrors (depending on the vehicle). The
air conditioning and rear screen de -ic -
ing functions must be activated.
Press button 7 to stop the heated rear
screen operating, and the integrated in-
dicator goes out.
You can change the ventilation speed
by turning control 6.
To exit this function , press:
– button 8 again;
– button 3.
Rear screen de-icing/
demisting
Press button 7 : the integrated indica -
tor light comes on. This function per -
mits rapid demisting/de-icing of the rear
screen and de-icing of the door mirrors
(on equipped vehicles).
To exit this function , press button 7
again. Demisting automatically stops
by default.
3786
Page 133 of 233
air conditioning ..................................... (up to the end of the DU)
heating and air conditioning system ..... (up to the end of the DU)
air conditioning ..................................... (up to the end of the DU)
3.13
ENG_UD20984_3
Air conditionn : informations et conseils d utilisation (X45 - H45 - Renault)
ENG_NU_977-2_H45_Ph2_Renault_3
Air conditioning: information and advice on use
AIR coNDITIoNINg: information and advice on use
Fuel consumption
You will normally notice an increase
in fuel consumption (especially
when driving in town) when the air
conditioning is operating.
For vehicles fitted with manual air
conditioning, switch off the system
when it is not required.
Advice for reducing
consumption and therefore
helping to preserve the
environment:
Drive with the air vents open and
the windows closed.
If the vehicle has been parked in
the sun, open the doors for a few
moments to let the hot air escape
before starting the engine.
Maintenance
Refer to the Maintenance Service
Booklet for your vehicle for the in -
spection frequency.
operating faults
As a general rule, contact your ap-
proved dealer in the event of an op-
erating fault.
– Reduction in de-icing, demist -
ing or air conditioning per -
formance. This may be caused
by the passenger compartment
filter cartridge becoming clogged.
– No cold air is being produced.
Check that the controls are set
correctly and that the fuses are
sound. Otherwise, switch off the
system.
Advice on use
In some situations, (air conditioning
off, air recirculation activated, venti-
lation speed at zero or low, etc.) you
may notice that condensation starts
to form on the windows and wind -
screen.
If there is condensation, use the
“clear View” function to remove it,
then use the air conditioning in auto-
matic mode to stop it forming again.
Do not open the refriger -
ant fluid circuit. The fluid
may damage eyes or skin.
Note
Presence of water under the ve -
hicle. After prolonged use of the air
conditioning system, it is normal for
water to be present under the vehi-
cle. This is caused by condensation.
Page 134 of 233
windows ................................................ (up to the end of the DU)
electric windows ................................... (up to the end of the DU)
child safety ............................................ (up to the end of the DU)
children (safety) .................................... (up to the end of the DU)
3.14
ENG_UD20985_3
L ves-vitres lectriques (X45 - H45 - Renault)
ENG_NU_977-2_H45_Ph2_Renault_3
Jaune NoirNoir texte
Electric windows
ElEcTRIc wINDowS (1/2)
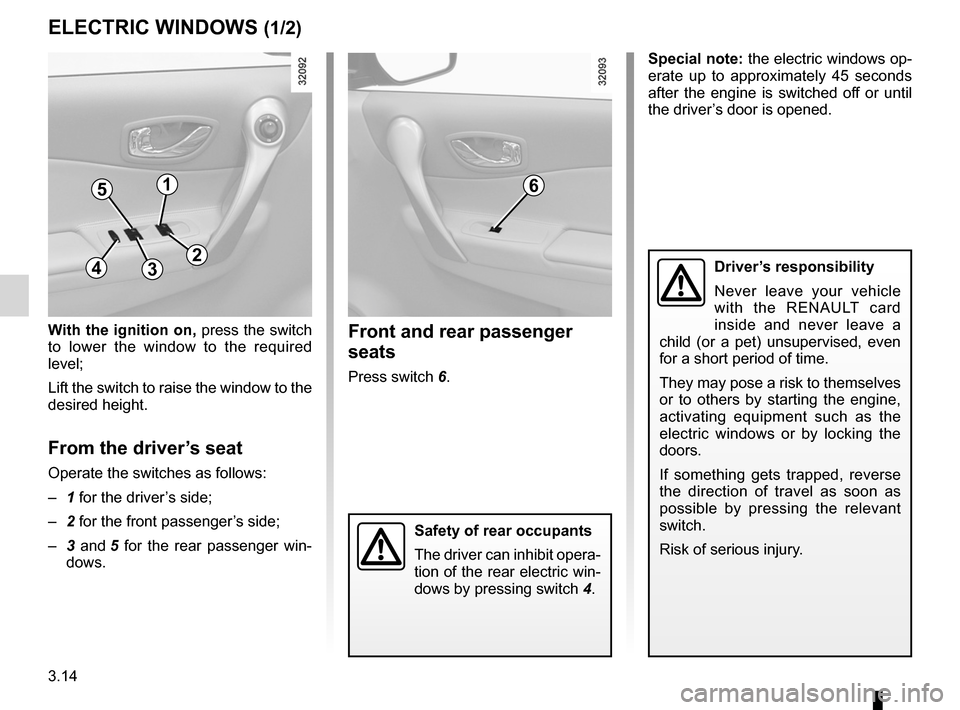
with the ignition on, press the switch
to lower the window to the required
level;
Lift the switch to raise the window to the
desired height.
From the driver’s seat
Operate the switches as follows:
– 1 for the driver’s side;
– 2 for the front passenger’s side;
– 3 and 5 for the rear passenger win-
dows.
Front and rear passenger
seats
Press switch 6. Special note: the electric windows op-
erate up to approximately 45 seconds
after the engine is switched off or until
the driver’s door is opened.
Driver’s responsibility
Never leave your vehicle
with the RENAULT card
inside and never leave a
child (or a pet) unsupervised, even
for a short period of time.
They may pose a risk to themselves
or to others by starting the engine,
activating equipment such as the
electric windows or by locking the
doors.
If something gets trapped, reverse
the direction of travel as soon as
possible by pressing the relevant
switch.
Risk of serious injury.
Safety of rear occupants
The driver can inhibit opera -
tion of the rear electric win-
dows by pressing switch 4.
51
432
6
Page 136 of 233
sunroof.................................................. (up to the end of the DU)
child safety ............................................ (up to the end of the DU)
children (safety) .................................... (up to the end of the DU)
3.16
ENG_UD20986_3
Toit ouvrant à commande électrique (X45 - H45 - Renault)
ENG_NU_977-2_H45_Ph2_Renault_3
Jaune NoirNoir texte
Electric sunroof
ElEcTRIc SuNRooF (1/2)
The system operates:
– when the ignition is switched on,
– when the ignition is switched off until
the driver ’s door is opened/closed
(limited to approximately 45 sec -
onds).
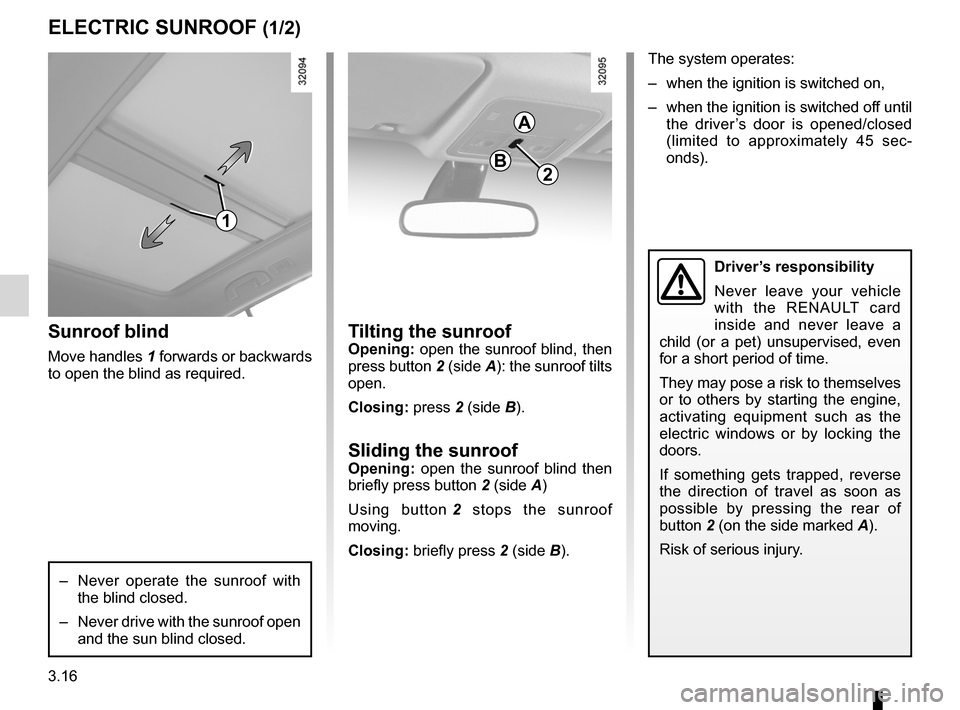
Tilting the sunroofopening: open the sunroof blind, then
press button 2 (side A): the sunroof tilts
open.
closing: press 2 (side B).
Sliding the sunroofopening: open the sunroof blind then
briefly press button 2 (side A)
Using button 2 stops the sunroof
moving.
closing: briefly press 2 (side B).
Sunroof blind
Move handles 1 forwards or backwards
to open the blind as required.
– Never operate the sunroof with
the blind closed.
– Never drive with the sunroof open
and the sun blind closed.
2
A
B
Driver’s responsibility
Never leave your vehicle
with the RENAULT card
inside and never leave a
child (or a pet) unsupervised, even
for a short period of time.
They may pose a risk to themselves
or to others by starting the engine,
activating equipment such as the
electric windows or by locking the
doors.
If something gets trapped, reverse
the direction of travel as soon as
possible by pressing the rear of
button 2 (on the side marked A).
Risk of serious injury.
1
Page 159 of 233
4.1
ENG_UD27166_2
Contents 4 (X45 - H45 - Renault)
ENG_NU_977-2_H45_Ph2_Renault_4
Section 4: Maintenance
Bonnet . . . . . . . . . . . . . . . . . . . . . . . . . . . . . . . . . . . . . . . . . . . . . . . . . . . . . . . . . . . . . . . . . . . . . . . . 4.2
Engine oil level: general information . . . . . . . . . . . . . . . . . . . . . . . . . . . . . . . . . . . . . . . . . . . . . . . . . 4.3
Engine oil level: topping up, filling . . . . . . . . . . . . . . . . . . . . . . . . . . . . . . . . . . . . . . . . . . . . . . . . . . . 4.5
Engine oil change . . . . . . . . . . . . . . . . . . . . . . . . . . . . . . . . . . . . . . . . . . . . . . . . . . . . . . . . . . . . . . . 4.6
Levels: . . . . . . . . . . . . . . . . . . . . . . . . . . . . . . . . . . . . . . . . . . . . . . . . . . . . . . . . . . . . . . . . . . . . . . . . 4.7
coolant . . . . . . . . . . . . . . . . . . . . . . . . . . . . . . . . . . . . . . . . . . . . . . . . . . . . . . . . . . . . . . . . . . 4.7
brake fluid . . . . . . . . . . . . . . . . . . . . . . . . . . . . . . . . . . . . . . . . . . . . . . . . . . . . . . . . . . . . . . . . 4.8
windscreen/headlight washer reservoir . . . . . . . . . . . . . . . . . . . . . . . . . . . . . . . . . . . . . . . . . 4.9
Filters . . . . . . . . . . . . . . . . . . . . . . . . . . . . . . . . . . . . . . . . . . . . . . . . . . . . . . . . . . . . . . . . . . . . . . . . . 4.9
Tyre pressures . . . . . . . . . . . . . . . . . . . . . . . . . . . . . . . . . . . . . . . . . . . . . . . . . . . . . . . . . . . . . . . . . . 4.10
Battery . . . . . . . . . . . . . . . . . . . . . . . . . . . . . . . . . . . . . . . . . . . . . . . . . . . . . . . . . . . . . . . . . . . . . . . . 4.11
Bodywork maintenance . . . . . . . . . . . . . . . . . . . . . . . . . . . . . . . . . . . . . . . . . . . . . . . . . . . . . . . . . . . 4.12
Interior trim maintenance . . . . . . . . . . . . . . . . . . . . . . . . . . . . . . . . . . . . . . . . . . . . . . . . . . . . . . . . . . 4.14
Page 160 of 233
bonnet................................................... (up to the end of the DU)
maintenance: mechanical ...................................... (up to the end of the DU)
4.2
ENG_UD23503_5
Capot moteur (X45 - H45 - Renault)
ENG_NU_977-2_H45_Ph2_Renault_4
Bonnet
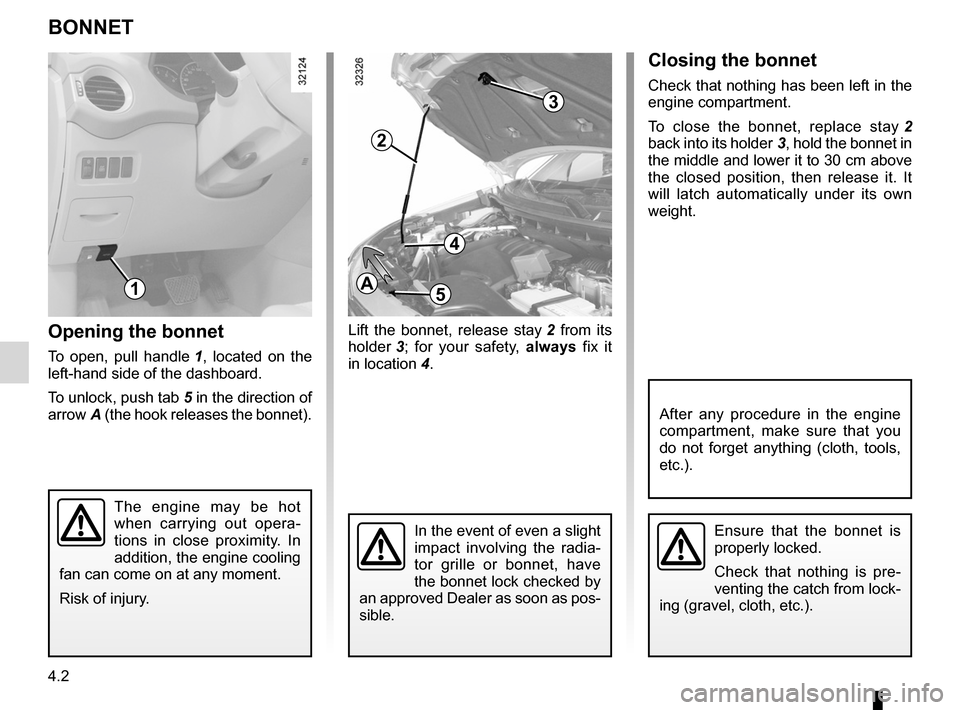
Opening the bonnet
To open, pull handle 1 , located on the
left-hand side of the dashboard.
To unlock, push tab 5 in the direction of
arrow A (the hook releases the bonnet).
BOnnet
The engine may be hot
when carrying out opera -
tions in close proximity. In
addition, the engine cooling
fan can come on at any moment.
Risk of injury.
In the event of even a slight
impact involving the radia -
tor grille or bonnet, have
the bonnet lock checked by
an approved Dealer as soon as pos-
sible.
15A
Closing the bonnet
Check that nothing has been left in the
engine compartment.
To close the bonnet, replace stay 2
back into its holder 3, hold the bonnet in
the middle and lower it to 30 cm above
the closed position, then release it. It
will latch automatically under its own
weight.
Ensure that the bonnet is
properly locked.
Check that nothing is pre -
venting the catch from lock-
ing (gravel, cloth, etc.).
After any procedure in the engine
compartment, make sure that you
do not forget anything (cloth, tools,
etc.).
Lift the bonnet, release stay 2 from its
holder 3 ; for your safety, always fix it
in location 4.
2
3
4
Page 161 of 233
maintenance:mechanical ...................................... (up to the end of the DU)
4.3
ENG_UD27282_7
Niveau huile moteur : g n ralit s (X45 - H45 - Renault)
ENG_NU_977-2_H45_Ph2_Renault_4
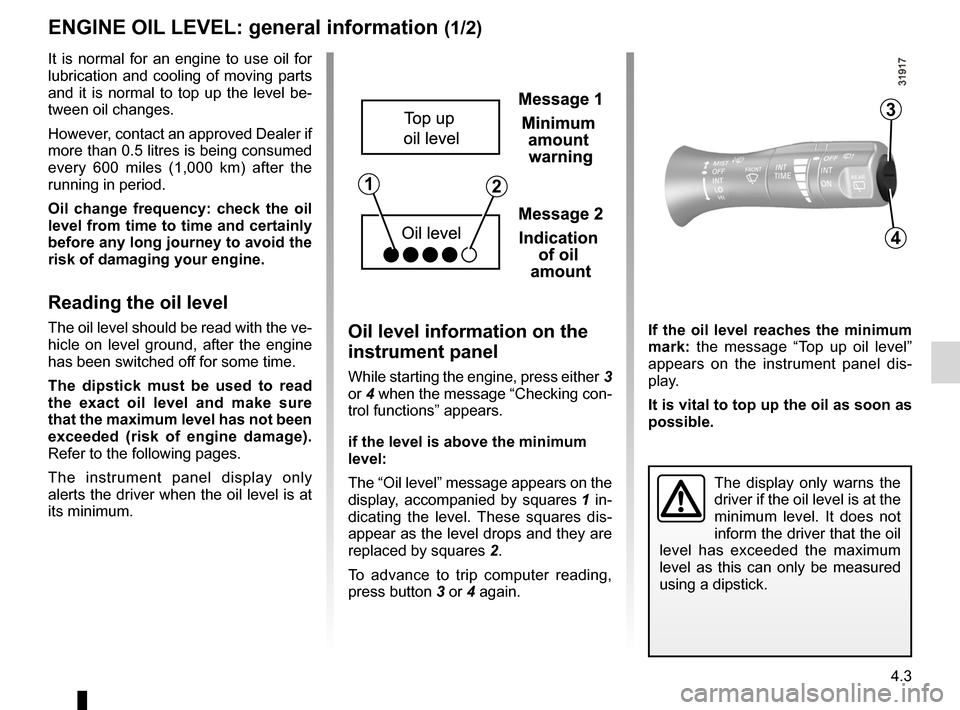
If the oil level reaches the minimum
mark: the message “ Top up oil level ”
appears on the instrument panel dis -
play.
It is vital to top up the oil as soon as
possible.
Engine oil level: general information
enGIne OIL LeVeL: general information (1/2)
The display only warns the
driver if the oil level is at the
minimum level. It does not
inform the driver that the oil
level has exceeded the maximum
level as this can only be measured
using a dipstick.
It is normal for an engine to use oil for
lubrication and cooling of moving parts
and it is normal to top up the level be-
tween oil changes.
However, contact an approved Dealer if
more than 0.5 litres is being consumed
every 600 miles (1,000 km) after the
running in period.
Oil change frequency: check the oil
level from time to time and certainly
before any long journey to avoid the
risk of damaging your engine.
Reading the oil level
The oil level should be read with the ve-
hicle on level ground, after the engine
has been switched off for some time.
t he dipstick must be used to read
the exact oil level and make sure
that the maximum level has not been
exceeded (risk of engine damage).
Refer to the following pages.
The instrument panel display only
alerts the driver when the oil level is at
its minimum.Oil level information on the
instrument panel
While starting the engine, press either 3
or 4 when the message “Checking con-
trol functions” appears.
if the level is above the minimum
level:
The “Oil level ” message appears on the
display, accompanied by squares 1 in -
dicating the level. These squares dis -
appear as the level drops and they are
replaced by squares 2.
To advance to trip computer reading,
press button 3 or 4 again.
12
3
4
Page 162 of 233
engine oil .............................................. (up to the end of the DU)
levels: engine oil ........................................ (up to the end of the DU)
4.4
ENG_UD27282_7
Niveau huile moteur : g n ralit s (X45 - H45 - Renault)
ENG_NU_977-2_H45_Ph2_Renault_4
enGIne OIL LeVeL: general information (2/2)
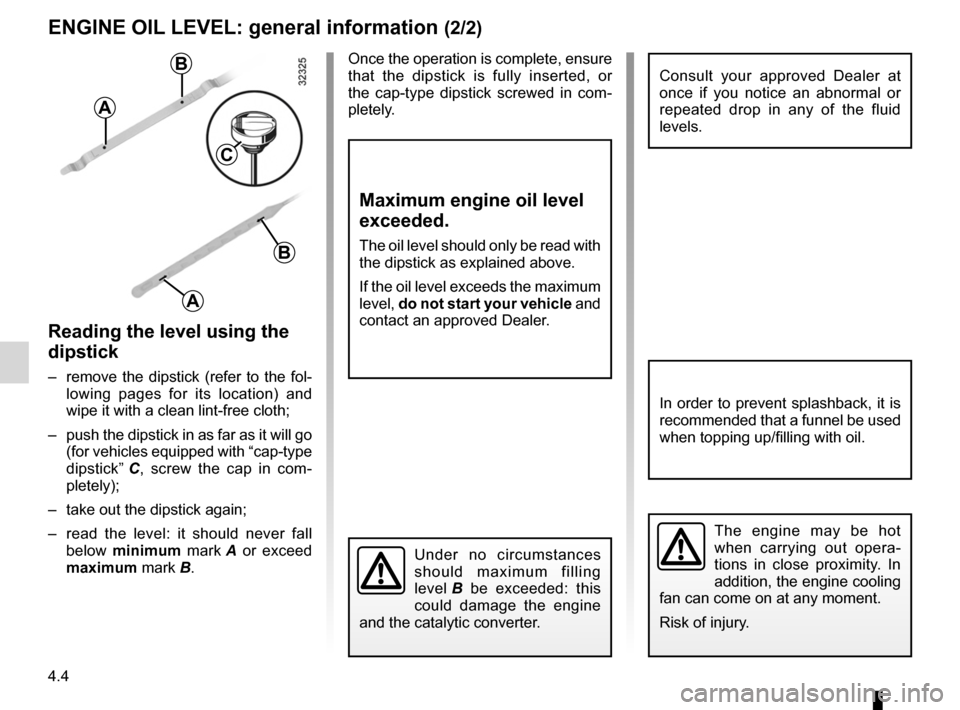
Reading the level using the
dipstick
– remove the dipstick (refer to the fol-
lowing pages for its location) and
wipe it with a clean lint-free cloth;
– push the dipstick in as far as it will go
(for vehicles equipped with “cap-type
dipstick” C , screw the cap in com -
pletely);
– take out the dipstick again;
– read the level: it should never fall
below minimum mark A or exceed
maximum mark B.
Consult your approved Dealer at
once if you notice an abnormal or
repeated drop in any of the fluid
levels.
The engine may be hot
when carrying out opera -
tions in close proximity. In
addition, the engine cooling
fan can come on at any moment.
Risk of injury.
A
B
C
B
A
Under no circumstances
should maximum filling
level B be exceeded: this
could damage the engine
and the catalytic converter.
Maximum engine oil level
exceeded.
The oil level should only be read with
the dipstick as explained above.
If the oil level exceeds the maximum
level, do not start your vehicle and
contact an approved Dealer.
In order to prevent splashback, it is
recommended that a funnel be used
when topping up/filling with oil.
Once the operation is complete, ensure
that the dipstick is fully inserted, or
the cap-type dipstick screwed in com -
pletely.