RENAULT KOLEOS 2018 Owners Manual
Manufacturer: RENAULT, Model Year: 2018, Model line: KOLEOS, Model: RENAULT KOLEOS 2018Pages: 332, PDF Size: 8.91 MB
Page 211 of 332
3.15
Switching air conditioning on
or off
In automatic mode, the system switches
the air conditioning system on or off,
depending on the climate conditions.
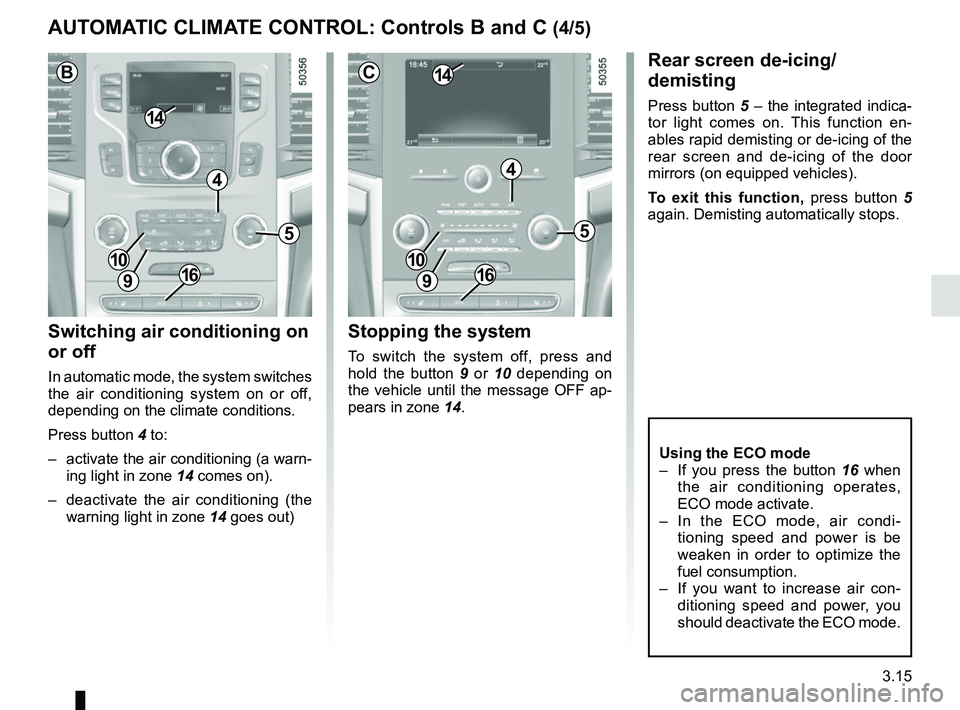
Press button 4 to:
– activate the air conditioning (a warn-ing light in zone 14 comes on).
– deactivate the air conditioning (the warning light in zone 14 goes out)
Rear screen de-icing/
demisting
Press button 5 – the integrated indica-
tor light comes on. This function en-
ables rapid demisting or de-icing of the
rear screen and de-icing of the door
mirrors (on equipped vehicles).
To exit this function, press button 5
again. Demisting automatically stops.
Stopping the system
To switch the system off, press and
hold the button 9 or 10 depending on
the vehicle until the message OFF ap-
pears in zone 14.
AUTOMATIC CLIMATE CONTROL: Controls B and C (4/5)
5
4
9
1410
C
5
4
9
14
B
10
9
10
Using the ECO mode
– If you press the button 16 when
the air conditioning operates,
ECO mode activate.
– In the ECO mode, air condi- tioning speed and power is be
weaken in order to optimize the
fuel consumption.
– If you want to increase air con- ditioning speed and power, you
should deactivate the ECO mode.
1616
Page 212 of 332
3.16
When Ø and ½ are choosed
at the same time, there can be some
drops of dew on the windscreen in
summer and they are recommended to
choose in winter.
½ is designed to
flow a little air for pleasantness.
If you want to demist the windscreen
fast, using Clear view function is rec-
ommended by pressing button 1.
Air recirculation
Depending on the vehicle or country,
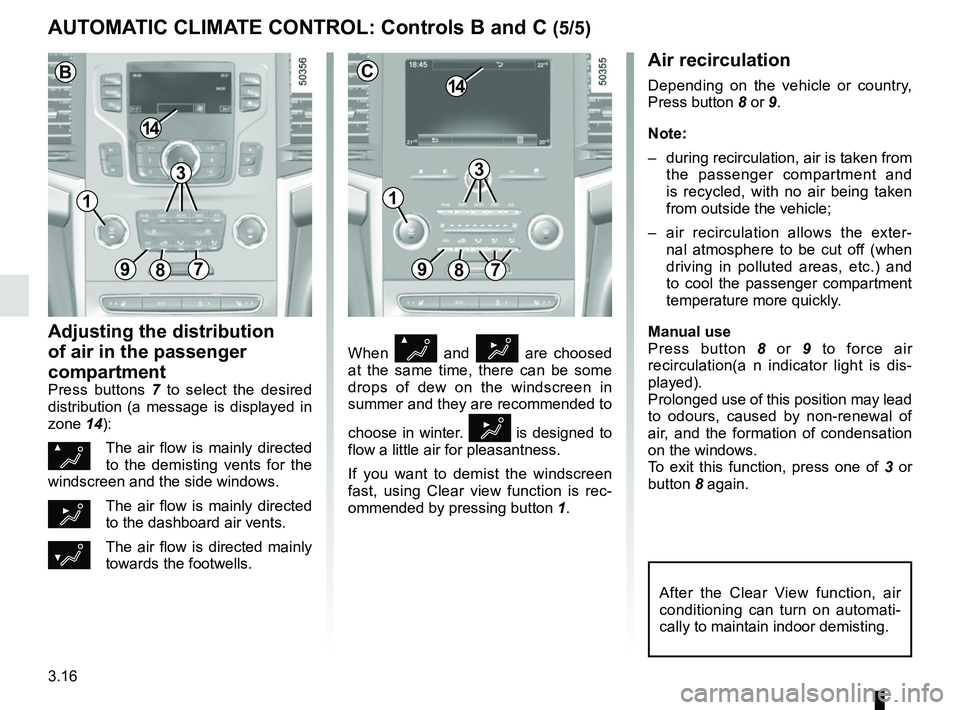
Press button 8 or 9.
Note:
– during recirculation, air is taken from
the passenger compartment and
is recycled, with no air being taken
from outside the vehicle;
– air recirculation allows the exter- nal atmosphere to be cut off (when
driving in polluted areas, etc.) and
to cool the passenger compartment
temperature more quickly.
Manual use
Press button 8 or 9 to force air
recirculation(a n indicator light is dis-
played).
Prolonged use of this position may lead
to odours, caused by non-renewal of
air, and the formation of condensation
on the windows.
To exit this function, press one of 3 or
button 8 again.
Adjusting the distribution
of air in the passenger
compartment
Press buttons 7 to select the desired
distribution (a message is displayed in
zone 14):
ØThe air flow is mainly directed
to the demisting vents for the
windscreen and the side windows.
½The air flow is mainly directed
to the dashboard air vents.
¿The air flow is directed mainly
towards the footwells.
AUTOMATIC CLIMATE CONTROL: Controls B and C (5/5)
89
14
7
C
After the Clear View function, air
conditioning can turn on automati-
cally to maintain indoor demisting.
3
897
14
B
3
11
Page 213 of 332
3.17
Operating faults
As a general rule, contact your ap-
proved dealer in the event of an oper-
ating fault.
– Reduction in de-icing, demisting or air conditioning performance.
This may be caused by the passen-
ger compartment filter cartridge be-
coming clogged.
– No cold air is being produced .
Check that the controls are set cor-
rectly and that the fuses are sound.
Otherwise, switch off the system.
Presence of water under the
vehicle
After prolonged use of the air condi-
tioning system, it is normal for water
to be present under the vehicle. This is
caused by condensation.
AIR CONDITIONING: information and advice on use
Do not open the refriger-
ant fluid circuit. The fluid
may damage eyes or skin.
Fuel consumption
You will normally notice an increase in
fuel consumption (especially in town)
when the air conditioning is operating.
For vehicles fitted with air conditioning
with no automatic mode, switch off the
system when it is not required.
Advice for reducing consumption
and helping to preserve the environ-
ment
Drive with the air vents open and the
windows closed.
If the vehicle has been parked in the
sun, open the doors for a few moments
to let the hot air escape before starting
the engine.
Advice on use
In some situations, (air conditioning
off, air recirculation activated, ventila-
tion speed at zero or low, etc.) you may
notice that condensation starts to form
on the windows and windscreen.
If there is condensation, use the “Clear
View” function to remove it, then use
the air conditioning in automatic mode
to stop it forming again.
Maintenance
Refer to the Maintenance Document
for your vehicle for the inspection fre-
quency.
Do not add anything to the
vehicle’s ventilation circuit
(for example, to remove
bad odours).
There is a risk of damage or of
fire.
Page 214 of 332
3.18
OUTSIDE AIR QUALITY AND DEODORISATION FUNCTION
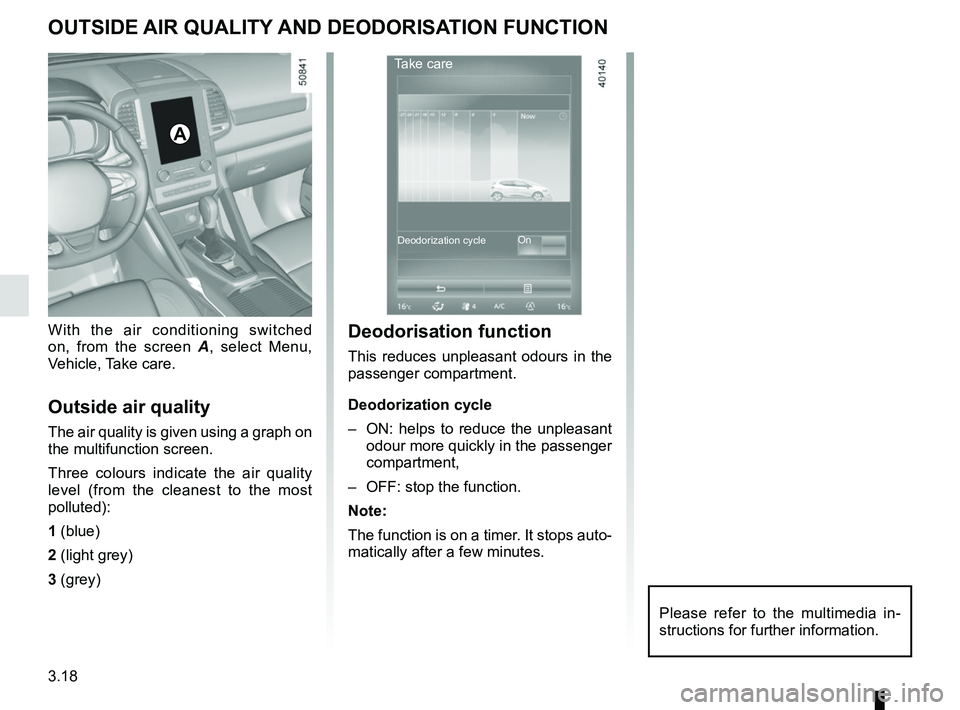
With the air conditioning switched
on, from the screen A, select Menu,
Vehicle, Take care.
Outside air quality
The air quality is given using a graph on
the multifunction screen.
Three colours indicate the air quality
level (from the cleanest to the most
polluted):
1 (blue)
2 (light grey)
3 (grey)
A
Deodorisation function
This reduces unpleasant odours in the
passenger compartment.
Deodorization cycle
– ON: helps to reduce the unpleasant odour more quickly in the passenger
compartment,
– OFF: stop the function.
Note:
The function is on a timer. It stops auto-
matically after a few minutes.
Take care
On
Deodorization cycle
Please refer to the multimedia in-
structions for further information.
Page 215 of 332
3.19
ELECTRIC WINDOWS (1/2)
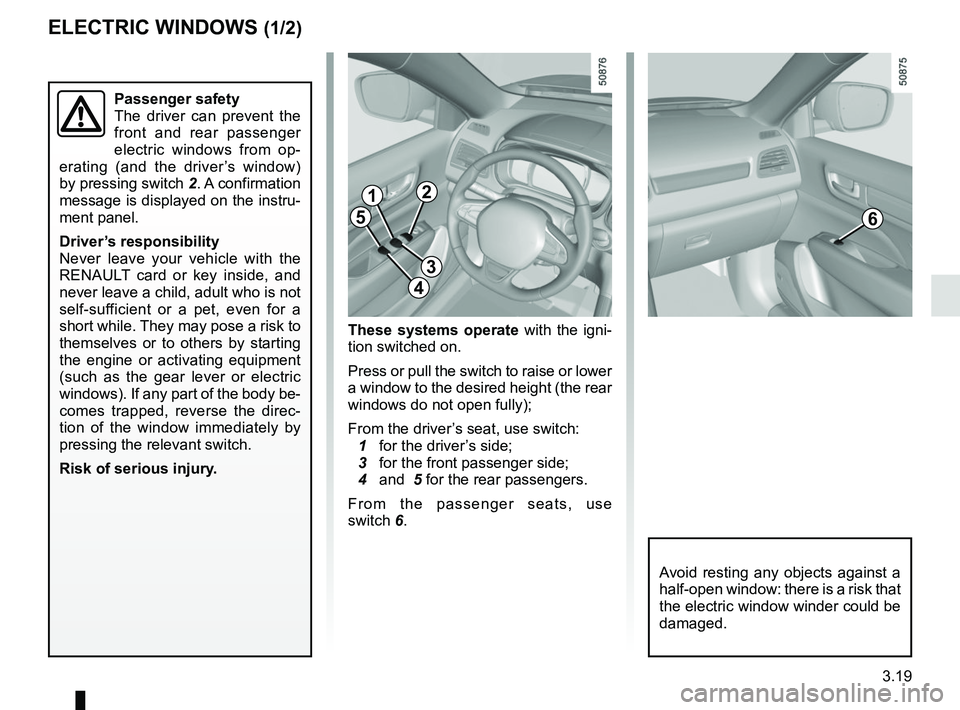
These systems operate with the igni-
tion switched on.
Press or pull the switch to raise or lower
a window to the desired height (the rear
windows do not open fully);
From the driver’s seat, use switch:
1 for the driver’s side;
3 for the front passenger side;
4 and 5 for the rear passengers.
From the passenger seats, use
switch 6.
1
3
4
56
Avoid resting any objects against a
half-open window: there is a risk that
the electric window winder could be
damaged.
Passenger safety
The driver can prevent the
front and rear passenger
electric windows from op-
erating (and the driver’s window)
by pressing switch 2. A confirmation
message is displayed on the instru-
ment panel.
Driver’s responsibility
Never leave your vehicle with the
RENAULT card or key inside, and
never leave a child, adult who is not
self-sufficient or a pet, even for a
short while. They may pose a risk to
themselves or to others by starting
the engine or activating equipment
(such as the gear lever or electric
windows). If any part of the body be-
comes trapped, reverse the direc-
tion of the window immediately by
pressing the relevant switch.
Risk of serious injury.
2
Page 216 of 332
3.20
One-touch mode
Depending on the vehicle, this mode
works in addition to the operation of the
electric windows described previously.
It is only fitted to the driver’s window.
Briefly press or pull switch 1 fully: the
window is fully lowered or raised.
Pressing the switch again stops the
window moving.
Note: if the window detects resistance
when closing (e.g.: branch of a tree,
etc.) it stops and then lowers again by a
few centimetres.
ELECTRIC WINDOWS (2/2)
Operating faults
In case of a fault when closing a window,
the system reverts to normal mode:
pull the switch concerned up as often
as necessary to fully close the window
(the window will close gradually), hold
the switch (still on the closure side) for
one second then lower and raise the
window fully to reinitialise the system.
If necessary, contact your authorised
dealer.
When closing the windows,
ensure that no part of the
body (arm, hand, etc.) is
protruding from the vehicle.
Risk of serious injury.
Page 217 of 332
3.21
ELECTRIC SUNROOF (1/2)
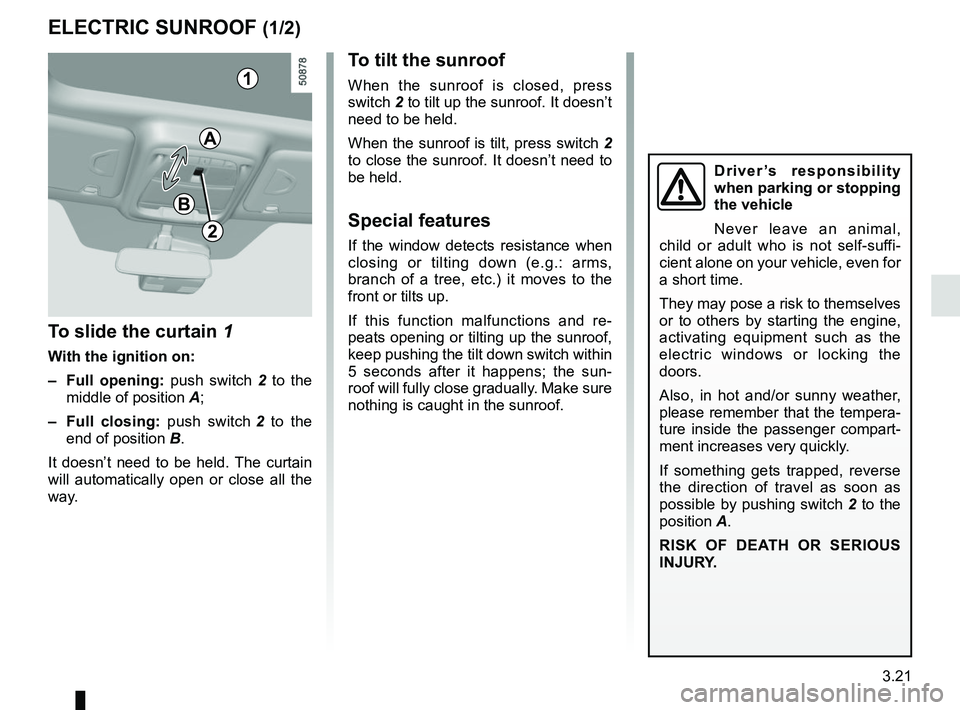
To slide the curtain 1
With the ignition on:
– Full opening: push switch 2 to the
middle of position A;
– Full closing: push switch 2 to the
end of position B.
It doesn’t need to be held. The curtain
will automatically open or close all the
way.
To tilt the sunroof
When the sunroof is closed, press
switch 2 to tilt up the sunroof. It doesn’t
need to be held.
When the sunroof is tilt, press switch 2
to close the sunroof. It doesn’t need to
be held.
Special features
If the window detects resistance when
closing or tilting down (e.g.: arms,
branch of a tree, etc.) it moves to the
front or tilts up.
If this function malfunctions and re-
peats opening or tilting up the sunroof,
keep pushing the tilt down switch within
5 seconds after it happens; the sun-
roof will fully close gradually. Make sure
nothing is caught in the sunroof.
1
2
A
B
Driver’s responsibility
when parking or stopping
the vehicle
Never leave an animal,
child or adult who is not self-suffi-
cient alone on your vehicle, even for
a short time.
They may pose a risk to themselves
or to others by starting the engine,
activating equipment such as the
electric windows or locking the
doors.
Also, in hot and/or sunny weather,
please remember that the tempera-
ture inside the passenger compart-
ment increases very quickly.
If something gets trapped, reverse
the direction of travel as soon as
possible by pushing switch 2 to the
position A.
RISK OF DEATH OR SERIOUS
INJURY.
Page 218 of 332
3.22
ELECTRIC SUNROOF (2/2)
It doesn’t need to be held. The sun-
roof will automatically open or close all
the way. To stop the window, push the
switch once more while it is opening or
closing.
Note: If you wish to open the sunroof
while driving, comfort opening is rec-
ommended to prohibit wind buffeting.
Precautions during use
– Vehicle with loaded roof bars.As a general rule, if there is a load
on the roof, use of the sunroof is not
recommended.
Before using the sunroof, check the
objects and/or accessories (bike
racks, roof boxes, etc.) attached to
the roof bars: they should be prop-
erly arranged and secured and
should not interfere with the opera-
tion of the sunroof.
Contact an approved dealer for de-
tails of possible conversions;
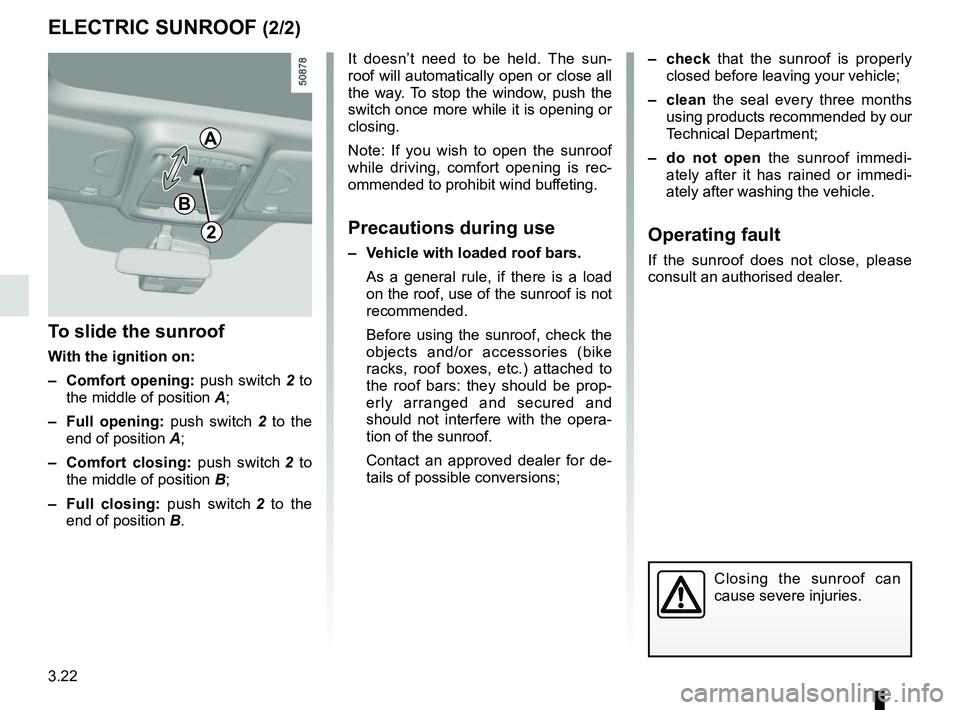
To slide the sunroof
With the ignition on:
– Comfort opening: push switch 2 to
the middle of position A;
– Full opening: push switch 2 to the
end of position A;
– Comfort closing: push switch 2 to
the middle of position B;
– Full closing: push switch 2 to the
end of position B.
2
– check that the sunroof is properly
closed before leaving your vehicle;
– clean the seal every three months using products recommended by our
Technical Department;
– do not open the sunroof immedi-
ately after it has rained or immedi-
ately after washing the vehicle.
Operating fault
If the sunroof does not close, please
consult an authorised dealer.
Closing the sunroof can
cause severe injuries.
A
B
Page 219 of 332
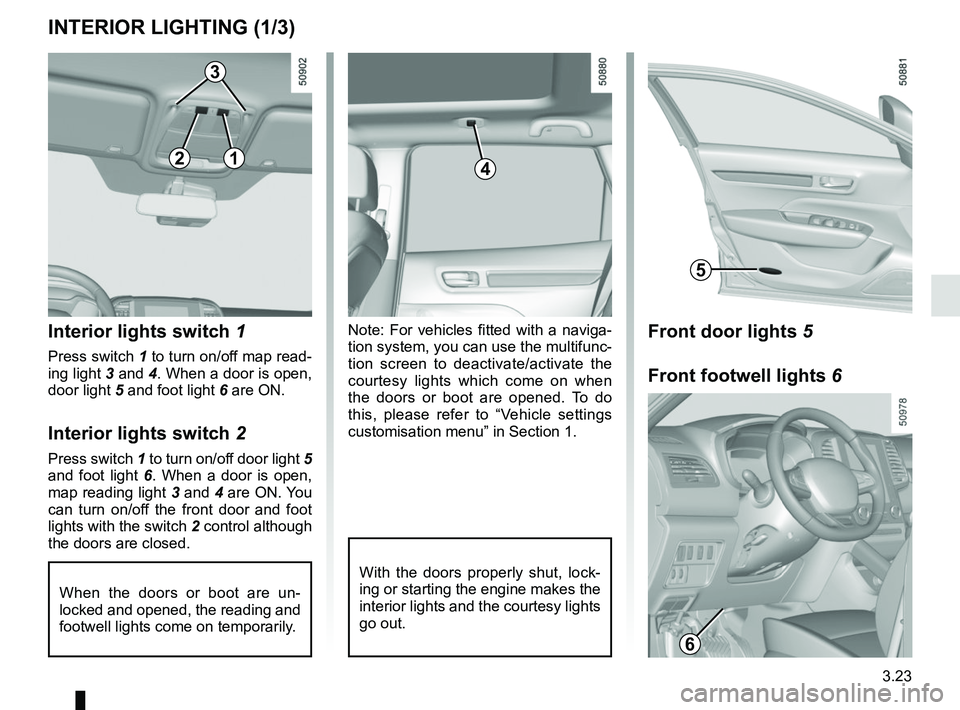
3.23
Note: For vehicles fitted with a naviga-
tion system, you can use the multifunc-
tion screen to deactivate/activate the
courtesy lights which come on when
the doors or boot are opened. To do
this, please refer to “Vehicle settings
customisation menu” in Section 1.Interior lights switch 1
Press switch 1 to turn on/off map read-
ing light 3 and 4. When a door is open,
door light 5 and foot light 6 are ON.
Interior lights switch 2
Press switch 1 to turn on/off door light 5
and foot light 6. When a door is open,
map reading light 3 and 4 are ON. You
can turn on/off the front door and foot
lights with the switch 2 control although
the doors are closed.
When the doors or boot are un-
locked and opened, the reading and
footwell lights come on temporarily.
INTERIOR LIGHTING (1/3)
With the doors properly shut, lock-
ing or starting the engine makes the
interior lights and the courtesy lights
go out.
4
3
5
12
Front door lights 5
Front footwell lights 6
6
Page 220 of 332
3.24
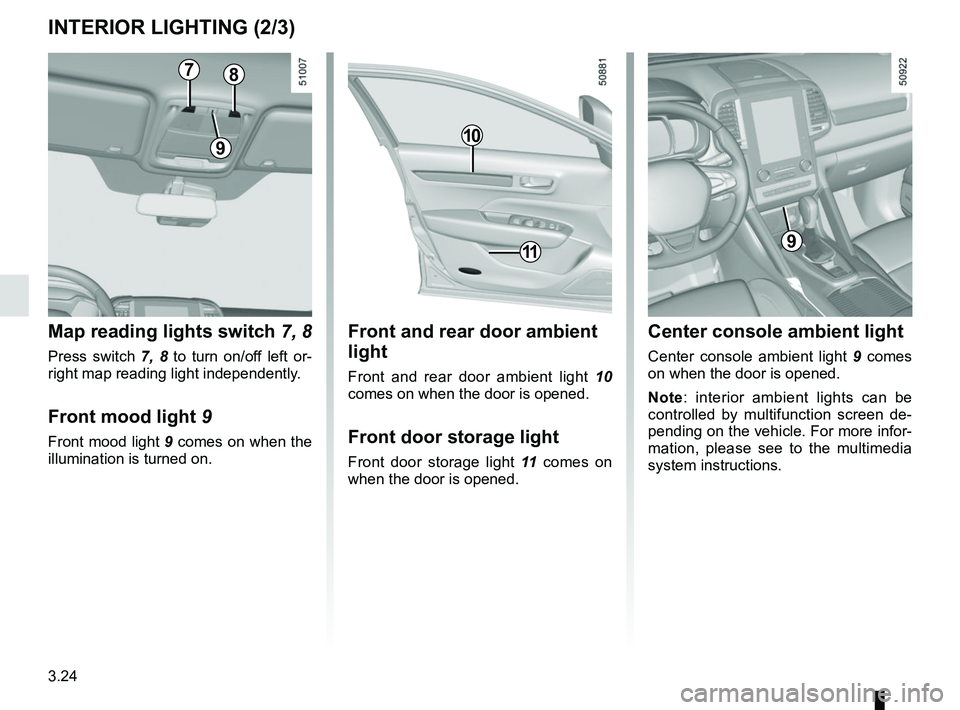
INTERIOR LIGHTING (2/3)
Front and rear door ambient
light
Front and rear door ambient light 10
comes on when the door is opened.
Front door storage light
Front door storage light 11 comes on
when the door is opened.
10
11
Center console ambient light
Center console ambient light 9 comes
on when the door is opened.
Note: interior ambient lights can be
controlled by multifunction screen de-
pending on the vehicle. For more infor-
mation, please see to the multimedia
system instructions.
9
Map reading lights switch 7, 8
Press switch 7, 8 to turn on/off left or-
right map reading light independently.
Front mood light 9
Front mood light 9 comes on when the
illumination is turned on.
9
78