RENAULT LAGUNA TOURER 2012 X91 / 3.G Owner's Manual
Manufacturer: RENAULT, Model Year: 2012, Model line: LAGUNA TOURER, Model: RENAULT LAGUNA TOURER 2012 X91 / 3.GPages: 241, PDF Size: 7.82 MB
Page 21 of 241
RENAULT ANTI-INTRUDER DEVICE (RAID) (up to the end of the DU)
central door locking .............................. (up to the end of the DU)
doors ..................................................... (up to the end of the DU)
locking the doors .................................. (up to the end of the DU)
1.15
ENG_UD23632_3
Condamnation automatique des ouvrants en roulage (X91 - B91 - K91 - Renault)
ENG_NU_936-5_BK91_Renault_1
Automatic locking of opening elements when driving
AUTOmATIc LOcKINg WHEN dRIvINg
Activating/deactivating the
function
Refer to the information on the “Vehicle
settings personalisation menu” in
Section 1; “Automatic locking of the
doors while driving” function:
=: function activated
<: function deactivated.
Operating principle
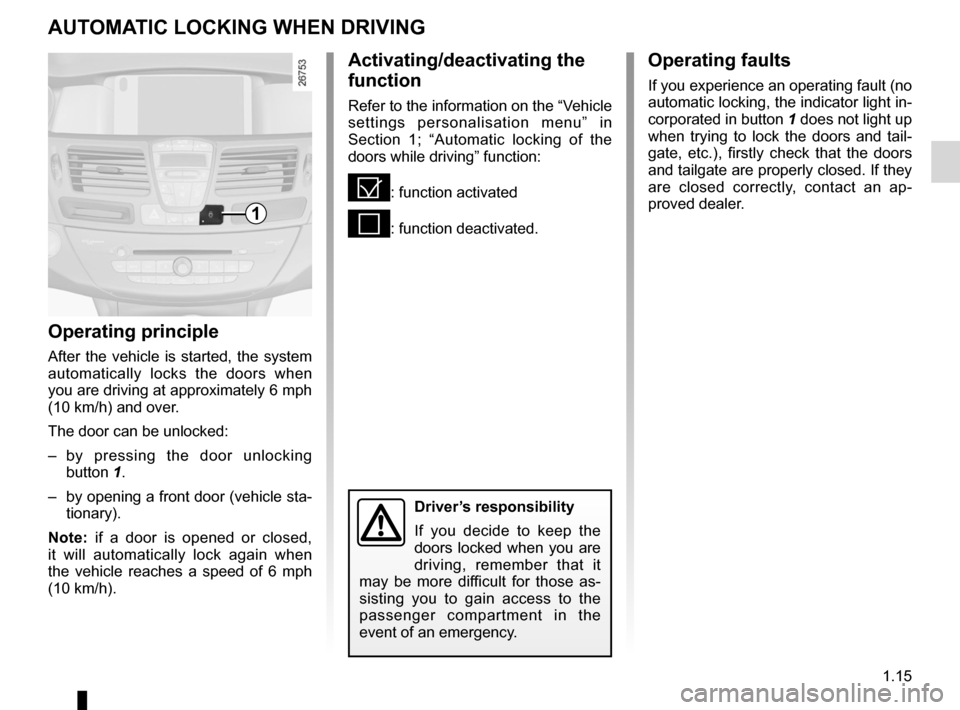
After the vehicle is started, the system
automatically locks the doors when
you are driving at approximately 6 mph
(10 km/h) and over.
The door can be unlocked:
– by pressing the door unlocking
button 1.
– by opening a front door (vehicle sta-
tionary).
Note: if a door is opened or closed,
it will automatically lock again when
the vehicle reaches a speed of 6 mph
(10 km/h).
Operating faults
If you experience an operating fault (no
automatic locking, the indicator light in-
corporated in button 1 does not light up
when trying to lock the doors and tail -
gate, etc.), firstly check that the doors
and tailgate are properly closed. If they
are closed correctly, contact an ap -
proved dealer.
1
driver’s responsibility
If you decide to keep the
doors locked when you are
driving, remember that it
may be more difficult for those as -
sisting you to gain access to the
passenger compartment in the
event of an emergency.
Page 22 of 241
headrest................................................ (up to the end of the DU)
front seats adjustment ...................................... (up to the end of the DU)
adjusting your driving position .............. (up to the end of the DU)
1.16
ENG_UD18801_8
Appuis-tête avant (B74 - K74 - X81 - J81 - X91 - B91 - K91 - D91 - X95 - B95 - D95 - J95 - R95 - Renault)
ENG_NU_936-5_BK91_Renault_1
Headrests - Seats
fRONT HEAdREsTs
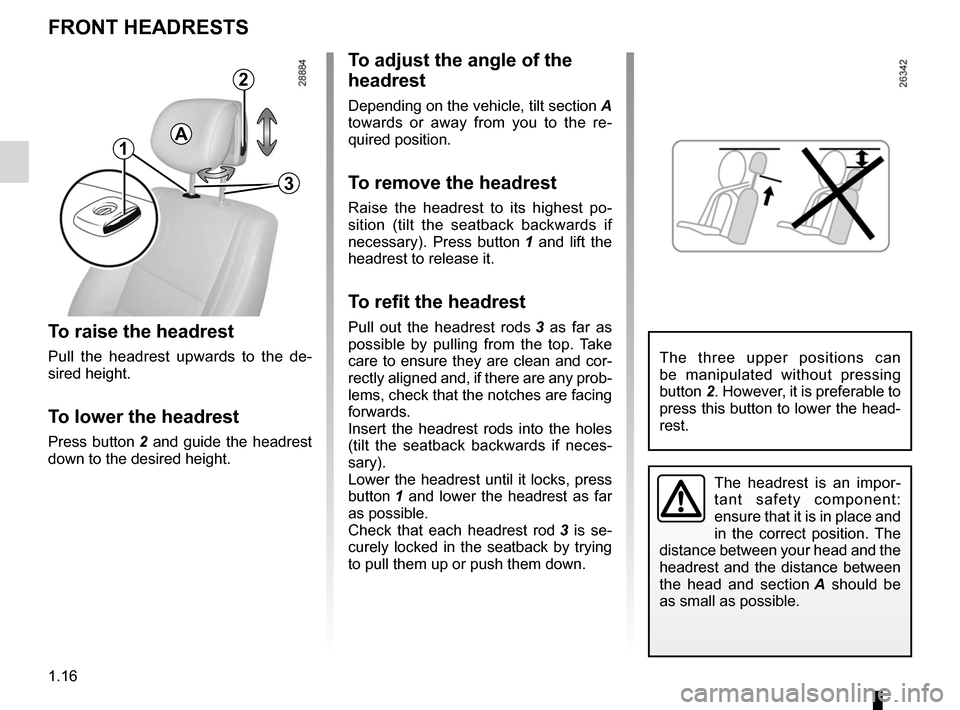
To raise the headrest
Pull the headrest upwards to the de -
sired height.
To lower the headrest
Press button 2 and guide the headrest
down to the desired height.
To adjust the angle of the
headrest
Depending on the vehicle, tilt section A
towards or away from you to the re -
quired position.
To remove the headrest
Raise the headrest to its highest po -
sition (tilt the seatback backwards if
necessary). Press button 1 and lift the
headrest to release it.
To refit the headrest
Pull out the headrest rods 3 as far as
possible by pulling from the top. Take
care to ensure they are clean and cor-
rectly aligned and, if there are any prob-
lems, check that the notches are facing
forwards.
Insert the headrest rods into the holes
(tilt the seatback backwards if neces -
sary).
Lower the headrest until it locks, press
button 1 and lower the headrest as far
as possible.
Check that each headrest rod 3 is se -
curely locked in the seatback by trying
to pull them up or push them down.
The headrest is an impor -
tant safety component:
ensure that it is in place and
in the correct position. The
distance between your head and the
headrest and the distance between
the head and section A should be
as small as possible.
2
3
A1
The three upper positions can
be manipulated without pressing
button 2. However, it is preferable to
press this button to lower the head-
rest.
Page 23 of 241
front seat adjustment ............................(up to the end of the DU)
front seats adjustment ...................................... (up to the end of the DU)
front seats with manual controls ........................................ (current page)
1.17
ENG_UD27623_3
Sièges avant à commandes manuelles (X91 - B91 - K91 - Renault)
ENG_NU_936-5_BK91_Renault_1
fRONT sEATs WITH mANUAL cONTROL
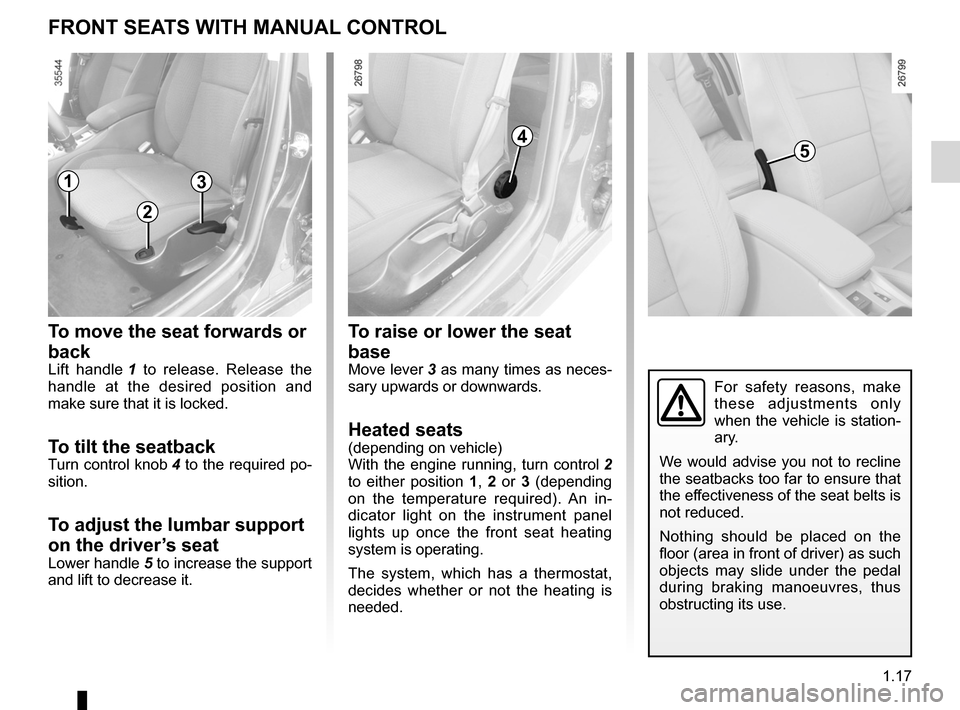
To move the seat forwards or
back
Lift handle 1 to release. Release the
handle at the desired position and
make sure that it is locked.
To tilt the seatbackTurn control knob 4 to the required po-
sition.
To adjust the lumbar support
on the driver’s seat
Lower handle 5 to increase the support
and lift to decrease it.
To raise or lower the seat
base
Move lever 3 as many times as neces-
sary upwards or downwards.
Heated seats(depending on vehicle)
With the engine running, turn control 2
to either position 1, 2 or 3 (depending
on the temperature required). An in -
dicator light on the instrument panel
lights up once the front seat heating
system is operating.
The system, which has a thermostat,
decides whether or not the heating is
needed.
For safety reasons, make
these adjustments only
when the vehicle is station-
ary.
We would advise you not to recline
the seatbacks too far to ensure that
the effectiveness of the seat belts is
not reduced.
Nothing should be placed on the
floor (area in front of driver) as such
objects may slide under the pedal
during braking manoeuvres, thus
obstructing its use.
45
1
2
3
Page 24 of 241
front seatswith electric controls ........................................ (current page)
1.18
ENG_UD6500_2
Sièges avant à à commandes électriques (X91 - B91 - K91 - Renault)
ENG_NU_936-5_BK91_Renault_1
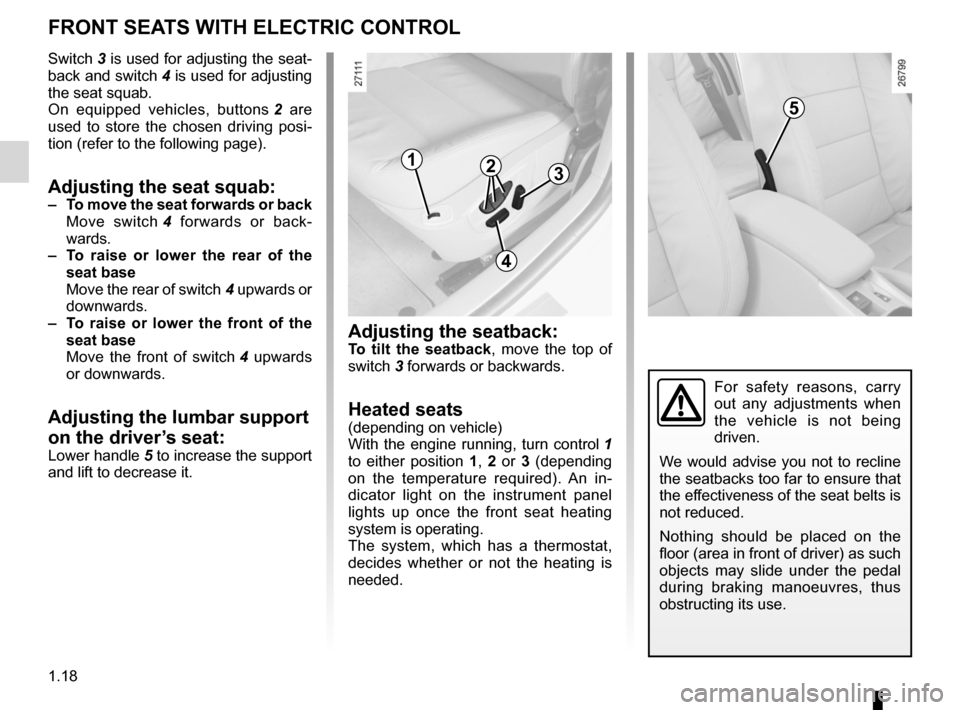
Switch 3 is used for adjusting the seat-
back and switch 4 is used for adjusting
the seat squab.
On equipped vehicles, buttons 2 are
used to store the chosen driving posi -
tion (refer to the following page).
Adjusting the seat squab:– To move the seat forwards or back
Move switch 4 forwards or back -
wards.
– To raise or lower the rear of the
seat base
Move the rear of switch 4 upwards or
downwards.
– To raise or lower the front of the
seat base
Move the front of switch 4 upwards
or downwards.
Adjusting the lumbar support
on the driver’s seat:
Lower handle 5 to increase the support
and lift to decrease it.
Adjusting the seatback:To tilt the seatback , move the top of
switch 3 forwards or backwards.
Heated seats(depending on vehicle)
With the engine running, turn control 1
to either position 1, 2 or 3 (depending
on the temperature required). An in -
dicator light on the instrument panel
lights up once the front seat heating
system is operating.
The system, which has a thermostat,
decides whether or not the heating is
needed.
fRONT sEATs WITH ELEcTRIc cONTROL
1
4
32
5
For safety reasons, carry
out any adjustments when
the vehicle is not being
driven.
We would advise you not to recline
the seatbacks too far to ensure that
the effectiveness of the seat belts is
not reduced.
Nothing should be placed on the
floor (area in front of driver) as such
objects may slide under the pedal
during braking manoeuvres, thus
obstructing its use.
Page 25 of 241
front seatdriver’s position memory .................................. (current page)
1.19
ENG_UD10351_4
Mémorisation du siège conducteur (X91 - B91 - K91 - Renault)
ENG_NU_936-5_BK91_Renault_1
dRIvER’s sEAT WITH pOsITION mEmORY
It is possible to store three driving po-
sitions.
A driving position includes the settings
for the driver’s seat base and seatback
and the door mirrors.
Operation
The storage of the driving position and
the recall of the driving position by
pressing the buttons are possible:
– with the “hands-free” card de -
tected or, depending on the vehicle,
RENAULT card in the card reader;
– when the driver’s door is opened.
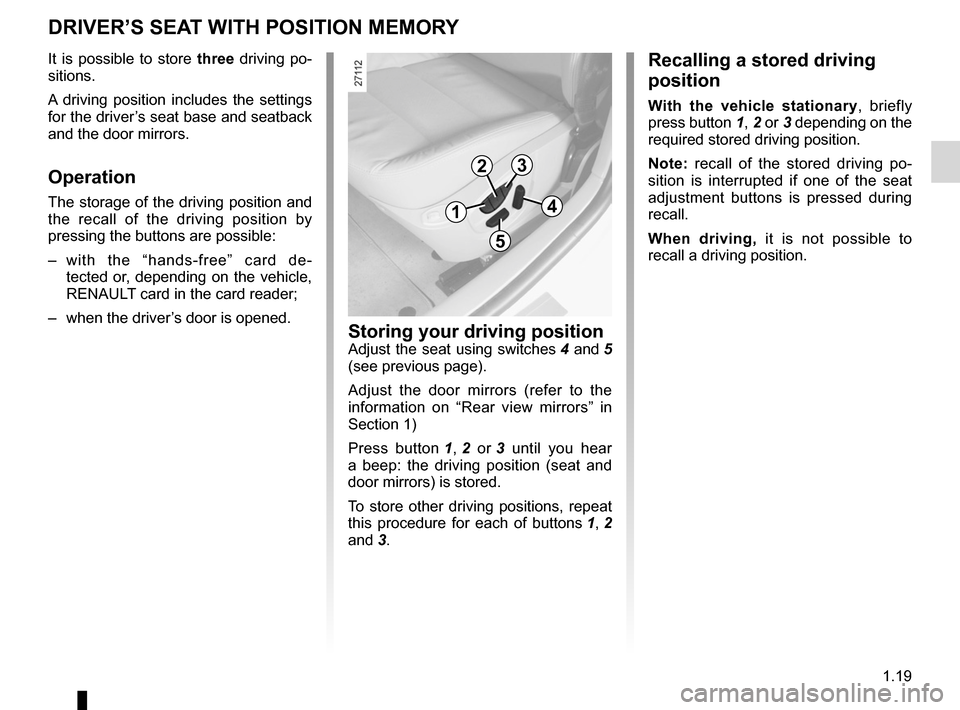
storing your driving positionAdjust the seat using switches 4 and 5
(see previous page).
Adjust the door mirrors (refer to the
information on “Rear view mirrors” in
Section 1)
Press button 1 , 2 or 3 until you hear
a beep: the driving position (seat and
door mirrors) is stored.
To store other driving positions, repeat
this procedure for each of buttons 1, 2
and 3.
Recalling a stored driving
position
With the vehicle stationary , briefly
press button 1, 2 or 3 depending on the
required stored driving position.
Note: recall of the stored driving po -
sition is interrupted if one of the seat
adjustment buttons is pressed during
recall.
When driving, it is not possible to
recall a driving position.
1
23
4
5
Page 26 of 241
seat belts .............................................. (up to the end of the DU)
adjusting your driving position ............................... (current page)
driving position settings ............................................................ (current page)
1.20
ENG_UD25510_2
Ceintures de sécurité (X91 - B91 - K91 - Renault)
ENG_NU_936-5_BK91_Renault_1
Jaune NoirNoir texte
Seat belts
Always wear your seat belt when trav-
elling in your vehicle. You must also
comply with the legislation of the par -
ticular country you are in. Before starting, first adjust your driv-
ing position, then ask all occupants
to adjust their seat belts to ensure
optimum protection.
Adjusting your driving
position
– s
it well back in your seat (having
first removed your coat or jacket).
This is essential to ensure your back
is positioned correctly;
– adjust the distance between the
seat and the pedals. Your seat
should be as far back as possible
while still allowing you to depress
the clutch pedal fully. The seatback
should be adjusted so that your arms
are slightly bent when you hold the
steering wheel;
– adjust the position of your head -
rest. For the maximum safety, your
head must be as close as possible to
the headrest;
– adjust the height of the seat. This
adjustment allows you to select the
seat position which offers you the
best possible view;
– adjust the position of the steering
wheel.
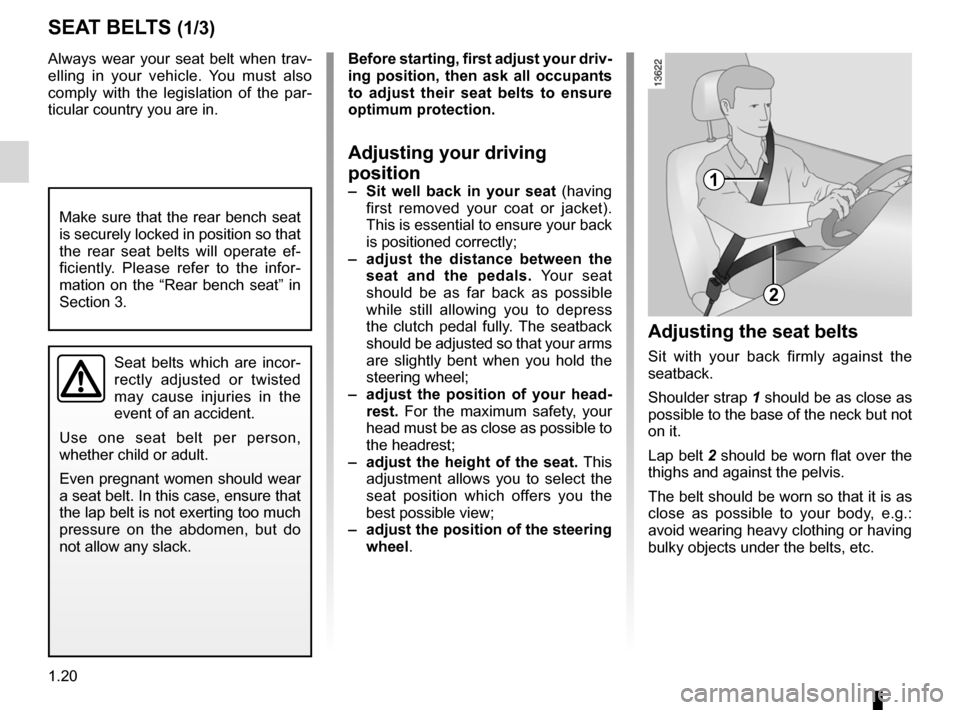
Adjusting the seat belts
Sit with your back firmly against the
seatback.
Shoulder strap 1 should be as close as
possible to the base of the neck but not
on it.
Lap belt 2 should be worn flat over the
thighs and against the pelvis.
The belt should be worn so that it is as
close as possible to your body, e.g.:
avoid wearing heavy clothing or having
bulky objects under the belts, etc.
sEAT BELTs (1/3)
Make sure that the rear bench seat
is securely locked in position so that
the rear seat belts will operate ef -
ficiently. Please refer to the infor -
mation on the “Rear bench seat” in
Section 3.
Seat belts which are incor -
rectly adjusted or twisted
may cause injuries in the
event of an accident.
Use one seat belt per person,
whether child or adult.
Even pregnant women should wear
a seat belt. In this case, ensure that
the lap belt is not exerting too much
pressure on the abdomen, but do
not allow any slack.
1
2
Page 27 of 241
JauneNoirNoir texte
1.21
ENG_UD25510_2
Ceintures de sécurité (X91 - B91 - K91 - Renault)
ENG_NU_936-5_BK91_Renault_1
™f ront seat belt reminder
warning light
This comes on when the engine is
started, then, if the driver’s or front pas-
senger ’s seat belt is not fastened (if
this seat is occupied) and the vehicle
has reached approximately 12 mph (20
km/h), it flashes and a beep sounds for
around 2 minutes.
Note: an object placed on the passen-
ger seat base may activate the warning
light in some cases.
Rear seat belt reminder
The number of rear seat belts fastened
appears on instrument panel for ap -
proximately 30 seconds each time:
– the vehicle is started;
– a door is opened;
– a rear seat belt is fastened or unfas-
tened.
Check that the rear passengers are
wearing seat belts and that the number
of seat belt shown as fastened corre -
sponds to the number of rear bench
seats occupied.
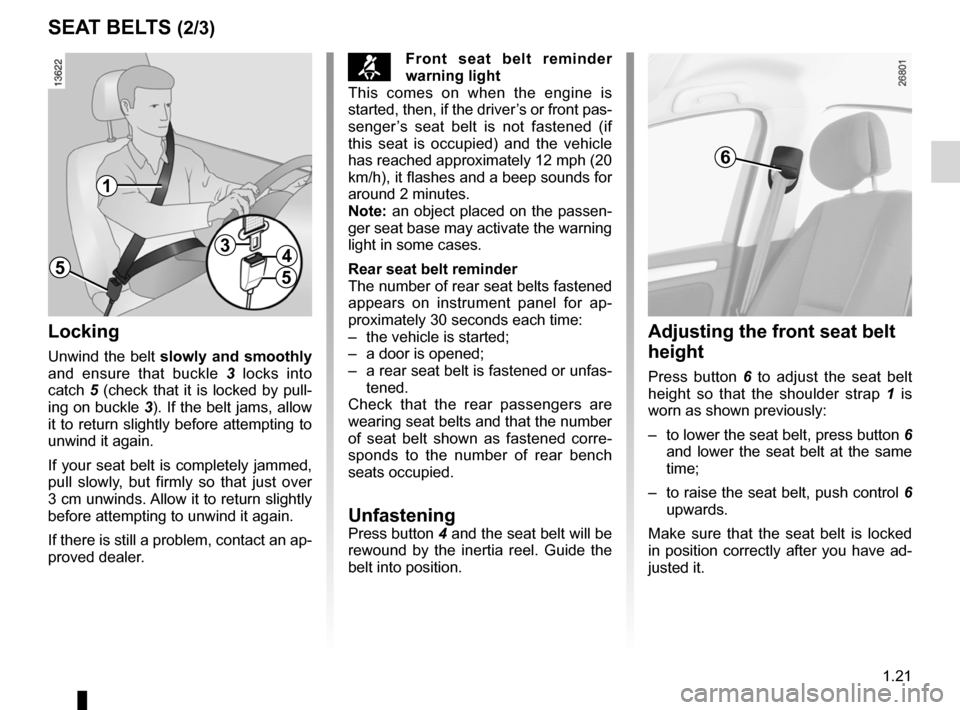
UnfasteningPress button 4 and the seat belt will be
rewound by the inertia reel. Guide the
belt into position.
sEAT BELTs (2/3)
Adjusting the front seat belt
height
Press button 6 to adjust the seat belt
height so that the shoulder strap 1 is
worn as shown previously:
– to lower the seat belt, press button 6
and lower the seat belt at the same
time;
– to raise the seat belt, push control 6
upwards.
Make sure that the seat belt is locked
in position correctly after you have ad-
justed it.
Locking
Unwind the belt slowly and smoothly
and ensure that buckle 3 locks into
catch 5 (check that it is locked by pull -
ing on buckle 3). If the belt jams, allow
it to return slightly before attempting to
unwind it again.
If your seat belt is completely jammed,
pull slowly, but firmly so that just over
3 cm unwinds. Allow it to return slightly
before attempting to unwind it again.
If there is still a problem, contact an ap-
proved dealer.
1
5
34
5
6
Page 28 of 241
1.22
ENG_UD25510_2
Ceintures de sécurité (X91 - B91 - K91 - Renault)
ENG_NU_936-5_BK91_Renault_1
sEAT BELTs (3/3)
The following information applies to the vehicle’s front and rear seat belts.
– No modification may be made to the component parts of the originally fitted restraint system: belts, seats and their
mountings.
– For special operations (e.g.: fitting child seats) contact an appro ved Dealer.
– Do not use devices which allow any slack in the belts (e.g. clothes pegs, clips, etc.): a seat belt which is worn too loosely
may cause injury in the event of an accident.
– Never wear the shoulder strap under your arm or behind your back.
– Never use the same belt for more than one person and never hold a baby or child on your lap with your seat belt around
them.
– The belt should never be twisted.
– Following an accident, have the seat belts checked and replaced if necessary. Always replace your seat belts as soon as
they show any signs of wear.
– When putting back the rear bench seat, take care that the seat belts are correctly positioned so that they can be used prop-
erly.
– Make sure that the seat belt buckle is inserted into the appropriate catch.
– Make sure the seat belt catch is properly positioned (it should not be hidden away, crushed or flattened by people or ob-
jects).
Page 29 of 241
seat belts .............................................. (up to the end of the DU)
additional methods of restraint ............. (up to the end of the DU)
additional methods of restraint to the rear seat belts .......................(up to the end of the DU)
air bag ................................................... (up to the end of the DU)
1.23
ENG_UD25511_2
Dispositifs complémentaires à la ceinture avant (X91 - B91 - K91 - Renault)
ENG_NU_936-5_BK91_Renault_1
Additional methods of restraint:
to the front seat belts
mETHOds Of REsTRAINT IN AddITION TO THE fRONT sEAT BELTs (1/4)
Depending on the vehicle, they are
composed of:
– seat belt inertia reel pretension -
ers;
– lap belt pretensioners;
– chest-level load limiters;
– air bags for driver and front pas -
senger.
These systems are designed to act in-
dependently or together when the vehi-
cle is subjected to a frontal impact.
Depending on the severity of the
impact, the system can trigger:
– seat belt locking;
– the seat belt inertia reel pretensioner
(which engages to correct seat belt
slack);
– the lap seat belt pretensioners to
hold the occupant in his seat;
– the low volume front air bag;
– the large volume front air bag.
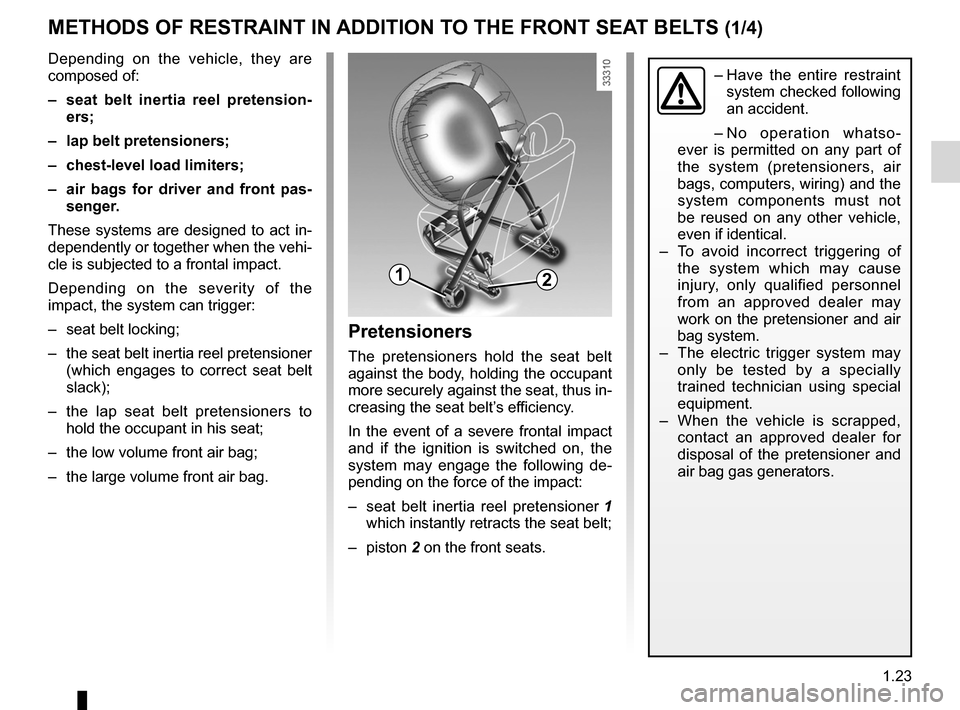
pretensioners
The pretensioners hold the seat belt
against the body, holding the occupant
more securely against the seat, thus in-
creasing the seat belt’s efficiency.
In the event of a severe frontal impact
and if the ignition is switched on, the
system may engage the following de -
pending on the force of the impact:
– seat belt inertia reel pretensioner 1
which instantly retracts the seat belt;
– piston 2 on the front seats.
– Have the entire restraint
system checked following
an accident.
– No operation whatso -
ever is permitted on any part of
the system (pretensioners, air
bags, computers, wiring) and the
system components must not
be reused on any other vehicle,
even if identical.
– To avoid incorrect triggering of
the system which may cause
injury, only qualified personnel
from an approved dealer may
work on the pretensioner and air
bag system.
– The electric trigger system may
only be tested by a specially
trained technician using special
equipment.
– When the vehicle is scrapped,
contact an approved dealer for
disposal of the pretensioner and
air bag gas generators.
12
Page 30 of 241
1.24
ENG_UD25511_2
Dispositifs complémentaires à la ceinture avant (X91 - B91 - K91 - Renault)
ENG_NU_936-5_BK91_Renault_1
Jaune NoirNoir texte
mETHOds Of REsTRAINT IN AddITION TO THE fRONT sEAT BELTs (2/4)
Load limiter
Above a certain severity of impact, this
mechanism is used to limit the force of
the belt against the body so that it is at
an acceptable level.
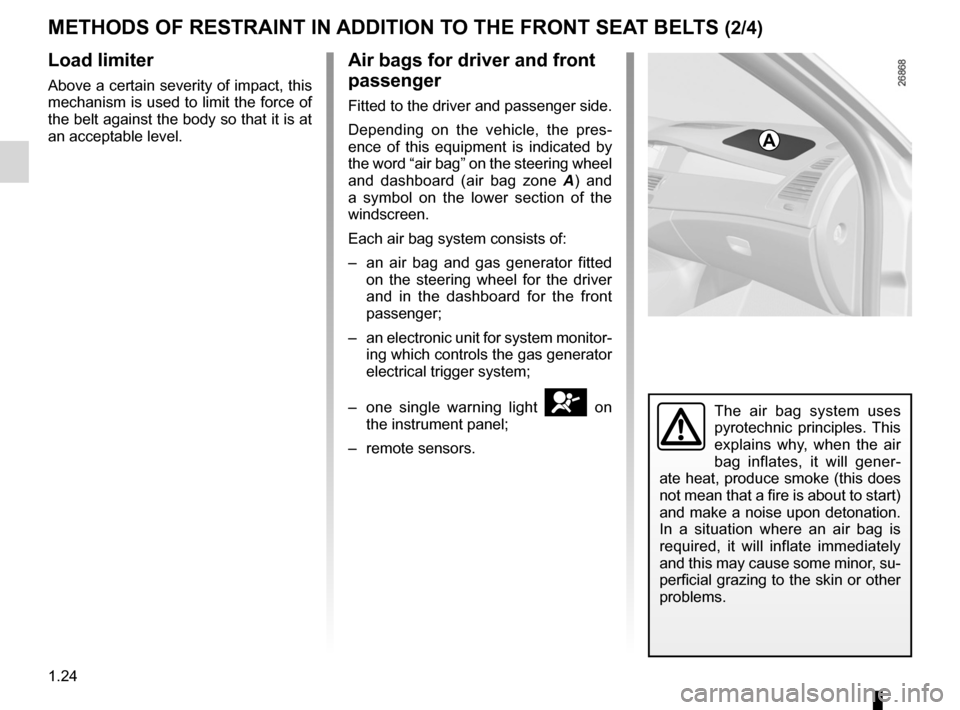
Air bags for driver and front
passenger
Fitted to the driver and passenger side.
Depending on the vehicle, the pres -
ence of this equipment is indicated by
the word “air bag” on the steering wheel
and dashboard (air bag zone A ) and
a symbol on the lower section of the
windscreen.
Each air bag system consists of:
– an air bag and gas generator fitted
on the steering wheel for the driver
and in the dashboard for the front
passenger;
– an electronic unit for system monitor-
ing which controls the gas generator
electrical trigger system;
– one single warning light
å on
the instrument panel;
– remote sensors.The air bag system uses
pyrotechnic principles. This
explains why, when the air
bag inflates, it will gener -
ate heat, produce smoke (this does
not mean that a fire is about to start)
and make a noise upon detonation.
In a situation where an air bag is
required, it will inflate immediately
and this may cause some minor, su-
perficial grazing to the skin or other
problems.
A