RENAULT MASTER 2018 Owners Manual
Manufacturer: RENAULT, Model Year: 2018, Model line: MASTER, Model: RENAULT MASTER 2018Pages: 290, PDF Size: 7.1 MB
Page 161 of 290
2.45
SEQUENTIAL GEARBOX (1/5)
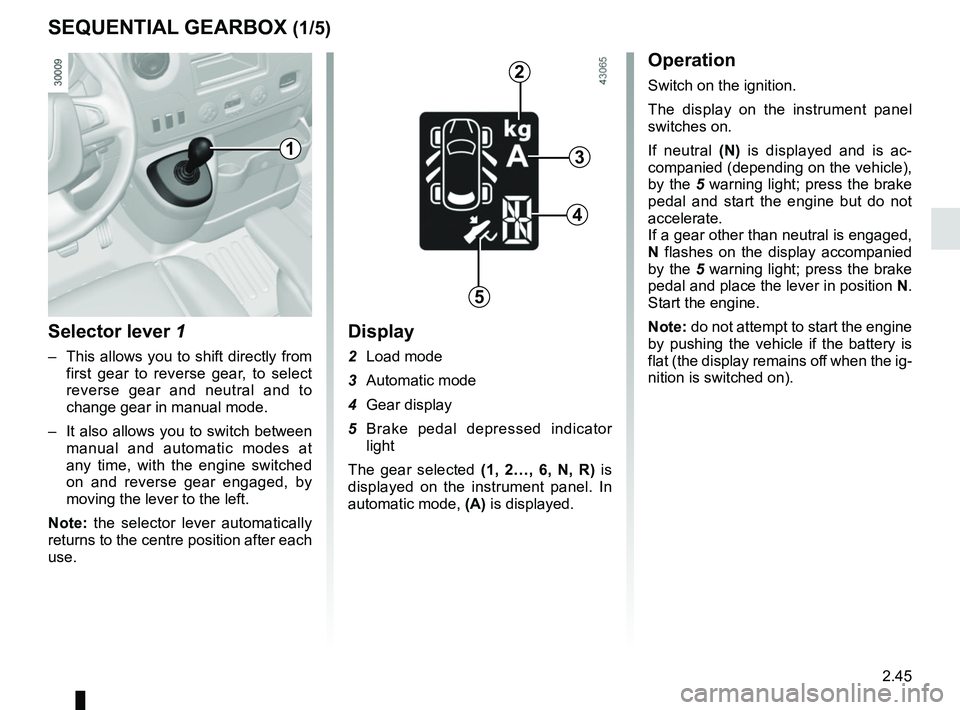
Selector lever 1
– This allows you to shift directly from first gear to reverse gear, to select
reverse gear and neutral and to
change gear in manual mode.
– It also allows you to switch between manual and automatic modes at
any time, with the engine switched
on and reverse gear engaged, by
moving the lever to the left.
Note: the selector lever automatically
returns to the centre position after each
use.
Display
2 Load mode
3 Automatic mode
4 Gear display
5 Brake pedal depressed indicator light
The gear selected (1, 2…, 6, N, R) is
displayed on the instrument panel. In
automatic mode, (A) is displayed.
Operation
Switch on the ignition.
The display on the instrument panel
switches on.
If neutral (N) is displayed and is ac-
companied (depending on the vehicle),
by the 5 warning light; press the brake
pedal and start the engine but do not
accelerate.
If a gear other than neutral is engaged,
N flashes on the display accompanied
by the 5 warning light; press the brake
pedal and place the lever in position N.
Start the engine.
Note: do not attempt to start the engine
by pushing the vehicle if the battery is
flat (the display remains off when the ig-
nition is switched on).
1
2
3
4
5
Page 162 of 290
2.46
Reverse gear (vehicle stationary)
– Brake pedal depressed. Push the
selector lever towards the right and
to the rear as shown on the base
of the lever, and then release it.
Reverse gear is engaged and the
letter R appears on the display.
– Release the brake pedal: – the engine’s idle speed is suffi-
cient for parking manoeuvres;
– accelerate gently to reverse.
You may shift from reverse gear to a
forwards gear by pushing the lever for-
wards once the vehicle is stationary.
Note: When the vehicle is stationary,
you must depress the brake pedal to
engage or disengage a gear. Otherwise,
warning light 5 will come on.
SEQUENTIAL GEARBOX (2/5)
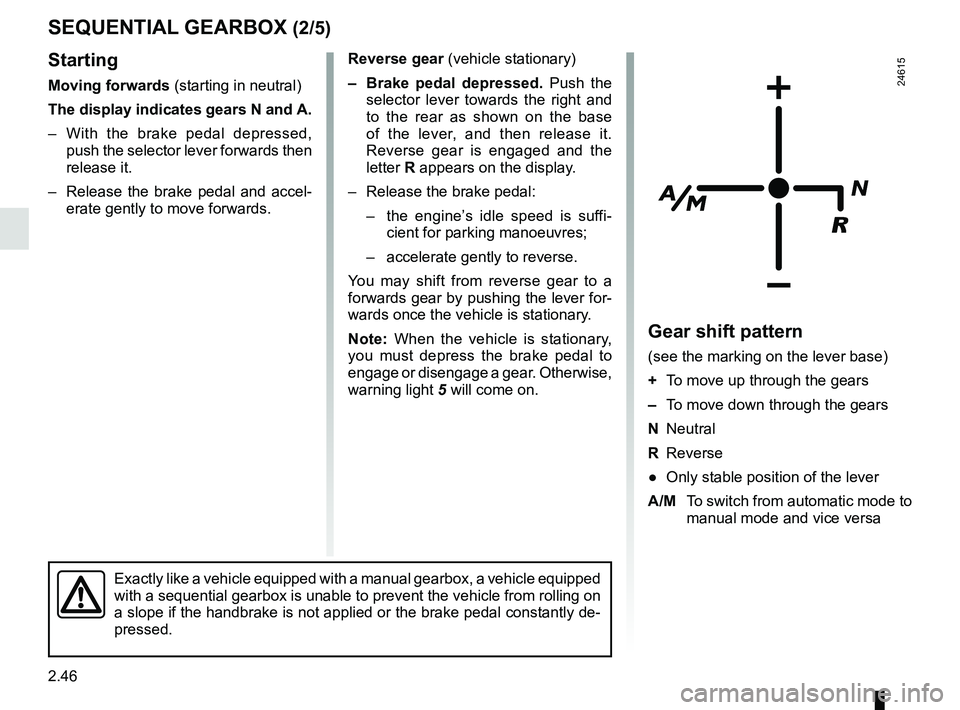
Gear shift pattern
(see the marking on the lever base)
+ To move up through the gears
– To move down through the gears
N Neutral
R Reverse
● Only stable position of the lever
A/M To switch from automatic mode to
manual mode and vice versa
24615
Exactly like a vehicle equipped with a manual gearbox, a vehicle equippe\
d
with a sequential gearbox is unable to prevent the vehicle from rolling \
on
a slope if the handbrake is not applied or the brake pedal constantly de\
-
pressed.
Starting
Moving forwards (starting in neutral)
The display indicates gears N and A.
– With the brake pedal depressed, push the selector lever forwards then
release it.
– Release the brake pedal and accel- erate gently to move forwards.
Page 163 of 290
2.47
SEQUENTIAL GEARBOX (3/5)
Operation in semiautomatic
mode (manual)
This mode can be activated at any time
when driving by pushing the lever to the
left. The mode is switched without shift-
ing up a gear.
You can initiate gear changes using the
selector lever.
To shift up a gear, push the selector
lever forwards; the accelerator pedal
does not have to be lifted.
To shift down a gear, push the selector
lever backwards; the accelerator pedal
does not have to be lifted. The system will not tolerate a series
of up or down changes that cause the
engine to underrev or overrev.
By pushing the lever forwards twice
you can move up two gears at a time
(except if underrevving). By pushing
the lever backwards twice you can
move down two gears at a time (unless
this causes overrevving).
When decelerating with the foot off
the pedal, the gears will automatically
drop to the low engine speed limit to
avoid stalling. First gear automatically
shifts below a certain speed limit. You
can stop the vehicle at red lights or
junctions etc. by depressing the brake
pedal; there is no need to change to
neutral (N).
The vehicle will move off again:
– either slowly, if you release the brake
without accelerating (e.g. when in a
traffic jam);
– or quickly, if you release the brake and accelerate.
Note: neutral may only be selected
when the vehicle is being driven or is
stationary when the brake pedal is
depressed (if you forget, warning
light 5 will come on) .
Push the gear selector lever to the right
to engage neutral.
If the engine speed is too high or too
low, the system will choose the opti-
mum gear.
Semiautomatic mode can be deacti-
vated and reactivated at any time when
the engine is running by pushing the
lever to the left.
Page 164 of 290
2.48
SEQUENTIAL GEARBOX (4/5)
Operation in automatic mode
Automatic mode is selected by default
every time the ignition is switched on.
The letter A appears on the display.
The vehicle is controlled using the ac-
celerator and the brake. Gears will
change automatically at the correct
moment and at a suitable engine speed
because the automatic mode takes the
road surface and the chosen driving
style into consideration.
Gears may be shifted manually in this
mode. Pushing the lever forwards
or backwards shifts a gear upwards
(except if there is a risk of underrev-
ving) or downwards (except if there is a
risk of overrevving).
Note: automatic mode takes account
of:
– the position and speed of depression of the accelerator pedal to assess
driving style and select the optimum
gear;
– action on the brake pedal, to com- mence engine braking in preparation
for a downshift.
You can stop the vehicle at red lights,
with the gear engaged, by depressing
the brake pedal; there is no need to
change to neutral (N).
The vehicle will move off again:
– either slowly, if you release the brake without accelerating (e.g. when in a
traffic jam);
– or quickly, if you release the brake and accelerate.
Accelerating and overtaking
– Slowly depress the accelerator pedal to accelerate gradually;
The oil level in the automatic gear-
box system reservoir varies depend-
ing on use. Adding oil is strictly
forbidden (except by qualified ap-
proved network personnel).
– to obtain maximum vehicle per-
formance regardless of the mode
selected (automatic or manual),
quickly depress the accelerator
pedal beyond the kickdown point.
The speed with which you depress the
pedal will allow you to downshift ac-
cording to the vehicle’s capabilities.
Parking the vehicle
It is possible to park in gear (for exam-
ple, on a slope):
– with the ignition on, select a gear with your foot on the brake ;
– check that a gear other than N is dis- played on the instrument panel, then
remove the ignition key;
– apply the handbrake.
To disengage the gear, switch on the
ignition without starting the engine and
shift the selector lever to neutral with
the brake pedal depressed . Check
that N is displayed on the instrument
panel.
Page 165 of 290
2.49
SEQUENTIAL GEARBOX (5/5)
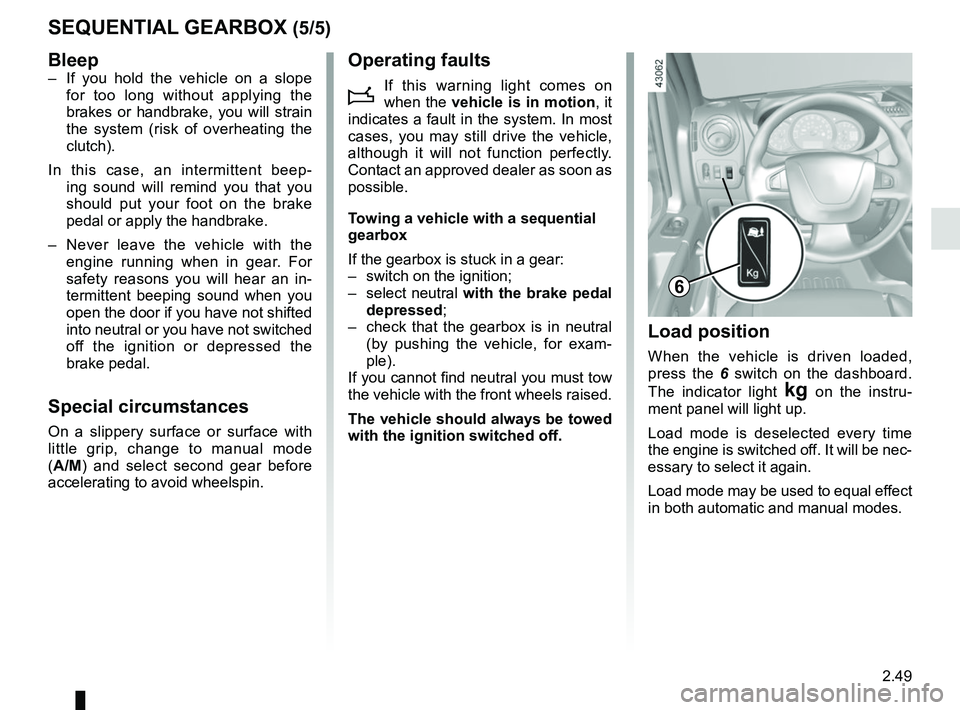
Load position
When the vehicle is driven loaded,
press the 6 switch on the dashboard.
The indicator light
§ on the instru-
ment panel will light up.
Load mode is deselected every time
the engine is switched off. It will be nec-
essary to select it again.
Load mode may be used to equal effect
in both automatic and manual modes.
6
Bleep– If you hold the vehicle on a slope for too long without applying the
brakes or handbrake, you will strain
the system (risk of overheating the
clutch).
In this case, an intermittent beep- ing sound will remind you that you
should put your foot on the brake
pedal or apply the handbrake.
– Never leave the vehicle with the engine running when in gear. For
safety reasons you will hear an in-
termittent beeping sound when you
open the door if you have not shifted
into neutral or you have not switched
off the ignition or depressed the
brake pedal.
Special circumstances
On a slippery surface or surface with
little grip, change to manual mode
(A/M) and select second gear before
accelerating to avoid wheelspin.
Operating faults
i
If this warning light comes on
when the vehicle is in motion , it
indicates a fault in the system. In most
cases, you may still drive the vehicle,
although it will not function perfectly.
Contact an approved dealer as soon as
possible.
Towing a vehicle with a sequential
gearbox
If the gearbox is stuck in a gear:
– switch on the ignition;
– select neutral with the brake pedal
depressed;
– check that the gearbox is in neutral (by pushing the vehicle, for exam-
ple).
If you cannot find neutral you must tow
the vehicle with the front wheels raised.
The vehicle should always be towed
with the ignition switched off.
Page 166 of 290

2.50
Page 167 of 290
3.1
Section 3: Your comfort
Air vents. . . . . . . . . . . . . . . . . . . . . . . . . . . . . . . .\
. . . . . . . . . . . . . . . . . . . . . . . . . . . . . . . . . . . . . . . 3.2
Manual air conditioning/heating system . . . . . . . . . . . . . . . . . . . . . . . . . . . . . . . . . . . .\
. . . . . . . . . . 3.4
Automatic climate control . . . . . . . . . . . . . . . . . . . . . . . . . . . . . . . . . . . .\
. . . . . . . . . . . . . . . . . . . . . 3.7
Air conditioning: information and advice on use . . . . . . . . . . . . . . . . . . . . . . . . . . . . . . . . . . . .\
. . . . 3.13
Windows . . . . . . . . . . . . . . . . . . . . . . . . . . . . . . . . . . . .\
. . . . . . . . . . . . . . . . . . . . . . . . . . . . . . . . . . 3.15
Interior lighting . . . . . . . . . . . . . . . . . . . . . . . . . . . . . . . . . . . . \
. . . . . . . . . . . . . . . . . . . . . . . . . . . . . . 3.17
Sun visor, grab handle . . . . . . . . . . . . . . . . . . . . . . . . . . . . . . . . . . . . \
. . . . . . . . . . . . . . . . . . . . . . . . 3.18
Ashtrays, cigarette lighter, accessories socket . . . . . . . . . . . . . . . . . . . . . . . . . . . . . . . . . . . .\
. . . . . 3.19
Passenger compartment storage, fittings . . . . . . . . . . . . . . . . . . . . . . . . . . . . . . . . . . . .\
. . . . . . . . . 3.20
Rear bench seats . . . . . . . . . . . . . . . . . . . . . . . . . . . . . . . . . . . .\
. . . . . . . . . . . . . . . . . . . . . . . . . . . 3.26
Multimedia equipment . . . . . . . . . . . . . . . . . . . . . . . . . . . . . . . . . . . . \
. . . . . . . . . . . . . . . . . . . . . . . . 3.28
Transporting objects . . . . . . . . . . . . . . . . . . . . . . . . . . . . . . . . . . . .\
. . . . . . . . . . . . . . . . . . . . . . . . . 3.29
Page 168 of 290
3.2
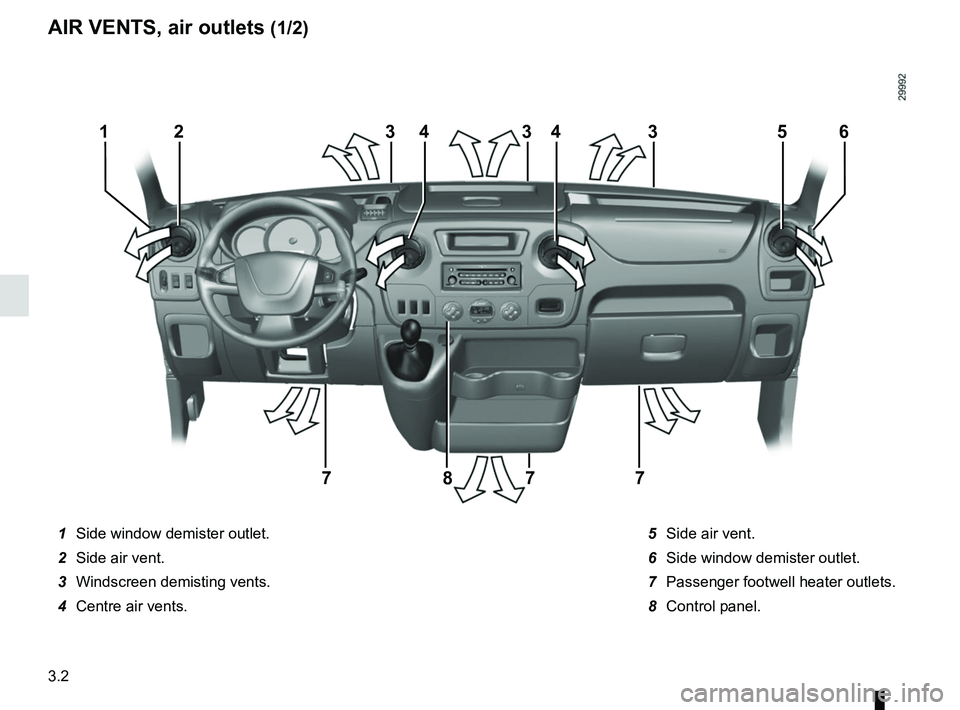
1 Side window demister outlet.
2 Side air vent.
3 Windscreen demisting vents.
4 Centre air vents. 5 Side air vent.
6 Side window demister outlet.
7 Passenger footwell heater outlets.
8 Control panel.
233354
7778
164
AIR VENTS, air outlets (1/2)
Page 169 of 290
3.3
AIR VENTS, air outlets (2/2)
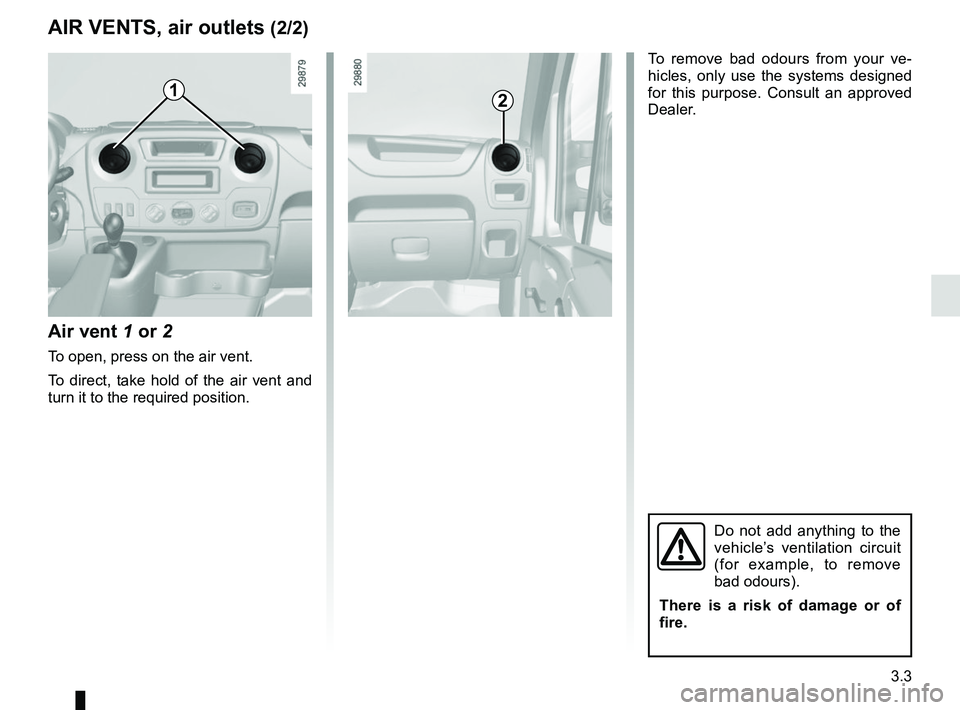
Air vent 1 or 2
To open, press on the air vent.
To direct, take hold of the air vent and
turn it to the required position.
12
To remove bad odours from your ve-
hicles, only use the systems designed
for this purpose. Consult an approved
Dealer.
Do not add anything to the
vehicle’s ventilation circuit
(for example, to remove
bad odours).
There is a risk of damage or of
fire.
Page 170 of 290
3.4
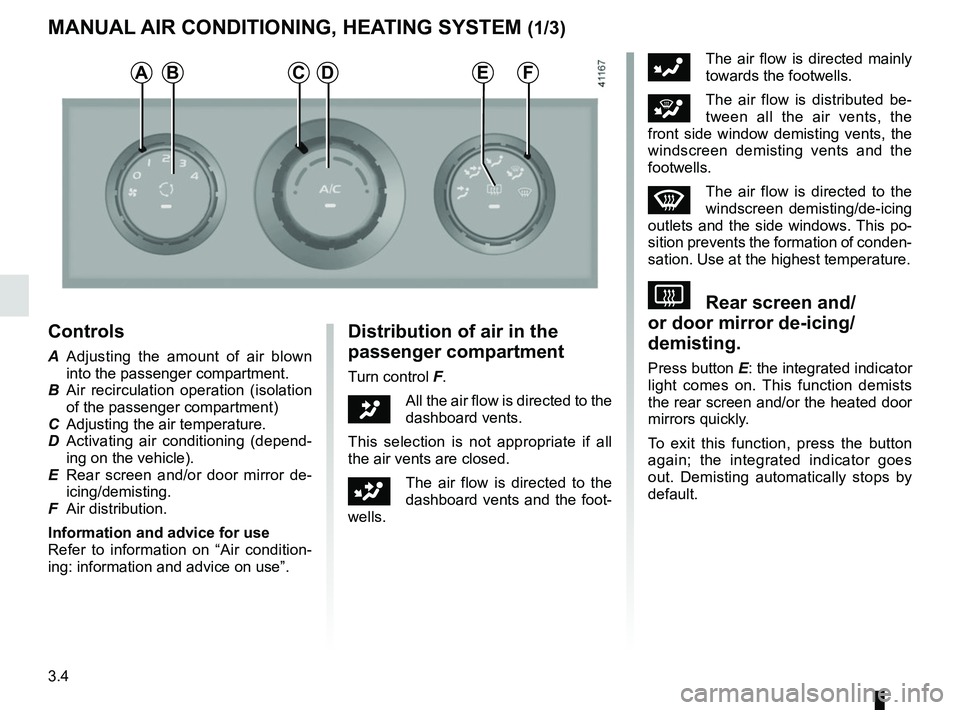
MANUAL AIR CONDITIONING, HEATING SYSTEM (1/3)
Controls
A Adjusting the amount of air blown into the passenger compartment.
B Air recirculation operation (isolation of the passenger compartment)
C Adjusting the air temperature.
D Activating air conditioning (depend- ing on the vehicle).
E Rear screen and/or door mirror de- icing/demisting.
F Air distribution.
Information and advice for use
Refer to information on “Air condition-
ing: information and advice on use”.
Distribution of air in the
passenger compartment
Turn control F.
JAll the air flow is directed to the
dashboard vents.
This selection is not appropriate if all
the air vents are closed.
GThe air flow is directed to the
dashboard vents and the foot-
wells.
FThe air flow is directed mainly
towards the footwells.
iThe air flow is distributed be-
tween all the air vents, the
front side window demisting vents, the
windscreen demisting vents and the
footwells.
WThe air flow is directed to the
windscreen demisting/de-icing
outlets and the side windows. This po-
sition prevents the formation of conden-
sation. Use at the highest temperature.
VRear screen and/
or door mirror de-icing/
demisting.
Press button E: the integrated indicator
light comes on. This function demists
the rear screen and/or the heated door
mirrors quickly.
To exit this function, press the button
again; the integrated indicator goes
out. Demisting automatically stops by
default.
ABDFCE