remove seats RENAULT MASTER 2018 User Guide
[x] Cancel search | Manufacturer: RENAULT, Model Year: 2018, Model line: MASTER, Model: RENAULT MASTER 2018Pages: 290, PDF Size: 7.1 MB
Page 78 of 290

1.72
Operating faultsIn the event that the front passenger air
bag activation/deactivation system is
faulty, child seats must not be fitted to
the front seat.
Allowing any other passenger to sit in
that seat is not recommended.
Contact your approved Dealer as soon
as possible.Activation of the front
passenger air bag
You should reactivate the air bag as
soon as you remove the child seat from
the front passenger seat to ensure the
protection of the front passenger in the
event of an impact.
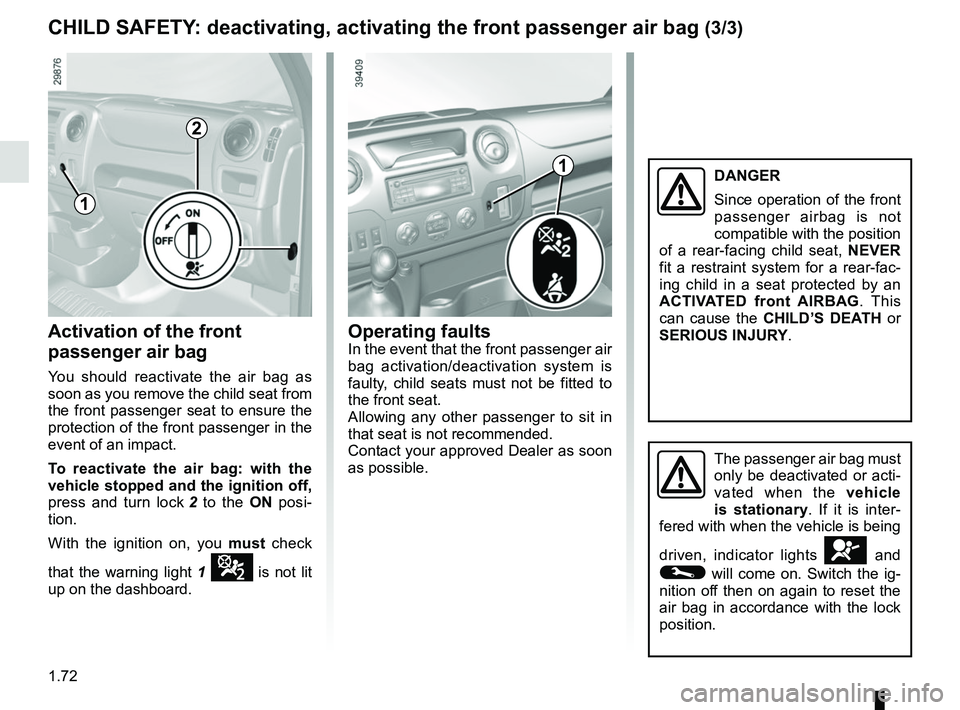
To reactivate the air bag: with the
vehicle stopped and the ignition off,
press and turn lock 2 to the ON posi-
tion.
With the ignition on, you must check
that the warning light 1
¹ is not lit
up on the dashboard.
CHILD SAFETY: deactivating, activating the front passenger air bag (3/3)
1
2
The passenger air bag must
only be deactivated or acti-
vated when the vehicle
is stationary. If it is inter-
fered with when the vehicle is being
driven, indicator lights
å and
© will come on. Switch the ig-
nition off then on again to reset the
air bag in accordance with the lock
position.
1DANGER
Since operation of the front
passenger airbag is not
compatible with the position
of a rear-facing child seat, NEVER
fit a restraint system for a rear-fac-
ing child in a seat protected by an
ACTIVATED front AIRBAG . This
can cause the CHILD’S DEATH or
SERIOUS INJURY.
Page 192 of 290

3.26
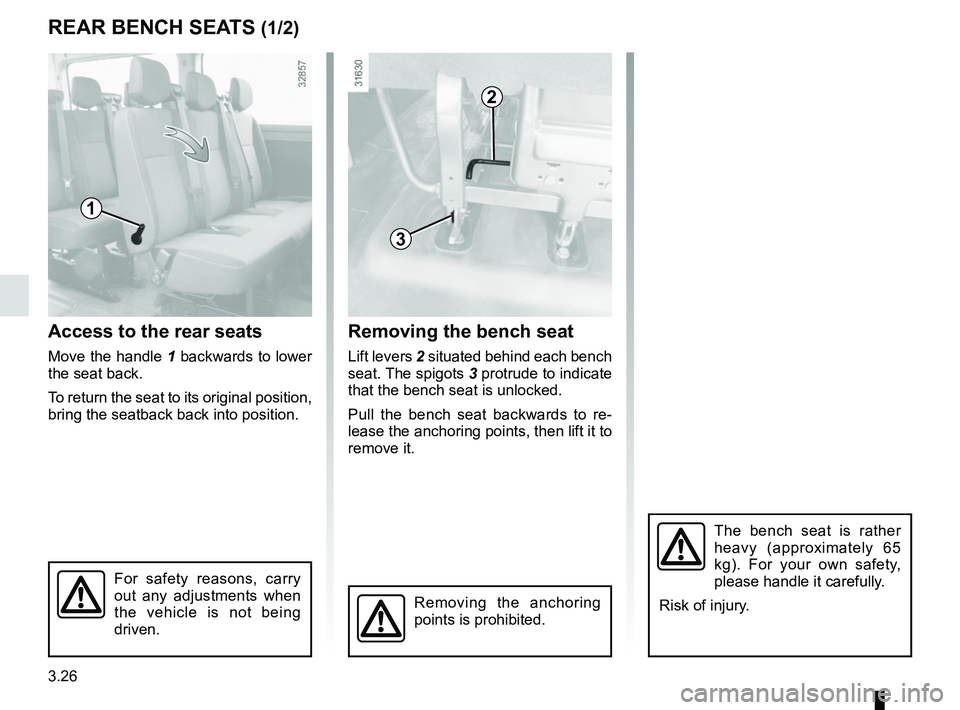
Access to the rear seats
Move the handle 1 backwards to lower
the seat back.
To return the seat to its original position,
bring the seatback back into position.
REAR BENCH SEATS (1/2)
Removing the bench seat
Lift levers 2 situated behind each bench
seat. The spigots 3 protrude to indicate
that the bench seat is unlocked.
Pull the bench seat backwards to re-
lease the anchoring points, then lift it to
remove it.
For safety reasons, carry
out any adjustments when
the vehicle is not being
driven.
Removing the anchoring
points is prohibited.
1
2
The bench seat is rather
heavy (approximately 65
kg). For your own safety,
please handle it carefully.
Risk of injury.
3
Page 213 of 290

4.17
Glass instrument panel(e.g. instrument panel, clock, exterior
temperature display, radio display, etc.)
Use a soft cloth (or cotton wool).
If this does not clean them properly,
use a soft cloth (or cotton wool) slightly
moistened with soapy water and then
wipe clean with another soft damp cloth
or cotton wool.
Finally, carefully dry off with a soft dry
cloth.
Do not use products containing alco-
hol and/or spray fluids on the area.
Seat belts
These must be kept clean.
Use products selected by our Technical
Department (Approved outlets) or
warm, soapy water and a sponge and
wipe with a dry cloth.
Detergents or dyes must not be used
under any circumstances.
INTERIOR TRIM MAINTENANCE (1/2)
Textiles (seats, door trim, etc)
Vacuum-clean the textiles regularly.
Liquid stain
Use soapy water.
Dab lightly (never rub) with a soft cloth,
rinse and remove the excess.
Solid or pasty stain
Carefully remove the excess solid or
pasty material immediately with a
spatula (working from the edges to the
centre to avoid spreading the stain).
Clean as for a liquid stain.
Special instructions for sweets or
chewing gum
Put an ice cube on the stain to solidify
it, then proceed as for a solid stain.
A well-maintained vehicle will last
longer. It is therefore recommended to
maintain the interior of the vehicle regu-
larly.
A stain should always be dealt with
swiftly.
Whatever type of stain is on the trim,
use
cold (or warm) soapy water with
natural soap.
Detergents (washing-up liquid, pow-
dered products, alcohol-based prod-
ucts) should not be used.
Use a soft cloth.
Rinse and soak up the excess.
For further recommendations for
maintaining the interior, and/or for
any unsatisfactory results, please
see an authorised dealer.
Page 218 of 290

5.4
TOOL KIT
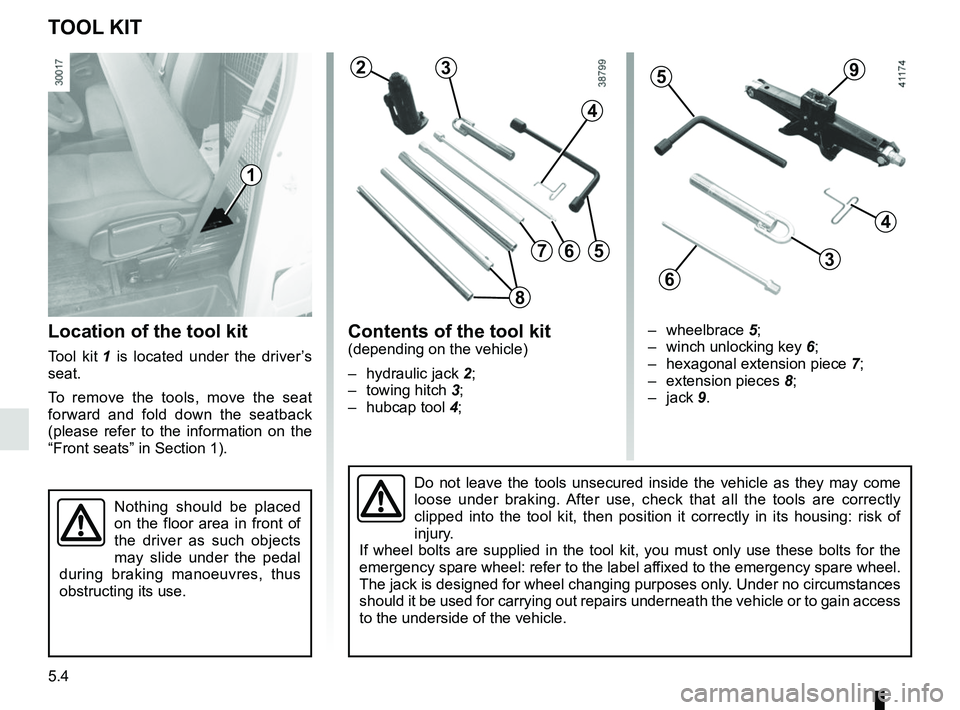
Location of the tool kit
Tool kit 1 is located under the driver’s
seat.
To remove the tools, move the seat
forward and fold down the seatback
(please refer to the information on the
“Front seats” in Section 1).
Contents of the tool kit(depending on the vehicle)
– hydraulic jack 2;
– towing hitch 3;
– hubcap tool 4;
1
Do not leave the tools unsecured inside the vehicle as they may come
loose under braking. After use, check that all the tools are correctly
clipped into the tool kit, then position it correctly in its housing: ri\
sk of
injury.
If wheel bolts are supplied in the tool kit, you must only use these bol\
ts for the
emergency spare wheel: refer to the label affixed to the emergency spare wheel.
The jack is designed for wheel changing purposes only. Under no circumstances
should it be used for carrying out repairs underneath the vehicle or to \
gain access
to the underside of the vehicle.
Nothing should be placed
on the floor area in front of
the driver as such objects
may slide under the pedal
during braking manoeuvres, thus
obstructing its use.
23
4
56
– wheelbrace 5;
– winch unlocking key 6;
– hexagonal extension piece 7;
– extension pieces 8;
– jack 9.
59
4
3
6
7
8