Button RENAULT MEGANE 2017 4.G User Guide
[x] Cancel search | Manufacturer: RENAULT, Model Year: 2017, Model line: MEGANE, Model: RENAULT MEGANE 2017 4.GPages: 346, PDF Size: 7.04 MB
Page 26 of 346
1.20
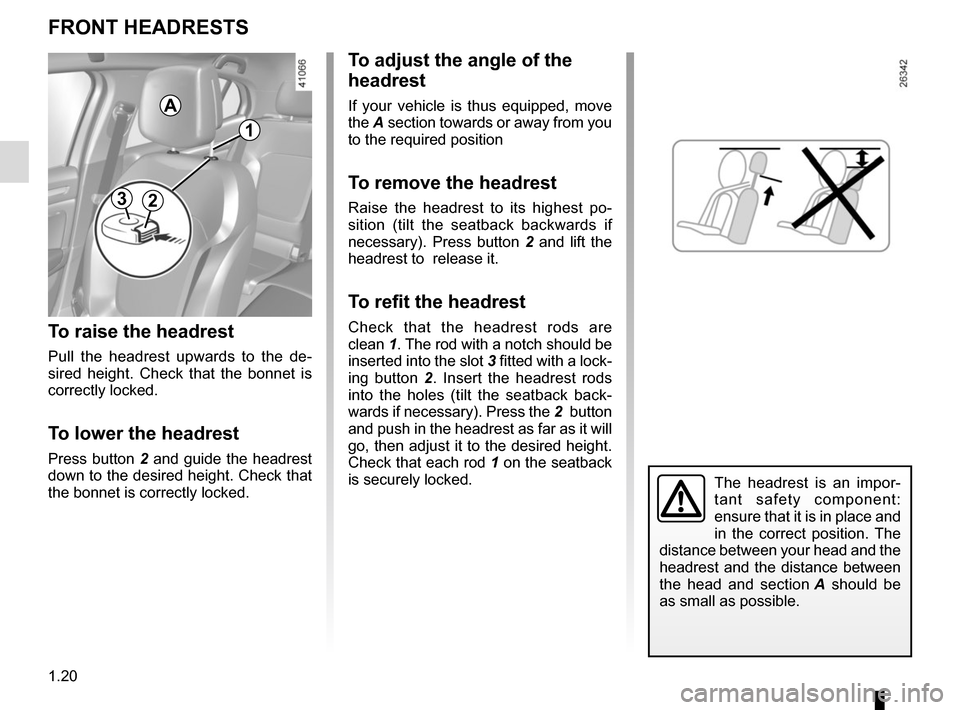
To raise the headrest
Pull the headrest upwards to the de-
sired height. Check that the bonnet is
correctly locked.
To lower the headrest
Press button 2 and guide the headrest
down to the desired height. Check that
the bonnet is correctly locked.
To adjust the angle of the
headrest
If your vehicle is thus equipped, move
the A section towards or away from you
to the required position
To remove the headrest
Raise the headrest to its highest po-
sition (tilt the seatback backwards if
necessary). Press button 2 and lift the
headrest to release it.
To refit the headrest
Check that the headrest rods are
clean 1. The rod with a notch should be
inserted into the slot 3 fitted with a lock-
ing button 2 . Insert the headrest rods
into the holes (tilt the seatback back-
wards if necessary). Press the 2 button
and push in the headrest as far as it will
go, then adjust it to the desired height.
Check that each rod 1 on the seatback
is securely locked.
FRONT HEADRESTS
The headrest is an impor-
tant safety component:
ensure that it is in place and
in the correct position. The
distance between your head and the
headrest and the distance between
the head and section A should be
as small as possible.
23
1
A
Page 31 of 346
1.25
SEAT BELTS (2/4)
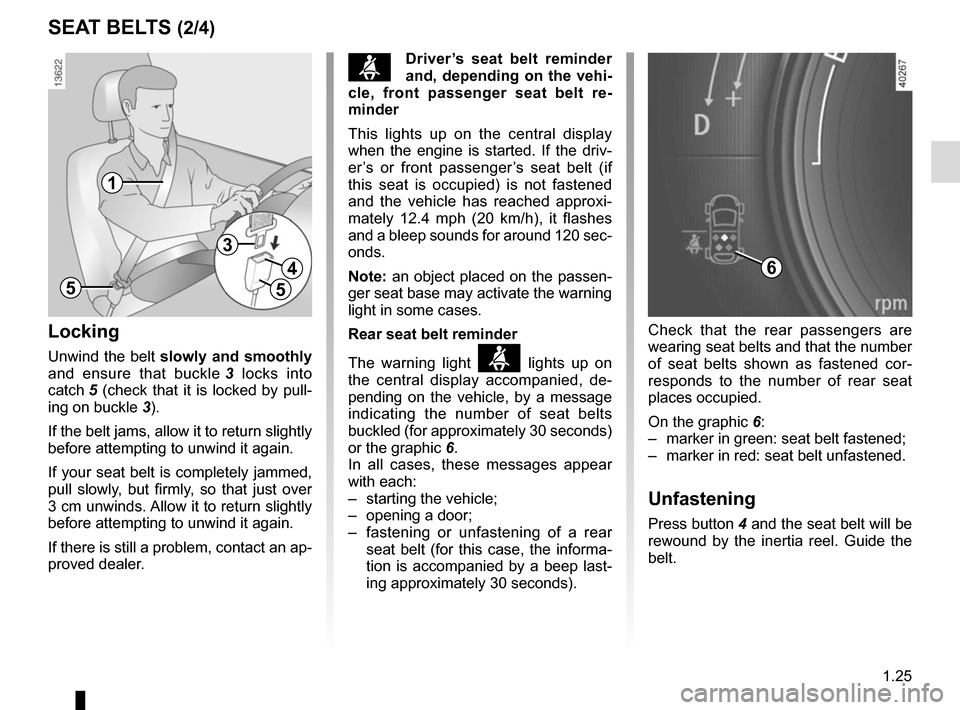
Locking
Unwind the belt slowly and smoothly
and ensure that buckle 3 locks into
catch 5 (check that it is locked by pull- ing on buckle 3).
If the belt jams, allow it to return slightly
before attempting to unwind it again.
If your seat belt is completely jammed,
pull slowly, but firmly, so that just over
3 cm unwinds. Allow it to return slightly
before attempting to unwind it again.
If there is still a problem, contact an ap-
proved dealer.
1
5
3
4
5
ßDriver’s seat belt reminder
and, depending on the vehi-
cle, front passenger seat belt re-
minder
This lights up on the central display
when the engine is started. If the driv-
er’s or front passenger’s seat belt (if
this seat is occupied) is not fastened
and the vehicle has reached approxi-
mately 12.4 mph (20 km/h), it flashes
and a bleep sounds for around 120 sec-
onds.
Note: an object placed on the passen-
ger seat base may activate the warning
light in some cases.
Rear seat belt reminder
The warning light
ß lights up on
the central display accompanied, de-
pending on the vehicle, by a message
indicating the number of seat belts
buckled (for approximately 30 seconds)
or the graphic 6.
In all cases, these messages appear
with each:
– starting the vehicle;
– opening a door;
– fastening or unfastening of a rear seat belt (for this case, the informa-
tion is accompanied by a beep last-
ing approximately 30 seconds). Check that the rear passengers are
wearing seat belts and that the number
of seat belts shown as fastened cor-
responds to the number of rear seat
places occupied.
On the graphic 6:
– marker in green: seat belt fastened;
– marker in red: seat belt unfastened.
Unfastening
Press button 4 and the seat belt will be
rewound by the inertia reel. Guide the
belt.
6
6
Page 32 of 346
1.26
SEAT BELTS (3/4)
Check that the rear seat
belts are positioned and
operating correctly each
time the rear bench seat is
moved.
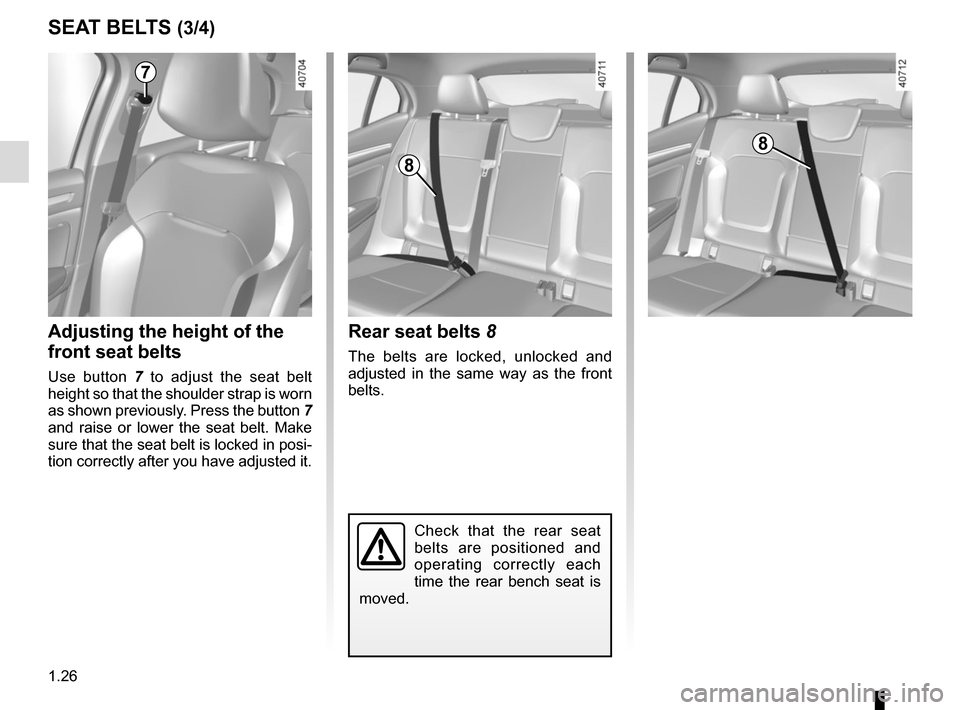
Rear seat belts 8
The belts are locked, unlocked and
adjusted in the same way as the front
belts.
Adjusting the height of the
front seat belts
Use button 7 to adjust the seat belt
height so that the shoulder strap is worn
as shown previously. Press the button 7
and raise or lower the seat belt. Make
sure that the seat belt is locked in posi-
tion correctly after you have adjusted it.
7
8
8
Page 61 of 346
1.55
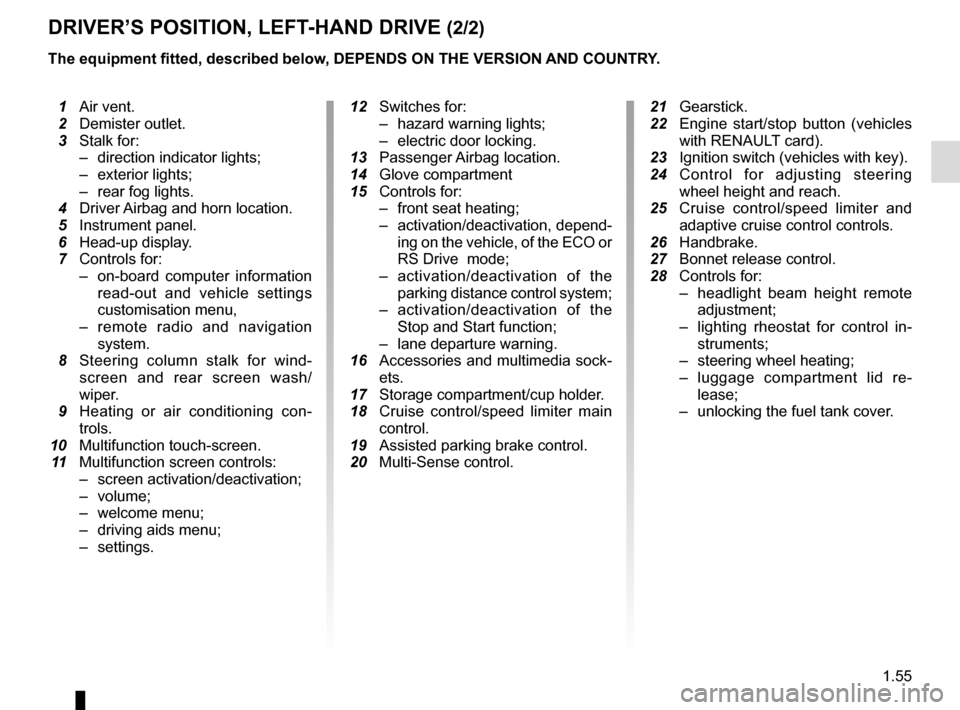
DRIVER’S POSITION, LEFT-HAND DRIVE (2/2)
The equipment fitted, described below, DEPENDS ON THE VERSION AND COUNTRY.
1 Air vent.
2 Demister outlet.
3 Stalk for:
– direction indicator lights;
– exterior lights;
– rear fog lights.
4 Driver Airbag and horn location.
5 Instrument panel.
6 Head-up display.
7 Controls for:
– on-board computer information
read-out and vehicle settings
customisation menu,
– remote radio and navigation
system.
8 Steering column stalk for wind-
screen and rear screen wash/
wiper.
9 Heating or air conditioning con-
trols.
10 Multifunction touch-screen.
11 Multifunction screen controls:
– screen activation/deactivation;
– volume;
– welcome menu;
– driving aids menu;
– settings.
12 Switches for:
– hazard warning lights;
– electric door locking.
13 Passenger Airbag location.
14 Glove compartment
15 Controls for:
– front seat heating;
– activation/deactivation, depend-
ing on the vehicle, of the ECO or
RS Drive mode;
– activation/deactivation of the
parking distance control system;
– activation/deactivation of the
Stop and Start function;
– lane departure warning.
16 Accessories and multimedia sock-
ets.
17 Storage compartment/cup holder.
18 Cruise control/speed limiter main
control.
19 Assisted parking brake control.
20 Multi-Sense control.
21 Gearstick.
22 Engine start/stop button (vehicles
with RENAULT card).
23 Ignition switch (vehicles with key).
24
Control for adjusting steering wheel height and reach.
25 Cruise control/speed limiter and
adaptive cruise control controls.
26 Handbrake.
27 Bonnet release control.
28 Controls for:
– headlight beam height remote
adjustment;
– lighting rheostat for control in-
struments;
– steering wheel heating;
– luggage compartment lid re-
lease;
– unlocking the fuel tank cover.
Page 63 of 346
1.57
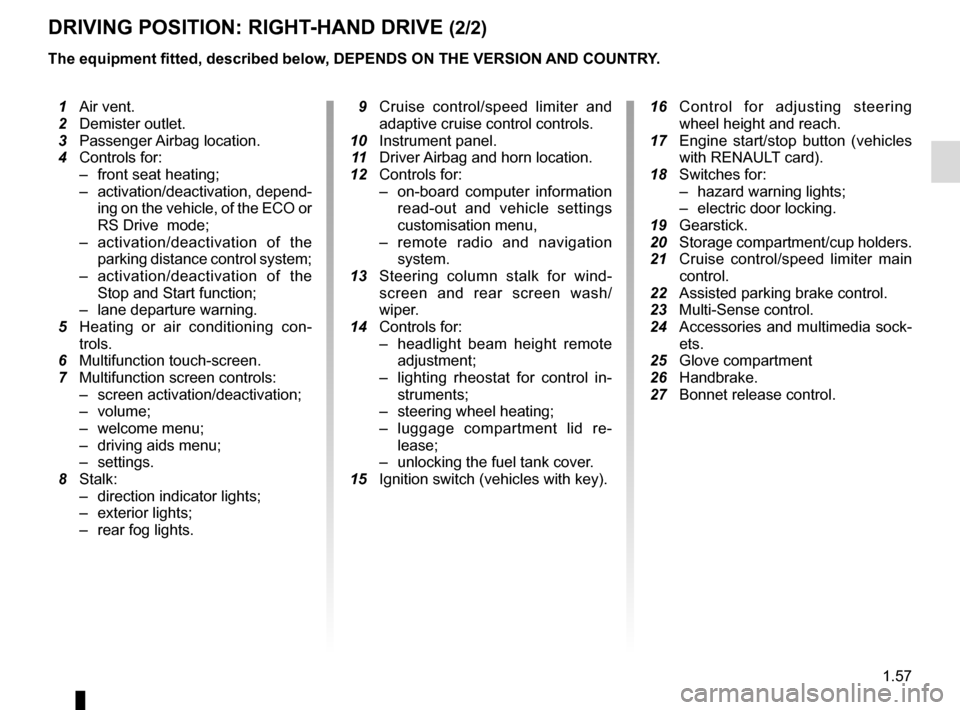
DRIVING POSITION: RIGHT-HAND DRIVE (2/2)
The equipment fitted, described below, DEPENDS ON THE VERSION AND COUNTRY.
16 Control for adjusting steering
wheel height and reach.
17 Engine start/stop button (vehicles
with RENAULT card).
18 Switches for:
– hazard warning lights;
– electric door locking.
19 Gearstick.
20 Storage compartment/cup holders.
21 Cruise control/speed limiter main
control.
22 Assisted parking brake control.
23 Multi-Sense control.
24 Accessories and multimedia sock-
ets.
25 Glove compartment
26 Handbrake.
27 Bonnet release control.
1 Air vent.
2 Demister outlet.
3 Passenger Airbag location.
4 Controls for:
– front seat heating;
– activation/deactivation, depend-
ing on the vehicle, of the ECO or
RS Drive mode;
– activation/deactivation of the
parking distance control system;
– activation/deactivation of the
Stop and Start function;
– lane departure warning.
5 Heating or air conditioning con-
trols.
6 Multifunction touch-screen.
7 Multifunction screen controls:
– screen activation/deactivation;
– volume;
– welcome menu;
– driving aids menu;
– settings.
8 Stalk:
– direction indicator lights;
– exterior lights;
– rear fog lights.
9 Cruise control/speed limiter and
adaptive cruise control controls.
10 Instrument panel.
11 Driver Airbag and horn location.
12 Controls for:
– on-board computer information
read-out and vehicle settings
customisation menu,
– remote radio and navigation
system.
13 Steering column stalk for wind-
screen and rear screen wash/
wiper.
14 Controls for:
– headlight beam height remote
adjustment;
– lighting rheostat for control in-
struments;
– steering wheel heating;
– luggage compartment lid re-
lease;
– unlocking the fuel tank cover.
15 Ignition switch (vehicles with key).
Page 73 of 346
1.67
DISPLAYS AND INDICATORS (4/6)
1211
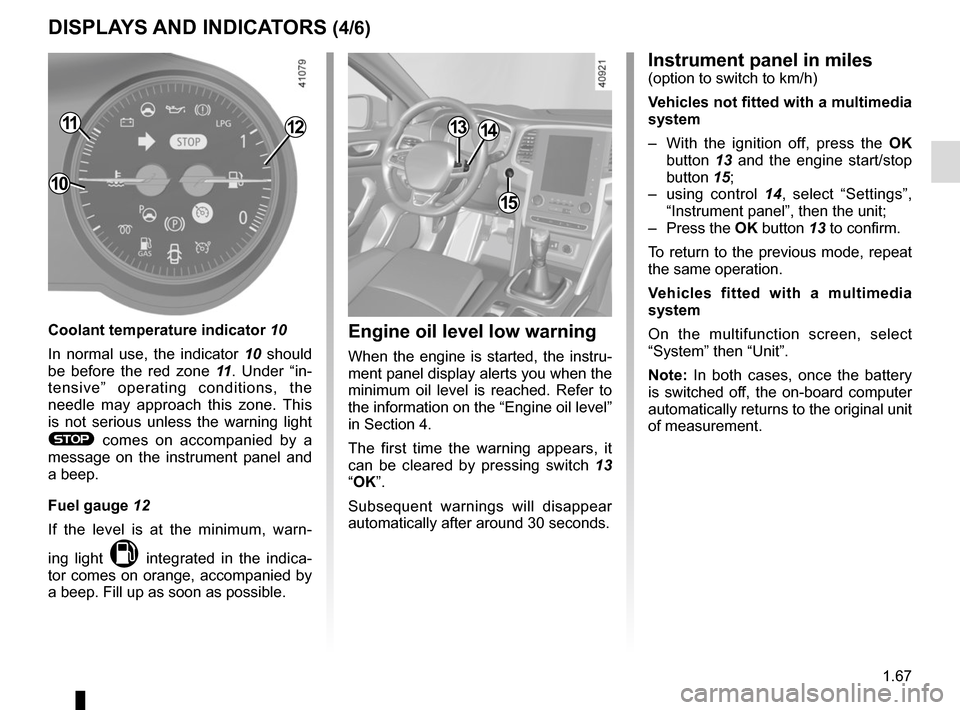
Coolant temperature indicator 10
In normal use, the indicator 10 should
be before the red zone 11. Under “in-
tensive” operating conditions, the
needle may approach this zone. This
is not serious unless the warning light
® comes on accompanied by a
message on the instrument panel and
a beep.
Fuel gauge 12
If the level is at the minimum, warn-
ing light
M integrated in the indica-
tor comes on orange, accompanied by
a beep. Fill up as soon as possible.
10
15
1314
Instrument panel in miles(option to switch to km/h)
Vehicles not fitted with a multimedia
system
– With the ignition off, press the OK
button 13 and the engine start/stop
button 15;
– using control 14, select “Settings”,
“Instrument panel”, then the unit;
– Press the OK button 13 to confirm.
To return to the previous mode, repeat
the same operation.
Vehicles fitted with a multimedia
system
On the multifunction screen, select
“System” then “Unit”.
Note: In both cases, once the battery
is switched off, the on-board computer
automatically returns to the original unit
of measurement.
Engine oil level low warning
When the engine is started, the instru-
ment panel display alerts you when the
minimum oil level is reached. Refer to
the information on the “Engine oil level”
in Section 4.
The first time the warning appears, it
can be cleared by pressing switch 13
“OK”.
Subsequent warnings will disappear
automatically after around 30 seconds.
Page 76 of 346
1.70
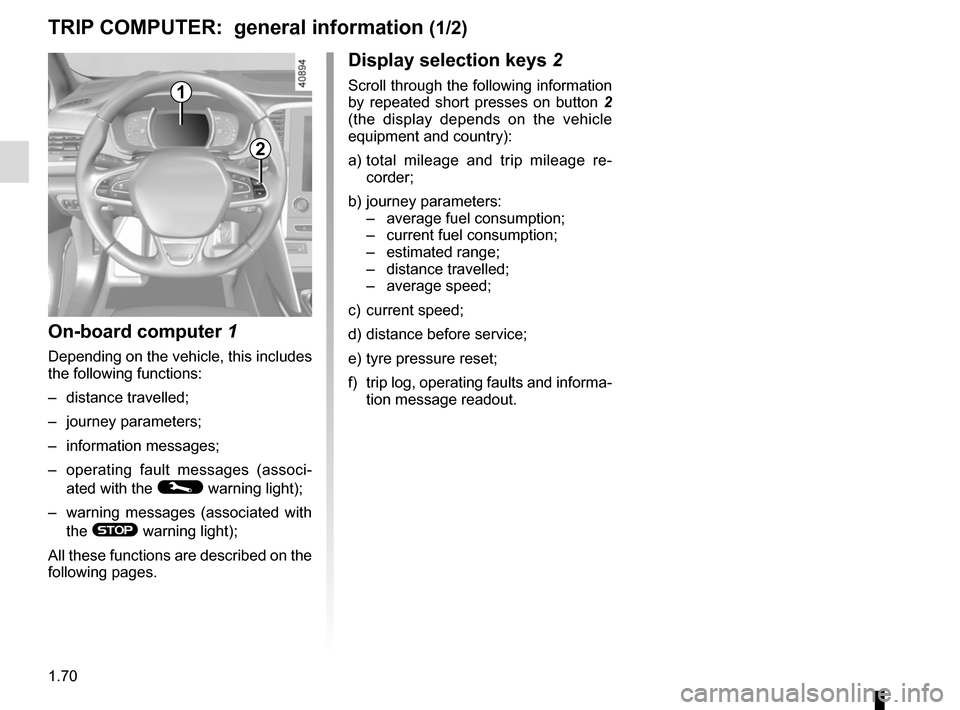
1
Display selection keys 2
Scroll through the following information
by repeated short presses on button 2
(the display depends on the vehicle
equipment and country):
a) total mileage and trip mileage re-
corder;
b) journey parameters: – average fuel consumption;
– current fuel consumption;
– estimated range;
– distance travelled;
– average speed;
c) current speed;
d) distance before service;
e) tyre pressure reset;
f) trip log, operating faults and informa- tion message readout.
On-board computer 1
Depending on the vehicle, this includes
the following functions:
– distance travelled;
– journey parameters;
– information messages;
– operating fault messages (associ-
ated with the
© warning light);
– warning messages (associated with the
® warning light);
All these functions are described on the
following pages.
TRIP COMPUTER: general information (1/2)
2
Page 77 of 346
1.71
3
ON-BOARD COMPUTER: general information (2/2)
Interpreting some of the
values displayed after
resetting
The values showing average fuel con-
sumption and average speed will
become more stable and reliable the
further you have travelled since the last
time the Reset button was pressed.
The average fuel consumption may de-
crease when:
– the vehicle stops accelerating;
– the engine reaches its operating
temperature (if the engine was cold
when the reset key was pressed);
– when driving from an urban area
onto the open road.
Automatic resetting of the
journey parameters
Resetting occurs automatically when
the maximum value of any of the pa-
rameters is exceeded.
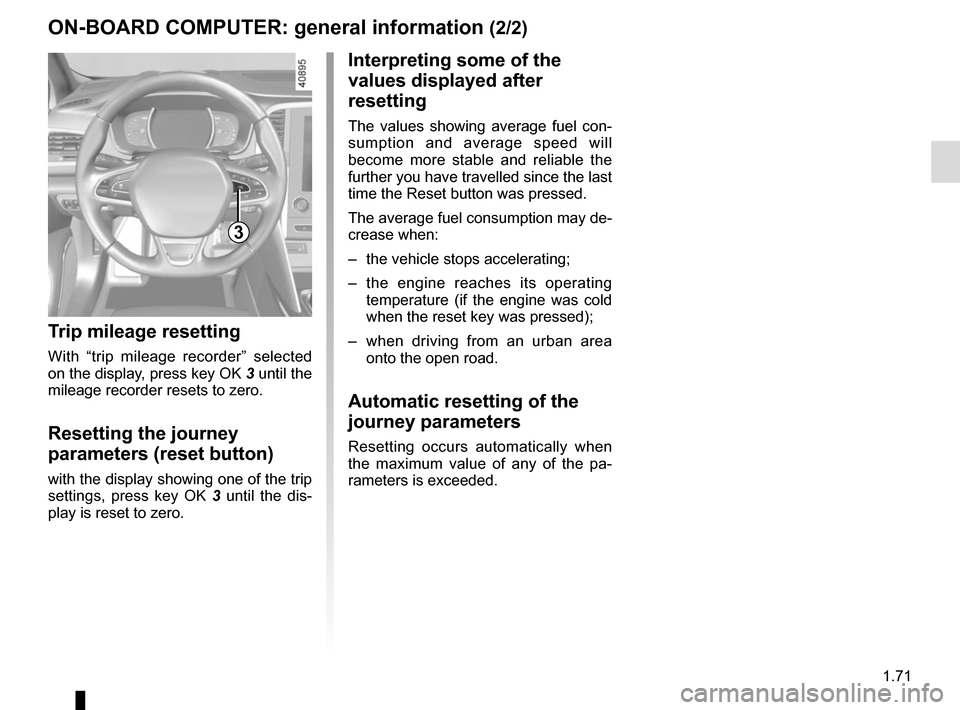
Trip mileage resetting
With “trip mileage recorder” selected
on the display, press key OK 3 until the
mileage recorder resets to zero.
Resetting the journey
parameters (reset button)
with the display showing one of the trip
settings, press key OK 3 until the dis-
play is reset to zero.
Page 80 of 346
1.74
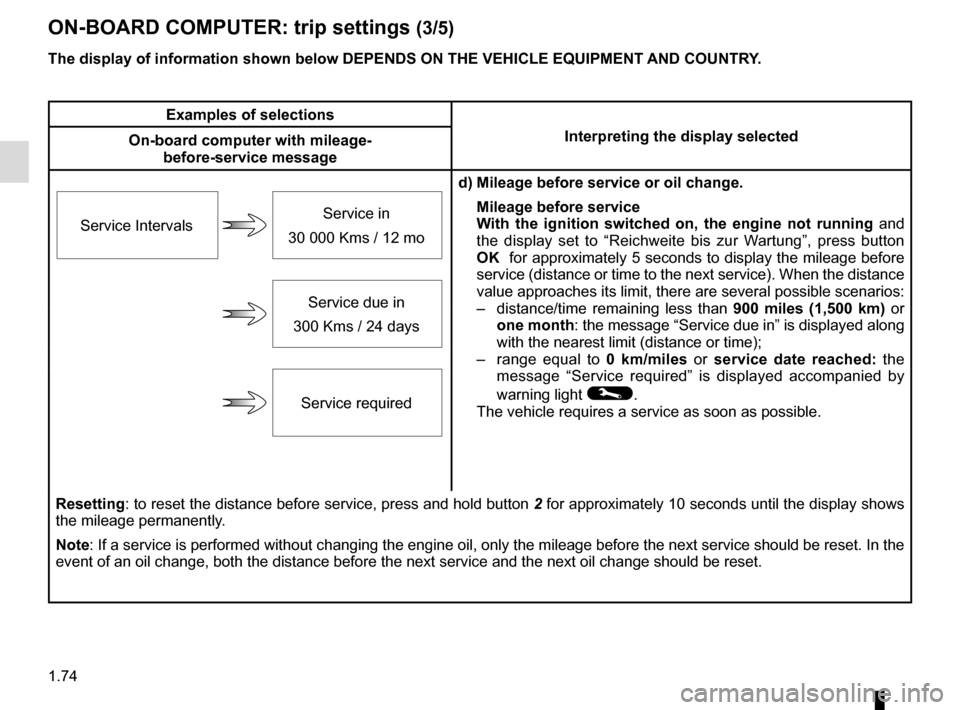
ON-BOARD COMPUTER: trip settings (3/5)
The display of information shown below DEPENDS ON THE VEHICLE EQUIPMENT \
AND COUNTRY.
Examples of selectionsInterpreting the display selected
On-board computer with mileage-
before-service message
d) Mileage before service or oil change.Mileage before service
With the ignition switched on, the engine not running and
the display set to “Reichweite bis zur Wartung”, press button
OK for approximately 5 seconds to display the mileage before
service (distance or time to the next service). When the distance
value approaches its limit, there are several possible scenarios:
– distance/time remaining less than 900 miles (1,500 km) or
one month : the message “Service due in” is displayed along
with the nearest limit (distance or time);
– range equal to 0 km/miles or service date reached: the
message “Service required” is displayed accompanied by
warning light
©.
The vehicle requires a service as soon as possible.
Service Intervals
Service in
30 000 Kms / 12 mo
Service due in
300 Kms / 24 days
Service required
Resetting: to reset the distance before service, press and hold button 2 for approximately 10 seconds until the display shows
the mileage permanently.
Note: If a service is performed without changing the engine oil, only the mi\
leage before the next service should be reset. In the
event of an oil change, both the distance before the next service and th\
e next oil change should be reset.
Page 81 of 346
1.75
The display of information shown below DEPENDS ON THE VEHICLE EQUIPMENT \
AND COUNTRY.
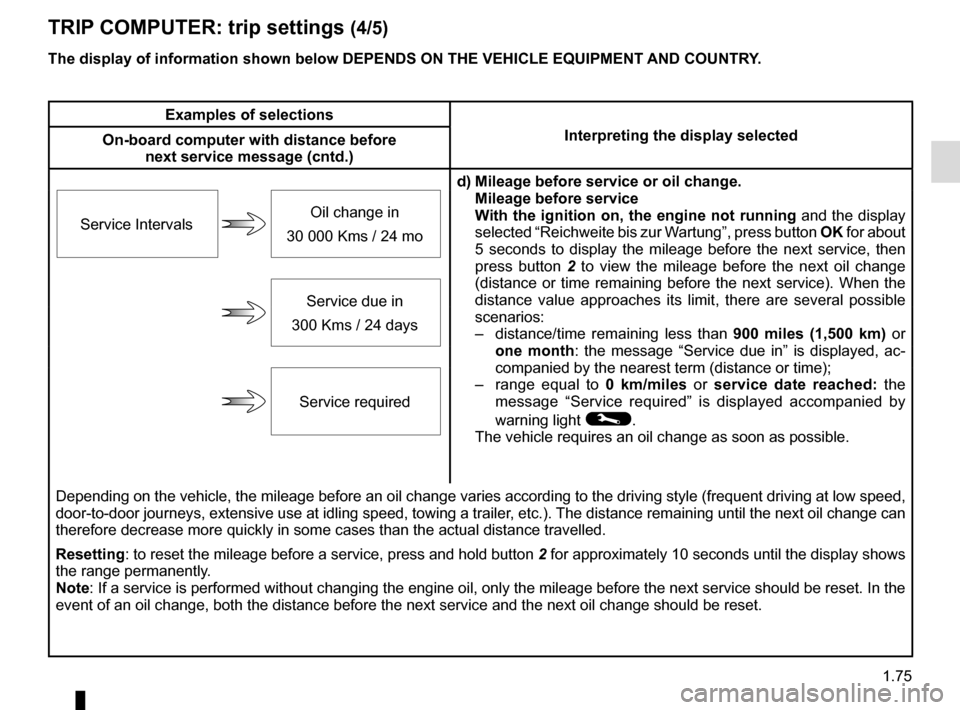
TRIP COMPUTER: trip settings (4/5)
Examples of selectionsInterpreting the display selected
On-board computer with distance before
next service message (cntd.)
d) Mileage before service or oil change.Mileage before service
With the ignition on, the engine not running and the display
selected “Reichweite bis zur Wartung”, press button OK for about
5 seconds to display the mileage before the next service, then
press button 2 to view the mileage before the next oil change
(distance or time remaining before the next service). When the
distance value approaches its limit, there are several possible
scenarios:
– distance/time remaining less than 900 miles (1,500 km) or
one month : the message “Service due in” is displayed, ac-
companied by the nearest term (distance or time);
– range equal to 0 km/miles or service date reached: the
message “Service required” is displayed accompanied by
warning light
©.
The vehicle requires an oil change as soon as possible.
Service Intervals
Oil change in
30 000 Kms / 24 mo
Service due in
300 Kms / 24 days
Service required
Depending on the vehicle, the mileage before an oil change varies accord\
ing to the driving style (frequent driving at low speed ,
door-to-door journeys, extensive use at idling speed, towing a trailer, etc.). The distance remaining until the next oil change can
therefore decrease more quickly in some cases than the actual distance t\
ravelled.
Resetting: to reset the mileage before a service, press and hold button 2 for approximately 10 seconds until the display shows
the range permanently.
Note: If a service is performed without changing the engine oil, only the mi\
leage before the next service should be reset. In the
event of an oil change, both the distance before the next service and th\
e next oil change should be reset.