Brake light RENAULT MEGANE 2017 4.G Owner's Manual
[x] Cancel search | Manufacturer: RENAULT, Model Year: 2017, Model line: MEGANE, Model: RENAULT MEGANE 2017 4.GPages: 346, PDF Size: 7.04 MB
Page 146 of 346
2.34
DRIVER CORRECTION DEVICES AND AIDS (5/10)
If the driver depresses the brake pedal
and the system still detects a risk of col-
lision, the brake force is increased.
If the driver fails to react following
an alert of an imminent collision, the
system activates the brakes.
Active emergency braking
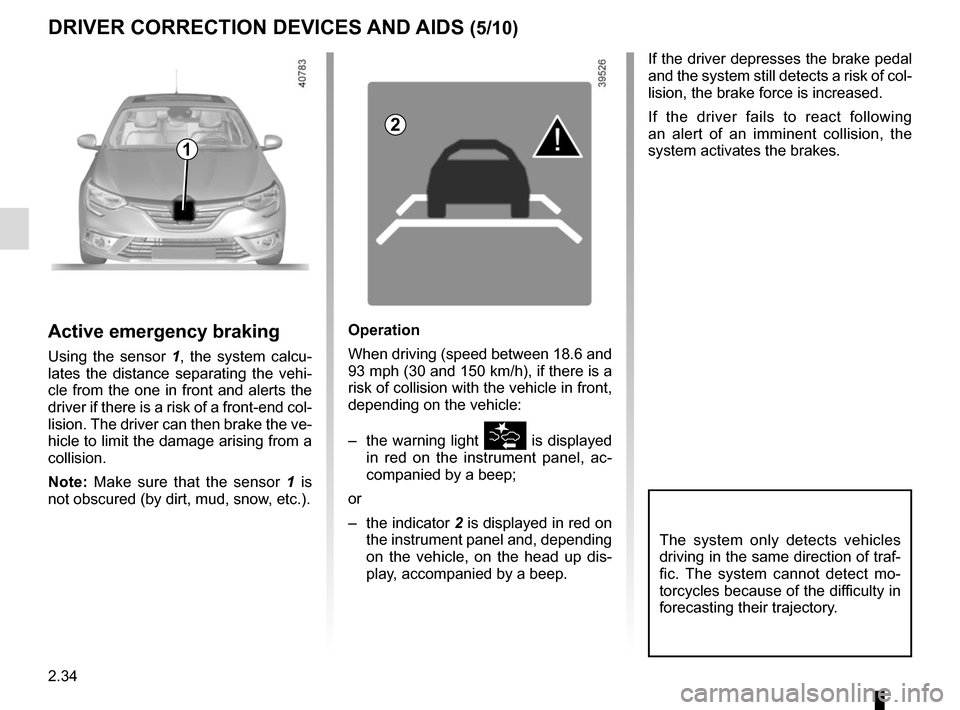
Using the sensor 1, the system calcu-
lates the distance separating the vehi-
cle from the one in front and alerts the
driver if there is a risk of a front-end col-
lision. The driver can then brake the ve-
hicle to limit the damage arising from a
collision.
Note: Make sure that the sensor 1 is
not obscured (by dirt, mud, snow, etc.).
Operation
When driving (speed between 18.6 and
93 mph (30 and 150 km/h), if there is a
risk of collision with the vehicle in front,
depending on the vehicle:
– the warning light
is displayed
in red on the instrument panel, ac-
companied by a beep;
or
– the indicator 2 is displayed in red on
the instrument panel and, depending
on the vehicle, on the head up dis- play, accompanied by a beep.
The system only detects vehicles
driving in the same direction of traf-
fic. The system cannot detect mo-
torcycles because of the difficulty in
forecasting their trajectory.
1
2
Page 147 of 346
2.35
DRIVER CORRECTION DEVICES AND AIDS (6/10)
Activating or deactivating the
system
For vehicles fitted with a navigation
system
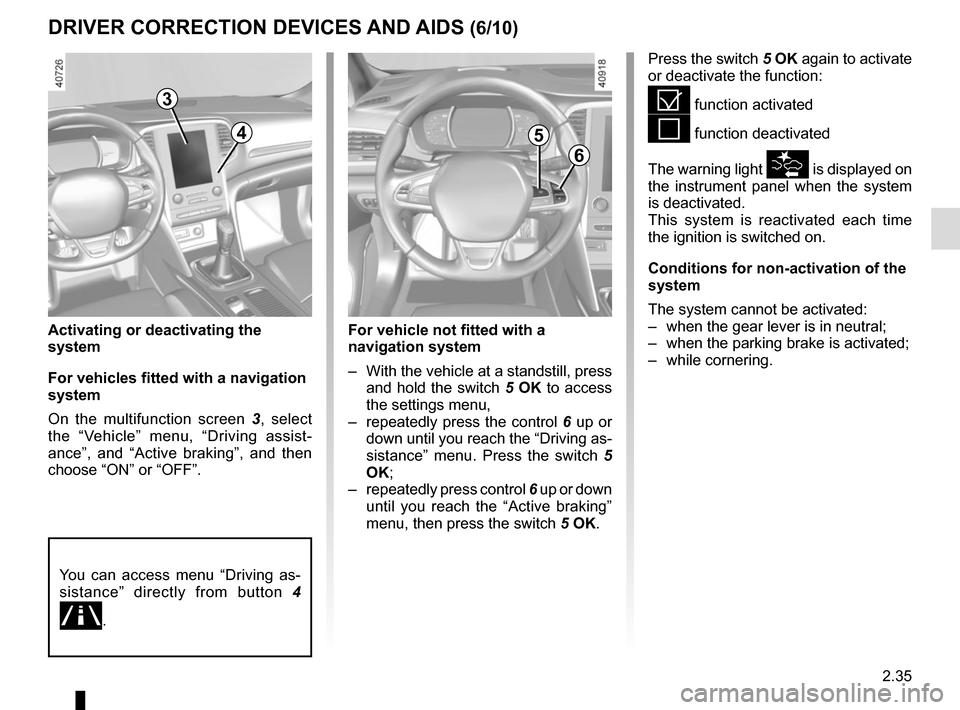
On the multifunction screen 3, select
the “Vehicle” menu, “Driving assist-
ance”, and “Active braking”, and then
choose “ON” or “OFF”.
Press the switch 5 OK again to activate
or deactivate the function:
= function activated
< function deactivated
The warning light
is displayed on
the instrument panel when the system
is deactivated.
This system is reactivated each time
the ignition is switched on.
Conditions for non-activation of the
system
The system cannot be activated:
– when the gear lever is in neutral;
– when the parking brake is activated;
– while cornering.
3
6
5
For vehicle not fitted with a
navigation system
– With the vehicle at a standstill, press and hold the switch 5 OK to access
the settings menu,
– repeatedly press the control 6 up or
down until you reach the “Driving as-
sistance” menu. Press the switch 5
OK;
– repeatedly press control 6 up or down
until you reach the “Active braking”
menu, then press the switch 5 OK.
You can access menu “Driving as-
sistance” directly from button 4
\b.
4
Page 149 of 346
2.37
DRIVER CORRECTION DEVICES AND AIDS (8/10)
Active emergency braking
Limitation of the system operation
– The system will only respond to vehicles which are moving or which have \
been sensed as moving.
– A vehicle travelling in the opposite direction will not trigger any alert\
or any action on the system operation.
– The sensor area should be kept clean and free of any modifications in or\
der to ensure the proper operation of the system.
– The system cannot respond to small vehicles such as motorbikes or bicycl\
es as effectively as to other vehicles.
Deactivating the function
You must disable the function if:
– the brake lights are not functioning;
– the front of the vehicle has undergone an impact or been damaged;
– the vehicle is being towed (breakdowns).
Halting the function
You can halt the active braking function at any time by tapping the accel\
erator pedal or by turning the steering wheel in a avo id-
ance manoeuvre.
If the driver notices any unusual behaviour in the system, please consul\
t an authorised dealer.
Page 172 of 346
2.60
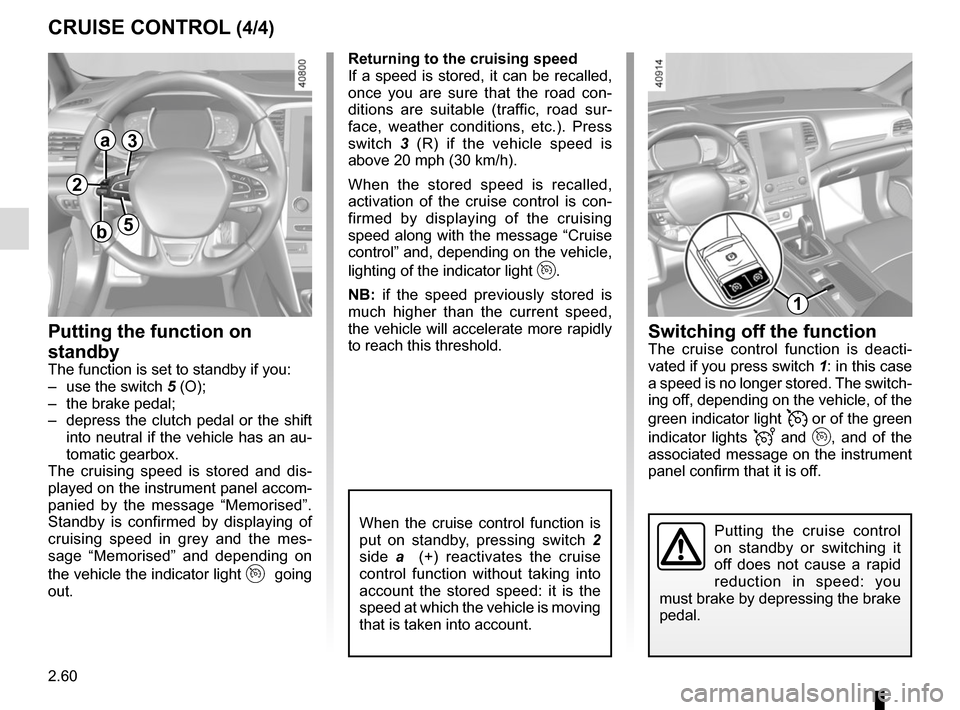
CRUISE CONTROL (4/4)Switching off the function
The cruise control function is deacti-
vated if you press switch 1: in this case
a speed is no longer stored. The switch-
ing off, depending on the vehicle, of the
green indicator light
or of the green
indicator lights
and , and of the
associated message on the instrument
panel confirm that it is off.
Returning to the cruising speed
If a speed is stored, it can be recalled,
once you are sure that the road con-
ditions are suitable (traffic, road sur-
face, weather conditions, etc.). Press
switch
3 (R) if the vehicle speed is
above 20 mph (30 km/h).
When the stored speed is recalled,
activation of the cruise control is con-
firmed by displaying of the cruising
speed along with the message “Cruise
control” and, depending on the vehicle,
lighting of the indicator light
.
NB: if the speed previously stored is
much higher than the current speed,
the vehicle will accelerate more rapidly
to reach this threshold.
When the cruise control function is
put on standby, pressing switch 2
side a (+) reactivates the cruise
control function without taking into
account the stored speed: it is the
speed at which the vehicle is moving
that is taken into account.
Putting the function on
standby
The function is set to standby if you:
– use the switch 5 (O);
– the brake pedal;
– depress the clutch pedal or the shift into neutral if the vehicle has an au-
tomatic gearbox.
The cruising speed is stored and dis-
played on the instrument panel accom-
panied by the message “Memorised”.
Standby is confirmed by displaying of
cruising speed in grey and the mes-
sage “Memorised” and depending on
the vehicle the indicator light
going
out.
Putting the cruise control
on standby or switching it
off does not cause a rapid
reduction in speed: you
must brake by depressing the brake
pedal.
2
a
b
3
5
1
Page 175 of 346
2.63
Driving
Once a cruising speed is memorised
and the cruise control function is active,
you may lift your foot off the accelera-
tor pedal.
If a following distance is stored and a
vehicle travelling slower than yours is
detected by the system in your lane,
your vehicle will brake (with the brake
lights on) and adapt its speed to that of
the vehicle in front, respecting the fol-
lowing distance selected previously.
Overtaking
If your speed is lower than the cruise
control and you wish to perform an
overtaking manoeuvre, activating the
direction indicator will provide acceler-
ation enabling the overtaking manoeu-
vre.
Please note that you must
keep your feet close to the
pedals in order to react in
an emergency.
ADAPTIVE CRUISE CONTROL (3/7)
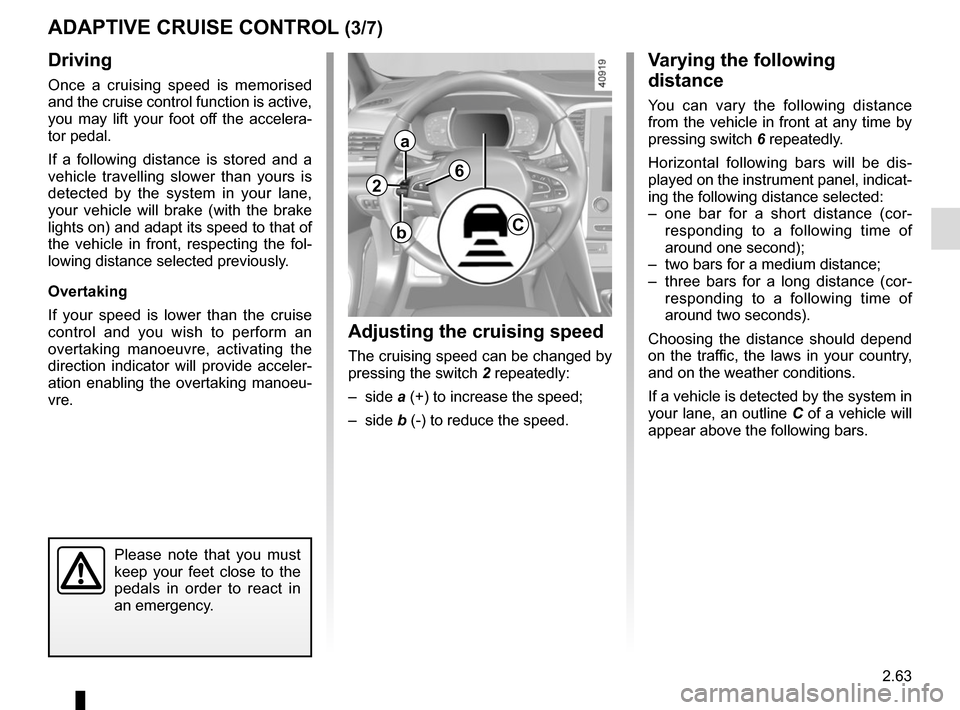
Adjusting the cruising speed
The cruising speed can be changed by
pressing the switch 2 repeatedly:
– side a (+) to increase the speed;
– side b (-) to reduce the speed.
Varying the following
distance
You can vary the following distance
from the vehicle in front at any time by
pressing switch 6 repeatedly.
Horizontal following bars will be dis-
played on the instrument panel, indicat-
ing the following distance selected:
– one bar for a short distance (cor- responding to a following time of
around one second);
– two bars for a medium distance;
– three bars for a long distance (cor- responding to a following time of
around two seconds).
Choosing the distance should depend
on the traffic, the laws in your country,
and on the weather conditions.
If a vehicle is detected by the system in
your lane, an outline C of a vehicle will
appear above the following bars.
2
a
bC
6
Page 177 of 346
2.65
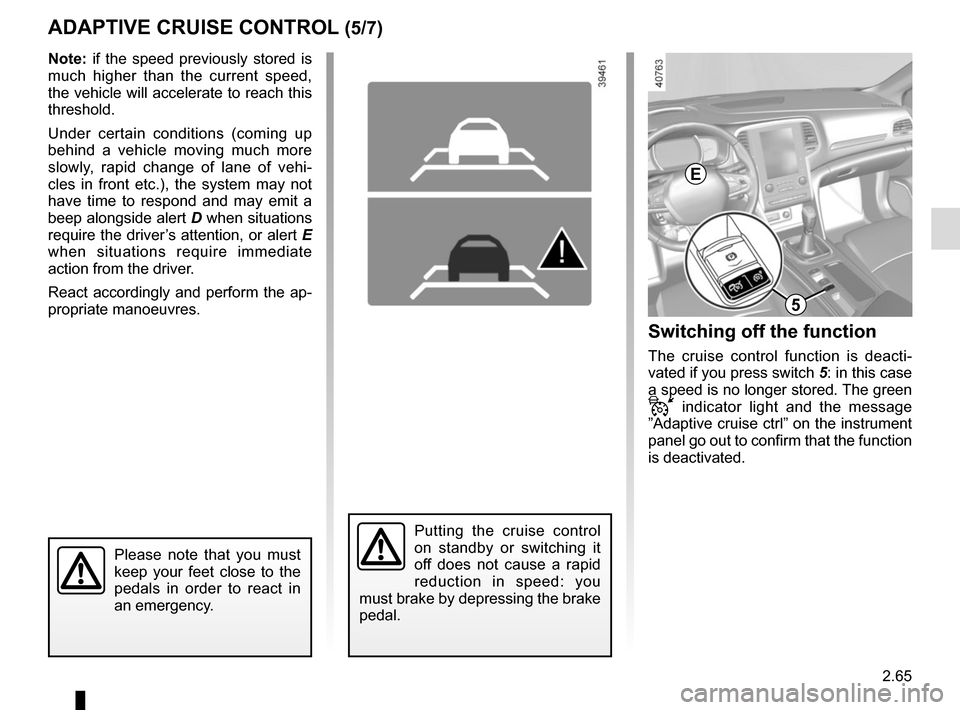
ADAPTIVE CRUISE CONTROL (5/7)Switching off the function
The cruise control function is deacti-
vated if you press switch 5: in this case
a speed is no longer stored. The green
indicator light and the message
”Adaptive cruise ctrl” on the instrument
panel go out to confirm that the function
is deactivated.
Putting the cruise control
on standby or switching it
off does not cause a rapid
reduction in speed: you
must brake by depressing the brake
pedal.
Please note that you must
keep your feet close to the
pedals in order to react in
an emergency.
Note: if the speed previously stored is
much higher than the current speed,
the vehicle will accelerate to reach this
threshold.
Under certain conditions (coming up
behind a vehicle moving much more
slowly, rapid change of lane of vehi-
cles in front etc.), the system may not
have time to respond and may emit a
beep alongside alert D when situations
require the driver’s attention, or alert E
when situations require immediate
action from the driver.
React accordingly and perform the ap-
propriate manoeuvres.
D
5
E
Page 179 of 346
2.67
ADAPTIVE CRUISE CONTROL (7/7)
Limitation of the system operation
– A vehicle travelling in the opposite direction will not trigger any alert\
or any action on the system operation.
– The sensor area should be kept clean and free of any modifications in or\
der to ensure the proper operation of the
system.
– Fixed obstacles (stationary vehicles, traffic jams, toll booths etc.) or objects travelling at low speed or of a \
small size ( motor-
bikes, bicycles, pedestrians etc.) may not be detected by the system.
– A vehicle entering the same lane will only be detected once it has entere\
d the detection zone. Sudden or late braking may then take place.
– When entering a bend or curve, the sensor may temporarily no longer dete\
ct the vehicle in front, and this may lead to acce- leration.
– When exiting a curve, the detection of the vehicle in front may be affected or delayed. Sudden or late braking may then take place.
– A slower vehicle travelling in an adjacent lane may be detected and cause\
a slowing down if one of the two vehicles is trav- elling too close to the lane of the other.
– The system is deactivated below around 20 mph (40 km/h). Drivers must \
react accordingly.
– Sudden changes in situation are not instantly taken into account by the \
system. Drivers must remain vigilant at all times and
under all circumstances.
Deactivating the function
You must disable the function if:
– the brake lights are not functioning;
– the front of the vehicle has undergone an impact or been damaged;
– the vehicle is being towed (breakdowns);
– traffic is heavy;
– the vehicle is travelling in a tunnel;
– the vehicle is travelling on a windy road;
– the vehicle is travelling on a slippery road or in poor weather conditio\
ns (fog, snow, rain, side winds etc.).
In the event of the system behaving abnormally, deactivate it and consult an authorised dealer.
Page 191 of 346
2.79
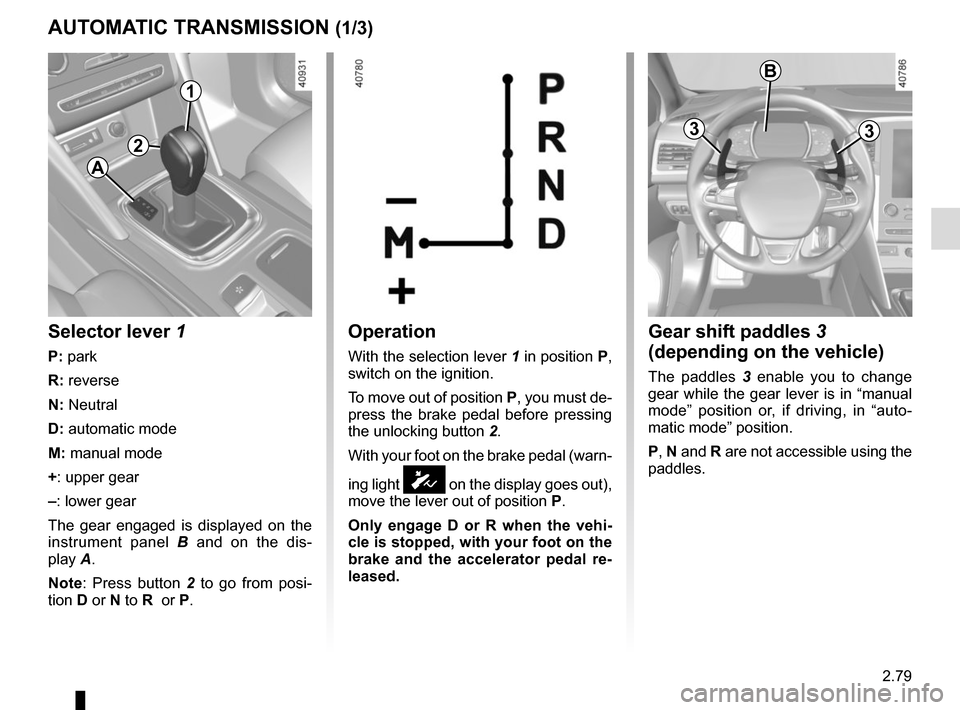
Operation
With the selection lever 1 in position P,
switch on the ignition.
To move out of position P, you must de-
press the brake pedal before pressing
the unlocking button 2.
With your foot on the brake pedal (warn-
ing light
Ó on the display goes out),
move the lever out of position P.
Only engage D or R when the vehi-
cle is stopped, with your foot on the
brake and the accelerator pedal re-
leased.
Selector lever 1
P: park
R: reverse
N: Neutral
D: automatic mode
M: manual mode
+: upper gear
–: lower gear
The gear engaged is displayed on the
instrument panel B and on the dis-
play A.
Note: Press button 2 to go from posi-
tion D or N to R or P.
AUTOMATIC TRANSMISSION (1/3)
A
Gear shift paddles 3
(depending on the vehicle)
The paddles 3 enable you to change
gear while the gear lever is in “manual
mode” position or, if driving, in “auto-
matic mode” position.
P, N and R are not accessible using the
paddles.
33
1
2
B
Page 247 of 346
3.53
Permissible nose weight, maxi-
mum permissible towing weight,
braked and unbraked: refer to
the information on “Weights” in
Section 6.
Choice and fitting of towing
equipment
Maximum weight of towing equip-
ment:
– 36 kg (5-door version);
– 37 kg (4-seater and estate ver-
sions).
For fitting and conditions of use,
refer to the equipment’s fitting in-
structions.
Please keep these instructions with
the rest of the vehicle documenta-
tion.
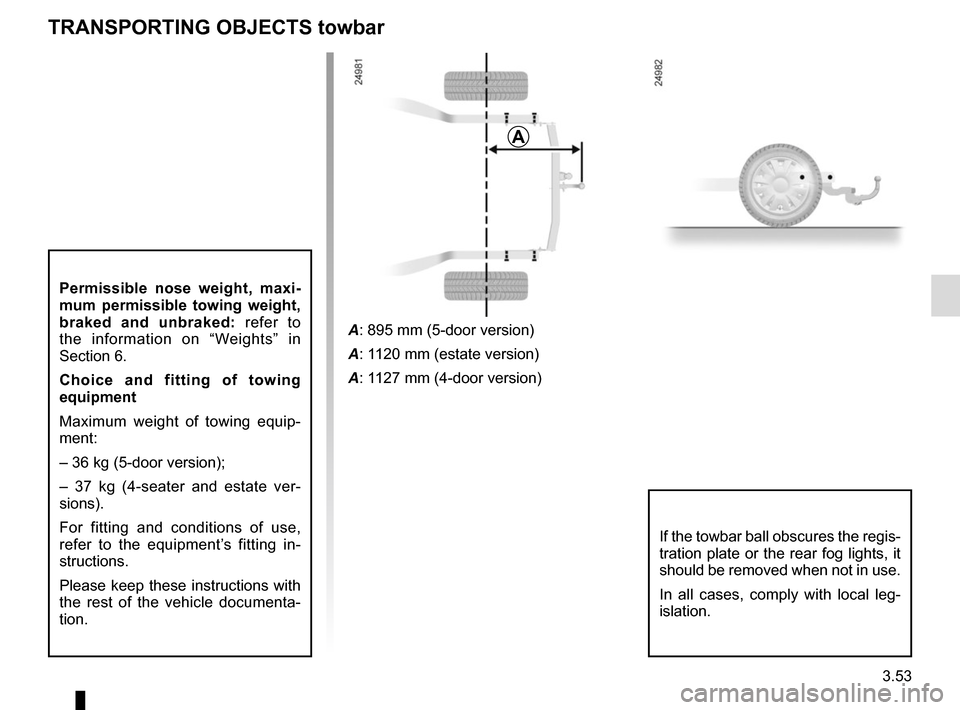
TRANSPORTING OBJECTS towbar
A
A: 895 mm (5-door version)
A: 1120 mm (estate version)
A: 1127 mm (4-door version)
If the towbar ball obscures the regis-
tration plate or the rear fog lights, it
should be removed when not in use.
In all cases, comply with local leg-
islation.
Page 261 of 346
4.9
LEVELS (2/3)
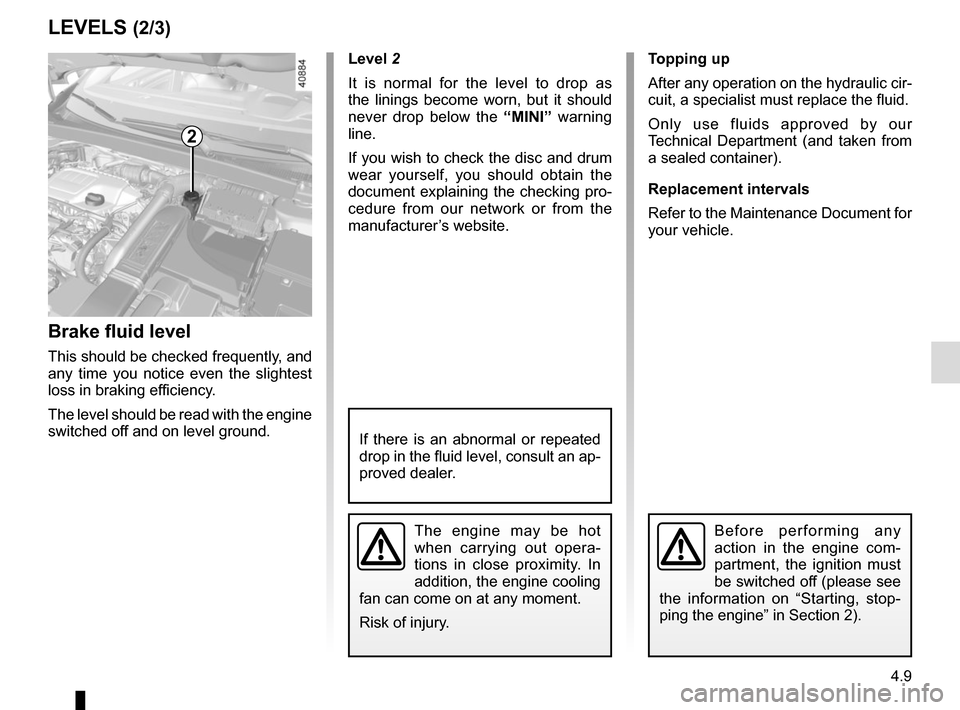
Brake fluid level
This should be checked frequently, and
any time you notice even the slightest
loss in braking efficiency.
The level should be read with the engine
switched off and on level ground.Level 2
It is normal for the level to drop as
the linings become worn, but it should
never drop below the “MINI” warning
line.
If you wish to check the disc and drum
wear yourself, you should obtain the
document explaining the checking pro-
cedure from our network or from the
manufacturer’s website. Topping up
After any operation on the hydraulic cir-
cuit, a specialist must replace the fluid.
Only use fluids approved by our
Technical Department (and taken from
a sealed container).
Replacement intervals
Refer to the Maintenance Document for
your vehicle.
The engine may be hot
when carrying out opera-
tions in close proximity. In
addition, the engine cooling
fan can come on at any moment.
Risk of injury.
2
Before performing any
action in the engine com-
partment, the ignition must
be switched off (please see
the information on “Starting, stop-
ping the engine” in Section 2).
If there is an abnormal or repeated
drop in the fluid level, consult an ap-
proved dealer.