display RENAULT MEGANE HATCHBACK 2016 X95 / 3.G Owners Manual
[x] Cancel search | Manufacturer: RENAULT, Model Year: 2016, Model line: MEGANE HATCHBACK, Model: RENAULT MEGANE HATCHBACK 2016 X95 / 3.GPages: 242, PDF Size: 3.54 MB
Page 17 of 242
child safety............................................................. (current page)
children (safety) ..................................................... (current page)
Jaune NoirNoir texte
1.11
ENG_UD18872_4
Ouverture et fermeture des portes (X95 - B95 - D95 - Renault)
ENG_NU_837-8_BDK95_Renault_1
OpENINg AN d c LO s IN g THE d OOR s (2/2)
c
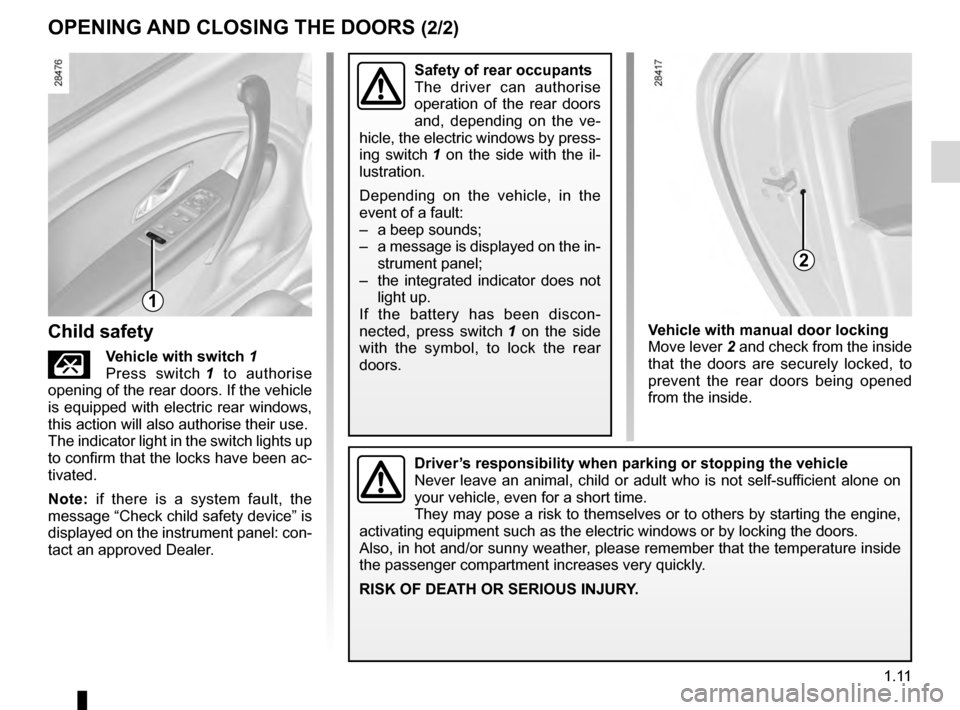
hild safety
Çvehicle with switch 1
Press switch 1
to authorise
opening of the rear doors. If the vehicle
is equipped with electric rear windows,
this action will also authorise their use.
The indicator light in the switch lights up
to confirm that the locks have been ac-
tivated.
Note: if there is a system fault, the
message “Check child safety device” is
displayed on the instrument panel: con-
tact an approved Dealer.
1
vehicle with manual door locking
Move lever 2 and check from the inside
that the doors are securely locked, to
prevent the rear doors being opened
from the inside.
2
safety of rear occupants
T he driver can authorise
operation of the rear doors
and, depending on the ve-
hicle, the electric windows by press-
ing switch
1 on the side with the il-
lustration.
Depending on the vehicle, in the
event of a fault:
–
a beep sounds;
–
a
message is displayed on the in-
strument panel;
–
the
integrated indicator does not
light up.
If the battery has been discon-
nected, press switch
1
on the side
with the symbol, to lock the rear
doors.
driver’s responsibility when parking or stopping the vehicle
Never leave an animal, child or adult who is not self-sufficient alone on
your vehicle, even for a short time.
They may pose a risk to themselves or to others by starting the engine,
activating equipment such as the electric windows or by locking the door\
s.
Also, in hot and/or sunny weather, please remember that the temperature inside
the passenger compartment increases very quickly.
RI
s
K O
f d EATH OR s ERIOU s INJURY.
Page 29 of 242
JauneNoirNoir texte
1.23
ENG_UD21482_6
Ceintures de sécurité (X95 - B95 - D95 - Renault)
ENG_NU_837-8_BDK95_Renault_1
sEAT BELTs (2/3)
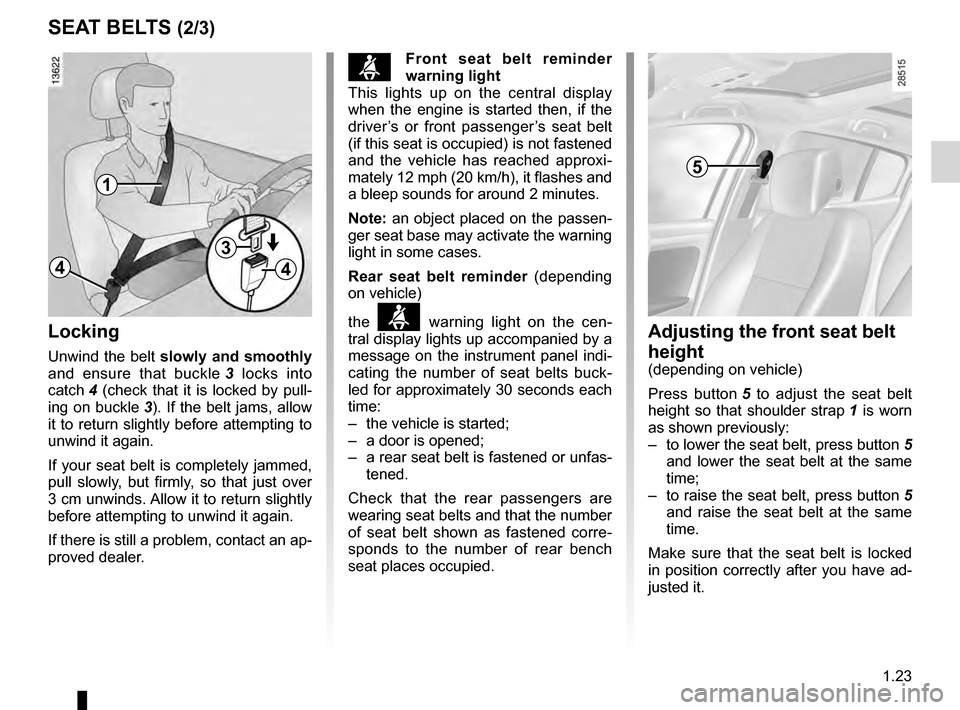
Adjusting the front seat belt
height
(depending on vehicle)
Press button
5
to adjust the seat belt
height so that shoulder strap
1 is worn
as shown previously:
–
to
lower the seat belt, press button 5
and lower the seat belt at the same
time;
–
to
raise the seat belt, press button 5
and raise the seat belt at the same
time.
Make sure that the seat belt is locked
in position correctly after you have ad-
justed it.
5
Locking
Unwind the belt slowly and smoothly
and ensure that buckle 3
locks into
catch
4 (check that it is locked by pull-
ing on buckle
3). If the belt jams, allow
it to return slightly before attempting to
unwind it again.
If your seat belt is completely jammed,
pull slowly, but firmly, so that just over
3 cm unwinds. Allow it to return slightly
before attempting to unwind it again.
If there is still a problem, contact an ap-
proved dealer.
1
4
3
4
ßfront seat belt reminder
warning light
This lights up on the central display
when the engine is started then, if the
driver’s or front passenger’s seat belt
(if this seat is occupied) is not fastened
and the vehicle has reached approxi-
mately 12 mph (20 km/h), it flashes and
a bleep sounds for around 2 minutes.
Note: an object placed on the passen-
ger seat base may activate the warning
light in some cases.
Rear seat belt reminder (depending
on vehicle)
the
ß warning light on the cen-
tral display lights up accompanied by a
message on the instrument panel indi-
cating the number of seat belts buck-
led for approximately 30 seconds each
time:
–
the vehicle is started;
–
a door is opened;
–
a
rear seat belt is fastened or unfas-
tened.
Check that the rear passengers are
wearing seat belts and that the number
of seat belt shown as fastened corre-
sponds to the number of rear bench
seat places occupied.
Page 49 of 242
air bagdeactivating the front passenger air bags ........ (current page)
front passenger air bag deactivation ..................... (current page)
child restraint/seat ................................ (up to the end of the DU)
child safety............................................ (up to the end of the DU)
child restraint/seat ................................ (up to the end of the DU)
transporting children ............................. (up to the end of the DU)
1.43
ENG_UD18912_4
Sécurité enfants : désactivation/activation airbag passager ava\
nt (X95 - B95 - D95 - Renault)
ENG_NU_837-8_BDK95_Renault_1
deactivating/activating the front passenger air bag
2
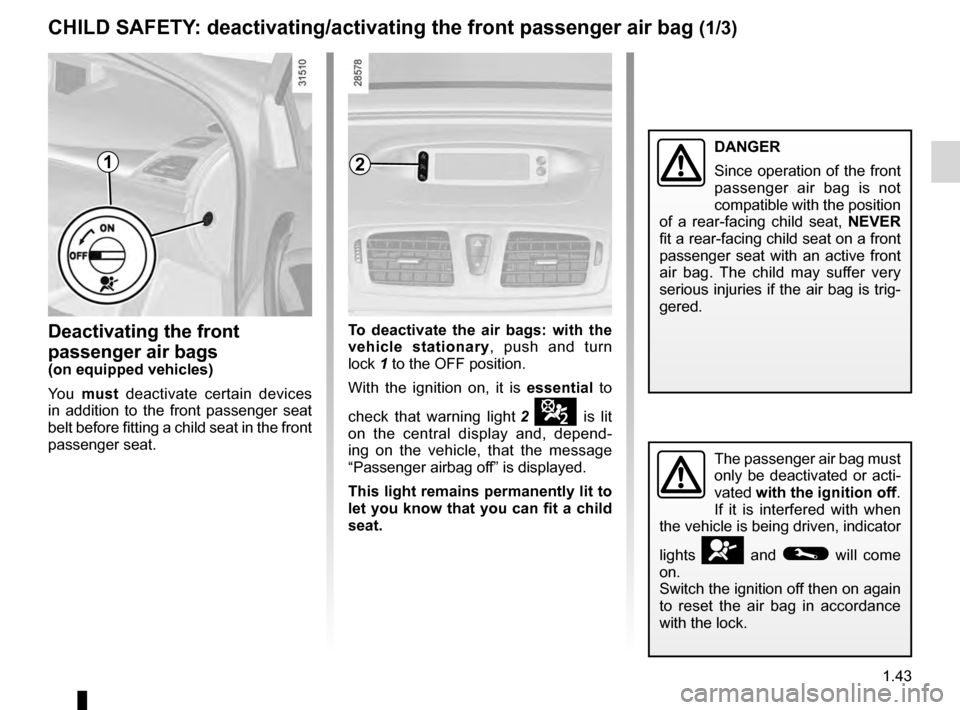
deactivating the front
passenger air bags
(on equipped vehicles)
You must deactivate certain devices
in addition to the front passenger seat
belt before fitting a child seat in the front
passenger seat. To deactivate the air bags: with the
vehicle stationary
, push and turn
lock 1 to the OFF position.
With the ignition on, it is essential to
check that warning light
2 ¹ is lit
on the central display and, depend-
ing on the vehicle, that the message
“Passenger airbag off” is displayed.
This light remains permanently lit to
let you know that you can fit a child
seat.
The passenger air bag must
only be deactivated or acti-
vated with the ignition off.
If it is interfered with when
the vehicle is being driven, indicator
lights
å and © will come
on.
Switch the ignition off then on again
to reset the air bag in accordance
with the lock.
cHILd sAfETY: deactivating/activating the front passenger air bag (1/3)
1dANgER
Since operation of the front
passenger air bag is not
compatible with the position
of a rear-facing child seat, NE
vE
R
fit a rear-facing child seat on a front
passenger seat with an active front
air bag. The child may suffer very
serious injuries if the air bag is trig-
gered.
Page 51 of 242
air bagactivating the front passenger air bags ............ (current page)
Jaune NoirNoir texte
1.45
ENG_UD18912_4
Sécurité enfants : désactivation/activation airbag passager ava\
nt (X95 - B95 - D95 - Renault)
ENG_NU_837-8_BDK95_Renault_1
cHILd sAfETY: deactivating/activating the front passenger air bag (3/3)
4
Operating faults
It is forbidden to fit a rear-facing child
seat to the front passenger seat if the
air bag activation/deactivation system
is faulty.
Allowing any other passenger to sit in
that seat is not recommended.
If warning lights
› and ¹ are
lit at the same time.
Contact your approved dealer as soon
as possible.
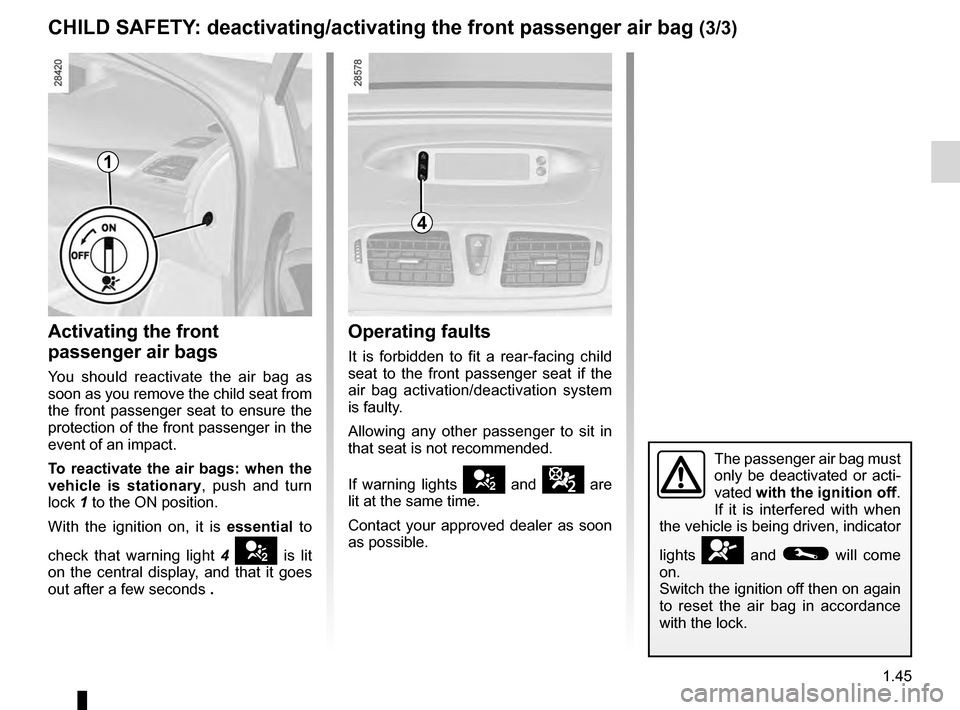
Activating the front
passenger air bags
You should reactivate the air bag as
soon as you remove the child seat from
the front passenger seat to ensure the
protection of the front passenger in the
event of an impact.
To reactivate the air bags: when the
vehicle is stationary , push and turn
lock
1 to the ON position.
With the ignition on, it is essential to
check that warning light
4 › is lit
on the central display, and that it goes
out after a few seconds .
1
The passenger air bag must
only be deactivated or acti-
vated with the ignition off.
If it is interfered with when
the vehicle is being driven, indicator
lights
å and © will come
on.
Switch the ignition off then on again
to reset the air bag in accordance
with the lock.
Page 56 of 242
instrument panel ................................... (up to the end of the DU)
warning lights........................................ (up to the end of the DU)
driver’s position .................................... (up to the end of the DU)
trip computer and warning system........ (up to the end of the DU)
indicators: instrument panel ............................. (up to the end of the DU)
display .................................................. (up to the end of the DU)
operating faults ..................................... (up to the end of the DU)
control instruments ............................... (up to the end of the DU)
indicators ............................................................... (current page)
lights: fog lights .......................................................... (current page)
lights: dipped beam headlights ................................... (current page)
lights: direction indicators ........................................... (current page)
lights: main beam headlights ...................................... (current page)
handbrake.............................................................. (current page)
fuel filling ................................................................. (current page)
1.50
ENG_UD23618_6
Tableau de bord : témoins lumineux (X95 - B95 - D95 - K95 - L38 - X38\
- X32 - B32 - Renault)
ENG_NU_837-8_BDK95_Renault_1
Jaune NoirNoir texte
Control instruments
WARNINg LIgHTs (1/4)
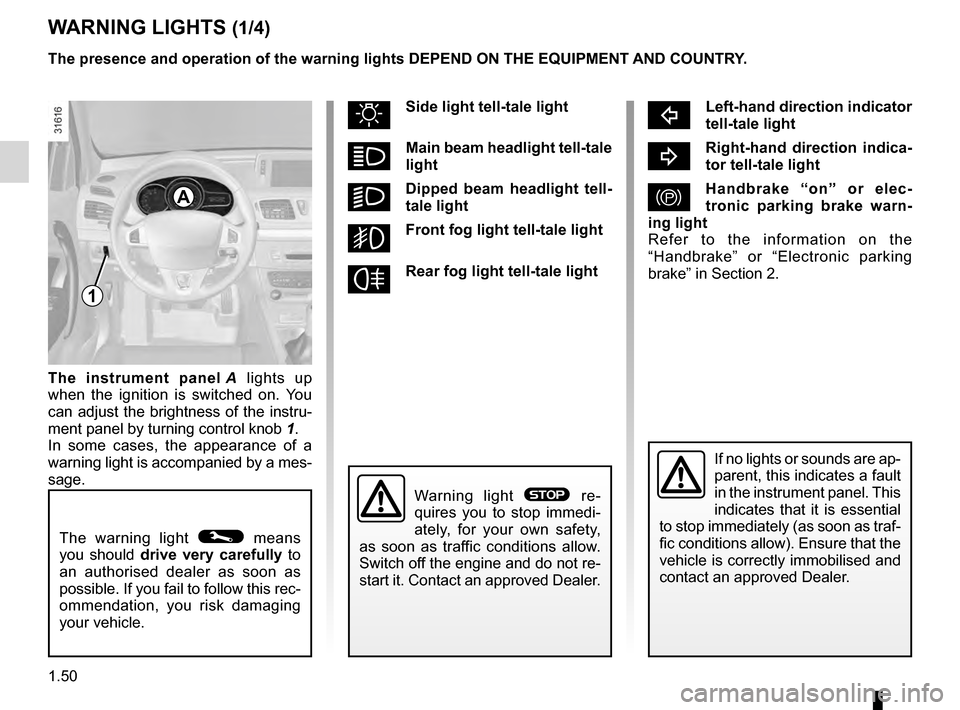
The warning light © means
you should drive very carefully to
an authorised dealer as soon as
possible. If you fail to follow this rec-
ommendation, you risk damaging
your vehicle.
A
cLeft-hand direction indicator
tell-tale light
bRight-hand direction indica-
tor tell-tale light
}Handbrake “on” or elec-
tronic parking brake warn-
ing light
Refer to the information on the
“Handbrake” or “Electronic parking
brake” in Section 2.
uside light tell-tale light
ámain beam headlight tell-tale
light
kdipped beam headlight tell-
tale light
gfront fog light tell-tale light
fRear fog light tell-tale light
If no lights or sounds are ap-
parent, this indicates a fault
in the instrument panel. This
indicates that it is essential
to stop immediately (as soon as traf-
fic conditions allow). Ensure that the
vehicle is correctly immobilised and
contact an approved Dealer.
Warning light ® re-
quires you to stop immedi-
ately, for your own safety,
as soon as traffic conditions allow.
Switch off the engine and do not re-
start it. Contact an approved Dealer.
1
The instrument panel A lights up
when the ignition is switched on. You
can adjust the brightness of the instru-
ment panel by turning control knob
1
.
In some cases, the appearance of a
warning light is accompanied by a mes-
sage. The presence and operation of the warning lights d E p EN d ON THE EQUI pm ENT AN d c OUNTRY.
Page 59 of 242
JauneNoirNoir texte
1.53
ENG_UD23618_6
Tableau de bord : témoins lumineux (X95 - B95 - D95 - K95 - L38 - X38\
- X32 - B32 - Renault)
ENG_NU_837-8_BDK95_Renault_1
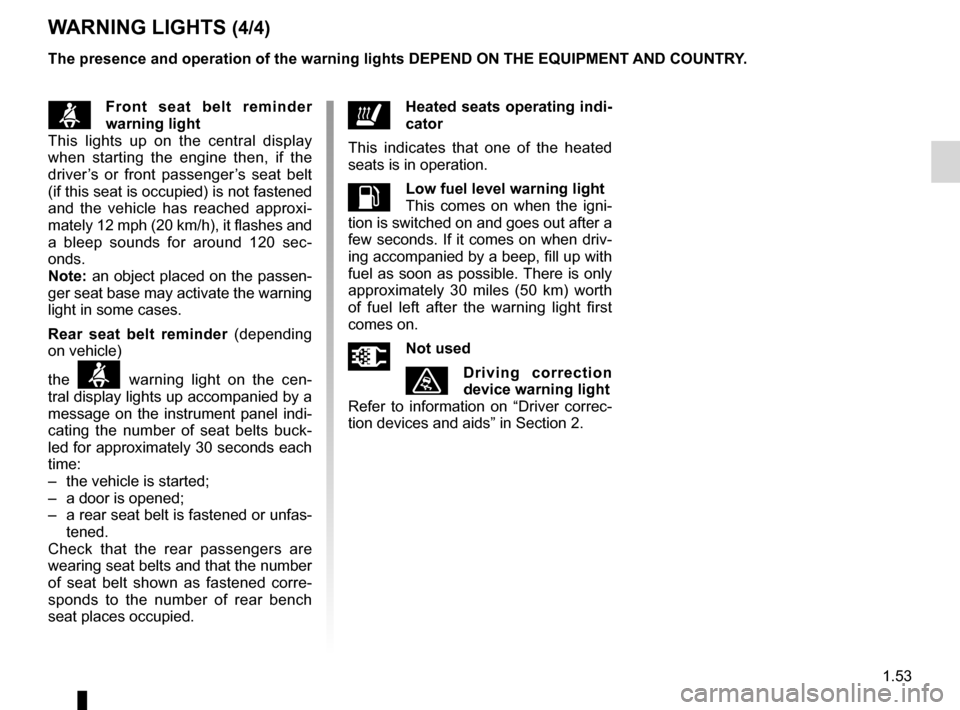
ßfront seat belt reminder
warning light
This lights up on the central display
when starting the engine then, if the
driver’s or front passenger’s seat belt
(if this seat is occupied) is not fastened
and the vehicle has reached approxi-
mately 12 mph (20 km/h), it flashes and
a bleep sounds for around 120 sec-
onds.
Note: an object placed on the passen-
ger seat base may activate the warning
light in some cases.
Rear seat belt reminder (depending
on vehicle)
the
ß warning light on the cen-
tral display lights up accompanied by a
message on the instrument panel indi-
cating the number of seat belts buck-
led for approximately 30 seconds each
time:
–
the vehicle is started;
–
a door is opened;
–
a
rear seat belt is fastened or unfas-
tened.
Check that the rear passengers are
wearing seat belts and that the number
of seat belt shown as fastened corre-
sponds to the number of rear bench
seat places occupied.
WARNINg LIgHTs (4/4)
ðHeated seats operating indi-
cator
This indicates that one of the heated
seats is in operation.
LLow fuel level warning light
This comes on when the igni-
tion is switched on and goes out after a
few seconds. If it comes on when driv-
ing accompanied by a beep, fill up with
fuel as soon as possible. There is only
approximately 30 miles (50 km) worth
of fuel left after the warning light first
comes on.
ÜNot used
ùdriving correction
device warning light
Refer to information on “Driver correc-
tion devices and aids” in Section 2.
The presence and operation of the warning lights
d
E
p
EN
d ON THE EQUI pm ENT AN d c OUNTRY.
Page 60 of 242
indicators:instrument panel ............................. (up to the end of the DU)
display .................................................. (up to the end of the DU)
instrument panel ................................... (up to the end of the DU)
fuel level ................................................................ (current page)
coolant ................................................................... (current page)
control instruments ............................... (up to the end of the DU)
levels: fuel ................................................................... (current page)
levels: coolant ............................................................. (current page)
1.54
ENG_UD18928_3
Tableau de bord : afficheurs et indicateurs (X95 - B95 - D95 - Renault)
ENG_NU_837-8_BDK95_Renault_1
Jaune NoirNoir texte
dIspLAYs AN d IN d I c ATOR s (1/2)
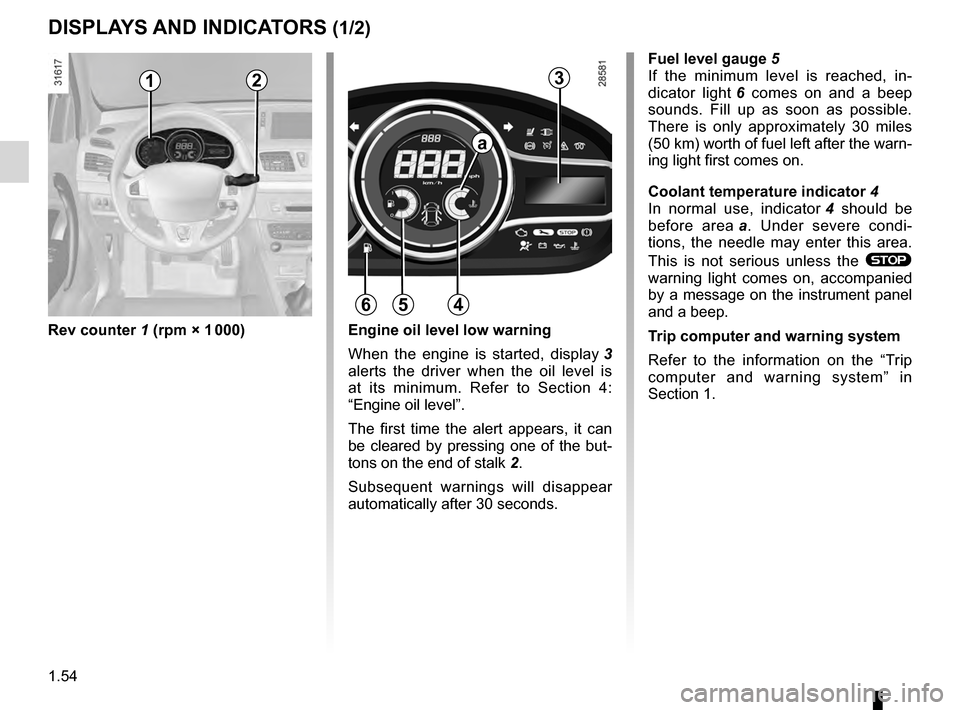
Rev counter 1 (rpm × 1 000)
f
uel level gauge
5
If the minimum level is reached, in-
dicator light
6
comes on and a beep
sounds. Fill up as soon as possible.
There is only approximately 30 miles
(50 km) worth of fuel left after the warn-
ing light first comes on.
c
oolant temperature indicator 4
In normal use, indicator
4
should be
before area
a .
Under severe condi-
tions, the needle may enter this area.
This is not serious unless the
®
warning light comes on, accompanied
by a message on the instrument panel
and a beep.
Trip computer and warning system
Refer to the information on the “Trip
computer and warning system” in
Section 1.
Engine oil level low warning
When the engine is started, display
3
alerts the driver when the oil level is
at its minimum. Refer to Section 4:
“Engine oil level”.
The first time the alert appears, it can
be cleared by pressing one of the but-
tons on the end of stalk
2.
Subsequent warnings will disappear
automatically after 30 seconds.
12
564
a
3
Page 61 of 242
JauneNoirNoir texte
1.55
ENG_UD18928_3
Tableau de bord : afficheurs et indicateurs (X95 - B95 - D95 - Renault)
ENG_NU_837-8_BDK95_Renault_1
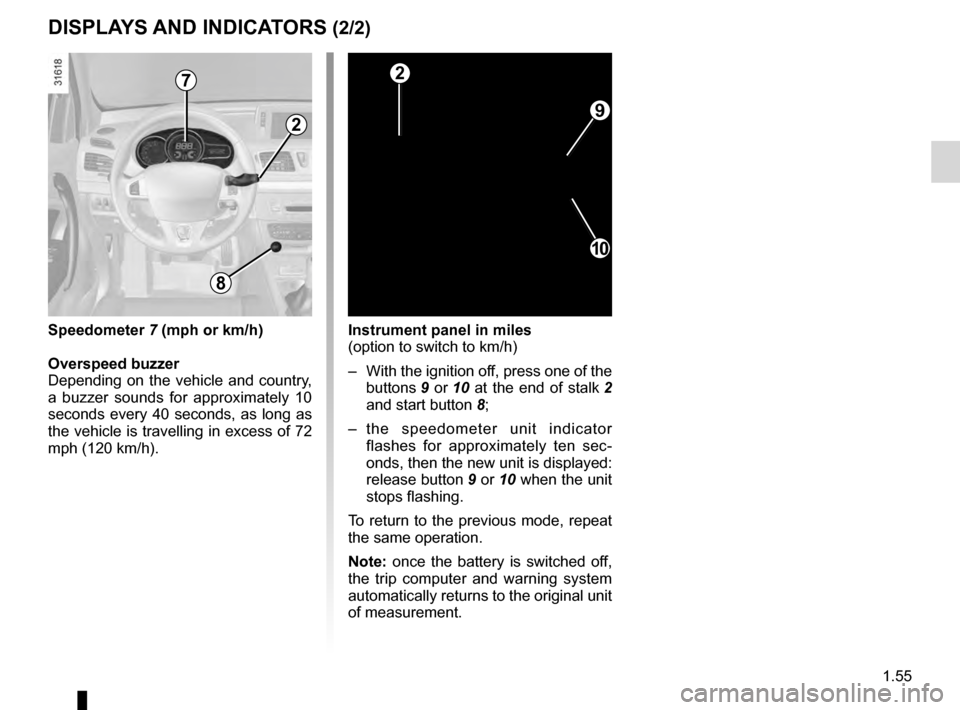
Instrument panel in miles
(option to switch to km/h)
–
With
the ignition off, press one of the
buttons
9 or 10 at the end of stalk 2
and start button
8;
–
t
he speedometer unit indicator
flashes for approximately ten sec-
onds, then the new unit is displayed:
release button
9 or 10 when the unit
stops flashing.
To return to the previous mode, repeat
the same operation.
Note: once the battery is switched off,
the trip computer and warning system
automatically returns to the original unit
of measurement.
dIspLAYs AN d IN d I c ATOR s (2/2)
9
10
2
2
8
speedometer 7 (mph or km/h)
Overspeed buzzer
Depending
on the vehicle and country,
a buzzer sounds for approximately 10
seconds every 40 seconds, as long as
the vehicle is travelling in excess of 72
mph (120 km/h).
7
Page 62 of 242
control instruments ............................... (up to the end of the DU)
indicators: instrument panel ............................. (up to the end of the DU)
trip computer and warning system........ (up to the end of the DU)
instrument panel ................................... (up to the end of the DU)
warning lights........................................ (up to the end of the DU)
instrument panel messages.................. (up to the end of the DU)
1.56
ENG_UD23628_4
Ordinateur de bord : généralités (X95 - B95 - D95 - K95 - L38 \
- X38 - X32 - B32 - Renault)
ENG_NU_837-8_BDK95_Renault_1
Jaune NoirNoir texte
trip computer
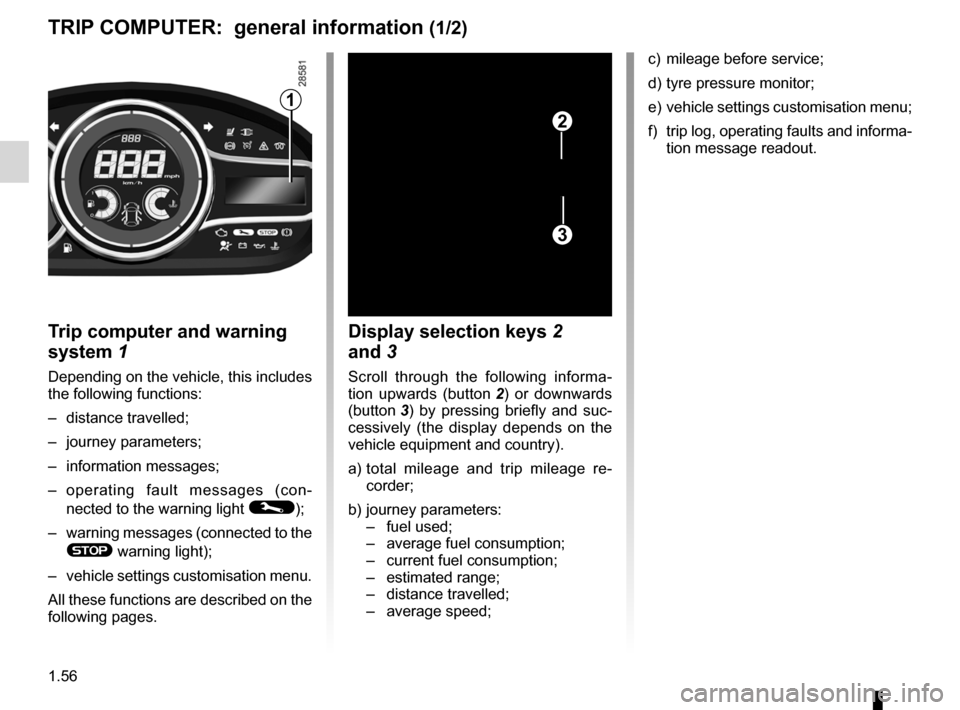
Trip computer and warning
system
1
Depending on the vehicle, this includes
the following functions:
–
distance travelled;
–
journey parameters;
–
information messages;
–
o
perating fault messages (con-
nected to the warning light
©);
–
warning
messages (connected to the
® warning light);
–
vehicle
settings customisation menu.
All these functions are described on the
following pages.
display selection keys 2
and 3
Scroll through the following informa-
tion upwards (button 2)
or downwards
(button
3 )
by pressing briefly and suc-
cessively (the display depends on the
vehicle equipment and country).
a)
t
otal mileage and trip mileage re-
corder;
b)
journey parameters:
–
fuel used;
–
average fuel consumption;
–
current fuel consumption;
–
estimated range;
–
distance travelled;
–
average speed;
1
2
3
c) mileage before service;
d)
tyre pressure monitor;
e)
vehicle
settings customisation menu;
f)
trip
log, operating faults and informa-
tion message readout.
TRIp c O mp UTER: general information (1/2)
Page 63 of 242
JauneNoirNoir texte
1.57
ENG_UD23628_4
Ordinateur de bord : généralités (X95 - B95 - D95 - K95 - L38 \
- X38 - X32 - B32 - Renault)
ENG_NU_837-8_BDK95_Renault_1
Trip mileage resetting
With “trip mileage recorder” selected on
the display, press button
2 or 3 until the
mileage recorder resets to zero.
Resetting the journey
parameters (reset button)
With one of the journey parameters se-
lected on the display, press button 2
or
3 until the display resets.
Interpreting some of the
values displayed after
resetting
The values showing average fuel con-
sumption, range and average speed
will become more stable and reliable
the further you travel after pressing the
reset button.
For the first few miles after pressing
the reset key you will notice that the
range increases as you travel. This
range takes into account the average
fuel consumption since the last time the
reset button was pressed. Therefore,
the average fuel consumption may de-
crease when:
–
the vehicle stops accelerating;
–
t
he engine reaches its operating
temperature (if the engine was cold
when the reset key was pressed);
–
w
hen driving from an urban area
onto the open road.
3
2
Automatic resetting of the
journey parameters
Resetting occurs automatically when
the maximum value of any of the pa-
rameters is exceeded.
TRIp c O mp UTER: general information (2/2)