service RENAULT MEGANE HATCHBACK 2016 X95 / 3.G User Guide
[x] Cancel search | Manufacturer: RENAULT, Model Year: 2016, Model line: MEGANE HATCHBACK, Model: RENAULT MEGANE HATCHBACK 2016 X95 / 3.GPages: 242, PDF Size: 3.54 MB
Page 163 of 242
engine oil .............................................. (up to the end of the DU)
oil change ............................................. (up to the end of the DU)
engine oil level ...................................... (up to the end of the DU)
engine oil capacity ................................ (up to the end of the DU)
4.5
ENG_UD21553_5
Niveau huile moteur : appoint/remplissage (X95 - B95 - D95 - Renault)
ENG_NU_837-8_BDK95_Renault_4
topping up/filling
engine Oil level: topping up/filling (1/2)
topping up/filling
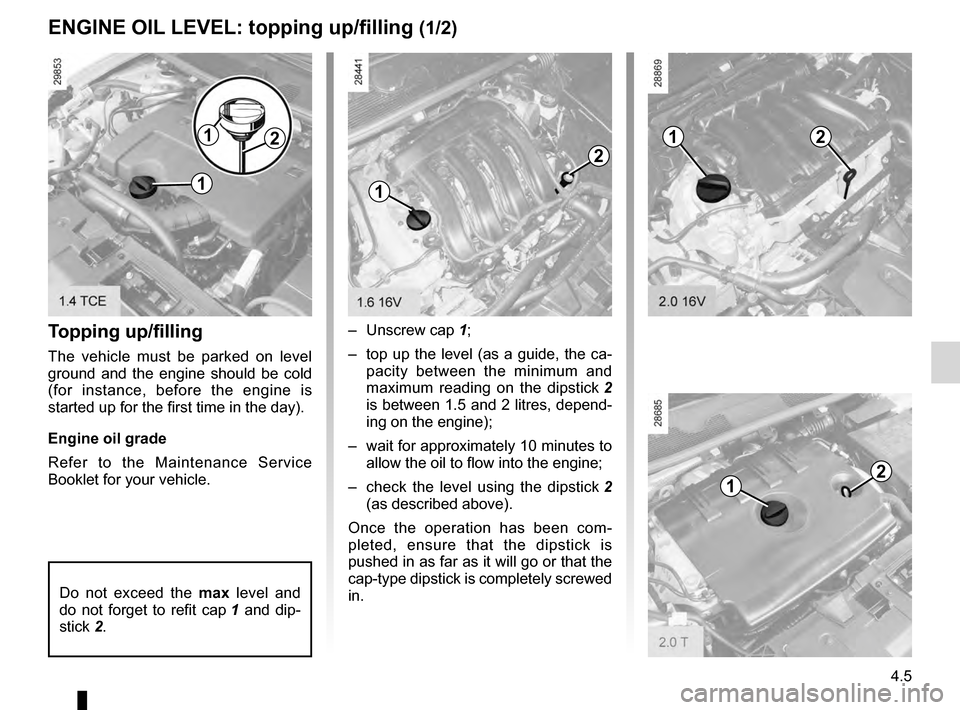
The vehicle must be parked on level
ground and the engine should be cold
(for instance, before the engine is
started up for the first time in the day).
e
ngine oil grade
Refer to the Maintenance Service
Booklet for your vehicle. –
Unscrew cap
1;
– top up the level (as a guide, the ca-
pacity between the minimum and
maximum reading on the dipstick
2
is between 1.5 and 2 litres, depend-
ing on the engine);
–
wait
for approximately 10 minutes to
allow the oil to flow into the engine;
–
c
heck the level using the dipstick
2
(as described above).
Once the operation has been com-
pleted, ensure that the dipstick is
pushed in as far as it will go or that the
cap-type dipstick is completely screwed
in.
Do not exceed the max level and
do not forget to refit cap 1 and dip-
stick
2.
1
2
21
12
1
12
Page 164 of 242
filteroil filter ............................................ (up to the end of the DU)
4.6
ENG_UD21553_5
Niveau huile moteur : appoint/remplissage (X95 - B95 - D95 - Renault)
ENG_NU_837-8_BDK95_Renault_4
Engine oil change
engine Oil level: topping up/filling (2/2)engine Oil CHA nge
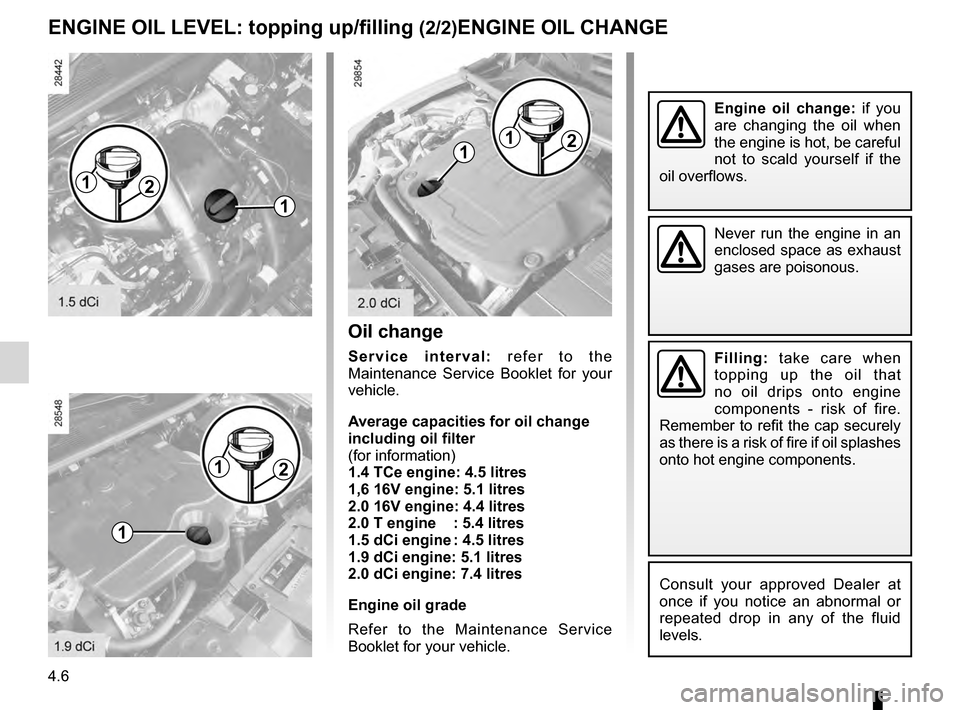
Oil change
S e r v i c e i n t e r v a l : r e f e r t o t h e
Maintenance Service Booklet for your
vehicle.
Average capacities for oil change
including oil filter
(for information)
1.4
t Ce engine: 4.5 litres
1,6 16
v engine: 5.1 litres
2.0 16
v engine: 4.4 litres
2.0
t engine : 5.4 litres
1.5 dCi engine
: 4.5 litres
1.9 dCi engine: 5.1 litres
2.0 dCi
engine: 7.4 litres
e
ngine oil grade
Refer to the Maintenance Service
Booklet for your vehicle.
engine oil change: if you
are changing the oil when
the engine is hot, be careful
not to scald yourself if the
oil overflows.
Filling: take care when
topping up the oil that
no oil drips onto engine
components - risk of fire.
Remember to refit the cap securely
as there is a risk of fire if oil splashes
onto hot engine components.
Never run the engine in an
enclosed space as exhaust
gases are poisonous.
Consult your approved Dealer at
once if you notice an abnormal or
repeated drop in any of the fluid
levels.
1
1
1
1
2
2
121
Page 165 of 242
levels:coolant ............................................................. (current page)
tanks and reservoirs coolant ............................................................. (current page)
coolant ................................................................... (current page)
4.7
ENG_UD18903_5
Niveaux / filtres (X95 - B95 - D95 - Renault)
ENG_NU_837-8_BDK95_Renault_4
Levels:
engine coolant
levelS (1/3)
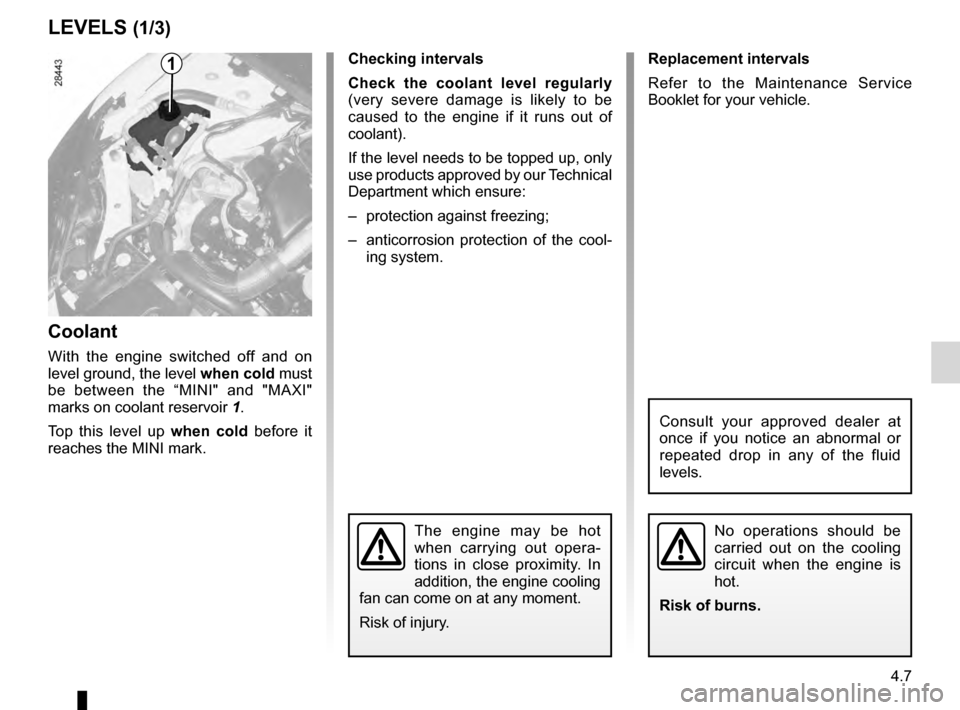
Coolant
With the engine switched off and on
level ground, the level when cold must
be between the “MINI" and "MAXI"
marks on coolant reservoir
1
.
Top this level up when cold before it
reaches the MINI mark. Checking intervals
Check the coolant level regularly
(very severe damage is likely to be
caused to the engine if it runs out of
coolant).
If the level needs to be topped up, only
use products approved by our Technical
Department which ensure:
–
protection against freezing;
–
a
nticorrosion protection of the cool-
ing system.
No operations should be
carried out on the cooling
circuit when the engine is
hot.
Risk of burns.
Consult your approved dealer at
once if you notice an abnormal or
repeated drop in any of the fluid
levels.
1Replacement intervals
Refer to the Maintenance Service
Booklet for your vehicle.
The engine may be hot
when carrying out opera-
tions in close proximity. In
addition, the engine cooling
fan can come on at any moment.
Risk of injury.
Page 166 of 242
brake fluid .............................................................. (current page)
levels: brake fluid ........................................................ (current page)
tanks and reservoirs brake fluid ........................................................ (current page)
4.8
ENG_UD18903_5
Niveaux / filtres (X95 - B95 - D95 - Renault)
ENG_NU_837-8_BDK95_Renault_4
Jaune NoirNoir texte
brake fluid
levelS (2/3)
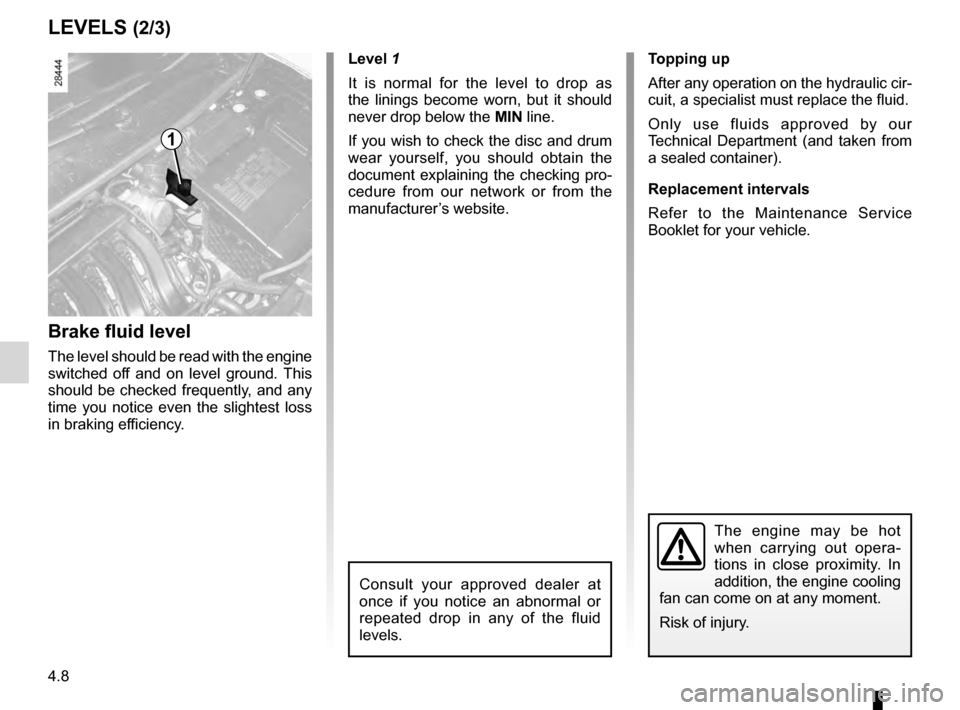
Brake fluid level
The level should be read with the engine
switched off and on level ground. This
should be checked frequently, and any
time you notice even the slightest loss
in braking efficiency.
l
evel 1
It is normal for the level to drop as
the linings become worn, but it should
never drop below the M in line.
If you wish to check the disc and drum
wear yourself, you should obtain the
document explaining the checking pro-
cedure from our network or from the
manufacturer’s website.
topping up
After
any operation on the hydraulic cir-
cuit, a specialist must replace the fluid.
Only use fluids approved by our
Technical Department (and taken from
a sealed container).
Replacement intervals
Refer to the Maintenance Service
Booklet for your vehicle.
1
The engine may be hot
when carrying out opera-
tions in close proximity. In
addition, the engine cooling
fan can come on at any moment.
Risk of injury.
Consult your approved dealer at
once if you notice an abnormal or
repeated drop in any of the fluid
levels.
Page 167 of 242
levels:windscreen washer reservoir ........................... (current page)
windscreen washer ................................................ (current page)
filter air filter ............................................................. (current page)
filter passenger compartment filter .......................... (current page)
filter oil filter ............................................................. (current page)
filter diesel filter ........................................................ (current page)
tanks and reservoirs: windscreen washer .......................................... (current page)
Jaune NoirNoir texte
4.9
ENG_UD18903_5
Niveaux / filtres (X95 - B95 - D95 - Renault)
ENG_NU_837-8_BDK95_Renault_4
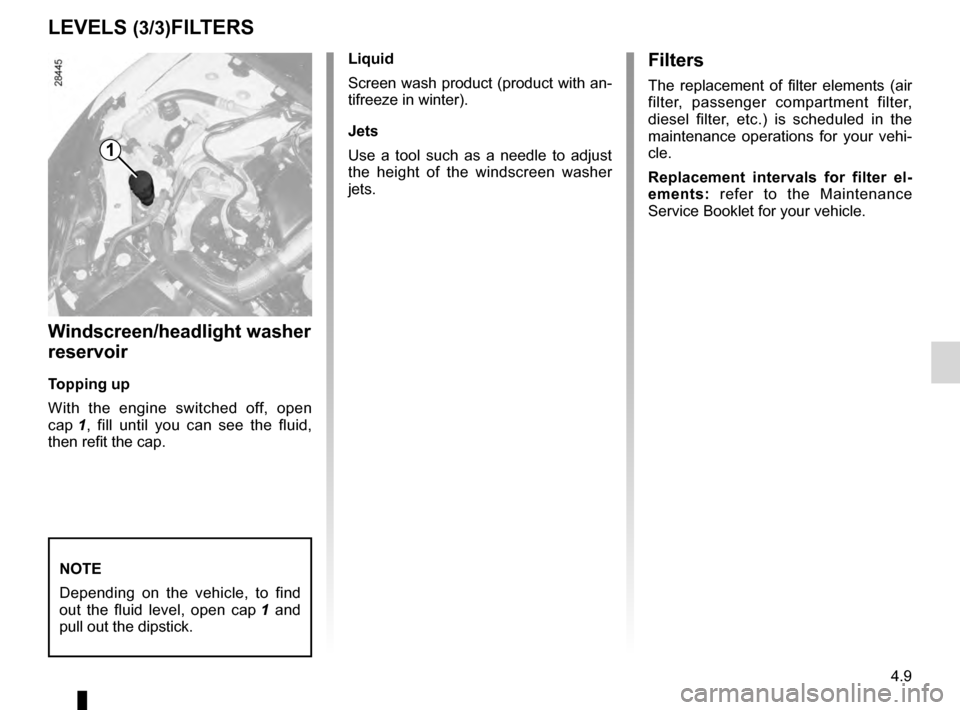
windscreen/headlight washer reservoir
Filters
levelS (3/3)FilteRS
Windscreen/headlight washer
reservoir
topping up
W ith the engine switched off, open
cap
1 ,
fill until you can see the fluid,
then refit the cap.
l
iquid
Screen wash product (product with an-
tifreeze in winter).
Jets
Use a tool such as a needle to adjust
the height of the windscreen washer
jets.
nOte
D
epending on the vehicle, to find
out the fluid level, open cap
1
and
pull out the dipstick.
Filters
The replacement of filter elements (air
filter, passenger compartment filter,
diesel filter, etc.) is scheduled in the
maintenance operations for your vehi-
cle.
Replacement intervals for filter el-
ements: refer to the Maintenance
Service Booklet for your vehicle.
1
Page 171 of 242

JauneNoirNoir texte
4.13
ENG_UD22865_9
Entretien de la carrosserie (X45 - H45 - J77 - X81 - X85 - B85 - C85 - \
S85 - X91 - B91 - K91 - D91 - X83 - X61 - X77 ph2 - K85 - X95 - B95 - D9\
5 - K95 - J95 - R95 - L38 -
ENG_NU_837-8_BDK95_Renault_4
– Before going through a roller type car
wash, return the windscreen wiper
stalk to the Park position (refer to
the information on the “Windscreen
wash/wipe” in Section 1). Check the
mounting of external accessories,
additional lights and mirrors, and
ensure that the wiper blades are se-
cured with adhesive tape.
Remove the radio aerial mast if your
vehicle is fitted with this equipment.
Remember to remove the tape and
refit the antenna after washing.
–
S
pray mechanical components,
hinges, etc. with products approved
by our Technical Department to
protect them after they have been
cleaned.
BODyWORk MAintenAnCe (2/2)
We have selected special products
to care for your vehicle and you can
obtain these from the manufactur-
er’s accessory outlets.
you should
– Observe the vehicle stopping dis- tances when driving on gravelled
surfaces to prevent paint damage.
–
R
epair, or have repaired quickly,
areas where the paint has been
damaged, to prevent corrosion
spreading.
–
R
emember to visit the body shop
periodically if your vehicle has an
anti-corrosion warranty. Refer to the
Maintenance Service Booklet.
–
R
espect local regulations about
washing vehicles (e.g. do not wash
your vehicle on a public highway). –
W
ash your car frequently,
with the
engine off , with cleaning products
recommended by our Technical
Department (never use abrasive
products) and be sure to jet-rinse off:
–
s
pots of tree resin and industrial
grime;
–
b
ird droppings, which cause a
chemical reaction with the paint
that rapidly discolours paint-
work and may even cause the
paint to peel off;
W
ash the vehicle immediately to
remove these marks since it is im-
possible to remove them by pol-
ishing;
–
s
alt, particularly in the wheel
arches and underneath the body
after driving in areas where the
roads have been gritted;
–
mud
in the wheel arches and un-
derneath the body which forms
damp patches.
Page 177 of 242
tyre inflation kit...................................... (up to the end of the DU)
5.3
ENG_UD21559_4
Kit de gonflage (X95 - B95 - D95 - L38 - X38 - X32 - B32 - Renault)
ENG_NU_837-8_BDK95_Renault_5
Tyre inflation kit
tyre Pressure KIt (1/3)
The kit is only approved for
inflating the tyres of the ve-
hicle originally equipped
with the kit.
It must never be used to inflate
the tyres of another vehicle, or any
other inflatable object (rubber ring,
rubber boat, etc.).
Avoid spillage on skin when han-
dling the repair liquid bottle. If drop-
lets do leak out, rinse them off with
plenty of water.
Keep the repair kit away from chil-
dren.
Do not dispose of the empty bottle
in the countryside. Return it to your
approved dealer or to a recycling or-
ganisation.
The bottle has a limited service
life which is indicated on its label.
Check the expiry date.
Contact an approved dealer to re-
place the inflation tube and repair
product bottle.
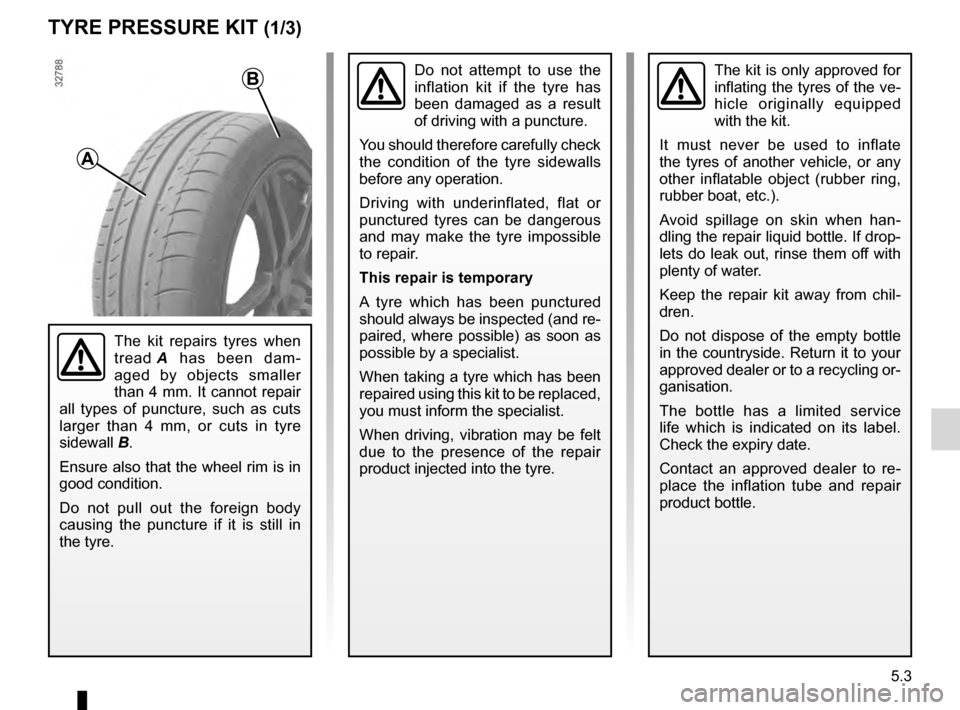
a
B
The kit repairs tyres when
tread A
has been dam-
aged by objects smaller
than 4 mm. It cannot repair
all types of puncture, such as cuts
larger than 4 mm, or cuts in tyre
sidewall
B
.
Ensure also that the wheel rim is in
good condition.
Do not pull out the foreign body
causing the puncture if it is still in
the tyre.
Do not attempt to use the
inflation kit if the tyre has
been damaged as a result
of driving with a puncture.
You should therefore carefully check
the condition of the tyre sidewalls
before any operation.
Driving with underinflated, flat or
punctured tyres can be dangerous
and may make the tyre impossible
to repair.
t
his repair is temporary
A tyre which has been punctured
should always be inspected (and re-
paired, where possible) as soon as
possible by a specialist.
When taking a tyre which has been
repaired using this kit to be replaced,
you must inform the specialist.
When driving, vibration may be felt
due to the presence of the repair
product injected into the tyre.
Page 201 of 242
RENAULT cardbattery ............................................. (up to the end of the DU)
RENAULT card battery ......................... (up to the end of the DU)
5.27
ENG_UD21014_4
Carte RENAULT : pile (X45 - H45 - X91 - B91 - K91 - X95 - B95 - D95 - E95 - K95 - J9\
5 - R95 - L38 - X38 - X32 - B32 - Renault)
ENG_NU_837-8_BDK95_Renault_5
Operating faultsIf the battery is too weak to ensure cor-
rect operation, you may start (insert the
RENAULT card in the card reader) and
lock/unlock the vehicle (refer to the in-
formation on “Locking/unlocking the
doors” in Section 1).
RENAULT card: battery
renault carD: battery
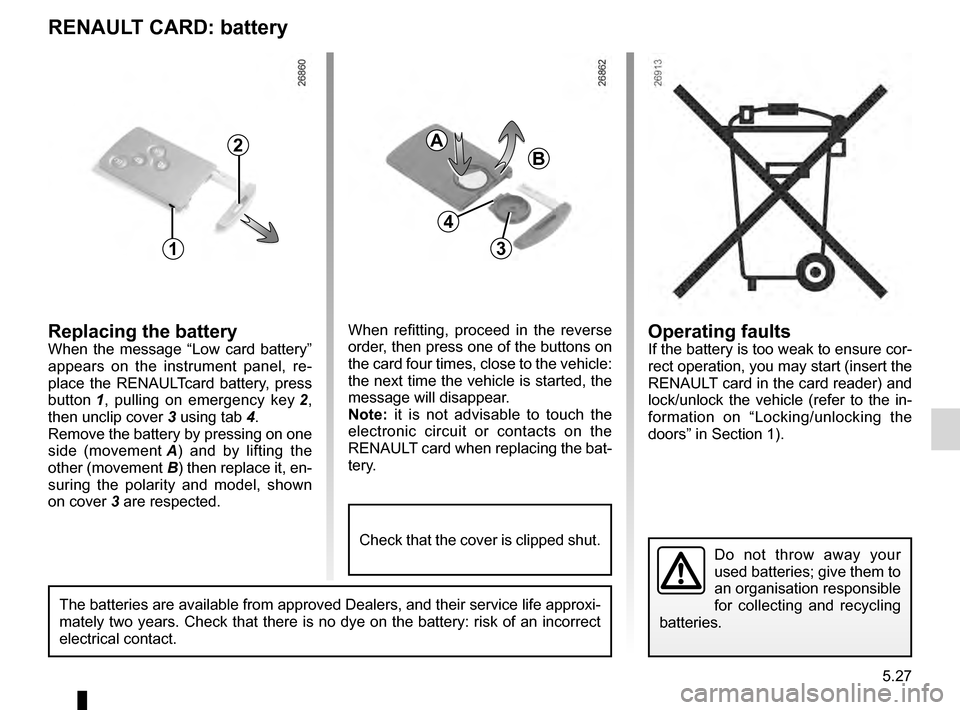
replacing the batteryWhen the message “Low card battery”
appears on the instrument panel, re-
place the RENAULTcard battery, press
button
1 ,
pulling on emergency key
2,
then unclip cover
3
using tab 4.
Remove the battery by pressing on one
side (movement
A )
and by lifting the
other (movement
B) then replace it, en-
suring the polarity and model, shown
on cover
3 are respected.
Do not throw away your
used batteries; give them to
an organisation responsible
for collecting and recycling
batteries.
1
2
When refitting, proceed in the reverse
order, then press one of the buttons on
the card four times, close to the vehicle:
the next time the vehicle is started, the
message will disappear.
no
te: it is not advisable to touch the
electronic circuit or contacts on the
RENAULT card when replacing the bat-
tery.
a
B
3
The batteries are available from approved Dealers, and their service life approxi-
mately two years. Check that there is no dye on the battery: risk of an incorrect
electrical contact.
4
Check that the cover is clipped shut.
Page 204 of 242
wiper blades ......................................... (up to the end of the DU)
wipers blades ............................................. (up to the end of the DU)
5.30
ENG_UD21380_4
Balais d’essuie-vitres (X95 - B95 - D95 - L38 - X38 - X32 - B32 - Re\
nault)
ENG_NU_837-8_BDK95_Renault_5
Wipers (replacing blades)
wInDscreen wIPer BlaDes
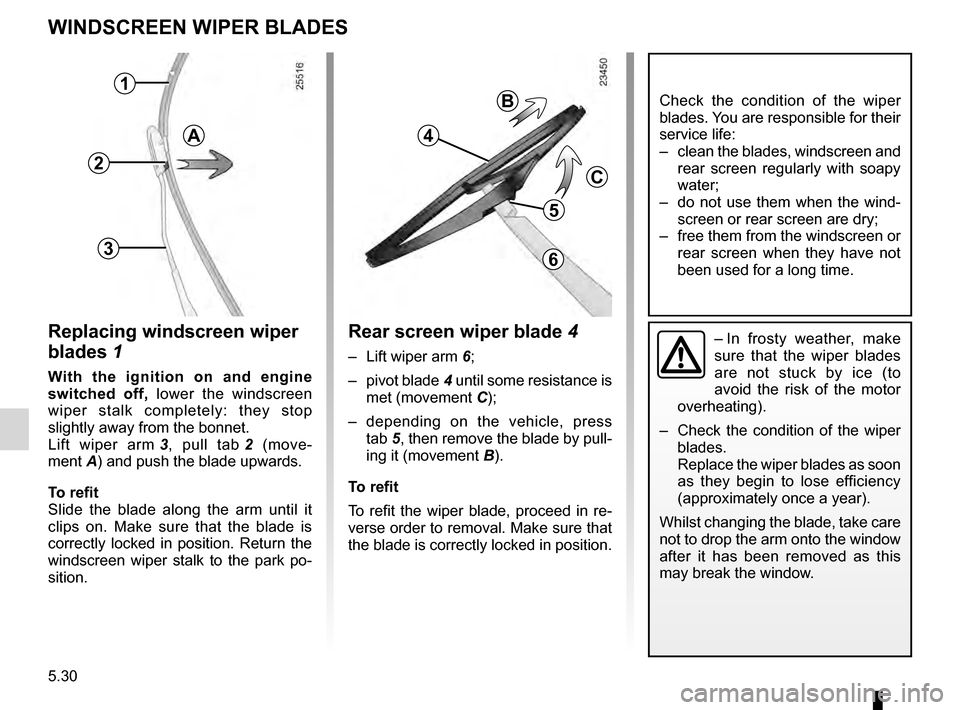
replacing windscreen wiper
blades 1
with the ignition on and engine
switched off, lower the windscreen
wiper stalk completely: they stop
slightly away from the bonnet.
Lift wiper arm
3 ,
pull tab
2
(move-
ment
A) and push the blade upwards.
to refit
S
lide the blade along the arm until it
clips on. Make sure that the blade is
correctly locked in position. Return the
windscreen wiper stalk to the park po-
sition.
1
2
3
Check the condition of the wiper
blades. You are responsible for their
service life:
–
clean
the blades, windscreen and
rear screen regularly with soapy
water;
–
do
not use them when the wind-
screen or rear screen are dry;
–
free
them from the windscreen or
rear screen when they have not
been used for a long time.
rear screen wiper blade 4
– Lift wiper arm 6;
–
pivot
blade
4
until some resistance is
met (movement
C);
–
d
epending on the vehicle, press
tab
5, then remove the blade by pull-
ing it (movement
B).
to refit
T
o refit the wiper blade, proceed in re-
verse order to removal. Make sure that
the blade is correctly locked in position.
4
5
B
c
a
6
– In frosty weather, make
sure that the wiper blades
are not stuck by ice (to
avoid the risk of the motor
overheating).
–
Check
the condition of the wiper
blades.
Replace the wiper blades as soon
as they begin to lose efficiency
(approximately once a year).
Whilst changing the blade, take care
not to drop the arm onto the window
after it has been removed as this
may break the window.
Page 213 of 242
6.1
ENG_UD24010_9
Sommaire 6 (X95 - B95 - D95 - Renault)
ENG_NU_837-8_BDK95_Renault_6
Section 6: Technical specifications
Vehicle identification plates . . . . . . . . . . . . . . . . . . . . . . . . . . . . . . . . . . . . . . . . . . . . . . . . . . . . . . . . 6.2
Engine identification plates
.
. . . . . . . . . . . . . . . . . . . . . . . . . . . . . . . . . . . . . . . . . . . . . . . . . . . . . . .
6.3
Dimensions
.
. . . . . . . . . . . . . . . . . . . . . . . . . . . . . . . . . . . . . . . . . . . . . . . . . . . . . . . . . . . . . . . . . . .
6.5
Engine specifications
. . . . . . . . . . . . . . . . . . . . . . . . . . . . . . . . . . . . . . . . . . . . . . . . . . . . . . . . . . . . .
6.8
W
eights
.
. . . . . . . . . . . . . . . . . . . . . . . . . . . . . . . . . . . . . . . . . . . . . . . . . . . . . . . . . . . . . . . . . . . . . .
6.9
T
owing weights
.
. . . . . . . . . . . . . . . . . . . . . . . . . . . . . . . . . . . . . . . . . . . . . . . . . . . . . . . . . . . . . . . .
6.9
Replacement parts and repairs
. . . . . . . . . . . . . . . . . . . . . . . . . . . . . . . . . . . . . . . . . . . . . . . . . . . . .
6.10
Service sheets
. . . . . . . . . . . . . . . . . . . . . . . . . . . . . . . . . . . . . . . . . . . . . . . . . . . . . . . . . . . . . . . . . .
6.1
1
Anti-corrosion check
.
. . . . . . . . . . . . . . . . . . . . . . . . . . . . . . . . . . . . . . . . . . . . . . . . . . . . . . . . . . . .
6.17